Raspberry Pi. Video transmission for remote control
Video transmission for remote control can be used in many projects related to the management of various devices. That is, it can be screwed to the wheelbase, to the quadcopter, to the body of a humanoid robot, and so on. Raspberry Pi (hereinafter raspberry) in this sense is convenient because it allows you to use for this not some kind of specialized devices like FPV, but the usual devices that many already have, and also simplifies the schemes of their inclusion and the complexity of writing programs for them, not to mention the cost of projects.

I recently got raspberries, in St. Petersburg they are already selling them in stores, so neither wait nor order is necessary, although it turns out a bit more expensive. Since I don’t have a monitor with HDMI, but I do have a router, remote controle via ssh port was chosen as the control option. This allows you to control raspberries from any computer included in the local network (as an option, but more complex - global).
')
Note. On a computer from which I run raspberries, it is worth Ubuntu. Although for Windows all this also remains valid.
Making the connection is easy. In a Debian image downloaded from an offsite, this feature is enabled by default. And the only thing that remains is to find out the ip address and enter the connection command. In order to find out the address, you can either enter the settings of the router (usually ip 192.168.0.1), or enter the command in the console
which will give a bunch of text, among which are the addresses of devices connected to the network and the status of their SSH port.
Next to open remote access
where pi is the name of the account, and after @ is the address of the raspberry.
Then they will ask you to enter a password, and if it is correct, the console will begin to communicate with you on behalf of raspberries.

More information about setting up remote access can be found at
http://www.penguintutor.com/linux/raspberrypi-headless
http://www.penguintutor.com/linux/tightvnc
The second link describes how to access the GUI remotely. It looks interesting - on the screen of your monitor you see the raspberry desktop. But due to the fact that the signal is on the grid, there is a delay and the mouse and other control comes with a delay. So do not play the pre-installed "snake" there.
How imho, raspberries as a desktop to use and there is no sense, all its advantages are lost. It is unlikely that someone has such a small room that there is no place to put a system unit next to the monitor, there is enough voltage in the outlet just to charge a cell phone, or not enough money even for a used personal computer. On the contrary, the minuses become obvious - low productivity relative to desktop computers and an unfriendly operating system.
Used camera Logitech c270 got no problems. However, further disappointment awaited as the hardware accelerated video encoding stated on raspberry was missing. That is, it is, but codecs are missing for it. And without it, programmatically, compression comes with a speed of 2-5 fps and gives 100% load on the machine. As a result, only the raw stream goes without hanging the system. That is, for recording (according to estimates) with a resolution of 640x480 100-200 mb will go away for one minute. But the bandwidth of the local network and wi-fi is enough so that for the time being it is possible and so to drive it, hoping that in the near future the codecs will still appear. So go ahead.
Long experiments and search for the desired spells will not describe. In the end, it all came down to using gstreamer. In short, this is a multimedia framework with a command line interface. There is also a library that allows you to programmatically use its components, which can be used later for integration into your own programs.
To install it on raspberries, you must enter
(if they are not there, maybe the version number has changed or something else, then it is convenient to use the “
Next on raspberry is introduced
Where
device = / dev / video0 - image source
'video / x-raw-yuv, width = 640, height = 480, framerate = 20/1' - format
udpsink host = 192.168.0.50 port = 4000 sync = false - the address where we send
The video is transmitted via the rtp protocol. This protocol works at the transport level and is used when transmitting real-time traffic. It can use both TCP and UDP, but since TCP repeats not reaching messages that are no longer needed, UDP is used in this case.
On the receiver side, enter
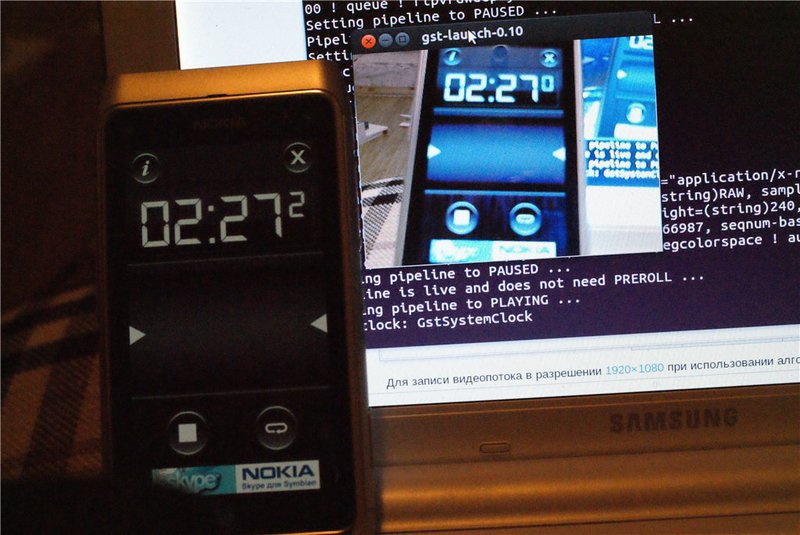
As a result, a picture will appear on the receiver side.
For lovers of recursion: this screenshot of the desktop netbook, which takes a picture of the raspberry, which takes it from the webcam, which is aimed at the raspberry lying on the netbook on the screen that ...
The image obtained in this way is identical in quality to that obtained directly without a network from a web camera, since no compression or transformation was applied.
The following screenshot shows the channel loading, on the left when transferring a 640x480 image, then a pause and 320x240.

However, since the picture does not go directly, but through the network, a signal delay appears. Then a series of simple experiments was carried out, which can be used to estimate the signal delay.
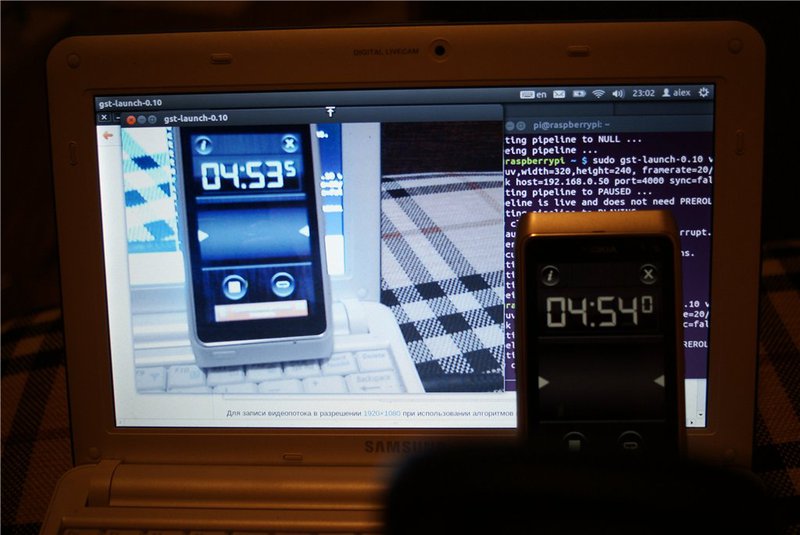
For the configuration of raspberry-> LAN cable-> router Dlink-300-> wi-fi-> netbook delay amounted to
for 640x480 resolution 0.5 seconds
for 320x240 resolution 0.2 seconds
Much or little depends on the purpose of use. For direct control of a quadcopter (without additional stabilization) or other systems that experience some kind of disturbance that takes them out of balance, this is a lot. Nevertheless, many things with such a delay can be controlled, as an example - moon rovers, which were controlled at all with a 2-minute delay.
UPD 09.10.2012
In the comments to this post, it was suggested to use the hardware compression built into the camera itself and transfer the picture in the mjpeg format.
After some searching for the desired spells, the command on the raspberry looks
But on the computer that accepts the picture
As a result, at a resolution of 640x480, the traffic was about 300-800 kbytes / sec, and the delay was 0.2-0.3 seconds.
TP-Link Adapter WN722N. In general, the installation of the adapter is not difficult, the process is well described here
http://elinux.org/RPi_Peripherals
with a few exceptions an exception that would find which took some time. The password must be entered in an already encrypted form. Thank ubuntu
http://help.ubuntu.ru/wiki/setting_network_manually
To do this, enter
As a result, after all the clarifications, the / etc / network / interfaces file for me now looks like this. These settings are correct wpa-psk, if you use wpa2 then the settings will be different, the description of which can be found in the link to Ubuntu.
auto lo
iface lo inet loopback
iface eth0 inet dhcp
# The wireless interface
iface wlan0 inet static
address 192.168.0.40
gateway 192.168.0.1
netmask 255.255.255.0
wpa-ap-scan 1
wpa-proto WPA
wpa-pairwise TKIP
wpa-group TKIP
wpa-key-mgmt WPA-PSK
wpa-ssid name
wpa-psk 7d7cf754caCensuref04b1b0ef6f15e21ed1292168950d20
wpa-driver wext
auto wlan0
After setting up the wireless connection on the side of the computer, you need to change the ip address and the communication will be the same as with a wired connection.
Further tests were performed on the delay time for the configuration:
raspberry-> adapter-> wi-fi-> router Dlink-300-> wi-fi-> netbook
(as well as for raspberry-> adapter-> wi-fi-> router Dlink-300-> LAN cable-> netbook)
for 640x480 resolution 0.8 seconds
for resolution 320x240 0.2-0.3 seconds
By the fact that the delay time has increased, you can make the assumption that either the adapter, or your connection, or the driver introduce delays, which are not present when connecting via LAN. So where the dimensions allow, instead of the adapter, connect the raspberry via the LAN to the router.
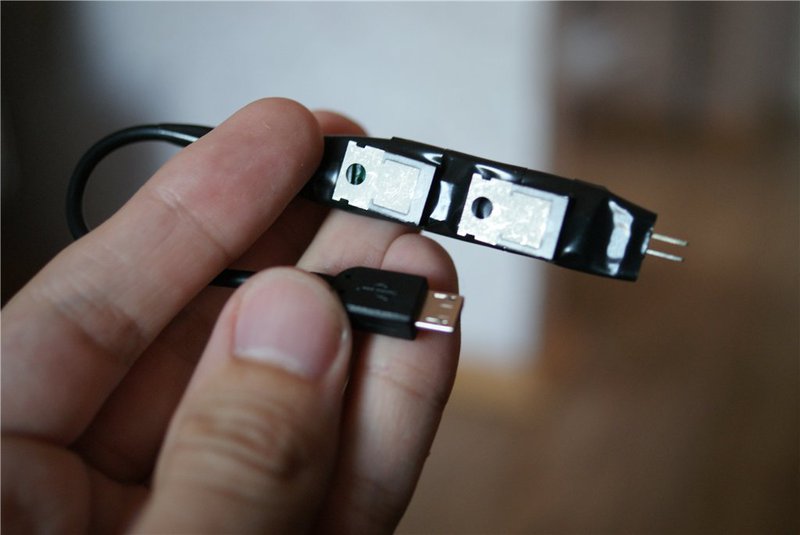
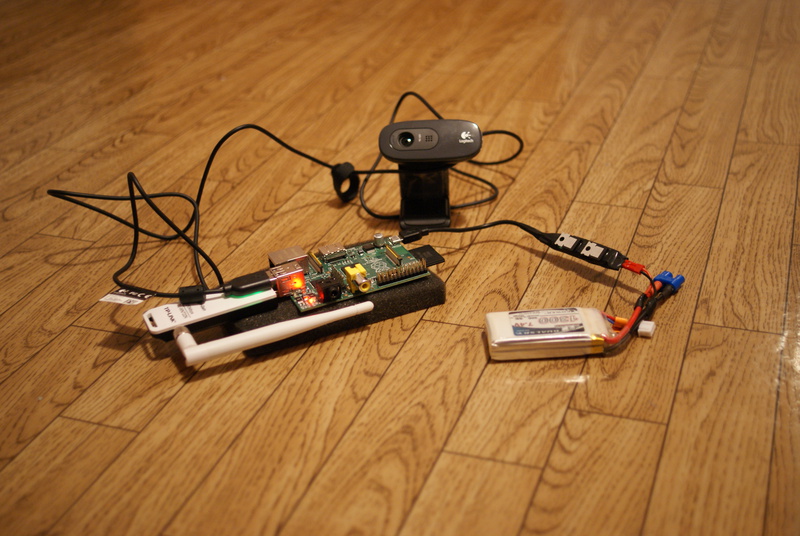
As an appendage, that would untie the system from the mains assembled converter for connecting to a LiPo battery. The fact is that raspberries are powered from 5V plus or minus 25%, so that batteries with different voltages cannot be directly connected, but this can be corrected with a small device.
His scheme is very simple and I found it here.
http://spydamonky.hackhut.com/2012/07/05/lipo-raspberry-pi-power-adapter/
I found the details of the circuit in the nearest specialty store, and the microUSB plug in the computer store bought the cheapest cable and cut it out.
In the first embodiment, as in the diagram, there was one voltage regulator, but it was very hot, because the maximum current was 1A there, and a minimum of 700mA passed through it, I decided to put a second one in parallel, which should double the maximum current. However, it is still very hot. Apparently it will be necessary to fasten some kind of radiator.
In general, it is better not to use LIPo batteries for such purposes as in the case of discharge below an acceptable level they irreversibly fail, and this point is not caught here either. That is, the device works, works, and when the battery ceases has died. If there is another type of battery on hand, then it is better to use them.
P.S.
Further, as a goal, put it all on some kind of platform and use it further.
Remote control
I recently got raspberries, in St. Petersburg they are already selling them in stores, so neither wait nor order is necessary, although it turns out a bit more expensive. Since I don’t have a monitor with HDMI, but I do have a router, remote controle via ssh port was chosen as the control option. This allows you to control raspberries from any computer included in the local network (as an option, but more complex - global).
')
Note. On a computer from which I run raspberries, it is worth Ubuntu. Although for Windows all this also remains valid.
Making the connection is easy. In a Debian image downloaded from an offsite, this feature is enabled by default. And the only thing that remains is to find out the ip address and enter the connection command. In order to find out the address, you can either enter the settings of the router (usually ip 192.168.0.1), or enter the command in the console
$ nmap -p 22 --open -sV 192.168.0.1/24which will give a bunch of text, among which are the addresses of devices connected to the network and the status of their SSH port.
Next to open remote access
$ ssh -p 22 pi@192.168.0.17where pi is the name of the account, and after @ is the address of the raspberry.
Then they will ask you to enter a password, and if it is correct, the console will begin to communicate with you on behalf of raspberries.
More information about setting up remote access can be found at
http://www.penguintutor.com/linux/raspberrypi-headless
http://www.penguintutor.com/linux/tightvnc
The second link describes how to access the GUI remotely. It looks interesting - on the screen of your monitor you see the raspberry desktop. But due to the fact that the signal is on the grid, there is a delay and the mouse and other control comes with a delay. So do not play the pre-installed "snake" there.
How imho, raspberries as a desktop to use and there is no sense, all its advantages are lost. It is unlikely that someone has such a small room that there is no place to put a system unit next to the monitor, there is enough voltage in the outlet just to charge a cell phone, or not enough money even for a used personal computer. On the contrary, the minuses become obvious - low productivity relative to desktop computers and an unfriendly operating system.
Webcam connection and image transfer
Used camera Logitech c270 got no problems. However, further disappointment awaited as the hardware accelerated video encoding stated on raspberry was missing. That is, it is, but codecs are missing for it. And without it, programmatically, compression comes with a speed of 2-5 fps and gives 100% load on the machine. As a result, only the raw stream goes without hanging the system. That is, for recording (according to estimates) with a resolution of 640x480 100-200 mb will go away for one minute. But the bandwidth of the local network and wi-fi is enough so that for the time being it is possible and so to drive it, hoping that in the near future the codecs will still appear. So go ahead.
Long experiments and search for the desired spells will not describe. In the end, it all came down to using gstreamer. In short, this is a multimedia framework with a command line interface. There is also a library that allows you to programmatically use its components, which can be used later for integration into your own programs.
To install it on raspberries, you must enter
$sudo apt-get install gstreamer0.10-plugins-base gstreamer0.10-plugins-good gstreamer0.10-plugins-ugly gstreamer0.10-tools(if they are not there, maybe the version number has changed or something else, then it is convenient to use the “
$apt-cache search gstreamer ” command and install something with similar names)Next on raspberry is introduced
$sudo gst-launch-0.10 v4l2src device=/dev/video0 ! 'video/x-raw-yuv,width=640,height=480, framerate=20/1'! ffmpegcolorspace ! rtpvrawpay ! udpsink host=192.168.0.50 port=4000 sync=falseWhere
device = / dev / video0 - image source
'video / x-raw-yuv, width = 640, height = 480, framerate = 20/1' - format
udpsink host = 192.168.0.50 port = 4000 sync = false - the address where we send
The video is transmitted via the rtp protocol. This protocol works at the transport level and is used when transmitting real-time traffic. It can use both TCP and UDP, but since TCP repeats not reaching messages that are no longer needed, UDP is used in this case.
On the receiver side, enter
$ gst-launch udpsrc caps="application/x-rtp, media=(string)video, clock-rate=(int)90000, encoding-name=(string)RAW, sampling=(string)YCbCr-4:2:0, depth=(string)8, width=(string)640, height=(string)480, ssrc=(uint)1825678493, payload=(int)96, clock-base=(uint)4068866987, seqnum-base=(uint)24582" port=4000 ! queue ! rtpvrawdepay ! queue ! ffmpegcolorspace ! autovideosinkAs a result, a picture will appear on the receiver side.
For lovers of recursion: this screenshot of the desktop netbook, which takes a picture of the raspberry, which takes it from the webcam, which is aimed at the raspberry lying on the netbook on the screen that ...
The image obtained in this way is identical in quality to that obtained directly without a network from a web camera, since no compression or transformation was applied.
The following screenshot shows the channel loading, on the left when transferring a 640x480 image, then a pause and 320x240.
However, since the picture does not go directly, but through the network, a signal delay appears. Then a series of simple experiments was carried out, which can be used to estimate the signal delay.
For the configuration of raspberry-> LAN cable-> router Dlink-300-> wi-fi-> netbook delay amounted to
for 640x480 resolution 0.5 seconds
for 320x240 resolution 0.2 seconds
Much or little depends on the purpose of use. For direct control of a quadcopter (without additional stabilization) or other systems that experience some kind of disturbance that takes them out of balance, this is a lot. Nevertheless, many things with such a delay can be controlled, as an example - moon rovers, which were controlled at all with a 2-minute delay.
UPD 09.10.2012
In the comments to this post, it was suggested to use the hardware compression built into the camera itself and transfer the picture in the mjpeg format.
After some searching for the desired spells, the command on the raspberry looks
gst-launch-0.10 v4l2src device=/dev/video0 ! 'image/jpeg,width=320,height=240, framerate=10/1' ! rtpjpegpay ! udpsink host=192.168.0.50 port=4000 sync=falseBut on the computer that accepts the picture
gst-launch udpsrc caps="application/x-rtp, media=(string)video, clock-rate=(int)90000, encoding-name=(string)JPEG, ssrc=(guint)469657143, payload=(int)96, clock-base=(guint)2841649723, seqnum-base=(guint)39869" port=4000 ! rtpjpegdepay ! jpegdec ! autovideosinkAs a result, at a resolution of 640x480, the traffic was about 300-800 kbytes / sec, and the delay was 0.2-0.3 seconds.
Connecting wi-fi adapter
TP-Link Adapter WN722N. In general, the installation of the adapter is not difficult, the process is well described here
http://elinux.org/RPi_Peripherals
with a few exceptions an exception that would find which took some time. The password must be entered in an already encrypted form. Thank ubuntu
http://help.ubuntu.ru/wiki/setting_network_manually
To do this, enter
$ wpa_passphrase <__> <ascii_>As a result, after all the clarifications, the / etc / network / interfaces file for me now looks like this. These settings are correct wpa-psk, if you use wpa2 then the settings will be different, the description of which can be found in the link to Ubuntu.
auto lo
iface lo inet loopback
iface eth0 inet dhcp
# The wireless interface
iface wlan0 inet static
address 192.168.0.40
gateway 192.168.0.1
netmask 255.255.255.0
wpa-ap-scan 1
wpa-proto WPA
wpa-pairwise TKIP
wpa-group TKIP
wpa-key-mgmt WPA-PSK
wpa-ssid name
wpa-psk 7d7cf754caCensuref04b1b0ef6f15e21ed1292168950d20
wpa-driver wext
auto wlan0
After setting up the wireless connection on the side of the computer, you need to change the ip address and the communication will be the same as with a wired connection.
Further tests were performed on the delay time for the configuration:
raspberry-> adapter-> wi-fi-> router Dlink-300-> wi-fi-> netbook
(as well as for raspberry-> adapter-> wi-fi-> router Dlink-300-> LAN cable-> netbook)
for 640x480 resolution 0.8 seconds
for resolution 320x240 0.2-0.3 seconds
By the fact that the delay time has increased, you can make the assumption that either the adapter, or your connection, or the driver introduce delays, which are not present when connecting via LAN. So where the dimensions allow, instead of the adapter, connect the raspberry via the LAN to the router.
Lipo
As an appendage, that would untie the system from the mains assembled converter for connecting to a LiPo battery. The fact is that raspberries are powered from 5V plus or minus 25%, so that batteries with different voltages cannot be directly connected, but this can be corrected with a small device.
His scheme is very simple and I found it here.
http://spydamonky.hackhut.com/2012/07/05/lipo-raspberry-pi-power-adapter/
I found the details of the circuit in the nearest specialty store, and the microUSB plug in the computer store bought the cheapest cable and cut it out.
In the first embodiment, as in the diagram, there was one voltage regulator, but it was very hot, because the maximum current was 1A there, and a minimum of 700mA passed through it, I decided to put a second one in parallel, which should double the maximum current. However, it is still very hot. Apparently it will be necessary to fasten some kind of radiator.
In general, it is better not to use LIPo batteries for such purposes as in the case of discharge below an acceptable level they irreversibly fail, and this point is not caught here either. That is, the device works, works, and when the battery ceases has died. If there is another type of battery on hand, then it is better to use them.
P.S.
Further, as a goal, put it all on some kind of platform and use it further.
Source: https://habr.com/ru/post/153611/
All Articles