Creating a beautiful .dmg image for a program on [Mac] OS X
I greet the honorable inhabitants of Habr!
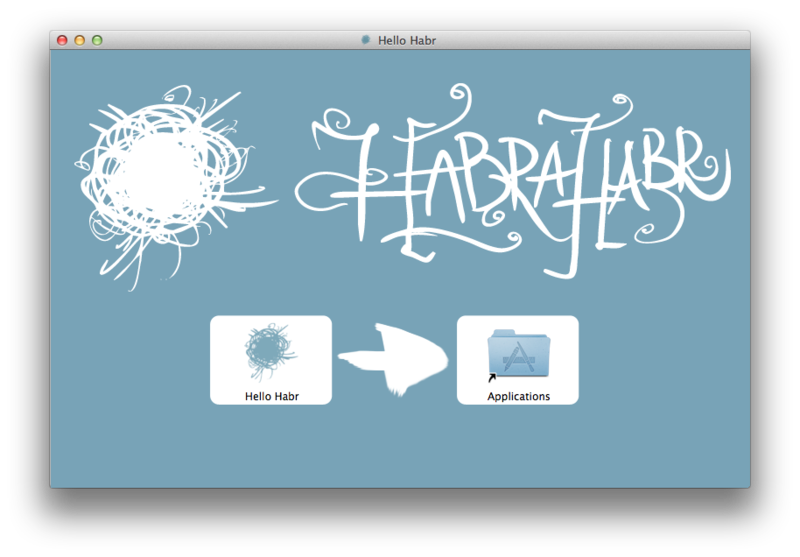
 Today I will tell you how beautifully present the installer of your program to the user. Surely everyone who uses not only the programs from the AppStore, faced with beautiful images of the .dmg disk, like Adium, for example. Such an image is, so to speak, an interactive installer, in which a clear hint is given: drag the icon over here. Everything is very clear and simple.
Of course, for the experienced makovod and zip-archive will fit, but everyone loves it to be beautiful and comfortable. So we, dear readers, will be concerned today with creating such a beautiful disk image for your (well or someone else's) program.
You can, of course, do it all manually, but this is not our_method ™ , so we will write a shell script to automate this process. Automation will also be useful to us in the case of commissioning a build server, then this server will not only build the program from source, but also make a disk image for distribution.
')
If you do not need to know how such a script works, but only a tool is needed - at the end there is a link to a very universal script, ready for use.
Action Plan in brief:
IMPORTANT! The script (more precisely, its part involving AppleScript) will not work properly if TotalFinder is installed (or a similar thing), and this can lead to unpredictable consequences! Seriously.
Now, in order for all items. Link to the finished script at the end of the article.
First we need to determine what we will pack and what name of the image we will get at the end. To do this, we write in the script as follows:
Here we set the name of the bundle that will be packaged, and read from it the version and build of the program using the PlistBuddy utility and set them as a suffix for the file name of the future disk image. The name of the image when mounting we set simply as the name of the bundle without an extension.
To create a temporary disk image, use the hdiutil program, calling it with the following parameters
Here, the
Now we mount the resulting image (and save the device name for later use):
Everything is quite simple here: attaching with read and write permissions, we don’t automatically open the fayder window, and then get the name of the type
Now let's copy the image and the icon onto the image, which are, for example, in the resources of our bundle (although, of course, they can be taken from any other place):
Next, we need to customize the mounted image, you can do it through the Finder manually, but we’ll act smarter: we will make the Finder do everything automatically via AppleScript. To call such scripts from the shell, there is an osascript utility, with which we will submit the following input to the input:
Of course, instead of
Now install the icon for the image via the SetFile utility:
Next, we set the necessary rights for the disk image, synchronize (twice for reliability) and extract the image:
That's it, now you can make the final disk image!
Here we use hdiutil to convert a temporary image into UDZO (UDIF compressed) format with compression level 9 (best). And at the output we get a disk image for distribution, which has an attractive appearance!
The full script is included in the github repository. I note that in the full version of the script there are a lot of possible input parameters (parsing which greatly increases its size), there is no hardcode at all (well, except for default parameters). Well, the picture shown at the beginning of the post is obtained by the following call to my script:
Well, now you can write your own script for such purposes or use mine, which is quite universal. Successful projects!
Today I will tell you how beautifully present the installer of your program to the user. Surely everyone who uses not only the programs from the AppStore, faced with beautiful images of the .dmg disk, like Adium, for example. Such an image is, so to speak, an interactive installer, in which a clear hint is given: drag the icon over here. Everything is very clear and simple.Of course, for the experienced makovod and zip-archive will fit, but everyone loves it to be beautiful and comfortable. So we, dear readers, will be concerned today with creating such a beautiful disk image for your (well or someone else's) program.
You can, of course, do it all manually, but this is not our_method ™ , so we will write a shell script to automate this process. Automation will also be useful to us in the case of commissioning a build server, then this server will not only build the program from source, but also make a disk image for distribution.
')
If you do not need to know how such a script works, but only a tool is needed - at the end there is a link to a very universal script, ready for use.
Action Plan in brief:
- Copy the bundle to the temporary directory
- Create a disk image from a temporary directory that is readable and writable.
- Install this image
- Customize the appearance of the image using AppleScript: create a symlink for / Applications, set the background and location of elements
- Set icon for disk image
- Unmount the image
- Convert image to compressed ridonly
- Done! You can upload to the site or in the Sparkle-caste.
IMPORTANT! The script (more precisely, its part involving AppleScript) will not work properly if TotalFinder is installed (or a similar thing), and this can lead to unpredictable consequences! Seriously.
Now, in order for all items. Link to the finished script at the end of the article.
First we need to determine what we will pack and what name of the image we will get at the end. To do this, we write in the script as follows:
TMP_DIR="./tmp" APP_BUNDLE_NAME="MyGreatApplication.app" APP_VERSION=`/usr/libexec/PlistBuddy -c "Print :CFBundleShortVersionString" "${APP_BUNDLE_NAME}/Contents/Info.plist"` APP_BUILD_VERSION=`/usr/libexec/PlistBuddy -c "Print :CFBundleVersion" "${APP_BUNDLE_NAME}/Contents/Info.plist"` DMG_NAME_BASE=${APP_BUNDLE_NAME%.*} DMG_NAME_SUFFIX=" ${APP_VERSION}.${APP_BUILD_VERSION}" DMG_NAME="${DMG_NAME_BASE}${DMG_NAME_SUFFIX}.dmg" VOL_NAME=${APP_BUNDLE_NAME%.*} Here we set the name of the bundle that will be packaged, and read from it the version and build of the program using the PlistBuddy utility and set them as a suffix for the file name of the future disk image. The name of the image when mounting we set simply as the name of the bundle without an extension.
To create a temporary disk image, use the hdiutil program, calling it with the following parameters
hdiutil create -ov -srcfolder ${TMP_DIR} -format UDRW -volname "${VOL_NAME}" "${DMG_NAME_TMP}" Here, the
TMP_DIR , VOL_NAME and DMG_NAME_TMP are the temporary directory, the image name (which will be displayed when mounted), and the temporary .dmg file name, respectively. The -format UDRW indicates the type of image: UDIF image for reading and writing. The ability to write to the disk, we need to customize the appearance of the mounted image. The -ov parameter instructs the utility to overwrite the image, if we suddenly did not delete it the last time.Now we mount the resulting image (and save the device name for later use):
device=$(hdiutil attach -readwrite -noverify -noautoopen ${DMG_NAME_TMP} | egrep '^/dev/' | sed 1q | awk '{print $1}') Everything is quite simple here: attaching with read and write permissions, we don’t automatically open the fayder window, and then get the name of the type
/dev/disk2 using egrep, sed and awk to parse the output of hdiutil.Now let's copy the image and the icon onto the image, which are, for example, in the resources of our bundle (although, of course, they can be taken from any other place):
BG_FOLDER="/Volumes/${VOL_NAME}/.background" mkdir "${BG_FOLDER}" cp "${APP_BUNDLE_NAME}/Contents/Resources/${BG_IMG_NAME}" "${BG_FOLDER}/" ICON_FOLDER="/Volumes/${VOL_NAME}" cp "${APP_BUNDLE_NAME}/Contents/Resources/${VOL_ICON_NAME}" "${ICON_FOLDER}/.VolumeIcon.icns" Next, we need to customize the mounted image, you can do it through the Finder manually, but we’ll act smarter: we will make the Finder do everything automatically via AppleScript. To call such scripts from the shell, there is an osascript utility, with which we will submit the following input to the input:
APPLESCRIPT=" tell application \"Finder\" tell disk \"${VOL_NAME}\" open -- Setting view options set current view of container window to icon view set toolbar visible of container window to false set statusbar visible of container window to false set the bounds of container window to {${WINDOW_LEFT}, ${WINDOW_TOP}, ${WINDOW_RIGHT}, ${WINDOW_BOTTOM}} set theViewOptions to the icon view options of container window set arrangement of theViewOptions to not arranged set icon size of theViewOptions to 72 -- Settings background set background picture of theViewOptions to file \".background:${BG_IMG_NAME}\" -- Adding symlink to /Applications make new alias file at container window to POSIX file \"/Applications\" with properties {name:\"Applications\"} -- Reopening close open -- Rearranging set the position of item \"Applications\" to {${APPS_X}, ${APPS_Y}} set the position of item \"${APP_BUNDLE_NAME}\" to {${BUNDLE_X}, ${BUNDLE_Y}} -- Updating and sleeping for 5 secs update without registering applications delay 5 end tell end tell " echo "$APPLESCRIPT" | osascript Of course, instead of
VOL_NAME and other things, our shell script will insert pre-prepared strings. This AppleScript tells the filer to open our mounted disk, set the desired display options for it: remove the address and status bar, set the icon view, set the window size, icon size. All these parameters will be saved in the .DS_Store file. Next we set the background image copied earlier. Then we create a symlink (alias in AS terms) for / Applications, reopen the window for applying the changes. Now we set the position of the program icons and the created symlink, update and sleep for 5 seconds for reliability.Now install the icon for the image via the SetFile utility:
SetFile -c icnC "${ICON_FOLDER}/.VolumeIcon.icns" SetFile -a C "${ICON_FOLDER}" Next, we set the necessary rights for the disk image, synchronize (twice for reliability) and extract the image:
chmod -Rf go-w /Volumes/"${VOL_NAME}" sync sync hdiutil detach ${device} That's it, now you can make the final disk image!
hdiutil convert "${DMG_NAME_TMP}" -format UDZO -imagekey zlib-level=9 -o "${DMG_NAME}" Here we use hdiutil to convert a temporary image into UDZO (UDIF compressed) format with compression level 9 (best). And at the output we get a disk image for distribution, which has an attractive appearance!
The full script is included in the github repository. I note that in the full version of the script there are a lot of possible input parameters (parsing which greatly increases its size), there is no hardcode at all (well, except for default parameters). Well, the picture shown at the beginning of the post is obtained by the following call to my script:
$ make_dmg.sh -V -b habr_logo_big.png -i habr_icon.icns -s "800:500" -c 535:345:253:345 "Hello Habr.app" Enabling version info in resulting dmg Setting background to habr_logo_big.png Setting icon to habr_icon.icns Setting window size to 800:500 Setting coordinates to 535:345:253:345 Bundle name set to Hello Habr.app Defaulting dmg volume name to Hello Habr *** Copying Hello Habr.app to the temporary dir... done! *** Creating temporary dmg disk image......... created: /Users/silvansky/Projects/habr_demo_dmg/Hello Habr_tmp.dmg *** Mounting temporary image... done! (device /dev/disk1) *** Sleeping for 5 seconds... done! *** Setting style for temporary dmg image... * Copying background image... done! * Copying volume icon... done! * Setting volume icon... done! * Executing applescript for further customization... done! *** Converting tempoprary dmg image in compressed readonly final image... * Changing mode and syncing... chmod: /Volumes/Hello Habr/.Trashes: Permission denied * Detaching /dev/disk1... "disk1" unmounted. "disk1" ejected. * Converting... … Driver Descriptor Map (DDM : 0)… (CRC32 $AF5ACFAD: Driver Descriptor Map (DDM : 0)) Apple (Apple_partition_map : 1)… (CRC32 $92261EDC: Apple (Apple_partition_map : 1)) disk image (Apple_HFS : 2)… ................................................................................................................................................................................... (CRC32 $F59F12B2: disk image (Apple_HFS : 2)) (Apple_Free : 3)… .................................................................................................................................................................................... (CRC32 $00000000: (Apple_Free : 3)) … .................................................................................................................................................................................... : 804.502ms : 4132028 , : CRC32 $AFE83FC5 : 13243, 10041 : 6.1 M/ : 39.1 % created: /Users/silvansky/Projects/habr_demo_dmg/Hello Habr 1.0.1.dmg done! *** Removing temporary image... done! *** Cleaning up temp folder... done! *** Everything done. DMG disk image is ready for distribution. Well, now you can write your own script for such purposes or use mine, which is quite universal. Successful projects!
Source: https://habr.com/ru/post/152677/
All Articles