Lehmann Audio Black Cube for 1000 r and 3 days? Easy!
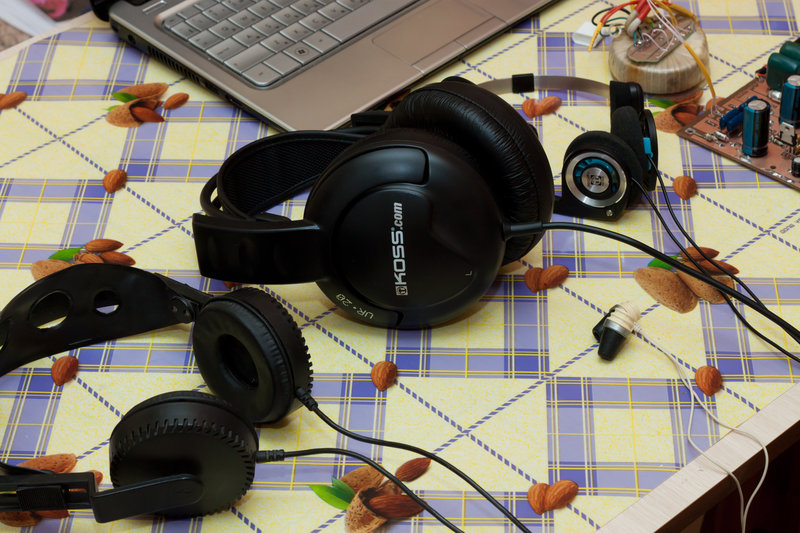
I bought unpretentious ears so that at night it was possible to ditch and sometimes listen to music, took inexpensive but big KOSS UR20. Connecting to the receiver was a little dumbfounded, the sound is very, very pleasant, jazz and classic just go with a bang. On the low end, of course, they lose a lot of Koss the plug plugs, and noticeably KOSS Porta Pro, which I have been carrying as a portable year. I was very surprised after when I decided to listen to Koss Porta Pro after listening to the songs on the KOSS UR20 - from the port it seemed as if they had woven cotton into their ears. And I considered them very “decent” in terms of sound. Although maybe this time and the atmosphere could spoil them so? All this to what? Yes, so, I decided to collect the amp for the ears, The amp will be home, not portable once.
I decided to start to collect a clone of Lehmann Audio Black Cube Linear doctorhead.ru/catalogue/?i=523
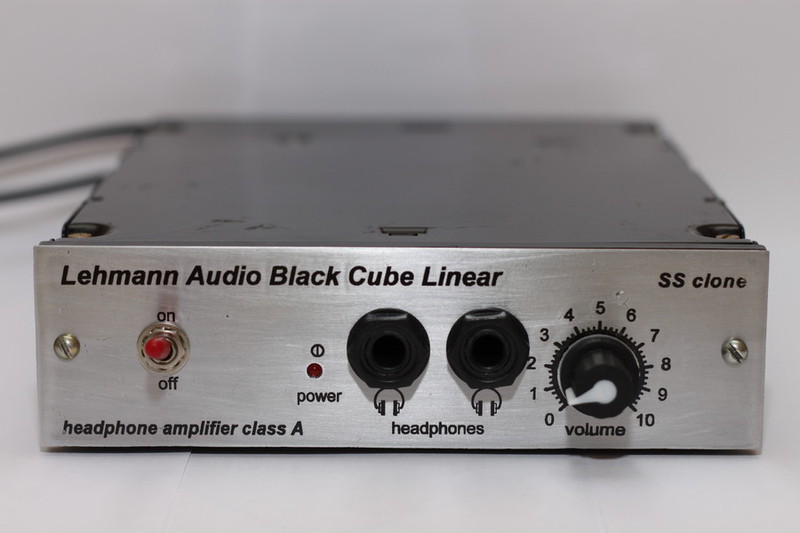
Here is the result:
All together it took about 3 nights and less than 1000 rubles of money.
For those interested in welcome under the cat, there will be a lot of pictures with a detailed description.
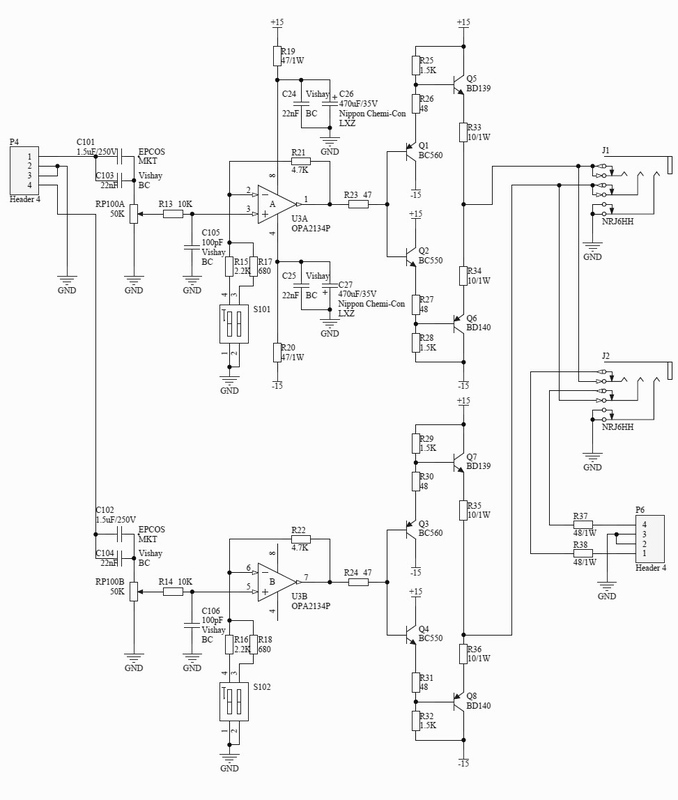
The circuit itself is quite simple: class A amplifier, OOS, the output stages are not covered, OOS is covered only by the OU. On the Internet, the scheme is easy to find.
Amplifier
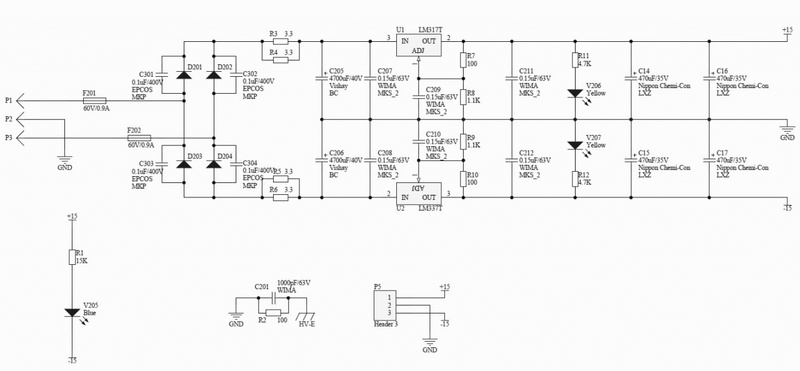
Nutrition
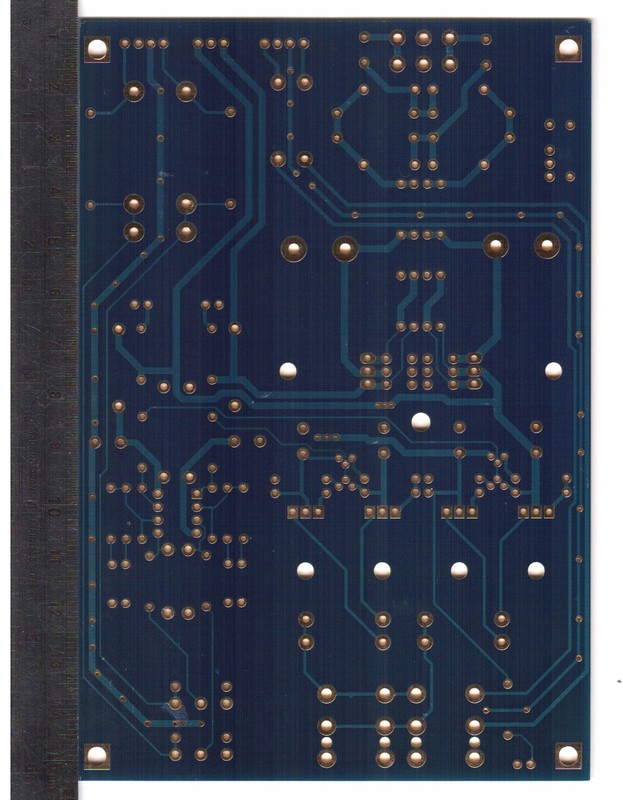
Thought how to make a signet, found a scanned printed circuit board on some Polish forum

')
and circled her in your favorite Sprint Layout
That's what happened
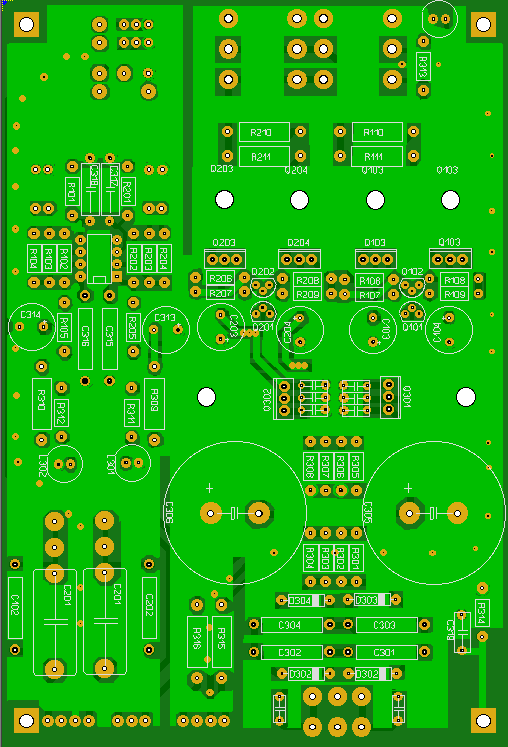
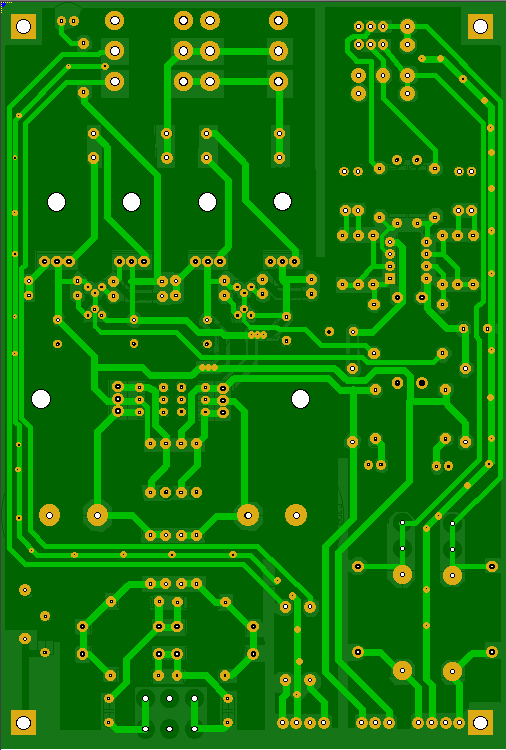
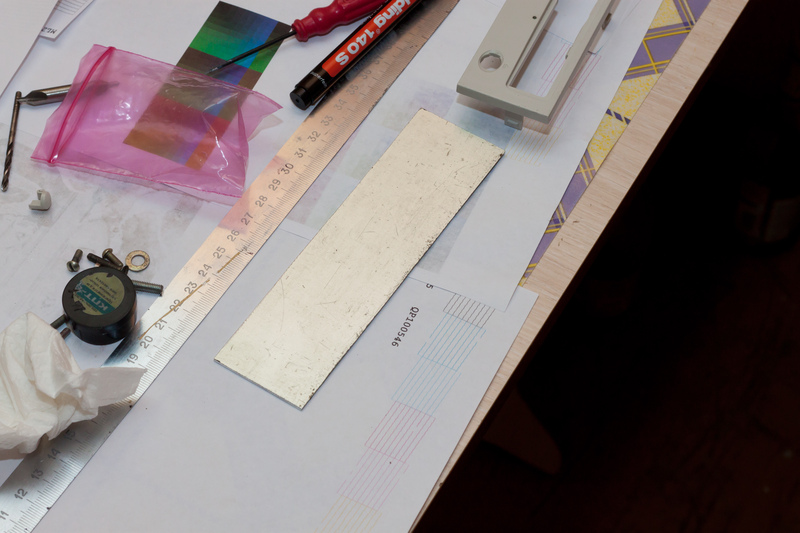
True, I just redrawed it, for I found a couple of errors and resized to fit my part size. Then it turned out that the store has foiled textolite only in size 10x15, and the board was larger, we had to redraw it again and reduce its overall dimensions.
LUT or Laser-Iron Technology is our all) I have been using glossy magazines for a long time as a transfer material, the main thing is that there are not many dark areas and fills on the sheets of the magazine.
We print out 2 sides.
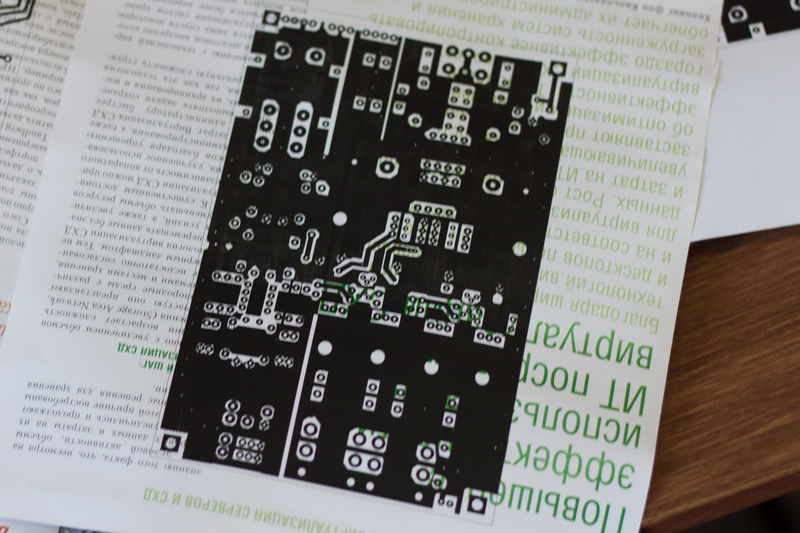
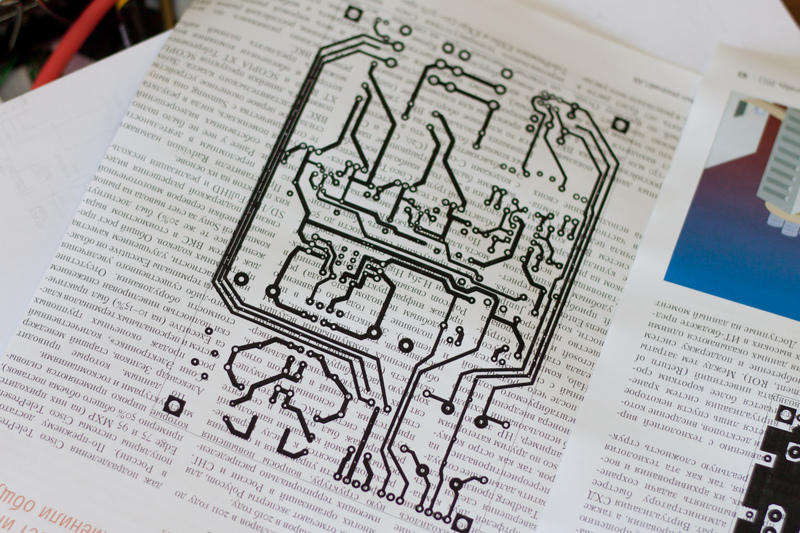
After that, the most fun thing is to combine them. I did LUT at once from both sides, put a piece of textolite into sheets and carefully wrapped them, then ironed it well with an iron, first one then the other side. In principle, it turned out well, one side ran a few tenths of a millimeter.
After proglazhivaniya need to place the board in the water and soaked paper very carefully removed, I do it with my fingertips under the water, like this

after laundering paper, you get such a fee
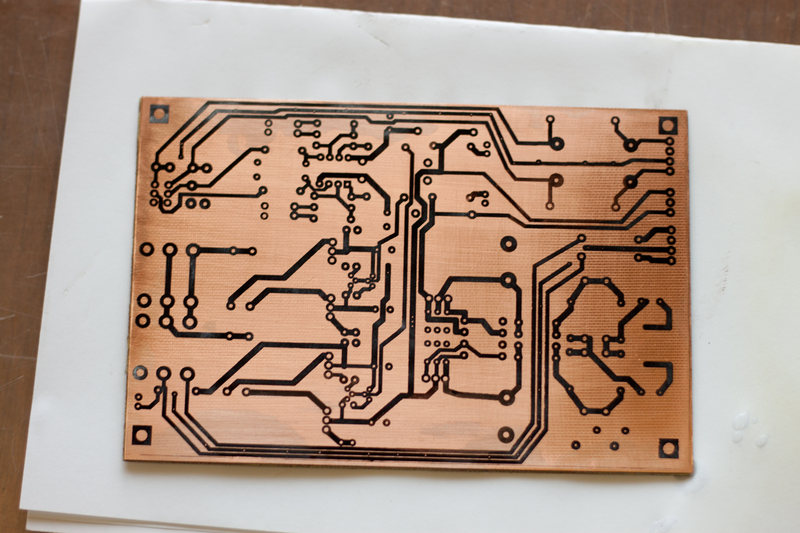
We carefully study it for the presence of jambs, if they are corrected with a scalpel with a ruler and marker. If everything is well we throw the board in the bath with a solution of ferric chloride (the preparation recipe is on the can). The main thing in this business is to stir the solution and regularly flip the board for uniform etching.
 I stick toothpicks around the edges to prevent the edges of the pickle bath from touching the board.
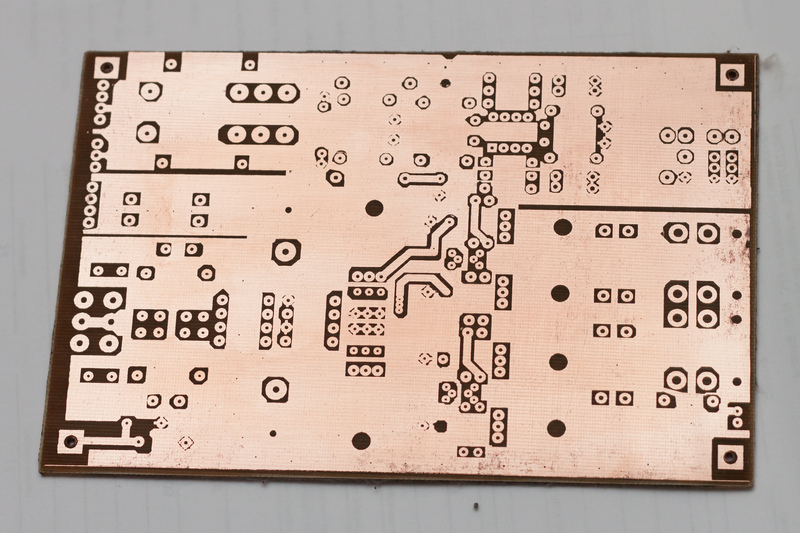
After etching, rinse the board well with the solution.

The toner, from the finished board, is washed off with acetone.
For the convenience of assembly, I like to put the elements

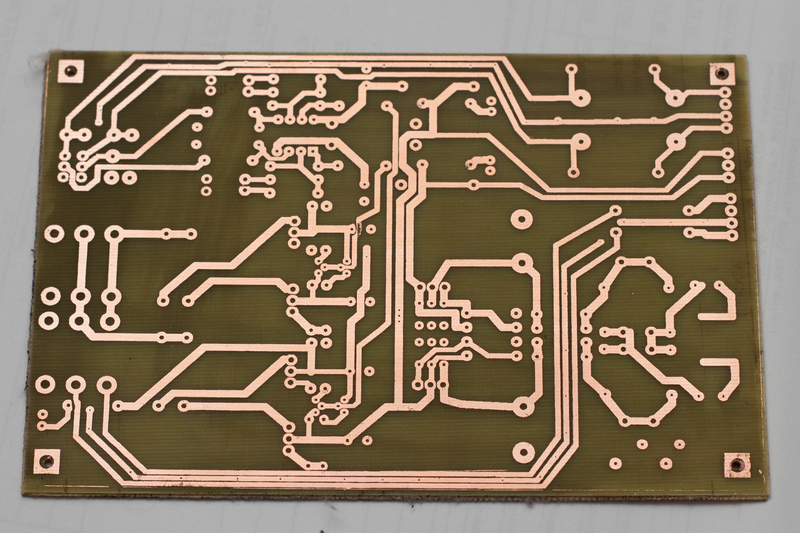
Then all the holes are drilled using a slider with a collet chuck.

The bottom of the board was tinned using a braid with flux and a small amount of solder.
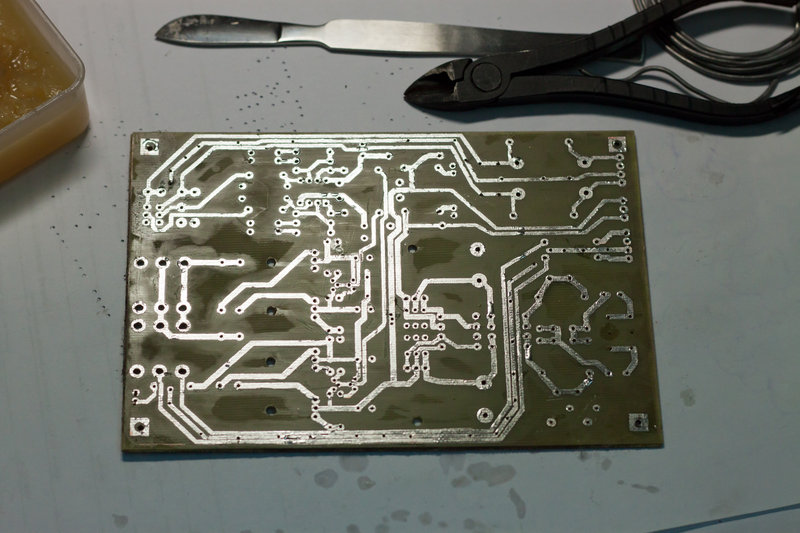
All of the following photos are mostly with a card that has not yet been washed out of the flux.
First of all, we collect the food chains, on the right are the favorite side cutters with the overlays.
and check them out. The power supply did not start the first time, it turned out that LM337 was completely Chinese, and it simply does not work. Therefore, the first test of the amplifier in the kitchen at night was from 2 laboratory sources (the lower one, by the way, is also homemade).

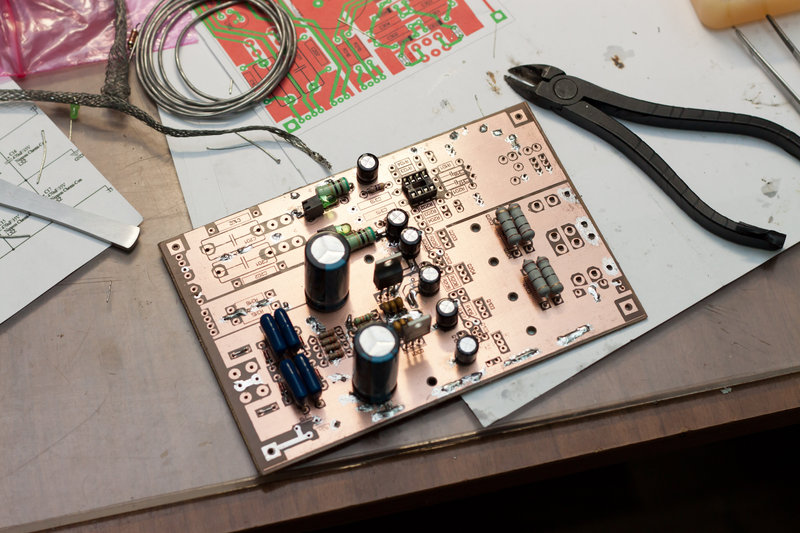
The test showed that the radiator is required. The board looks like this for now.
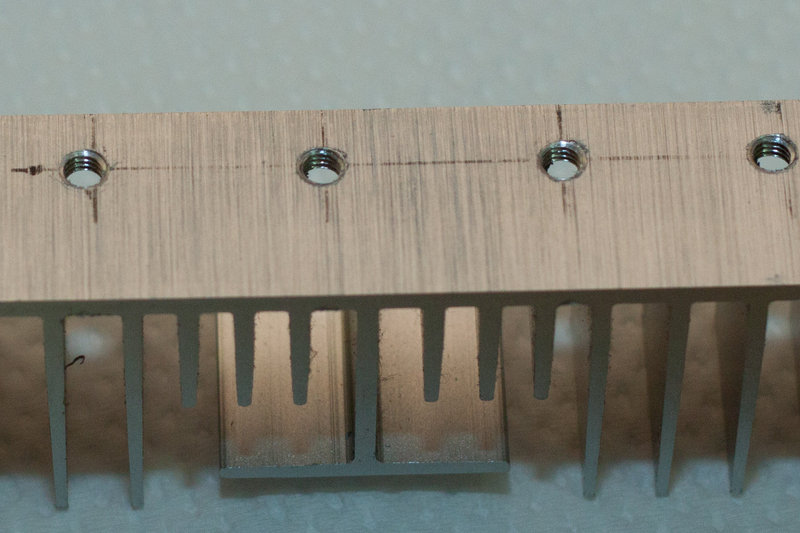
Took out of stock the old radiator from the motherboard nasverlil

Cut, chamfer
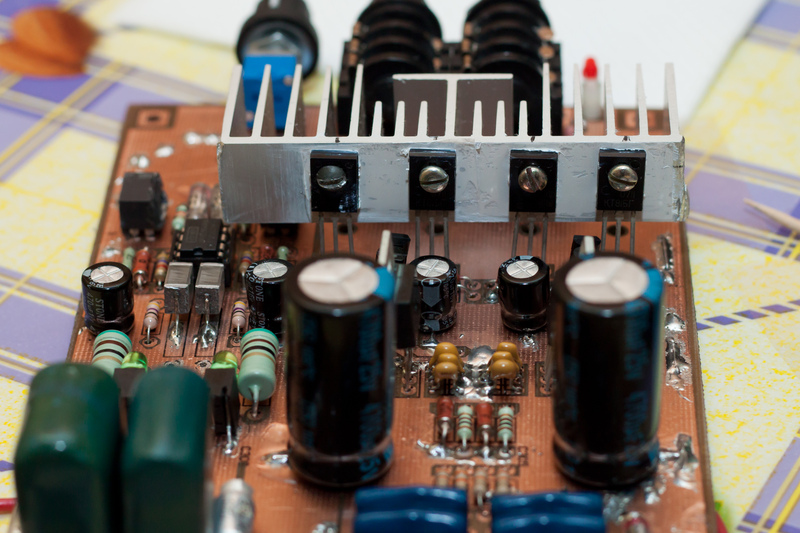
Mica and CPT, radiator in place. The circuit consumes about 150 mA for each power supply. I will remind the amplifier class A.
The transformer took ready with the old decommissioned Hungarian amplifier.
Test listening did on the following ears TDS-5M and 3 pairs of KOSS))) all srednyachok.
Most of the self-made designs die without gaining a body. Then I surpassed my laziness and decided on a feat - a complete case for this amplifier. A CD-ROM case was taken as a donor. The process of drilling holes and installing racks for the board did not capture, there was no camera at hand. It turned out such an unsightly design.


The front panel is full of slag, not beautiful in general.
Their old stocks are raising aluminum sheets and cutting the pad to fit the front panel of the CDROM.
Without hesitation, I fastened this panel with two screws, chose the cutest ones))))

We are drilling and trying on, it has already become better.
 .
.
The body decided to make it black matte (just a can of matte black paint remained making a homemade budget subwoofer for the movie ).
For painting, he removed everything from the body and covered everything with paint from an aerosol can, then there was a boring drying and assembly. The front panel proshkuril and degreased inscribed LUTom

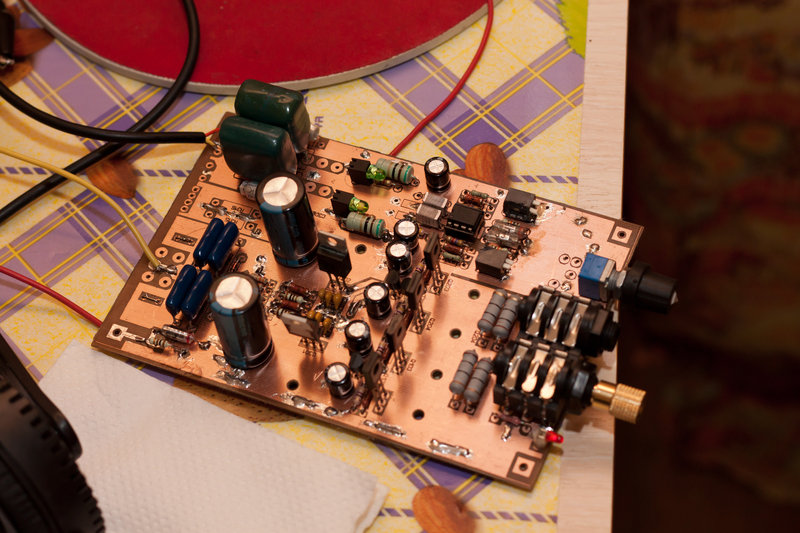
Assembled board in the case
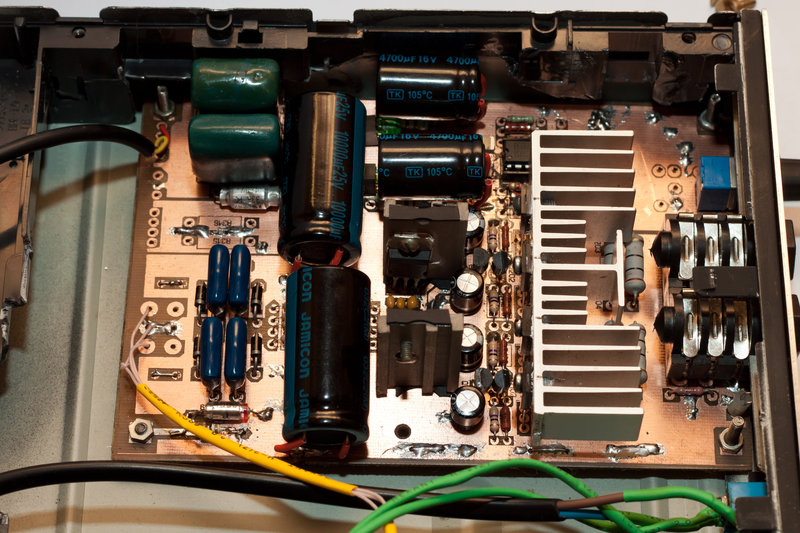
We had to change the power supply in front of the stabilizers from 4700 to 10,000 near OPA2134 from 470 to 4700 uF, because there was a small hum that could be heard at night in complete silence. Also added radiators for integral stabilizers, since their temperature in a closed case is not the best.
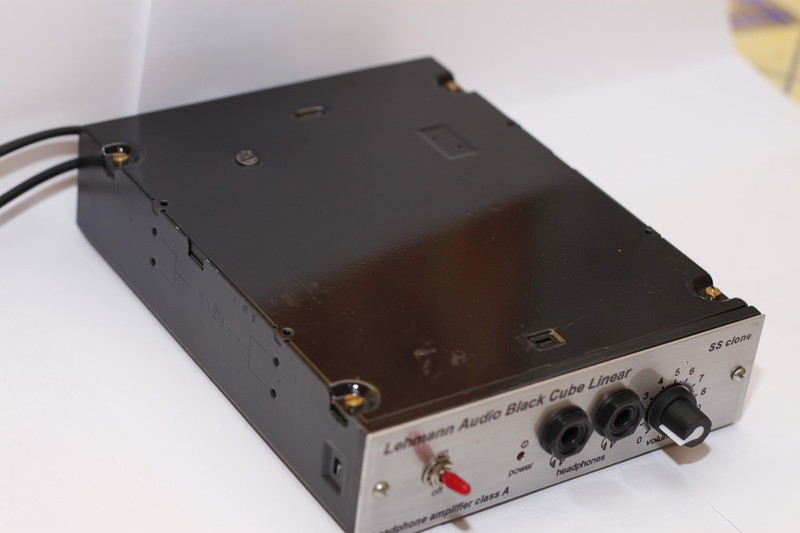
Here's a nice one, in my opinion, turned out to be an amplifier

The cost of parts in total did not exceed 1000 p. The original costs about 40,000 p. I do not pretend to the quality of the original, but I do not think that the resulting amplifier is bad. He plays very well. Decent ears promised to give for comparison. Source Asus Xonar D1.
The most expensive is capacitors.
Transistors are matched by the transfer ratio of complimentary pairs and they are the same in both channels. Went through several packages with them in the radio store.
The output voltage of the amplifier does not exceed 5 mV.
All resistances are selected with an accuracy of less than 1% or even better.
Input capacitors K73-17 + mica.
The volume control is not the most expensive but not the cheapest alpha.
What is left to finish:
1. Cover the second layer of paint
2. Cover the front panel and case with varnish to protect the coating (the varnish will only be available next week).
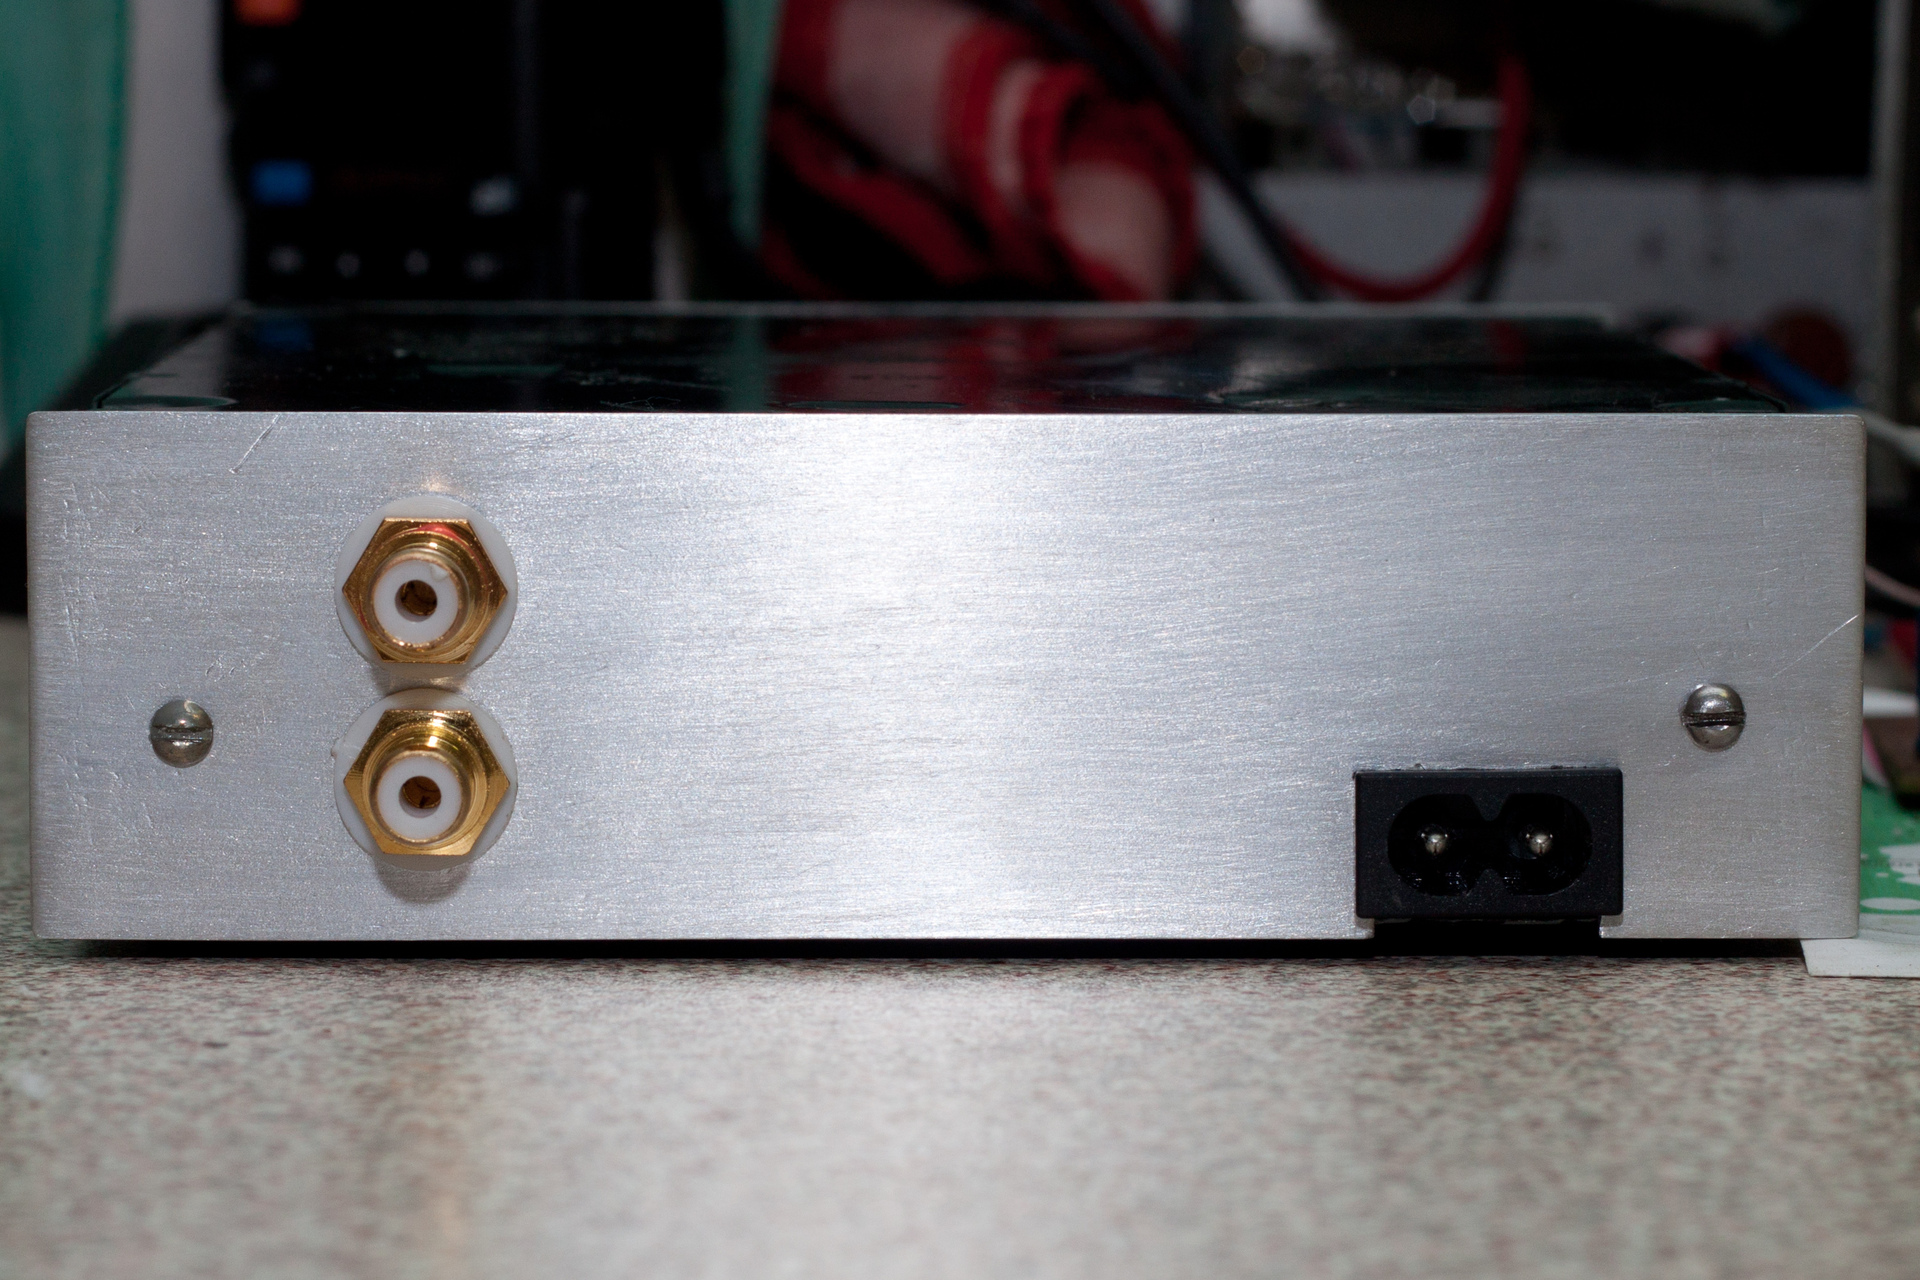
3. Saw the back panel and put the normal RCA connectors (there is no time for this yet). If everything works out on the weekend I will.
4. To measure the amplifier at least RMAA. The oscilloscope looked, gave a rectangle to the input, saw the output exactly the same.
UPD Items 1, 2 and 3 implemented
Bonus
And this daughter does a test audition)))

I decided to start to collect a clone of Lehmann Audio Black Cube Linear doctorhead.ru/catalogue/?i=523
Here is the result:
All together it took about 3 nights and less than 1000 rubles of money.
For those interested in welcome under the cat, there will be a lot of pictures with a detailed description.
Scheme and design
The circuit itself is quite simple: class A amplifier, OOS, the output stages are not covered, OOS is covered only by the OU. On the Internet, the scheme is easy to find.
Amplifier
Nutrition
Thought how to make a signet, found a scanned printed circuit board on some Polish forum
')
and circled her in your favorite Sprint Layout
That's what happened
True, I just redrawed it, for I found a couple of errors and resized to fit my part size. Then it turned out that the store has foiled textolite only in size 10x15, and the board was larger, we had to redraw it again and reduce its overall dimensions.
PCB manufacturing
LUT or Laser-Iron Technology is our all) I have been using glossy magazines for a long time as a transfer material, the main thing is that there are not many dark areas and fills on the sheets of the magazine.
We print out 2 sides.
After that, the most fun thing is to combine them. I did LUT at once from both sides, put a piece of textolite into sheets and carefully wrapped them, then ironed it well with an iron, first one then the other side. In principle, it turned out well, one side ran a few tenths of a millimeter.
After proglazhivaniya need to place the board in the water and soaked paper very carefully removed, I do it with my fingertips under the water, like this
after laundering paper, you get such a fee
We carefully study it for the presence of jambs, if they are corrected with a scalpel with a ruler and marker. If everything is well we throw the board in the bath with a solution of ferric chloride (the preparation recipe is on the can). The main thing in this business is to stir the solution and regularly flip the board for uniform etching.
I stick toothpicks around the edges to prevent the edges of the pickle bath from touching the board.After etching, rinse the board well with the solution.
The toner, from the finished board, is washed off with acetone.
For the convenience of assembly, I like to put the elements
Then all the holes are drilled using a slider with a collet chuck.
The bottom of the board was tinned using a braid with flux and a small amount of solder.
All of the following photos are mostly with a card that has not yet been washed out of the flux.
Assembly
First of all, we collect the food chains, on the right are the favorite side cutters with the overlays.
and check them out. The power supply did not start the first time, it turned out that LM337 was completely Chinese, and it simply does not work. Therefore, the first test of the amplifier in the kitchen at night was from 2 laboratory sources (the lower one, by the way, is also homemade).
The test showed that the radiator is required. The board looks like this for now.
Took out of stock the old radiator from the motherboard nasverlil
Cut, chamfer
Mica and CPT, radiator in place. The circuit consumes about 150 mA for each power supply. I will remind the amplifier class A.
The transformer took ready with the old decommissioned Hungarian amplifier.
Test listening did on the following ears TDS-5M and 3 pairs of KOSS))) all srednyachok.
Housing
Most of the self-made designs die without gaining a body. Then I surpassed my laziness and decided on a feat - a complete case for this amplifier. A CD-ROM case was taken as a donor. The process of drilling holes and installing racks for the board did not capture, there was no camera at hand. It turned out such an unsightly design.
The front panel is full of slag, not beautiful in general.
Their old stocks are raising aluminum sheets and cutting the pad to fit the front panel of the CDROM.
Without hesitation, I fastened this panel with two screws, chose the cutest ones))))
We are drilling and trying on, it has already become better.
.Painting and design
The body decided to make it black matte (just a can of matte black paint remained making a homemade budget subwoofer for the movie ).
For painting, he removed everything from the body and covered everything with paint from an aerosol can, then there was a boring drying and assembly. The front panel proshkuril and degreased inscribed LUTom
Assembled board in the case
We had to change the power supply in front of the stabilizers from 4700 to 10,000 near OPA2134 from 470 to 4700 uF, because there was a small hum that could be heard at night in complete silence. Also added radiators for integral stabilizers, since their temperature in a closed case is not the best.
Here's a nice one, in my opinion, turned out to be an amplifier
Total
The cost of parts in total did not exceed 1000 p. The original costs about 40,000 p. I do not pretend to the quality of the original, but I do not think that the resulting amplifier is bad. He plays very well. Decent ears promised to give for comparison. Source Asus Xonar D1.
The most expensive is capacitors.
Transistors are matched by the transfer ratio of complimentary pairs and they are the same in both channels. Went through several packages with them in the radio store.
The output voltage of the amplifier does not exceed 5 mV.
All resistances are selected with an accuracy of less than 1% or even better.
Input capacitors K73-17 + mica.
The volume control is not the most expensive but not the cheapest alpha.
What is left to finish:
4. To measure the amplifier at least RMAA. The oscilloscope looked, gave a rectangle to the input, saw the output exactly the same.
UPD Items 1, 2 and 3 implemented
Bonus
And this daughter does a test audition)))
Source: https://habr.com/ru/post/152659/
All Articles