Connecting "self-made" devices via bluetooth with iOS
Hello, Habrayuzer! I had a situation at work that I had to design a device for iOS that would transmit data to iPad via bluetooth. In short, this is a device that should hide in a regular pack of cigarettes and transfer data to the ipad, on which edge it lies. I started studying the apple site for the interaction between bluetooth devices and the ipad itself, but there were options to either use GameKit (which we didn’t fit at all), or to join the Apple MFi program (which brings a lot of restrictions and just don’t enter it). They began to look for solutions, and then a person came to me, who was very good at electronics.
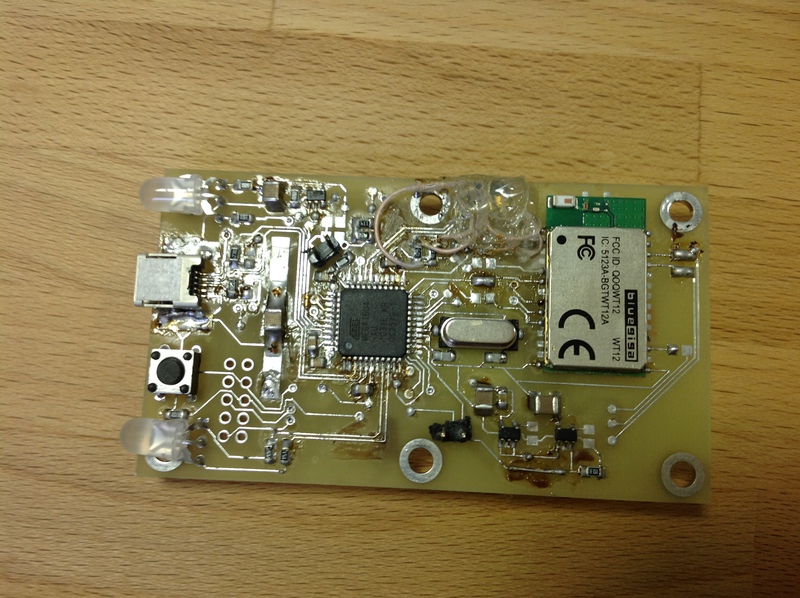
Initially, the development was planned for Arduino, but a knowledgeable person dissuaded from this undertaking due to large financial costs (a batch of about 1000 pieces was needed). And we found the optimal solution - to assemble the device ourselves. Since I am not good at electronics, I will simply describe what components were used:
The result was this prototype:
')
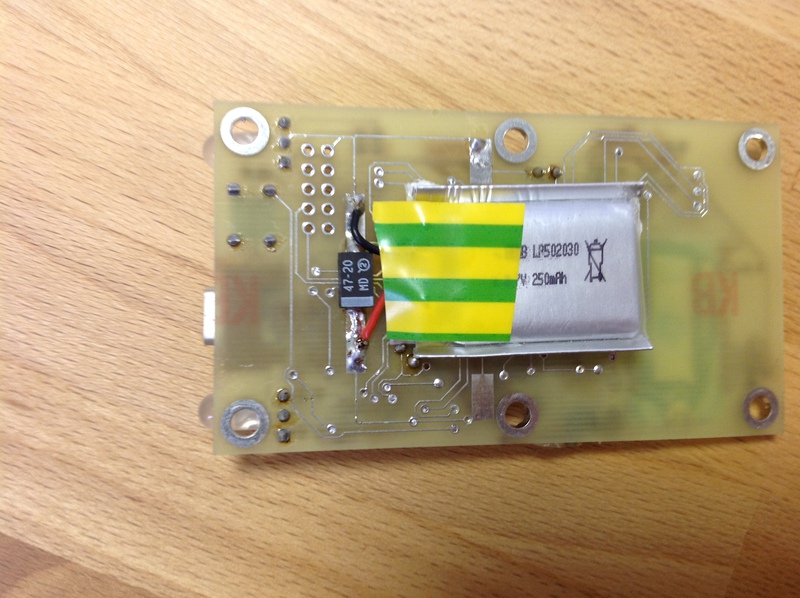
Bottom view:
The device perfectly conveyed its position, but the main question arose: how to transfer this data to the iPad?
The solution came quite unexpectedly - there is such a profile in SSP - “just works”, when code is exchanged,
but without indication and user involvement. And we decided to use it, emulating the usual bluetooth keyboard. Screwed this profile to the prototype, and this is what happened (I apologize for the quality of the video, but I think the point will be clear):
The device transmits a certain letter 10 times per second depending on the location, and at each change of position transmits a number from 0 to 9 which corresponds to the charge of the battery.
Well, on the iPad it was not difficult to intercept data from the keyboard. I created a hidden UITextField, and just intercepted the “pressed” keys in it. Here is a brief code for how this all works:
I hope this article will make life easier for someone. If anyone needs a circuit, device firmware, or details about how it ultimately works, I’m happy to share it!
Initially, the development was planned for Arduino, but a knowledgeable person dissuaded from this undertaking due to large financial costs (a batch of about 1000 pieces was needed). And we found the optimal solution - to assemble the device ourselves. Since I am not good at electronics, I will simply describe what components were used:
- position sensor MMA7260QT
- ATmega16U4-AU controller
- bluetooth bluegiga
The result was this prototype:
')
Bottom view:
The device perfectly conveyed its position, but the main question arose: how to transfer this data to the iPad?
The solution came quite unexpectedly - there is such a profile in SSP - “just works”, when code is exchanged,
but without indication and user involvement. And we decided to use it, emulating the usual bluetooth keyboard. Screwed this profile to the prototype, and this is what happened (I apologize for the quality of the video, but I think the point will be clear):
The device transmits a certain letter 10 times per second depending on the location, and at each change of position transmits a number from 0 to 9 which corresponds to the charge of the battery.
Well, on the iPad it was not difficult to intercept data from the keyboard. I created a hidden UITextField, and just intercepted the “pressed” keys in it. Here is a brief code for how this all works:
@interface ViewController : UIViewController <UITextFieldDelegate> { IBOutlet UITextField *textField; } @property (nonatomic, strong) IBOutlet UILabel *currTestLabel; @property (nonatomic, strong) IBOutlet UILabel *packPositionLabel; @property (nonatomic, strong) IBOutlet UILabel *batteryPercentageLabel; @end @implementation ViewController - (void)viewDidLoad { [super viewDidLoad]; [textField becomeFirstResponder]; } - (BOOL)textField:(UITextField *)textField shouldChangeCharactersInRange:(NSRange)range replacementString:(NSString *)string { if ([string isEqualToString:@"Z"] || [string isEqualToString:@"z"] || [string isEqualToString:@""] || [string isEqualToString:@""]) { _packPositionLabel.text = @""; } if ([string isEqualToString:@"9"]) { _batteryPercentageLabel.text = @"100%"; } return NO; } @end I hope this article will make life easier for someone. If anyone needs a circuit, device firmware, or details about how it ultimately works, I’m happy to share it!
Source: https://habr.com/ru/post/152621/
All Articles