Using the IAR Ebedded Workbench IDE

Introduction
Using different microcontrollers, there is a need to choose a convenient development environment. We have plenty to choose from - be it IAR or Keil µVision, or even Code Composer Studio.
Below we will talk about the IAR Embedded Workbench IDE on the example of STM32F10x. This development environment is powerful enough. There are all sorts of sweets.
IAR setup
First you need to configure IAR.
basic settings
After launching IAR, go to the options ( Tools-> Options ... ). The Editor is immediately selected. In the Ident size field, the number indicates the number of spaces when you press Tab. For me it is convenient to use the number 4 .
It is worth paying attention to the item Key Bindings . Here you can assign hot keys. Agree, after all, it is convenient and quick to use shortcuts. For now, you can assign the combination Ctrl + W as closing active tabs. To do this, select Window in Menu and for the Close active tab command, assign Ctrl + W.
With the rest of the hot keys, we introduce below.
Project Settings
Suppose we can create a new project (if not, Project-> Create New Project ... ). After creating the project, two project configurations are available to us - Debug and Release . You can switch between them in the Workspace window:

Fig. 1 - Workspace window
')
Convenient to use multiple configurations. In the Debug configuration, you can select the programmer simulator, and in Release - a specific programmer (for example, J-Link). That will allow you to first debug in the simulator, without losing time on the firmware of the microcontroller, and then flash under the Release configuration.
You can add new configurations through the menu: Project-> Edit Configurations .
The options for the project itself are Project-> Options ... ( Alt + F7 ). To open the project options window, select the project itself in the Workspace window, otherwise the options of the selected file will open.
I will give the settings for configuring Debug (in brackets - for Release ).
Open Options ( Alt + F7 )
- General Options .
Target tab. Select the Device - for example, ST STM32F100xB (I have STM32VLDISCOVERY with STM32F100RBT6 on board). - C / C ++ Compiler .
Optimizations tab. Select Level - None (for Release - High ).
Preprocessor tab. In the Additional include directories field, enter all paths of header files with the extension * .h . For example:$PROJ_DIR$\..\Lib\include\
The rest of the variables, like $ PROJ_DIR $, can be viewed in the help on F1 by typing Argument variables in the search.
In the same tab, in the Defined symbols field, enter the required defines. This is analogous to the usual #define directive. For our debugging handkerchief, you need to enter STM32F10X_MD_VL , if we want to use libraries from curved STMs.
Also for the Debug configuration, you can start the defib DEBUG . This is convenient if you use, for example, the construction:#ifndef DEBUG
Delay(100 );
#endif
Why should we wait this time when debugging, right? - Linker
Config tab. Here you can select the configuration file for the linker, if necessary (if you do not have an 8-bit microcontroller). If you need to reallocate the memory of the microcontroller in its own way, then you need to pick the * .icf file. You can read about this in Help-> C / C ++ Development Guide page 81 Linking your application . If this topic is complex, then you can write about it separately. Ask if that. - Debugger .
Setup tab. In the Driver field, select Simulator (for Release , your programmer. For my board, ST-LINK. In the settings for it, you need to select the SWD interface).
Fig. 2 - Project Tree
And finally, create a project tree to your taste.
Some tricks
Hotkeys
Search:
Normal search - Ctrl + F
Find Next - F3
Search project files - Ctrl + Shift + F
Walking on Found (or Error / Worning) - F4
Project Navigation:
Go to the declaration of a variable (even if it is in another file) - F12 is a very useful function!
Navigate forward - Alt + Right
Navigation back - Alt + Left
Miscellanea:
Open header / source - Ctrl + Shift + H (or P.M.M in the editor, and select Open Header / Source File in the context menu)
Comment out the selected block - Ctrl + K
Uncomment - Ctrl + Shift + K
Select the contents of the brackets - Ctrl + B
Auto Alignment - Ctrl + T
Put / remove Breakpoint - F9
Paste the template - Ctrl + Shift + Space is also an interesting thing.
To add your template, you need to open the CodeTemplates.ENU.txt file through the menu Edit-> Code Templates-> Edit Templates
Now you can enter something like this:
#TEMPLATE "&Warning"," :"=" " #warning %1 Template syntax:
#TEMPLATE ,[=default value], ...
«&» ( ). «>» . .
Template menu ( Ctrl+Shift+Space ). Warning:
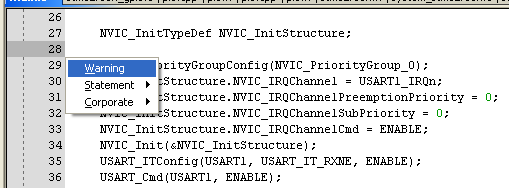
. 3 – Template
:
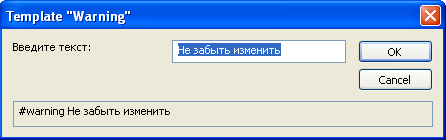
. 4 – Warning
OK. , :

. 5 –
(#error <>) Build .
IAR, . . .
, .
IAR#TEMPLATE ,[=default value], ...
«&» ( ). «>» . .
Template menu ( Ctrl+Shift+Space ). Warning:
. 3 – Template
:
. 4 – Warning
OK. , :
. 5 –
(#error <>) Build .
IAR, . . .
, .
IAR
«&» ( ). «>» . .
Template menu ( Ctrl+Shift+Space ). Warning:
. 3 – Template
:
. 4 – Warning
OK. , :
. 5 –
(#error <>) Build .
IAR, . . .
, .
IAR
#TEMPLATE ,[=default value], ...

«&» ( ). «>» . .

Template menu ( Ctrl+Shift+Space ). Warning:

. 3 – Template

:

. 4 – Warning

OK. , :

. 5 –

(#error <>) Build .


IAR, . . .
, .


IAR
#TEMPLATE ,[=default value], ...
«&» ( ). «>» . .
Template menu ( Ctrl+Shift+Space ). Warning:
. 3 – Template
:
. 4 – Warning
OK. , :
. 5 –
(#error <>) Build .
IAR, . . .
, .
IAR
«&» ( ). «>» . .
Template menu ( Ctrl+Shift+Space ). Warning:
. 3 – Template
:
. 4 – Warning
OK. , :
. 5 –
(#error <>) Build .
IAR, . . .
, .
IAR
#TEMPLATE ,[=default value], ...

«&» ( ). «>» . .

Template menu ( Ctrl+Shift+Space ). Warning:

. 3 – Template

:

. 4 – Warning

OK. , :

. 5 –

(#error <>) Build .


IAR, . . .
, .


IAR
#TEMPLATE ,[=default value], ...
«&» ( ). «>» . .
Template menu ( Ctrl+Shift+Space ). Warning:
. 3 – Template
:
. 4 – Warning
OK. , :
. 5 –
(#error <>) Build .
IAR, . . .
, .
IAR
Source: https://habr.com/ru/post/152407/
All Articles