Automated OS installation on the example of Windows Embedded x64
Step-by-step instruction with examples
 Surely everyone can manually install and configure the Windows operating system. But for the case when for production purposes this task should be performed dozens or hundreds of times, the need arises for an automated installation.
This article describes the basic steps and tips on how to create a "silent", automated installation of the operating system, configure it and test the result. Of course, the network can find a fairly large number of articles and tips about the individual phases of this task, but the general instructions and answers to the questions: Where to start? What needs to be prepared? What are the main process steps? - unfortunately, a rarity.
Therefore, the answers to these questions here will find those who perform such a task for the first time.
Windows Embedded Standard 7x64 is chosen as the operating system for the examples.
')
Machine requirements:
Should be installed:
- Windows Embedded Standard 7 SP1 (Tools)
Toolkit can be downloaded here (evaluation version)
In previous versions of Windows, the Windows System Image Manager (SIM) is used to edit answer files. Windows SIM is part of the Windows Automated Installation Kit (AIK), which can be downloaded here . The Image Configuration Editor interface in Windows Embedded Standard 7 Tools is very similar to the Windows SIM interface.
Must be available:
- The original ISO image for installing Windows (+ license key, if you do not plan to install the evaluation version).
- All necessary drivers for target device.
- Applications that are planned to be installed in the system immediately after installing the OS.
Basic tools:
- Windows Embedded Standard 7 SP1 (Tools) \ Image Configuration Editor (ICE)
- Windows Embedded Standard 7 SP1 (Tools) \ Windows PE Tools Command Prompt
- Symantec Ghost \ Ghost Boot Wizard
Folder structure in production environment:
Create a working folder. For example, a folder named “Work”.
Copy the contents of the original ISO image with the installation of Windows in your working directory. The result should be the following:
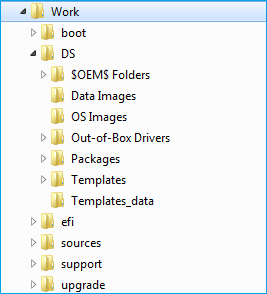

Notice the two subfolders in the Distribution Share (DS) folder: “ $ OEM $ Folders ” and “ Out-Of-Box Drivers ”.
Create a folder “Work \ DS \ Out-Of-Box Drivers \”. The necessary drivers for the target device will be stored here.
Create the “Work \ DS \ $ OEM $ Folders \ (CustomFolder) \ $ OEM $ \ $$ folder structure. Additional files, applications, registry files, configurations and scripts will be stored here.
The contents of the \ $ OEM $ \ $$ folder are automatically copied to the% WINDIR% folder, so it can be used during any phase of the Windows installation. More details about $ OEM $ folders.
The steps to create an automated installation are:
Step 1. Create an AutoUnattend.xml answer file.
Step 2. Adding drivers to the process of automatic installation of the OS.
Step 3. Adding additional applications and system settings using an answer file, scripts and commands.
Step 4. Creating a test image.
Step 5. Remove the image from the test machine and deploy to target devices.
These steps can be divided into sub-items with many details. But in this article it is planned to give only a general vision of the task.
1. Create an AutoUnattend.xml answer file.
To make the installation fully automated, you need at least to answer all the questions in the Windows Setup Wizard. The XML response file contains all the required fields for this.
The Image Configuration Editor (ICE) can be used to create and edit an automated installation answer file. Of course, you can use any text editor for this, but without the convenience and graphical interface of the ICE oriented to this task.
ICE allows you to create an answer file, add components (features), drivers, and all the necessary options to make the installation fully automated.
An intuitive user interface and an advanced search system make ICE a priority when choosing a tool to create and edit an answer file.
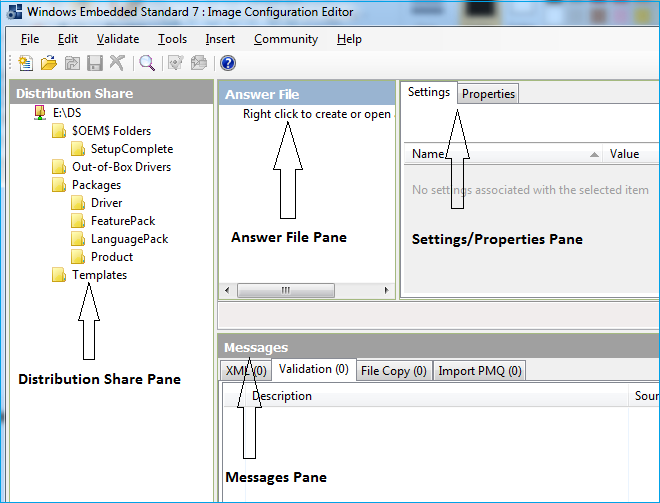
To get started with ICE:
- Open Distribution Share (DS): in our case it will be “Work \ DS”.
- Create a new (blank) answer file. Add components and options.
Features
Windows Features (in this text, the word “component” is used as the Russian equivalent here) are added in accordance with the requirements of the target device. ICE can automatically add necessary and optional components after you add the required minimum.
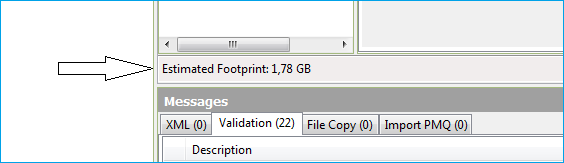
If your device is limited in disk space - pay attention to the Estimated Footprint indicator: this is the estimated size that Windows will occupy on the disk after installation.
Options
All components have one or more properties. At a minimum, it is necessary to determine the answers to the standard installation questions: the default installation language, confirmation of the Microsoft Software License Terms, the product key, on which disk and in which partition Windows will be installed, and local installations.
You can also automatically set the following Windows Welcome settings: language and region, user name, computer name, desktop wallpaper, date and time, current location, home group, wireless network, administrator password.
All options are configured on one or more phases of the installation of Windows. Pay attention to what specific phase you are planning to set up a specific option.
Disk tuning
In the first phase of Windows installation ( Windows PE ), you can configure the creation and deletion of partitions on a physical disk. The set of options allows you to delete existing partitions, create new partitions, specify types, specify formats, letters and partition marks, select which drive will be installed on Windows.
To create a new disk partition for the DiskConfiguration / Disk / CreatePartitions option, in the context menu, select the action " Insert New CreatePartition ".
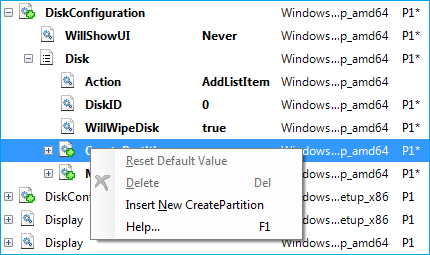
In the CreatePartition section that appears, type:
- The sequence number of the created section ( Order );
- Type ( Type ) - Primary, EFI, Extended, Logical or MSR;
- Size ( Size );
- And will the partition be a fixed size or expandable ( Extend ) - true or false. If Extend = true, the Size option is not required
To add additional features to the created partitions for the DiskConfiguration / Disk / ModifyPartitions option, in the context menu, select the "Insert New ModifyPartition" action .
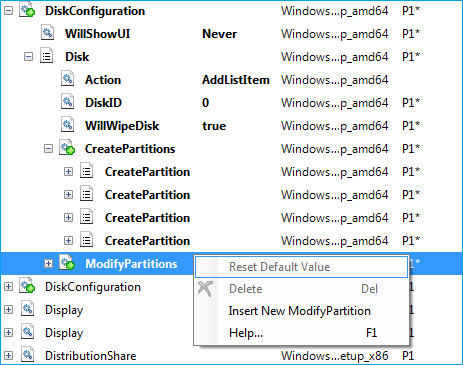
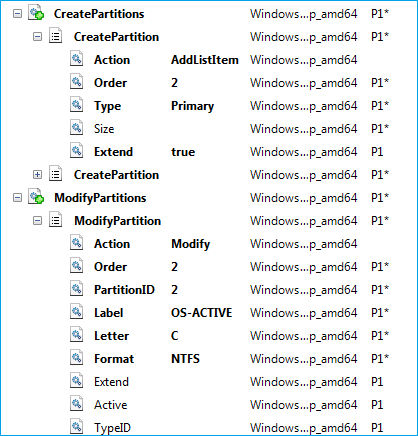
In the ModifyPartition branch that appears, enter:
- Order number - it must match the order number in the CreatePartition section;
- Section label ( Label );
- The letter of the section ( Letter );
- Format ( Format ) - NTFS or FAT32;
- Will the partition be a fixed size or expandable ( Extend ) - true or false;
- Section Active ( Active ) - true or false;
- Type of section ( TypeID ). For example, for the system partition used to store system repair tools, the TypeID should be assigned 0x27.
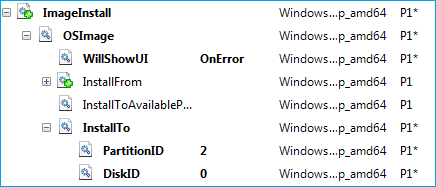
The ImageInstall option allows you to select on which partition the operating system will be installed.
Check and save answer file
To check the error response file, use F5 . Warnings and errors will be displayed in the message panel.
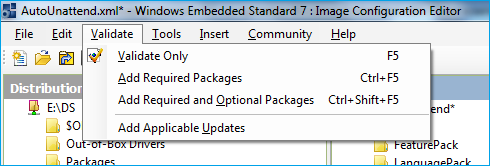
If you have omitted the required packages, you can add them automatically using the keyboard shortcuts Ctrl + F5 .
Ctrl + Shift + F5 adds all required and optional packages. Using this option, you should pay attention to the fact that the footprint can be significantly exceeded.
The answer file must be named Autounattend.xml and saved to the root of the working directory.
2. Adding drivers to the process of automatic installation of the OS.
To enable the automatic installation of the driver, you must download them in advance from the official website and:
- Add to Out-Of-Box drivers a folder with driver installation files.
- Add a path to each driver to one of the Windows installation phases. Attention : a certain driver must be installed at a certain stage (in a certain phase).
3. Adding additional applications and system settings using an answer file, scripts and commands.
To add additional files to the installation, use the $ OEM $ folder. The $ OEM $ directory and its subfolders are automatically detected by Windows installation and copied to the hard disk.
For example, all files and folders from “DS \ $ OEM $ Folders \\ $ OEM $ \ $$” will be copied to% WinDir%. You can run scripts and install applications right from there.
To use the $ OEM $ folder, do the following:
- Set the value “true” to the property “UseConfigurationSet” in the answer file
- In the Distribution Share panel in ICE, expand $ OEM $ Folders.
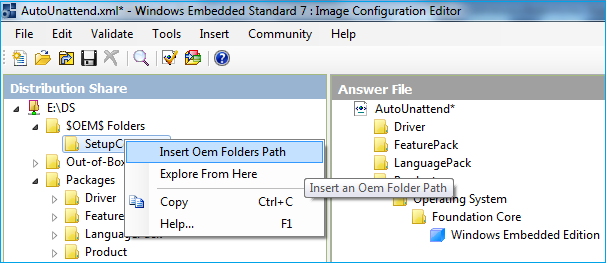
- Right-click on the CustomFolder, and select “Insert Oem Folders Path”.
To install applications automatically after installation of the OS, set their settings, add registry entries and files, you can use the following methods:
- RunSynchronous and RunAsynchronous commands in the answer file.
- FirstLogonCommands in the answer file. These commands are executed automatically when the user logs into the system for the first time.
- SetupComplete.cmd starts automatically at the end of the OS installation. Windows Setup looks for a file named SetupComlete.cmd in the “% WINDIR% \ Setup \ Scripts” directory , so you should copy this file to the “DS \ $ OEM $ Folders \ (CustomFolder) \ $ OEM $ \ $$ \ Setup \ Scripts directory ” In the working folder.
Each of these methods has its pros and cons. And be sure to consider the context of command execution.
To silently install applications during OS installation, use the appropriate keys: / s , / silent or / r with setup.iss file for InstallShield installation, / qn for MSI packages, / verysilent / SP for InnoSetup, / s for Wiseinstaller etc. Use help and the / option . to see the command line options for installing the application.
4. Creating a test image.
A test image can be created as an ISO image or as a bootable USB.
An example of creating an ISO image using the oscdimg tool (% ProgramFiles% \ Windows Embedded Standard 7 \ Tools \ AMD64 \ oscdimg.exe) in case the Work folder is located in the root of drive C:
oscdimg -bC: \ work \ boot \ etfsboot.com -u2 -hmc: \ work c: \ work \ wes7x64_test.iso
For test purposes, we advise you to include standard tools for testing all necessary configurations (accessories, Microsoft management console, etc.) in the installation for the duration of the test.
5. Removing an image from a test machine and deploying it to target devices.
If you plan to make an image from a test machine and apply it on target devices, you first need to prepare a test machine using SYSPREP. This is a requirement from Microsoft. Otherwise, Microsoft does not provide product support.
Sysprep prepares a Microsoft Windows installation for duplication, auditing, and delivery to the client.
Sysprep removes specific system data from Windows, such as ComputerSID. Therefore, preparation using SYSPREP is an important step in creating an image.
You can create an image using WindowsPE with ImageX or SymantecGhost tools.
Using the WindowsPE Tools Command Prompt, you can create a bootable WinPE image with automated wim file creation.
Using the Symantec Ghost \ Ghost Boot Wizard, you can create a bootable Ghost image with automated creation of a ghost file.
Each of these images can be used for further delivery to target devices.
The resulting image can be used in lite-touch and zero-touch deployment strategies .
Source: https://habr.com/ru/post/152311/
All Articles