Export layouts from Planner 5D
Recently on Habré was presented the service of creating apartment layouts Planner 5D.
Your submissive servant just needed a 3D apartment model to visualize the state of home automation - display where the light is on and where it is turned off, and the new service came in exactly the way.

One problem remained unsolved - how to import data from Planner 5D into your own program. To do this, it was necessary to figure out how to extract data from the service, parse the data format and make a tool to check whether the model is rendered correctly.
It was clear that in order to render the scene in WebGL used in the scheduler, the data of object models, textures and information on the placement of objects on the scene must be received in the browser separately. Through the Chrome network debugger, the data sought was quickly found. It turned out that the application receives data through the JSON API at planner5d.com/api/project/ <projectId> . The data is given without authentication, which slightly simplified the task.
')
Inside JSON, a list of projects is listed (apparently, it is assumed that several projects can be in one file at once). Each project has a user-defined name and the project's scene data, which is another JSON wrapped in a string.
To extract the JSON package and deploy it to separate project files, the utility fetch.pl was written, which performs the specified operations:
Now that the projects have been extracted, you can look at their insides and figure out how they work. It turned out that the data structure is a tree of objects on the scene. At the very top is the Project object, floors are embedded in it, on each floor there are several rooms (Room), in the rooms there are walls (Wall), windows (Window), doors (Door) and arbitrary mesh objects (Ns) .
The purpose of the fields of objects is quite clear from the names: x, y, z - coordinates, Sx, Sy, Sz - scale of the model, a - angle of rotation, Fx, Fy - reflection horizontally and vertically. The displacement and rotation transformations applied to the ancestor must also apply to all child objects. Scale and reflection transformations are applied only to the model of a particular object itself and do not affect its subsidiaries.
There were no problems with textures at all. If the object has a texture field, go to planner5d.com/m/t/<filename>.jpg and pick up the file.
Object models turned out to be more cleverly packed. If a mesh object has an id field, then its model can be downloaded from the address planner5d.com/m/i/<name>.png . Technically, this is a monochrome PNG file that is read pixel-by-pixel, and then this data is interpreted as JSON. The resulting JSON file contains lists of vertices, normals, UV coordinates of textures, and other things common for 3D. Judging by the header of the model files, they were exported from Blender.
After the import was finished, the result was a Perl library for all operations. To download a texture (it will be taken from the cache if it is already downloaded) and get the file name in the local file system where it is located:
To similarly download the object model and unpack it in JSON:
In order to make sure that all the data were interpreted correctly, it was necessary to reassemble the scene from the received data and render it. For these purposes, the open-source renderer POV-Ray is selected, which is a full-fledged raytracer and allows you to get pictures with photorealistic quality. Its input format is a text file in a special language describing the scene. In order to form this file, we need a new module - Planner5D :: Povray, which will be trained to export the scene tree to the pov format. First we need to convert the object models to the pov format and save them in separate files, which will later be connected via #include to the main scene file:
Files with models are also cached. If the file mesh-220.pov does not exist yet, it will be formed from 220.json downloaded in the previous step. If there is also no 220.json file, it will be downloaded automatically. After referring to getPovMeshPath, you can be sure that the necessary pov-file has been formed on your disk.
After the necessary models have been formed, we should build a pov-file for the entire scene. First, the scene must be read from its JSON description and the object structure must be recreated in memory. To do this, create a Planner5D :: Parser object and count the scene:
The debug key will cause the program to output the loading of textures and models to stderr. After calling the parse_string method, the output will be a link to the root node of the object tree ($ root).
The next step is to form the pov-file using the methods of the class Planner5D :: Povray. First, prepare the auxiliary objects (camera, grass, lighting):
Run the program and render the scene:

Now you can add walls to the scene:

Separately, you can add windows and doors:

Do not forget about the floor, furniture and other utensils:

Something is missing ... oh shit! Lost windows to make openings in the walls. No problems. For this you have to use a clever trick. For each window and door, we determine their bounding box and subtract the resulting bounding boxes from the walls using the POV-Ray operator “difference”. To do this, add to the file a call to povDefWindowsDoorsHoles, which will determine the object with the “holes” that we will cut, and replace povSceneWalls with povSceneWallsWithHoles. Temporarily remove the windows and doors to see what happened:

Fine. Now put the windows in place:
So, the problem remains. Sunlight enters the apartment not only through the windows, but also through the top. Look at the right wall in the bathroom. How can it be lit by sunlight? No So you need to apply another trick. We will cover the apartment from above with a ceiling that will repeat the shape of the floor, but will have special attributes that make the object invisible, but allow it to cast a shadow:

POV-Ray has a powerful arsenal of effects that can be used in rendering - from simple lighting models (ambient / diffuse / specular) to physical modeling of the behavior of light rays in materials. For example, having described a prism , it is possible to achieve that in it white light is decomposed into a spectrum:

We need the minimum functionality - to make the windows transparent and mirrors reflective. The descriptions of the materials used in Planner 5D do not contain information about the reflectivity of the mirrors and the transparency of the glass on the windows. To solve the problem, use the hack and override the materialTransparency method of Planner5D :: Model :: Window:
Make a similar hack for the reflectivity of mirrors:
The method of identifying objects and materials in them is extremely barbaric. Let's hope that the Planner 5D authors will give human names to the materials so that you can identify the glasses by the presence of the string “glass” in the name of the material, and the mirrors by the string “mirror”. But so far only.
Let's try to change the angle and look in the mirror. By default, the povCamera method creates a camera that looks into the center of an apartment from somewhere above. You can pass to it two optional arguments with camera coordinates and look_at points relative to the center of the apartment. The center is the geometric center of the bounding box of the entire project, lowered to the ground level. X, Y - coordinates on the ground plane, Z - height above the ground. All dimensions are in centimeters:

If you need to change some particular model, for example, to correct the visualization of an object directly in the data, you can directly correct the data / pov / mesh- <id> .pov file responsible for the desired object. If the pov file exists, it will not be automatically regenerated, and your changes will remain intact. Another wish for Planner 5D developers is to export object names in a machine-readable format. Search for them by identifiers is very inconvenient.
The library is distributed under the BSD license. You can download it here: https://github.com/amlinux/planner5d-parser . I hope it will help those who lacked the tools for fast and convenient visualization of apartments and houses. Enjoy using.
Your submissive servant just needed a 3D apartment model to visualize the state of home automation - display where the light is on and where it is turned off, and the new service came in exactly the way.
One problem remained unsolved - how to import data from Planner 5D into your own program. To do this, it was necessary to figure out how to extract data from the service, parse the data format and make a tool to check whether the model is rendered correctly.
Data import
It was clear that in order to render the scene in WebGL used in the scheduler, the data of object models, textures and information on the placement of objects on the scene must be received in the browser separately. Through the Chrome network debugger, the data sought was quickly found. It turned out that the application receives data through the JSON API at planner5d.com/api/project/ <projectId> . The data is given without authentication, which slightly simplified the task.
')
Inside JSON, a list of projects is listed (apparently, it is assumed that several projects can be in one file at once). Each project has a user-defined name and the project's scene data, which is another JSON wrapped in a string.
To extract the JSON package and deploy it to separate project files, the utility fetch.pl was written, which performs the specified operations:
$ ./fetch.pl d24411aad3135fc8fef7c907bbd18af8 Writing myApartment.json... Now that the projects have been extracted, you can look at their insides and figure out how they work. It turned out that the data structure is a tree of objects on the scene. At the very top is the Project object, floors are embedded in it, on each floor there are several rooms (Room), in the rooms there are walls (Wall), windows (Window), doors (Door) and arbitrary mesh objects (Ns) .
The purpose of the fields of objects is quite clear from the names: x, y, z - coordinates, Sx, Sy, Sz - scale of the model, a - angle of rotation, Fx, Fy - reflection horizontally and vertically. The displacement and rotation transformations applied to the ancestor must also apply to all child objects. Scale and reflection transformations are applied only to the model of a particular object itself and do not affect its subsidiaries.
There were no problems with textures at all. If the object has a texture field, go to planner5d.com/m/t/<filename>.jpg and pick up the file.
Object models turned out to be more cleverly packed. If a mesh object has an id field, then its model can be downloaded from the address planner5d.com/m/i/<name>.png . Technically, this is a monochrome PNG file that is read pixel-by-pixel, and then this data is interpreted as JSON. The resulting JSON file contains lists of vertices, normals, UV coordinates of textures, and other things common for 3D. Judging by the header of the model files, they were exported from Blender.
After the import was finished, the result was a Perl library for all operations. To download a texture (it will be taken from the cache if it is already downloaded) and get the file name in the local file system where it is located:
use Planner5D::Downloader; my $downloader = Planner5D::Downloader->new; my $filepath = $downloader->getTexturePath('stone_4.jpg'); To similarly download the object model and unpack it in JSON:
use Planner5D::Downloader; my $downloader = Planner5D::Downloader->new; my $filepath = $downloader->getMeshPath('220'); Visualization
In order to make sure that all the data were interpreted correctly, it was necessary to reassemble the scene from the received data and render it. For these purposes, the open-source renderer POV-Ray is selected, which is a full-fledged raytracer and allows you to get pictures with photorealistic quality. Its input format is a text file in a special language describing the scene. In order to form this file, we need a new module - Planner5D :: Povray, which will be trained to export the scene tree to the pov format. First we need to convert the object models to the pov format and save them in separate files, which will later be connected via #include to the main scene file:
use Planner5D::Povray; my $povray = Planner5D::Povray->new; my $filepath = $povray->getPovMeshPath('220'); Files with models are also cached. If the file mesh-220.pov does not exist yet, it will be formed from 220.json downloaded in the previous step. If there is also no 220.json file, it will be downloaded automatically. After referring to getPovMeshPath, you can be sure that the necessary pov-file has been formed on your disk.
After the necessary models have been formed, we should build a pov-file for the entire scene. First, the scene must be read from its JSON description and the object structure must be recreated in memory. To do this, create a Planner5D :: Parser object and count the scene:
use Planner5D::Parser; my $data = join '', <STDIN>; my $parser = Planner5D::Parser->new(debug => 1); my $root = $parser->parse_string($data); The debug key will cause the program to output the loading of textures and models to stderr. After calling the parse_string method, the output will be a link to the root node of the object tree ($ root).
The next step is to form the pov-file using the methods of the class Planner5D :: Povray. First, prepare the auxiliary objects (camera, grass, lighting):
use Planner5D::Povray; my $povray = Planner5D::Povray->new(debug => 1); print $povray->povCamera($root); print $povray->povObserverLight($root); print $povray->povSunsetLight($root); print $povray->povGrass($root); Run the program and render the scene:
./planner2pov.pl < myApartment.json > myApartment.pov povray myApartment.pov Now you can add walls to the scene:
print $povray->povDefWalls($root); print $povray->povSceneWalls($root); Separately, you can add windows and doors:
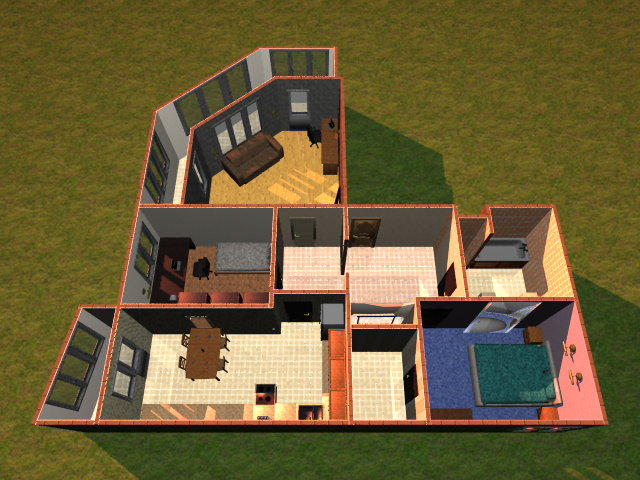
print $povray->povDefWalls($root); print $povray->povSceneWalls($root); Do not forget about the floor, furniture and other utensils:
print $povray->povDefWindowsDoors($root); print $povray->povSceneWindowsDoors($root); print $povray->povDefObjects($root); print $povray->povSceneObjects($root); Something is missing ... oh shit! Lost windows to make openings in the walls. No problems. For this you have to use a clever trick. For each window and door, we determine their bounding box and subtract the resulting bounding boxes from the walls using the POV-Ray operator “difference”. To do this, add to the file a call to povDefWindowsDoorsHoles, which will determine the object with the “holes” that we will cut, and replace povSceneWalls with povSceneWallsWithHoles. Temporarily remove the windows and doors to see what happened:
print $povray->povDefWalls($root); print $povray->povDefWindowsDoorsHoles($root); print $povray->povSceneWallsWithHoles($root); Fine. Now put the windows in place:
So, the problem remains. Sunlight enters the apartment not only through the windows, but also through the top. Look at the right wall in the bathroom. How can it be lit by sunlight? No So you need to apply another trick. We will cover the apartment from above with a ceiling that will repeat the shape of the floor, but will have special attributes that make the object invisible, but allow it to cast a shadow:
print $povray->povDefCeiling($root); print $povray->povSceneCeiling($root); Special effects
POV-Ray has a powerful arsenal of effects that can be used in rendering - from simple lighting models (ambient / diffuse / specular) to physical modeling of the behavior of light rays in materials. For example, having described a prism , it is possible to achieve that in it white light is decomposed into a spectrum:
We need the minimum functionality - to make the windows transparent and mirrors reflective. The descriptions of the materials used in Planner 5D do not contain information about the reflectivity of the mirrors and the transparency of the glass on the windows. To solve the problem, use the hack and override the materialTransparency method of Planner5D :: Model :: Window:
sub materialTransparency { my $self = shift; my $modelMat = shift; my $overrideMat = shift; # Hack. Forced transparency for glass return 0.8 if $overrideMat->{name} eq 'color_1'; return Planner5D::Model::Ns::materialTransparency($modelMat, $overrideMat); } Make a similar hack for the reflectivity of mirrors:
sub materialReflection { my $self = shift; my $modelMat = shift; my $overrideMat = shift; # Hack. Mirror reflection if ($self->{id} == 239 && $modelMat->{DbgIndex} == 1) { return 0.9; } if ($self->{id} == 144 && $modelMat->{DbgIndex} == 0) { return 0.9; } return 0; } The method of identifying objects and materials in them is extremely barbaric. Let's hope that the Planner 5D authors will give human names to the materials so that you can identify the glasses by the presence of the string “glass” in the name of the material, and the mirrors by the string “mirror”. But so far only.
Let's try to change the angle and look in the mirror. By default, the povCamera method creates a camera that looks into the center of an apartment from somewhere above. You can pass to it two optional arguments with camera coordinates and look_at points relative to the center of the apartment. The center is the geometric center of the bounding box of the entire project, lowered to the ground level. X, Y - coordinates on the ground plane, Z - height above the ground. All dimensions are in centimeters:
print $povray->povCamera($root, [300, -500, 200], [300, -200, 0]); If you need to change some particular model, for example, to correct the visualization of an object directly in the data, you can directly correct the data / pov / mesh- <id> .pov file responsible for the desired object. If the pov file exists, it will not be automatically regenerated, and your changes will remain intact. Another wish for Planner 5D developers is to export object names in a machine-readable format. Search for them by identifiers is very inconvenient.
Source codes
The library is distributed under the BSD license. You can download it here: https://github.com/amlinux/planner5d-parser . I hope it will help those who lacked the tools for fast and convenient visualization of apartments and houses. Enjoy using.
Source: https://habr.com/ru/post/152135/
All Articles