Breaking the BIOS: Enable VT-x Virtualization Support on Acer Aspire One Netbook
In this article, we will tell you step by step on how to file your netbook or laptop with a file in which, for some misunderstanding, bit 2 in MSR 0x3A is off and locked in that state - you simply have virtualization support in the processor, but blocked by bios.
WARNING: everything described in this article is designed for what you know what you are doing. All at your own risk! If you are not sure, do not try this at home.
The problem that we will solve for the end user of the computer looks like this: When using the second type of hypervisor (for example, VirtualBox)
')
Here is the message you can see when trying to start a virtual with a number of processors greater than 1:
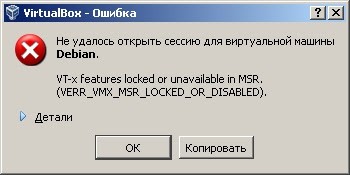
You also get a similar error message if you are going to run a 64-bit virtual machine (for example, Debian amd64) from a 32-bit host of an OS, for example WinXP.
This question can be answered by checking some bits in some processor state words. The easiest way to make sure that in your case the problem is treated is to look at what the SecurAble program shows . In my case, it looked like this:
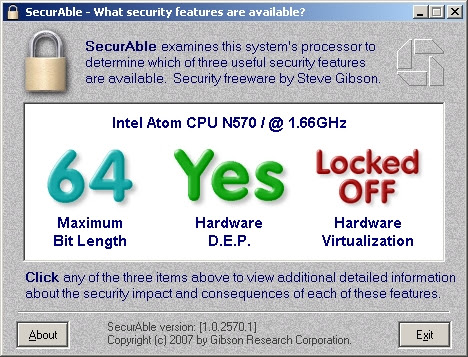
So, if you have a program showing the same picture as shown above, then you can cure this problem. However, the caveat is that it is possible to set the desired bit in the processor register only in BIOS, because the harmful BIOS of your laptop puts it at zero, then turns on the blocking bit and changing this bit is no longer possible (before rebooting the computer, where the BIOS is during POST again throw it off and zalochit).
The bios on the Insyde Acer Aspire netbook, its settings are very scarce and, of course, we cannot go into the BIOS settings editing program and enable virtualization there. That would be too easy.
Therefore, we will disassemble the BIOS and change its code so that we have the bit set to 1. If we are ready, then read on.
So, some technical information - to understand what we are doing and why.
Modern processors, at least many of them, have virtualization support. It is answered for by bit №5 in the word ECX when calling the CPUID command with the parameter EAX = 01H. This method of verification is the only correct one, since, as practice shows, the Intel website is lying, for example, for my Intel Atom N570 processor . This link is written:
However, we know that this is not true. For those who are on “you” with assembly language programming, it will not be difficult to find out by writing something like
I was too lazy to do this, so I downloaded the CPUID Explorer open source program, launched it and looked at the result. By the way, CPU-Z is not suitable here - it gives the result too “user friendly” - we also needed to know the exact value of the bit. Here is how it looked in my case:

The VMX bit of interest is circled in a circle. It is set to 1, it is, despite the fact that the Intel site tells us.
The processor instruction documentation on page 215 tells us about the CPUID command that
But that is not all. In order for the second type of hypervisors to use virtualization support commands (VMX), you must explicitly enable these instructions in the MSR (special processor register) number 0x3A. Here is what the documentation for this register tells us on page 237:
register 3Ah: IA32_FEATURE_CONTROL
Bit 0: lock bit - if it is set, then further modifications of this register are not allowed until the next reboot.
Bit 1: VMX in SMX - safer mode extensions. The virtualization functions in SMX are allowed only when the processor supports SMX - this is indicated in the adjacent left, 6th bit in ECX when calling the CPUID.01H command - in the picture above this bit is zero, our Atm N570 processor does not support SMX - therefore and in MSR 0x3A bit number 1 must be zero.
Bit 2: VMX is not in SMX - this, in fact, is the bit responsible for supporting virtualization. It corresponds to the circled bit in CPUID and it should be set to 1.
To make sure that we all understand our computer correctly, we need to look at what is actually stored in MSR 0x3A. For this, I used the msr-tools package in Debian (real, not virtual. In virtual, the result is incorrect). This is how you can check the value of this bit:
- rebuild in Debian, then:
Nine!!! Nine is 00001001. As you can see, our BIOS uses the undocumented bit number 3 in the special word of the register 0x3A - according to the documentation, this bit is Reserved. But that is not the point. The bottom line is that we have the lock bit turned on and our VMX bit 2 is off - so that's right, the SecurAble program is not lying and we really have virtualization support disabled at the BIOS level, although it is supported by the processor.
We will rule it.
The fact is that with virtualization support (VMX) disabled in the processor word 0x3A, your virtual machines in VirtualBox work in para-virtualization mode. Not being able to translate the hypervisor in VMX Root and the virtual machine in VMX Non-root operation, they are forced to translate processor instructions ON FLY. The problem is represented by 17 processor instructions that are not “VM-safe”, i.e. they use the only registers or data blocks (tables) in the processor for the entire computer. These commands are SGDT, SIDT, SLDT, SMSW, PUSHF / POPF, LAR, LSL, VERR / VERW, CALL, JMP, INT n, INTO, RET, STR and even the banal MOV! All these instructions are changed on the fly so that the virtual machine executes them in a system-safe manner. More about this problem is described here (eng.). Because of this, the performance of the virtual machine suffers.
For this task we need the following things:
To begin with, it is very important to know that if something goes wrong, then how to restore the computer. For my laptop with the InsydeH20 BIOS, there is an undocumented BIOS recovery procedure:
And voila, the motherboard itself (as a riddle) will download a new BIOS from the USB HDD and flash it in 1 minute, then the laptop will reboot.
I checked this method, in this way the standard BIOS from the manufacturer’s site (a different version than I’ve been to before) is working - indeed, it works, the BIOS version has been updated.
In the same way, I decided to eventually upload the bios to the system as well.
So, we begin:
Unpacking the BIOS from the SFX archive downloaded from the manufacturer’s website. Jos itself will have a file name of something like
Next we need to unpack the BIOS, because it is compressed. To do this, use the program PhoenixTool.exe. In the first field in its window we specify this compressed BIOS, and the program decompiles it itself, in my case, as many as 609 source files having names in the format GUID.ext. Some of these files are configuration files, and some are binary, but all with the ROM extension. Some binaries contain programs with a standard Windows PE header.
Our task is to find among the 609 files a file containing the instruction we need.
it turned out that looking for the MOV EAX, 3AH command before the WRMSR command is meaningless - in my BIOS, the WRMSR is framed as a separate function and takes parameters via the stack. Therefore, I did it this way (it seemed to me easier, in IDA): I installed the nasm package on Linux, which includes ndisasm. Then disassemble all * .ROM files with the command
And then with a simple search I found the
This code was found only in one file named 62D171CB-78CD-4480-8678-C6A2A797A8DE.MOD, and this code looked like this (after some of my work on renaming functions into more understandable, and adding a couple of comments):
By definition, the code that locks a register does it once. Therefore, this is the most successful place to make our hack: we change the number 1 to the number 5 in the instructions:
This will lead to the fact that simultaneously with setting the lock bit we set the VMX bit (bit # 2). Note here that we do not have the right to set bit # 1, because the SMX instruction set in our processor is not supported (it says CPUID.1H: ECX bit 6.
We will change not quite in the * .ROM file, but in the * .MOD braid that contains this file. To do this, in the PhoenixTool.exe program, which is already open and the BIOS is already loaded into it, click on the Structure button, and find the branch with our file name:
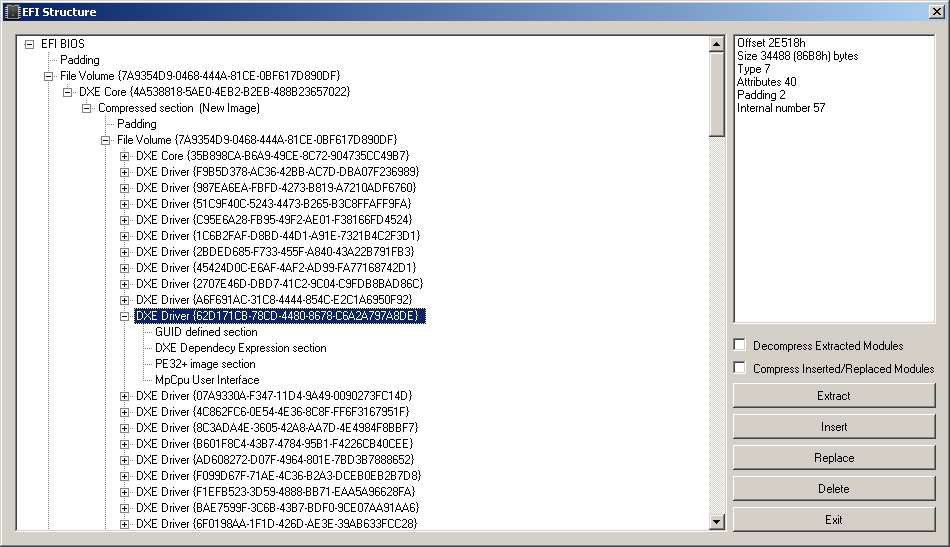
Press the Extract button, we get the * .MOD file (which consists of the header + body of the * .ROM file), and we rule our bit in this MOD file. We look at IDA, which binary code corresponds to the neighborhood of the instruction that we change, and in the HEX editor, open the file, look for this place in the code, and change only 1 byte from 01 to 05. Save the modified * .MOD file. Then in PhoenixTool, click Replace, select the modified MOD, and click Exit. Everything. The program itself reassembled the BIOS and packed it for us, while calling it with the same name as it was (the old file was saved with the OLD extension).
Everything. Now we are uploading a single file with a new BIOS to a USB HDD (it can be on a USB flash drive), and we are performing the above-described procedure for emergency BIOS recovery. She will flash the computer with this new bios and everything will be ready.
Here is what the output of the SecurAble program now looks like:
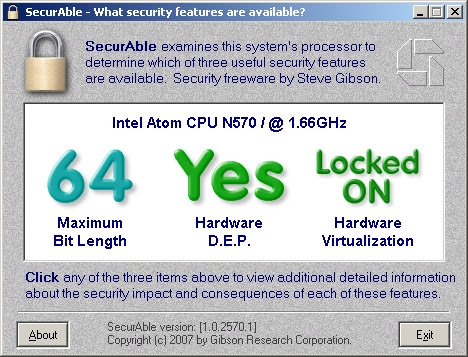
Now VirtualBox starts virtuals with 4 cores (and not with one, as it was before). Now I can run 64-bit operating systems in virtual machines from under my main 32-bit operating system.
And, most importantly, now virtuals are actually virtualized (the hypervisor uses VMX instructions), and not paravirtualized ones.
PS In the bios of other manufacturers (not Insyde), it is possible to edit not the BIOS itself, but only its settings, extracted by the SYMCMOS.EXE program. There, the process is the same, except that in the disassembled BIOS there is a setting number that is used to disable or enable VMX, and then this setting is corrected directly in the BIOS CMOS. In my own BIOS, there are no such settings, or the symcmos program does not find them, so this way of finishing the file does not work in my case. The path of the BIOS direct hack looks more reliable: in this way we simply ignore any BIOS settings, simply set the VMX bit and reset the 0x3A register after that.
There is happiness :) Thank you for reading to the end.
WARNING: everything described in this article is designed for what you know what you are doing. All at your own risk! If you are not sure, do not try this at home.
So what is the problem?
The problem that we will solve for the end user of the computer looks like this: When using the second type of hypervisor (for example, VirtualBox)
- you cannot run virtuals with more than one processor
- you cannot run 64-bit guest operating systems inside a 32-bit host OS.
')
Here is the message you can see when trying to start a virtual with a number of processors greater than 1:
You also get a similar error message if you are going to run a 64-bit virtual machine (for example, Debian amd64) from a 32-bit host of an OS, for example WinXP.
Is it possible to cure it?
This question can be answered by checking some bits in some processor state words. The easiest way to make sure that in your case the problem is treated is to look at what the SecurAble program shows . In my case, it looked like this:
So, if you have a program showing the same picture as shown above, then you can cure this problem. However, the caveat is that it is possible to set the desired bit in the processor register only in BIOS, because the harmful BIOS of your laptop puts it at zero, then turns on the blocking bit and changing this bit is no longer possible (before rebooting the computer, where the BIOS is during POST again throw it off and zalochit).
The bios on the Insyde Acer Aspire netbook, its settings are very scarce and, of course, we cannot go into the BIOS settings editing program and enable virtualization there. That would be too easy.
Therefore, we will disassemble the BIOS and change its code so that we have the bit set to 1. If we are ready, then read on.
What you need to know before starting work
So, some technical information - to understand what we are doing and why.
Modern processors, at least many of them, have virtualization support. It is answered for by bit №5 in the word ECX when calling the CPUID command with the parameter EAX = 01H. This method of verification is the only correct one, since, as practice shows, the Intel website is lying, for example, for my Intel Atom N570 processor . This link is written:
Intel® Virtualization Technology (VT-x) No However, we know that this is not true. For those who are on “you” with assembly language programming, it will not be difficult to find out by writing something like
MOV EAX, 1 CPUID and then check the 5th bit of the ECX register.I was too lazy to do this, so I downloaded the CPUID Explorer open source program, launched it and looked at the result. By the way, CPU-Z is not suitable here - it gives the result too “user friendly” - we also needed to know the exact value of the bit. Here is how it looked in my case:
The VMX bit of interest is circled in a circle. It is set to 1, it is, despite the fact that the Intel site tells us.
The processor instruction documentation on page 215 tells us about the CPUID command that
Bit #5 VMX Virtual Machine Extensions. A value of 1 indicates that the processor supports this technology
But that is not all. In order for the second type of hypervisors to use virtualization support commands (VMX), you must explicitly enable these instructions in the MSR (special processor register) number 0x3A. Here is what the documentation for this register tells us on page 237:
register 3Ah: IA32_FEATURE_CONTROL
Bit 0: lock bit - if it is set, then further modifications of this register are not allowed until the next reboot.
Bit 1: VMX in SMX - safer mode extensions. The virtualization functions in SMX are allowed only when the processor supports SMX - this is indicated in the adjacent left, 6th bit in ECX when calling the CPUID.01H command - in the picture above this bit is zero, our Atm N570 processor does not support SMX - therefore and in MSR 0x3A bit number 1 must be zero.
Bit 2: VMX is not in SMX - this, in fact, is the bit responsible for supporting virtualization. It corresponds to the circled bit in CPUID and it should be set to 1.
How to check the contents of MSR 0x3A
To make sure that we all understand our computer correctly, we need to look at what is actually stored in MSR 0x3A. For this, I used the msr-tools package in Debian (real, not virtual. In virtual, the result is incorrect). This is how you can check the value of this bit:
- rebuild in Debian, then:
# apt-get install msr-tools # modprobe msr # rdmsr 0x3A 9 Nine!!! Nine is 00001001. As you can see, our BIOS uses the undocumented bit number 3 in the special word of the register 0x3A - according to the documentation, this bit is Reserved. But that is not the point. The bottom line is that we have the lock bit turned on and our VMX bit 2 is off - so that's right, the SecurAble program is not lying and we really have virtualization support disabled at the BIOS level, although it is supported by the processor.
We will rule it.
Why this problem needs to be solved
The fact is that with virtualization support (VMX) disabled in the processor word 0x3A, your virtual machines in VirtualBox work in para-virtualization mode. Not being able to translate the hypervisor in VMX Root and the virtual machine in VMX Non-root operation, they are forced to translate processor instructions ON FLY. The problem is represented by 17 processor instructions that are not “VM-safe”, i.e. they use the only registers or data blocks (tables) in the processor for the entire computer. These commands are SGDT, SIDT, SLDT, SMSW, PUSHF / POPF, LAR, LSL, VERR / VERW, CALL, JMP, INT n, INTO, RET, STR and even the banal MOV! All these instructions are changed on the fly so that the virtual machine executes them in a system-safe manner. More about this problem is described here (eng.). Because of this, the performance of the virtual machine suffers.
What we need
For this task we need the following things:
- Original BIOS for our netbook from the manufacturer’s website.
- IDA
- phoenixtool210.zip (google knows where to download)
- HHD Hex Editor Neo or any other HEX Editor
- FAR Manager :)
- nasm - to disassemble
- Knowing how to flush the BIOS in emergency mode
To begin with, it is very important to know that if something goes wrong, then how to restore the computer. For my laptop with the InsydeH20 BIOS, there is an undocumented BIOS recovery procedure:
- Format USB HDD in FAT16 with a mega partition on 100 (FAT32 does not understand)
- upload one file with compressed bios there (ZE6.fd in my case)
- turn off the laptop, then remove all USB devices and battery
- unplug the power cord
- connect USB HDD
- press and hold Esc + Fn
- plug in power and after 5 seconds press the power button
- release the keyboard buttons
And voila, the motherboard itself (as a riddle) will download a new BIOS from the USB HDD and flash it in 1 minute, then the laptop will reboot.
I checked this method, in this way the standard BIOS from the manufacturer’s site (a different version than I’ve been to before) is working - indeed, it works, the BIOS version has been updated.
In the same way, I decided to eventually upload the bios to the system as well.
So, we begin:
Unpacking the BIOS from the SFX archive downloaded from the manufacturer’s website. Jos itself will have a file name of something like
ZE6.fd and have a size of 2 megabytes exactly.Next we need to unpack the BIOS, because it is compressed. To do this, use the program PhoenixTool.exe. In the first field in its window we specify this compressed BIOS, and the program decompiles it itself, in my case, as many as 609 source files having names in the format GUID.ext. Some of these files are configuration files, and some are binary, but all with the ROM extension. Some binaries contain programs with a standard Windows PE header.
Our task is to find among the 609 files a file containing the instruction we need.
WRMSR it turned out that looking for the MOV EAX, 3AH command before the WRMSR command is meaningless - in my BIOS, the WRMSR is framed as a separate function and takes parameters via the stack. Therefore, I did it this way (it seemed to me easier, in IDA): I installed the nasm package on Linux, which includes ndisasm. Then disassemble all * .ROM files with the command
ndisasm -b 32 file.rom > file.asm And then with a simple search I found the
wrmsr command in them - there were 29 such files. Then I had to load each of them into IDA and look for the necessary code there that locks the 3AH register.This code was found only in one file named 62D171CB-78CD-4480-8678-C6A2A797A8DE.MOD, and this code looked like this (after some of my work on renaming functions into more understandable, and adding a couple of comments):
LOCK_VMX proc near push esi push 3Ah call ReadMSR pop ecx mov ecx, eax xor esi, esi and ecx, 1 or ecx, esi pop esi jnz short exitprc ; if(ReadMSR() & 1) goto exitprc; push edx or eax, 1 ; Set lock bit (bit #0) push eax push 3Ah call WriteMSR add esp, 0Ch exitprc: retn LOCK_VMX endp By definition, the code that locks a register does it once. Therefore, this is the most successful place to make our hack: we change the number 1 to the number 5 in the instructions:
or eax, 1 This will lead to the fact that simultaneously with setting the lock bit we set the VMX bit (bit # 2). Note here that we do not have the right to set bit # 1, because the SMX instruction set in our processor is not supported (it says CPUID.1H: ECX bit 6.
We will change not quite in the * .ROM file, but in the * .MOD braid that contains this file. To do this, in the PhoenixTool.exe program, which is already open and the BIOS is already loaded into it, click on the Structure button, and find the branch with our file name:
Press the Extract button, we get the * .MOD file (which consists of the header + body of the * .ROM file), and we rule our bit in this MOD file. We look at IDA, which binary code corresponds to the neighborhood of the instruction that we change, and in the HEX editor, open the file, look for this place in the code, and change only 1 byte from 01 to 05. Save the modified * .MOD file. Then in PhoenixTool, click Replace, select the modified MOD, and click Exit. Everything. The program itself reassembled the BIOS and packed it for us, while calling it with the same name as it was (the old file was saved with the OLD extension).
Everything. Now we are uploading a single file with a new BIOS to a USB HDD (it can be on a USB flash drive), and we are performing the above-described procedure for emergency BIOS recovery. She will flash the computer with this new bios and everything will be ready.
Here is what the output of the SecurAble program now looks like:
Now VirtualBox starts virtuals with 4 cores (and not with one, as it was before). Now I can run 64-bit operating systems in virtual machines from under my main 32-bit operating system.
And, most importantly, now virtuals are actually virtualized (the hypervisor uses VMX instructions), and not paravirtualized ones.
PS In the bios of other manufacturers (not Insyde), it is possible to edit not the BIOS itself, but only its settings, extracted by the SYMCMOS.EXE program. There, the process is the same, except that in the disassembled BIOS there is a setting number that is used to disable or enable VMX, and then this setting is corrected directly in the BIOS CMOS. In my own BIOS, there are no such settings, or the symcmos program does not find them, so this way of finishing the file does not work in my case. The path of the BIOS direct hack looks more reliable: in this way we simply ignore any BIOS settings, simply set the VMX bit and reset the 0x3A register after that.
There is happiness :) Thank you for reading to the end.
Source: https://habr.com/ru/post/152056/
All Articles