Prism and user interaction requests
In the Prism guide, you can find a small reference to how to handle a user interaction request using the InteractionRequest class. Let me remind you what it was about:
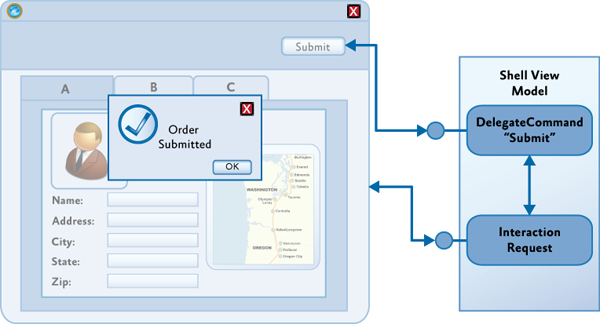
One approach to implementing user interaction using the MVVM pattern is to allow the view model to send a request for interaction directly to the view. This can be done using the interaction request object (interaction request), coupled with the behavior in the view. The request object contains the details of the interaction request, as well as the callback delegate invoked when the dialog is closed. Also, this object contains an event indicating the start of the interaction. A submission subscribes to this event to receive the command to start user interaction. A view usually contains the appearance of a given interaction and behavior (behavior), which is associated with the request object provided by the view model.
')
The data approach provides a simple, but fairly flexible mechanism that preserves the division of responsibility between the presentation model and the presentation. This allows the view model to encapsulate the interaction logic, while the view contains only visual aspects. The interaction logic, which is located in the presentation model, can be easily tested, and the user interface designers can fully concentrate on the appearance of the interaction.
The approach based on the interaction query agrees well with the MVVM template and allows the view to display state changes of the view model. Also, using two-way data binding, you can achieve data transfer from the user to the view model and vice versa. All this is very similar to the
The Prism library directly supports this template using the
The
Prism provides predefined context classes that support common interaction scenarios. The
The
To use the
Since the interaction request object defines only the interaction logic, everything else must be specified in the view. For this, behaviors are often used, which allows the designer to select the desired behaviors and associate it with the interaction request object in the view model.
The presentation must respond to the event of the beginning of the interaction and provide a suitable appearance for it. The Microsoft Expression Blend Behaviors Framework supports the concept of triggers and actions. Triggers are used to initiate actions whenever a corresponding event occurs.
The standard
After the event occurs, the
The following example shows how, using
When a user interacts with a pop-up window, the context object is updated according to the bindings defined in the pop-up window, or in the data template used to display the contents of the
To support other interaction mechanisms, other triggers and actions can be defined. The implementation of the
By default, the Prism library does not provide any action class for WPF that shows a popup window, or something like that. I will try to correct this omission.
To begin with, we will create the main window blank with the view model.
The view model is created directly in XAML. It contains the interaction request property and the command property that initiates this request.
As you can see, when the button is pressed, the
This class is inherited from the
As a result, we get the following pop-up window:

In the WPF primitive library, there is a wonderful Popup class, which is a pop-up window with content. We will act as follows: when attaching an action, we will create a popup and store it in a private field in a closed state. This popup must be added to the root element of the main window. To do this, check whether the class derived from the
In MainWindows, change the action declaration:
Now the message template will be taken from the resources. Since the action is attached before the resource library of the main window is initialized, the template declaration must be placed in
To close a message, you need to find the

This is the simple way to organize user interaction, with a full division of responsibility between the view and the view model.
Archive with the project.
Link to post in my blog.
Using Interaction Request Objects
One approach to implementing user interaction using the MVVM pattern is to allow the view model to send a request for interaction directly to the view. This can be done using the interaction request object (interaction request), coupled with the behavior in the view. The request object contains the details of the interaction request, as well as the callback delegate invoked when the dialog is closed. Also, this object contains an event indicating the start of the interaction. A submission subscribes to this event to receive the command to start user interaction. A view usually contains the appearance of a given interaction and behavior (behavior), which is associated with the request object provided by the view model.
')
The data approach provides a simple, but fairly flexible mechanism that preserves the division of responsibility between the presentation model and the presentation. This allows the view model to encapsulate the interaction logic, while the view contains only visual aspects. The interaction logic, which is located in the presentation model, can be easily tested, and the user interface designers can fully concentrate on the appearance of the interaction.
The approach based on the interaction query agrees well with the MVVM template and allows the view to display state changes of the view model. Also, using two-way data binding, you can achieve data transfer from the user to the view model and vice versa. All this is very similar to the
DelegateCommand object and the InvokeCommandBehavior behavior.The Prism library directly supports this template using the
IInteractionRequest interface and the InteractionRequest<T> class. The IInteractionRequest interface defines an interaction start event. The behavior in the view is associated with this interface and subscribes to this event. The InteractionRequest<T> class implements the IInteractionRequest interface and defines two Raise methods for initiating interaction and setting the request context, and also, if desired, a callback delegate.Initiation of interaction from the view model
The
InteractionRequest<T> class coordinates the interaction of the view model with the view during the interaction request. The Raise method allows the view model to initiate an interaction and define a context object (of type T ) and a callback delegate that is called when the interaction ends. The context object allows the view model to transfer data and state to the view, for use during user interaction. If a callback delegate is defined, then the context object will be passed back to the view model during its call. This allows you to send back any changes that occurred during the interaction. public interface IInteractionRequest { event EventHandler<InteractionRequestedEventArgs> Raised; } public class InteractionRequest<T> : IInteractionRequest { public event EventHandler<InteractionRequestedEventArgs> Raised; public void Raise(T context, Action<T> callback) { var handler = this.Raised; if (handler != null) { handler( this, new InteractionRequestedEventArgs( context, () => callback(context))); } } } Prism provides predefined context classes that support common interaction scenarios. The
Notification class is the base class for all context objects. It is used when the interaction request must inform the user about any event that occurred in the application. It provides two properties - Title and Content . Usually, this message is one-way, that is, it is assumed that the user will not change the context values during the interaction.The
Confirmation class is inherited from the Notification class and adds a third property — Confirmed — used to determine whether the user has confirmed the operation or canceled it. The Confirmation class is used to perform the MessageBox style interaction, in which you need to get a yes / no response from the user. You can define your own context class, inherited from the Notification class, to store the data and states necessary for the interaction.To use the
InteractionRequest<T> class, the view model must create an instance of this class and set a read-only property to allow the view to bind to this property. public IInteractionRequest ConfirmCancelInteractionRequest { get { return this.confirmCancelInteractionRequest; } } this.confirmCancelInteractionRequest.Raise( new Confirmation("Are you sure you wish to cancel?"), confirmation => { if (confirmation.Confirmed) { this.NavigateToQuestionnaireList(); } }); } Using behavior to set the visual appearance of the interaction
Since the interaction request object defines only the interaction logic, everything else must be specified in the view. For this, behaviors are often used, which allows the designer to select the desired behaviors and associate it with the interaction request object in the view model.
The presentation must respond to the event of the beginning of the interaction and provide a suitable appearance for it. The Microsoft Expression Blend Behaviors Framework supports the concept of triggers and actions. Triggers are used to initiate actions whenever a corresponding event occurs.
The standard
EventTrigger provided by Expression Blend can be used to track the events of the start of an interaction, by associating it with an interaction request object defined in the presentation model. However, the Prism library contains its own EventTrigger , called the InteractionRequestTrigger , which automatically connects to the appropriate Raised IInteractionRequest .After the event occurs, the
InteractionRequestTrigger starts the actions specified in it. For Silverlight, the Prism library provides the PopupChildWindowAction class, which displays a pop-up window to the user. After the child window is displayed, its DataContext set to the context parameter specified in the request object. Using the ContentTemplate property, you can define a data template that is used to display the passed context. The title of the popup window is associated with the Title property of the context object.The following example shows how, using
InteractionRequestTrigger and PopupChildWindowAction , to display a pop-up window for receiving confirmation from the user. <i:Interaction.Triggers> <prism:InteractionRequestTrigger SourceObject="{Binding ConfirmCancelInteractionRequest}"> <prism:PopupChildWindowAction ContentTemplate="{StaticResource ConfirmWindowTemplate}"/> </prism:InteractionRequestTrigger> </i:Interaction.Triggers> <UserControl.Resources> <DataTemplate x:Key="ConfirmWindowTemplate"> <Grid MinWidth="250" MinHeight="100"> <TextBlock TextWrapping="Wrap" Grid.Row="0" Text="{Binding}"/> </Grid> </DataTemplate> </UserControl.Resources> When a user interacts with a pop-up window, the context object is updated according to the bindings defined in the pop-up window, or in the data template used to display the contents of the
Content property of the context object. After the pop-up window is closed, the context object is passed back to the view model via the callback method, saving all user-modified data. In this example, the Confirmed property is set to true if the user clicks the OK button.To support other interaction mechanisms, other triggers and actions can be defined. The implementation of the
InteractionRequestTrigger and PopupChildWindowAction classes can be used as a base for writing your own triggers and actions.Creating your own popup implementation
By default, the Prism library does not provide any action class for WPF that shows a popup window, or something like that. I will try to correct this omission.
Simple implementation as a child window
To begin with, we will create the main window blank with the view model.
<Window xmlns="http://schemas.microsoft.com/winfx/2006/xaml/presentation" xmlns:x="http://schemas.microsoft.com/winfx/2006/xaml" xmlns:i="http://schemas.microsoft.com/expression/2010/interactivity" xmlns:localInter="clr-namespace:PrismNotifications.Notifications" xmlns:inter="clr-namespace:Microsoft.Practices.Prism.Interactivity.InteractionRequest;assembly=Microsoft.Practices.Prism.Interactivity" xmlns:local="clr-namespace:PrismNotifications" x:Class="PrismNotifications.MainWindow" Title="MainWindow" Height="350" Width="525"> <Window.DataContext> <local:MainWindowsViewModel /> </Window.DataContext> <Grid> <Grid.RowDefinitions> <RowDefinition /> <RowDefinition Height="Auto" /> </Grid.RowDefinitions> <i:Interaction.Triggers> <inter:InteractionRequestTrigger SourceObject="{Binding ShowNotificationInteractionRequest}"> <localInter:ShowChildWindowsAction> <DataTemplate DataType="{x:Type inter:Notification}"> <Grid Width="200" Height="150"> <TextBlock Text="{Binding Content}" /> </Grid> </DataTemplate> </localInter:ShowChildWindowsAction> </inter:InteractionRequestTrigger> </i:Interaction.Triggers> <StackPanel HorizontalAlignment="Right" Margin="10" Grid.Row="1"> <Button Command="{Binding ShowNotificationCommand}"> Show notificaiton windows </Button> </StackPanel> </Grid> </Window> The view model is created directly in XAML. It contains the interaction request property and the command property that initiates this request.
using Microsoft.Practices.Prism.Commands; using Microsoft.Practices.Prism.Interactivity.InteractionRequest; using Microsoft.Practices.Prism.ViewModel; namespace PrismNotifications { /// <summary> /// . /// </summary> public class MainWindowsViewModel : NotificationObject { public MainWindowsViewModel() { ShowNotificationInteractionRequest = new InteractionRequest<Notification>(); ShowNotificationCommand = new DelegateCommand( () => ShowNotificationInteractionRequest.Raise( new Notification { Title = "", Content = "." })); } /// <summary> /// . /// </summary> public InteractionRequest<Notification> ShowNotificationInteractionRequest { get; private set; } /// <summary> /// , <see cref="ShowNotificationInteractionRequest"/>. /// </summary> public DelegateCommand ShowNotificationCommand { get; private set; } } } As you can see, when the button is pressed, the
Raise method is called, to which an instance of the Notification class is passed, with the specified Title and Content properties. The Grid element contains the InteractionRequestTrigger trigger, which is associated with the ShowNotificationInteractionRequest property, which is an interaction request. Inside the trigger is placed the ShowChildWindowsAction action, in which the data template is specified. using System.Windows; using System.Windows.Interactivity; using System.Windows.Markup; using Microsoft.Practices.Prism.Interactivity.InteractionRequest; namespace PrismNotifications.Notifications { /// <summary> /// . /// </summary> [ContentProperty("ContentDataTemplate")] public class ShowChildWindowsAction : TriggerAction<UIElement> { /// <summary> /// , . /// </summary> public DataTemplate ContentDataTemplate { get; set; } protected override void Invoke(object parameter) { var args = (InteractionRequestedEventArgs) parameter; } } } This class is inherited from the
TriggerAction<T> class, where T is the type of the object to which the trigger joins. Using the ContentPropertyAttribute attribute, ContentPropertyAttribute indicate that the ContentDataTemplate property will be a content property. When an interaction request occurs, the Invoke method will be called, in which a parameter of the InteractionRequestedEventArgs type containing the context and the callback delegate will be passed. Let's make it so that when this method is called, a child window is displayed with the header defined in the args.Context.Title property and the content specified in the args.Context property. Also, you need to remember to call the callback method (if specified) when closing the window. protected override void Invoke(object parameter) { var args = (InteractionRequestedEventArgs) parameter; // , , . Window parentWindows = Window.GetWindow(AssociatedObject); // , . var childWindows = new Window { Owner = parentWindows, WindowStyle = WindowStyle.ToolWindow, SizeToContent = SizeToContent.WidthAndHeight, WindowStartupLocation = WindowStartupLocation.CenterOwner, Title = args.Context.Title, Content = args.Context, ContentTemplate = ContentDataTemplate, }; // . childWindows.Closed += (sender, eventArgs) => { if (args.Callback != null) { args.Callback(); } }; // . childWindows.ShowDialog(); } As a result, we get the following pop-up window:
Using the class popup.
In the WPF primitive library, there is a wonderful Popup class, which is a pop-up window with content. We will act as follows: when attaching an action, we will create a popup and store it in a private field in a closed state. This popup must be added to the root element of the main window. To do this, check whether the class derived from the
Panel is the root element and, if so, add a popup to the collection of its children. If not, we will create a new Grid and replace the root element with it, adding the existing one to its collection of elements. When you open the popup, we will block the contents of the window, and when you close it, unblock and call the delegate of the callback. When you move a window, the default popup does not move with it, so you must manually force it to update its location. When creating a popup, you can set its property PopupAnimation = PopupAnimation.Fade and AllowsTransparency = true , for its smooth appearance and disappearance. using System; using System.Windows; using System.Windows.Controls; using System.Windows.Controls.Primitives; using System.Windows.Interactivity; using System.Windows.Markup; using Microsoft.Practices.Prism.Interactivity.InteractionRequest; namespace PrismNotifications.Notifications { /// <summary> /// . /// </summary> [ContentProperty("ContentDataTemplate")] public class ShowPopupAction : TriggerAction<UIElement> { private Action _callback; private Popup _popup; private ContentControl _popupContent; private Panel _root; /// <summary> /// , . /// </summary> public DataTemplate ContentDataTemplate { get; set; } protected override void OnAttached() { // . Window window = Window.GetWindow(AssociatedObject); if (window == null) { throw new NullReferenceException("Windows is null."); } // , Grid, // - . _root = window.Content as Panel; if (_root == null) { _root = new Grid(); _root.Children.Add((UIElement) window.Content); window.Content = _root; } // . _popupContent = new ContentControl { ContentTemplate = ContentDataTemplate, }; // , . _popup = new Popup { StaysOpen = true, PopupAnimation = PopupAnimation.Fade, AllowsTransparency = true, Placement = PlacementMode.Center, Child = _popupContent, }; _popup.Closed += PopupOnClosed; window.LocationChanged += (sender, a) => UpdatePopupLocation(); _root.Children.Add(_popup); } private void UpdatePopupLocation() { // , // . // . if (!_popup.IsOpen) { return; } const double delta = 0.1; _popup.HorizontalOffset += delta; _popup.HorizontalOffset -= delta; } private void PopupOnClosed(object sender, EventArgs eventArgs) { // . if (_callback != null) { _callback(); } _root.IsEnabled = true; } protected override void Invoke(object parameter) { var args = (InteractionRequestedEventArgs) parameter; _callback = args.Callback; _popupContent.Content = args.Context; // . _root.IsEnabled = false; _popup.IsOpen = true; } } } In MainWindows, change the action declaration:
<i:Interaction.Triggers> <inter:InteractionRequestTrigger SourceObject="{Binding ShowNotificationInteractionRequest}"> <localInter:ShowPopupAction ContentDataTemplate="{StaticResource popupTemplate}" /> </inter:InteractionRequestTrigger> </i:Interaction.Triggers> Now the message template will be taken from the resources. Since the action is attached before the resource library of the main window is initialized, the template declaration must be placed in
App.xaml . <Application xmlns="http://schemas.microsoft.com/winfx/2006/xaml/presentation" xmlns:x="http://schemas.microsoft.com/winfx/2006/xaml" xmlns:localInter="clr-namespace:Microsoft.Practices.Prism.Interactivity.InteractionRequest;assembly=Microsoft.Practices.Prism.Interactivity" xmlns:i="http://schemas.microsoft.com/expression/2010/interactivity" xmlns:ei="http://schemas.microsoft.com/expression/2010/interactions" x:Class="PrismNotifications.App" StartupUri="MainWindow.xaml"> <Application.Resources> <DataTemplate DataType="{x:Type localInter:Notification}" x:Key="popupTemplate"> <Border Width="200" Height="150" Background="{StaticResource {x:Static SystemColors.WindowBrushKey}}" BorderBrush="{StaticResource {x:Static SystemColors.WindowFrameBrushKey}}" BorderThickness="1" CornerRadius="2" Padding="5"> <Grid> <Grid.RowDefinitions> <RowDefinition Height="Auto" /> <RowDefinition Height="*" /> <RowDefinition Height="Auto" /> </Grid.RowDefinitions> <TextBlock Text="{Binding Content}" HorizontalAlignment="Center" VerticalAlignment="Center" Grid.Row="1" /> <Button Content="Close" HorizontalAlignment="Right" Grid.Row="2"> <i:Interaction.Triggers> <i:EventTrigger EventName="Click"> <ei:ChangePropertyAction TargetObject="{Binding RelativeSource={RelativeSource Mode=FindAncestor, AncestorType=Popup}}" PropertyName="IsOpen" Value="False" /> </i:EventTrigger> </i:Interaction.Triggers> </Button> <TextBlock HorizontalAlignment="Center" Text="{Binding Title}" /> </Grid> </Border> </DataTemplate> </Application.Resources> </Application> To close a message, you need to find the
Popup element tree and change its IsOpen property to false . This can be done using triggers and actions from the Expression Framework. As a result, we get a pop-up window of the following form:This is the simple way to organize user interaction, with a full division of responsibility between the view and the view model.
Archive with the project.
Link to post in my blog.
Source: https://habr.com/ru/post/152003/
All Articles