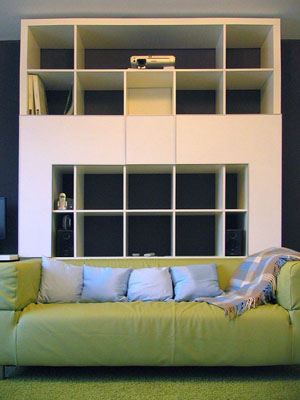
We assemble a computer rack
This post is about how to place more than a dozen electronic devices in a regular rack.
At the same time, everything looks neat, does not overheat, and a bonus comes with two multifunctional folding tables.

Now, in order of the stuffing rack.
0. L-shaped hinged doors / tables. Made of 10mm plywood, glued on both sides with 3mm white plexiglass. Butt finished with aluminum edge profile.
Plexiglas was bought in the construction market (sheet 6 sq. M.).
At first, 6 squares seemed to be a large stock, but while cutting L shaped pieces, several blanks cracked and there was no stock left.
The doors in the open position based on the armrests of the sofa. However, having assembled the entire structure, I realized that they were too flexible and nothing could be put on them. Tables sagged even under their own weight.
Therefore, a mechanism was developed to support the edge of the door, here it is:

It consists of a steel chain, which is fixed on the rack and edge of the door, and in the open state does not allow the door to bend.
The door maintains thus 5 - 10 kg, that is quite enough for plates, mugs, monitor, etc.
In order to close / raise the door, the chain does not hang out from the outside, it is attached to the fishing line, which is wound around the mechanism from the tape measure. The photo shows how the chain neatly folds when the door is raised.
In a vertical state, the door is held by a furniture magnet.
1. Old, but true, Dual Xeon with a TV tuner, which now basically serves as a media center and torrent client, but sometimes you can work and play it.

It is arranged as follows:
1.0. The computer is located in the central cell of the rack, which is internally laid with a centimeter layer of “foam” for sound insulation.
1.1. The motherboard is installed in a piece of the old case, from which all the excess is cut off by the grinder.
1.2., 1.3. Square tubes, made of cardboard packaging, are put on one end of the processor cooler, which, I recall, are two, and the other end of the tubes is inserted into the slot in the wall of the rack.
They remove all the heat from the processors to the next cell of the rack, preventing the entire computer from overheating.
1.4. Rack with Hardy, pulled out of the old building, located behind the cardboard tubes.
1.5. Power Supply. Embedded with one side into the wall of the rack, and the other rests on a rack with hard.
From the side of the neighboring cell, it looks like this:

The power supply cooler, as well as the processor cooler, draws air from the cell with the computer, from hot hards, preventing the temperature inside the computer from rising.
Since when the temperature inside the cell with a computer increases, the cooler starts working at higher speeds and creates extra noise that interferes with watching a movie.
The cell next to the computer, where all the hot air is diverted, is thus significantly heated, now it is 38 degrees, when in room 23. And this is when the computer is idling at the distribution of torrents.
When the hot water was turned off, in the evening I put several five-liter water bottles in the cell and in the morning she washed her perfectly, it was much more convenient than messing with kettles and pans.
True, they started to strain me a little on electricity costs, so I’m thinking about something more economical.
1.6. Ordinary dvd cutter, fit in the thread in the thread.
1.7. A hole in the top of the cell can be seen through which the “cold” air is sucked in / out to the computer. By the way, there is another cooler under it, which directs the air flow to the tuner, sound card and video card so that they do not overheat.
1.8. Kapka on / off. lonely perched on the edge of the hull.
1.9. The photo shows the edge of the door with hinges and two wiring - green and red, which are "stuck" in the door. In fact, these are power supply LEDs and hdd, which are glued in the holes that reach the middle of the outer layer of plexiglass and are visible from the outside of the rack with the door closed. This is not very necessary, but if you go into the room at night, then the rack winks at you with friendly lights.
')
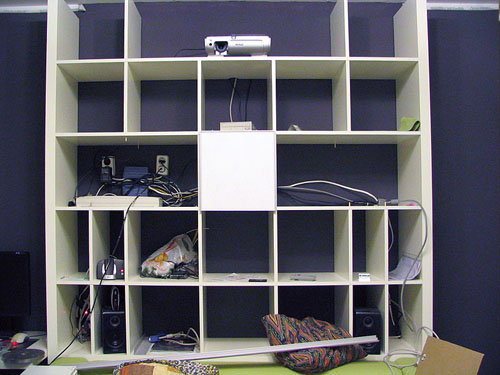
2. Monitor. I use it, if I need to work, then I take it out of the cell and put it on the folding table.
3. Speakers from the audio system. In fact, it is only the rear. Three more columns are located in front. Sub is located at the bottom right.
4. DECT Telephone and IP (SIP) telephone in one device.
5. TV decoder (IPTV set-top box), connected to the TV tuner in the computer.
6. Scanner.
7. If you need to wake up, the rack brews coffee.
8. Projector. Projects the image from the computer on the wall, opposite the rack, which is painted white. By the way, the black color of the back wall was not chosen randomly, but in order to reduce the amount of parasitic light falling on the “screen”. Basically, the projector is used for watching movies and TV, sometimes for work, as an additional monitor.
He really turned upside down, this is normal, allowed to save money on a special mount.
9. New Router. He breathes fresh air outside, next to him is a hole through which hot air comes out of the rack. The old Router lived inside the cell, above the scanner, at a temperature of 38-40 degrees and, apparently, therefore, his life was not long.
10. External hard drive near the router, because, at first, it was plugged into it, but it was sooooo slow. Now hard plug into the computer directly. When the rack was designed, I did not count on a quick increase in consumers of sockets in this cell and it did not have enough power, well, he reached the spare - to the right of the monitor.
11. In spite of all my efforts on the ventilation system, this whole filling (and there is also the wife’s equipment) generates so much heat that it can fry us until crisp in one series of “Dr. House”. I had to install the air conditioner, the remote control was higher, otherwise the overly curious son would eat it.
12. IR extension cable. He controls the IPTV set-top box, the signal from which goes to the computer, and from the computer not only to the monitor and the projector, but also to the monitor in the kitchen, where you can also watch movies, TV or check mail. In order to switch channels to the IPTV set-top box from the kitchen, an IR signal extender is used. Damn, well, I would have made the control of the console from the computer, I would switch the wireless mouse from any place, and this IR extension works through time, terribly uncomfortable. Well, at least, otherwise I would have had to run from room to room to switch channels.
In the kitchen, along with the video, there is also an audio cable from the zvukovuhi, since I have 7.1. 5.1 are used in the hall and 2.1 - in the kitchen.
13. To the heap, the IPTV set-top box is stuck in a separate switch (the cost of which is included in the rental of the set-top box). Of course, it would be possible to plug it into the router, but there you have to mess with the VLAN settings, and the ports there are all busy.
I write about it all so that you can imagine the amount of wires that the rack conceals in itself. By the way, a separate power wiring from the switchboard is connected to it (with a separate UZO / automatic switch, respect my neighbor for installing it). This whole pile is neatly laid into the baseboard with a triple cable channel, nowhere does nothing hang in the air, it does not lie on the floor. The eyeliner from a plinth in a rack also passes on boxes. The amount of work that we did then was fully appreciated with the advent of a child who lives quietly in an apartment, and we are not afraid that he will eat one wire or another.
Now, about how it all gathered.
First there were legs ...
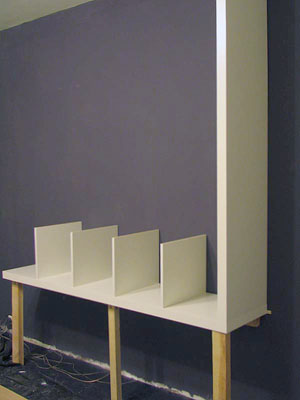
The base of the rack rests on three legs and on the rail, which is bolted to the wall. The empty rack weighs 95kg and it was decided to collect it already on the wall, because the two of us and my wife could not raise the 95kg and put it on our feet. It turned out that it was also very inconvenient to assemble a rack on the wall.
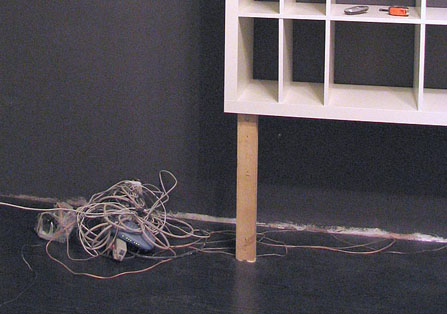
After a few hours of matyuganiy, the frame of the rack was assembled and stood on its feet. Under his feet lay a tangle of wires:
We start to unravel the tangle and try to assemble the computer and the basic systems of Internet provision.
Finally IT earned and you can check email:

In the photo you can see that the location of the company is different from what happened at the end, because you first had to collect it wrong, to understand that it overheats, use it and collect it on a new, just some kind of agile.
Finally, the “configuration” of the computer has settled down and we start to start wiring in the rack:
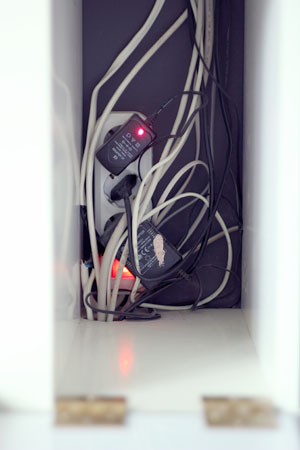
This is the “information entry” on the left side at the base of the rack. On the other hand, there are fewer wires - there is only audio wiring to the subwoofer and from it to the speakers.
Finally, the wiring and main devices are in place, almost everything is ready:
Notice how part of the walls of the rack was moved to form L-shaped shapes.
By the way, the photo shows the “Old router” of blue color, tucked between two sockets, just in the way of the hot air from the computer, he had only a few days to live.
It remains only to assemble the L-shaped doors and make the door under the rack:

Of course, the place under the shelving is also used, it’s a pity the sub didn’t fit there, I had to fill the place with other trash. In the photo you can see the "gas-lift", which holds the door open, not letting it bang you on the back, while you are trying to get or stick something under the rack with cancer.
Behind a plinth and a white vertical box posting to saba is placed and from it to columns.
Now everything is finished and looks like this:
But the horror that was before the appearance of the rack:

At the same time, everything looks neat, does not overheat, and a bonus comes with two multifunctional folding tables.
Now, in order of the stuffing rack.
0. L-shaped hinged doors / tables. Made of 10mm plywood, glued on both sides with 3mm white plexiglass. Butt finished with aluminum edge profile.
Plexiglas was bought in the construction market (sheet 6 sq. M.).
At first, 6 squares seemed to be a large stock, but while cutting L shaped pieces, several blanks cracked and there was no stock left.
The doors in the open position based on the armrests of the sofa. However, having assembled the entire structure, I realized that they were too flexible and nothing could be put on them. Tables sagged even under their own weight.
Therefore, a mechanism was developed to support the edge of the door, here it is:
It consists of a steel chain, which is fixed on the rack and edge of the door, and in the open state does not allow the door to bend.
The door maintains thus 5 - 10 kg, that is quite enough for plates, mugs, monitor, etc.
In order to close / raise the door, the chain does not hang out from the outside, it is attached to the fishing line, which is wound around the mechanism from the tape measure. The photo shows how the chain neatly folds when the door is raised.
In a vertical state, the door is held by a furniture magnet.
1. Old, but true, Dual Xeon with a TV tuner, which now basically serves as a media center and torrent client, but sometimes you can work and play it.
It is arranged as follows:
1.0. The computer is located in the central cell of the rack, which is internally laid with a centimeter layer of “foam” for sound insulation.
1.1. The motherboard is installed in a piece of the old case, from which all the excess is cut off by the grinder.
1.2., 1.3. Square tubes, made of cardboard packaging, are put on one end of the processor cooler, which, I recall, are two, and the other end of the tubes is inserted into the slot in the wall of the rack.
They remove all the heat from the processors to the next cell of the rack, preventing the entire computer from overheating.
1.4. Rack with Hardy, pulled out of the old building, located behind the cardboard tubes.
1.5. Power Supply. Embedded with one side into the wall of the rack, and the other rests on a rack with hard.
From the side of the neighboring cell, it looks like this:
The power supply cooler, as well as the processor cooler, draws air from the cell with the computer, from hot hards, preventing the temperature inside the computer from rising.
Since when the temperature inside the cell with a computer increases, the cooler starts working at higher speeds and creates extra noise that interferes with watching a movie.
The cell next to the computer, where all the hot air is diverted, is thus significantly heated, now it is 38 degrees, when in room 23. And this is when the computer is idling at the distribution of torrents.
When the hot water was turned off, in the evening I put several five-liter water bottles in the cell and in the morning she washed her perfectly, it was much more convenient than messing with kettles and pans.
True, they started to strain me a little on electricity costs, so I’m thinking about something more economical.
1.6. Ordinary dvd cutter, fit in the thread in the thread.
1.7. A hole in the top of the cell can be seen through which the “cold” air is sucked in / out to the computer. By the way, there is another cooler under it, which directs the air flow to the tuner, sound card and video card so that they do not overheat.
1.8. Kapka on / off. lonely perched on the edge of the hull.
1.9. The photo shows the edge of the door with hinges and two wiring - green and red, which are "stuck" in the door. In fact, these are power supply LEDs and hdd, which are glued in the holes that reach the middle of the outer layer of plexiglass and are visible from the outside of the rack with the door closed. This is not very necessary, but if you go into the room at night, then the rack winks at you with friendly lights.
')
2. Monitor. I use it, if I need to work, then I take it out of the cell and put it on the folding table.
3. Speakers from the audio system. In fact, it is only the rear. Three more columns are located in front. Sub is located at the bottom right.
4. DECT Telephone and IP (SIP) telephone in one device.
5. TV decoder (IPTV set-top box), connected to the TV tuner in the computer.
6. Scanner.
7. If you need to wake up, the rack brews coffee.
8. Projector. Projects the image from the computer on the wall, opposite the rack, which is painted white. By the way, the black color of the back wall was not chosen randomly, but in order to reduce the amount of parasitic light falling on the “screen”. Basically, the projector is used for watching movies and TV, sometimes for work, as an additional monitor.
He really turned upside down, this is normal, allowed to save money on a special mount.
9. New Router. He breathes fresh air outside, next to him is a hole through which hot air comes out of the rack. The old Router lived inside the cell, above the scanner, at a temperature of 38-40 degrees and, apparently, therefore, his life was not long.
10. External hard drive near the router, because, at first, it was plugged into it, but it was sooooo slow. Now hard plug into the computer directly. When the rack was designed, I did not count on a quick increase in consumers of sockets in this cell and it did not have enough power, well, he reached the spare - to the right of the monitor.
11. In spite of all my efforts on the ventilation system, this whole filling (and there is also the wife’s equipment) generates so much heat that it can fry us until crisp in one series of “Dr. House”. I had to install the air conditioner, the remote control was higher, otherwise the overly curious son would eat it.
12. IR extension cable. He controls the IPTV set-top box, the signal from which goes to the computer, and from the computer not only to the monitor and the projector, but also to the monitor in the kitchen, where you can also watch movies, TV or check mail. In order to switch channels to the IPTV set-top box from the kitchen, an IR signal extender is used. Damn, well, I would have made the control of the console from the computer, I would switch the wireless mouse from any place, and this IR extension works through time, terribly uncomfortable. Well, at least, otherwise I would have had to run from room to room to switch channels.
In the kitchen, along with the video, there is also an audio cable from the zvukovuhi, since I have 7.1. 5.1 are used in the hall and 2.1 - in the kitchen.
13. To the heap, the IPTV set-top box is stuck in a separate switch (the cost of which is included in the rental of the set-top box). Of course, it would be possible to plug it into the router, but there you have to mess with the VLAN settings, and the ports there are all busy.
I write about it all so that you can imagine the amount of wires that the rack conceals in itself. By the way, a separate power wiring from the switchboard is connected to it (with a separate UZO / automatic switch, respect my neighbor for installing it). This whole pile is neatly laid into the baseboard with a triple cable channel, nowhere does nothing hang in the air, it does not lie on the floor. The eyeliner from a plinth in a rack also passes on boxes. The amount of work that we did then was fully appreciated with the advent of a child who lives quietly in an apartment, and we are not afraid that he will eat one wire or another.
Now, about how it all gathered.
First there were legs ...
The base of the rack rests on three legs and on the rail, which is bolted to the wall. The empty rack weighs 95kg and it was decided to collect it already on the wall, because the two of us and my wife could not raise the 95kg and put it on our feet. It turned out that it was also very inconvenient to assemble a rack on the wall.
After a few hours of matyuganiy, the frame of the rack was assembled and stood on its feet. Under his feet lay a tangle of wires:
We start to unravel the tangle and try to assemble the computer and the basic systems of Internet provision.
Finally IT earned and you can check email:
In the photo you can see that the location of the company is different from what happened at the end, because you first had to collect it wrong, to understand that it overheats, use it and collect it on a new, just some kind of agile.
Finally, the “configuration” of the computer has settled down and we start to start wiring in the rack:
This is the “information entry” on the left side at the base of the rack. On the other hand, there are fewer wires - there is only audio wiring to the subwoofer and from it to the speakers.
Finally, the wiring and main devices are in place, almost everything is ready:
Notice how part of the walls of the rack was moved to form L-shaped shapes.
By the way, the photo shows the “Old router” of blue color, tucked between two sockets, just in the way of the hot air from the computer, he had only a few days to live.
It remains only to assemble the L-shaped doors and make the door under the rack:
Of course, the place under the shelving is also used, it’s a pity the sub didn’t fit there, I had to fill the place with other trash. In the photo you can see the "gas-lift", which holds the door open, not letting it bang you on the back, while you are trying to get or stick something under the rack with cancer.
Behind a plinth and a white vertical box posting to saba is placed and from it to columns.
Now everything is finished and looks like this:
But the horror that was before the appearance of the rack:
Source: https://habr.com/ru/post/151863/
All Articles