Creating a cloud-based PHP site with SQL Database and deploying it with Git
This guide contains information on creating a Windows Azure PHP website with a Windows Azure SQL Database and deploying it using Git. It is assumed that PHP , SQL Server Express , Microsoft SQL Server drivers for PHP , a web server and Git are installed on your computer. After completing all the steps, you will get a PHP website with a SQL database running on the Windows Azure platform.
Note. You can use the Microsoft Web Platform Installer to install and configure PHP, SQL Server Express, Microsoft SQL Server drivers for PHP, and IIS.
What will be discussed in this guide:
')
By following the instructions in this tutorial, you will create a simple PHP web application for registration. This application will be posted on the Windows Azure website. A screenshot of the finished application is shown below:

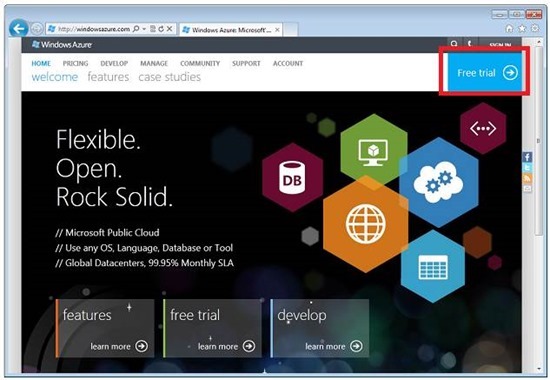
Open a web browser and go to http://www.windowsazure.com . To get started using your free account, click in the upper right corner of the Free Trial and follow the steps. To verify identity, you may need to provide a credit card or mobile phone number. There is no invoice.
Go to https://account.windowsazure.com/ and sign in with your Windows Azure account. Click the preview features item to see the available preview options.

Scroll to Web Sites and click try it now .

Select a subscription and check the box.

To create a Windows Azure website and SQL database, follow these steps:
Sign in to the Windows Azure portal (preview version) . At the bottom left of the portal, click the + New icon.
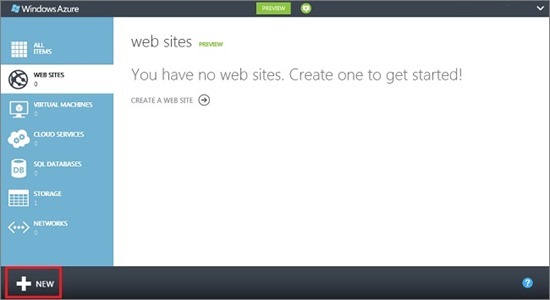
Click WEB SITE , and then CREATE WITH DATABASE .

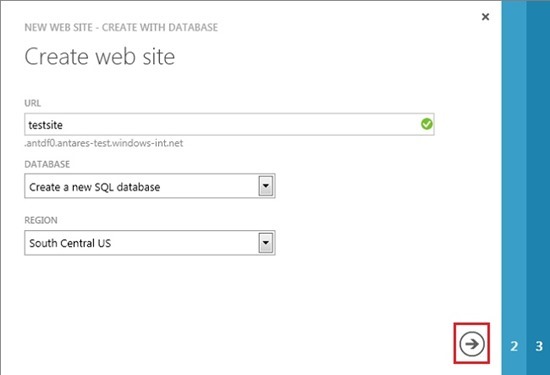
Enter a value in the URL field, select Create a New SQL Database in the DATABASE drop-down list, and specify the data center for the website in the REGION drop-down list. Click the arrow at the bottom of the dialog box.
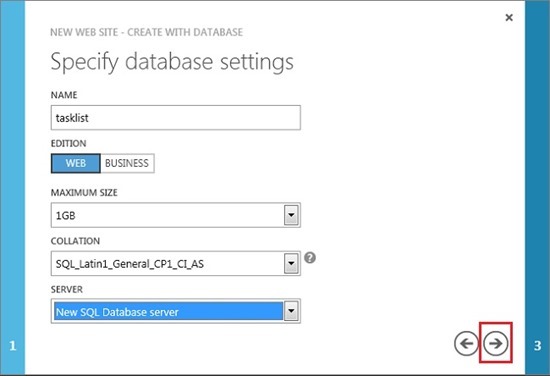
Enter a value for the database in the NAME field, select a value for EDITION (WEB or BUSINESS) , set the MAX SIZE value for the database and a value for COLLATION , select NEW SQL Database server . Click the arrow at the bottom of the dialog box.
Enter the administrator name and password (confirm password), select the region in which the SQL database server will be created, and check the

After creating the website, the message Creation of Web Site '[SITE_NAME]' completed successfully . You can now enable Git publishing.
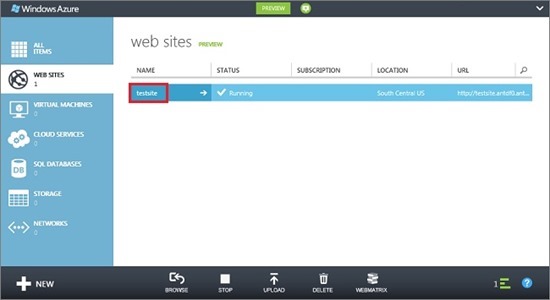
Click the name of the website displayed in the list of websites to open the quick start panel of the website.
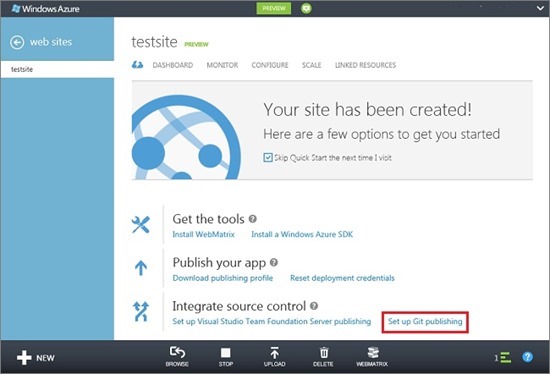
At the bottom of the Quick Start page, click Set up Git publishing .
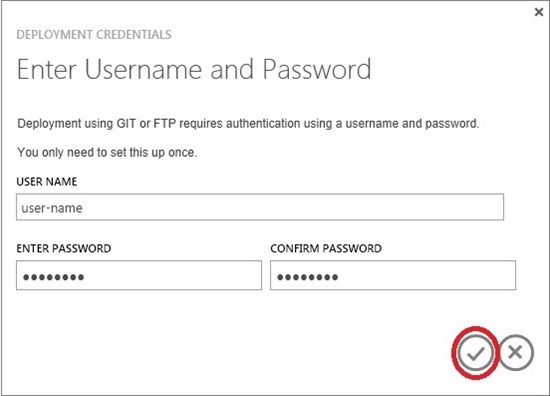
To enable Git publishing, you must specify a username and password. Remember the created username and password. (If the Git repository was previously configured, this action is skipped.)
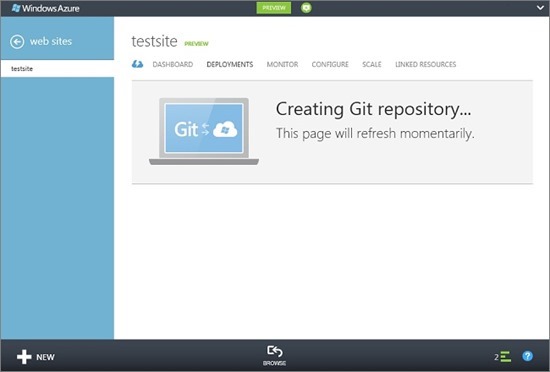
Setting up the repository will take a few seconds.
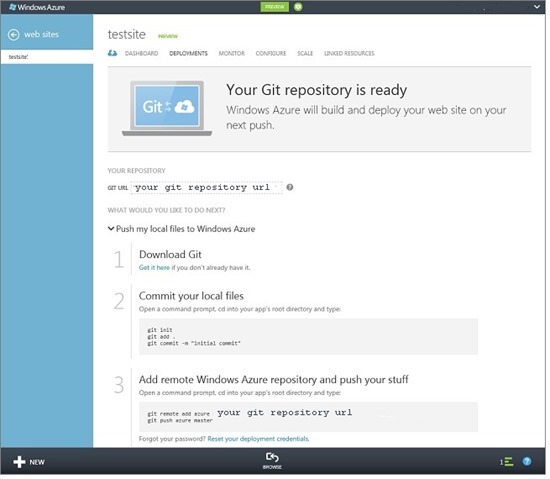
When the repository is ready, instructions will appear on how to place the application files in the repository. Keep these instructions in mind, as they will be needed later.
To connect to the SQL database instance running on Windows Azure websites, you will need connection information. To obtain information about connecting to a SQL database, follow these steps:
On the Management Portal (Preview), click LINKED RESOURCES , and then click the name of the database.

Click View connection strings .

In the PHP section of the dialog that opens, remember the values for
The Registration application is a simple PHP application for registering event participants by entering the name and email address of the user. Information about previous registered persons is displayed in the table. Registration information is stored in a SQL database instance. The application consists of two files (the code for copying and pasting is shown below).
To run the application locally, follow these steps. It assumes that PHP, SQL Server Express and a web server are installed on the local computer and the PDO extension for SQL Server is enabled.
Create a SQL Server database named
> sqlcmd -S localhost \ sqlexpress -U <local user name> -P <local password>
1> create database registration
2> GO
In the root directory of the web server, create a folder named
Open the
Note. You will need to update the values with both a local SQL Server username and password.
Open a web browser and go to the file http: //localhost/registration/createtable.php . A table will be created in the database.
Open the index.php file in a text editor or IDE and add basic HTML and CSS code for the page (PHP code will be added at later stages).
Inside PHP tags, add PHP code to connect to the database.
Note. You will need to update the values again with a local MySQL username and password.
After the code to connect to the database, add the code to insert the registration data into the database.
Finally, after the above code, add code to extract data from the database.
Now you can go to the file http: //localhost/registration/index.php to test the application.
By testing the application locally, you can publish it on the Windows Azure website using Git. However, you must first update the database connection information in the application. Using the database connection information obtained earlier (in the "Obtaining SQL Database Connection Information" section ), update the following information in both the - and - files with the appropriate values.
Note. The value of the SERVER should be added, and the value combines the values of USERNAME, '@', and the server identifier. The server identifier consists of the first 10 characters of the SERVER value.
You are now ready to set up Git publishing and publish the application.
Note. Perform the same steps that are described at the end of the sections “Creating a Windows Azure Website” and “Setting Up Git Publishing”.
Open GitBash (or a terminal if you have Git in), change directories to the root directory of the application, and run the following commands.
git init
git add.
git commit -m "initial commit"
git remote add azure [URL for remote repository]
git push azure master
You will be prompted to enter a password created earlier.
Go to http: // [site_name] .azurewebsites.net / createtable.php to create a MySQL table for the application. Go to http: // [site_name] .azurewebsites.net / index.php to start using the application.
You can make changes to a published application and publish them with Git.
To post your app changes, follow these steps:
Modify the application locally.
Open GitBash (or a terminal if you have Git in), change directories to the root directory of the application, and run the following commands.
git add.
git commit -m "commenting changes"
git push azure master
You will be prompted to enter a password created earlier.
Go to http: // [site_name] .azurewebsites.net / index.php to view the changes.
Note. You can use the Microsoft Web Platform Installer to install and configure PHP, SQL Server Express, Microsoft SQL Server drivers for PHP, and IIS.
What will be discussed in this guide:
')
- How to create a Windows Azure website and SQL database using the management portal (preview). Since PHP is enabled by default on Windows Azure websites, no special actions are required to run PHP code.
- How to publish and re-publish applications on Windows Azure platform using Git.
By following the instructions in this tutorial, you will create a simple PHP web application for registration. This application will be posted on the Windows Azure website. A screenshot of the finished application is shown below:

Creating a Windows Azure website and setting up Git publishing. Create a Windows Azure account
Open a web browser and go to http://www.windowsazure.com . To get started using your free account, click in the upper right corner of the Free Trial and follow the steps. To verify identity, you may need to provide a credit card or mobile phone number. There is no invoice.

Enable Windows Azure website
Go to https://account.windowsazure.com/ and sign in with your Windows Azure account. Click the preview features item to see the available preview options.

Scroll to Web Sites and click try it now .

Select a subscription and check the box.

To create a Windows Azure website and SQL database, follow these steps:
Sign in to the Windows Azure portal (preview version) . At the bottom left of the portal, click the + New icon.

Click WEB SITE , and then CREATE WITH DATABASE .

Enter a value in the URL field, select Create a New SQL Database in the DATABASE drop-down list, and specify the data center for the website in the REGION drop-down list. Click the arrow at the bottom of the dialog box.

Enter a value for the database in the NAME field, select a value for EDITION (WEB or BUSINESS) , set the MAX SIZE value for the database and a value for COLLATION , select NEW SQL Database server . Click the arrow at the bottom of the dialog box.

Enter the administrator name and password (confirm password), select the region in which the SQL database server will be created, and check the
Allow Windows Azure Services to access the server box.
After creating the website, the message Creation of Web Site '[SITE_NAME]' completed successfully . You can now enable Git publishing.
Click the name of the website displayed in the list of websites to open the quick start panel of the website.

At the bottom of the Quick Start page, click Set up Git publishing .

To enable Git publishing, you must specify a username and password. Remember the created username and password. (If the Git repository was previously configured, this action is skipped.)

Setting up the repository will take a few seconds.

When the repository is ready, instructions will appear on how to place the application files in the repository. Keep these instructions in mind, as they will be needed later.

Getting information about connecting to a SQL database
To connect to the SQL database instance running on Windows Azure websites, you will need connection information. To obtain information about connecting to a SQL database, follow these steps:
On the Management Portal (Preview), click LINKED RESOURCES , and then click the name of the database.

Click View connection strings .

In the PHP section of the dialog that opens, remember the values for
SERVER , DATABASE , and USERNAME .Creating and testing the application locally
The Registration application is a simple PHP application for registering event participants by entering the name and email address of the user. Information about previous registered persons is displayed in the table. Registration information is stored in a SQL database instance. The application consists of two files (the code for copying and pasting is shown below).
- index.php . Displays the form for registration and a table with data about the registered participant.
- createtable.php . Creates a SQL database table for an application. This file is used only once.
To run the application locally, follow these steps. It assumes that PHP, SQL Server Express and a web server are installed on the local computer and the PDO extension for SQL Server is enabled.
Create a SQL Server database named
registration . This can be done from the sqlcmd command line using the following commands.> sqlcmd -S localhost \ sqlexpress -U <local user name> -P <local password>
1> create database registration
2> GO
In the root directory of the web server, create a folder named
registration , and in it create two files, one with the name createtable.php and the other with the name index.php .Open the
createtable.php file in a text editor or IDE and add the code below. This code will be used to create the registration_tbl table in the database. <?php // DB connection info $host = "localhost\sqlexpress"; $user = "user name"; $pwd = "password"; $db = "registration"; try{ $conn = new PDO( "sqlsrv:Server= $host ; Database = $db ", $user, $pwd); $conn->setAttribute( PDO::ATTR_ERRMODE, PDO::ERRMODE_EXCEPTION ); $sql = "CREATE TABLE registration_tbl( id INT NOT NULL IDENTITY(1,1) PRIMARY KEY(id), name VARCHAR(30), email VARCHAR(30), date DATE)"; $conn->query($sql); } catch(Exception $e){ die(print_r($e)); } echo "<h3>Table created.</h3>"; ?> Note. You will need to update the values with both a local SQL Server username and password.
Open a web browser and go to the file http: //localhost/registration/createtable.php . A table will be created in the database.
Open the index.php file in a text editor or IDE and add basic HTML and CSS code for the page (PHP code will be added at later stages).
<html> <head> <Title>Registration Form</Title> <style type="text/css"> body { background-color: #fff; border-top: solid 10px #000; color: #333; font-size: .85em; margin: 20; padding: 20; font-family: "Segoe UI", Verdana, Helvetica, Sans-Serif; } h1, h2, h3,{ color: #000; margin-bottom: 0; padding-bottom: 0; } h1 { font-size: 2em; } h2 { font-size: 1.75em; } h3 { font-size: 1.2em; } table { margin-top: 0.75em; } th { font-size: 1.2em; text-align: left; border: none; padding-left: 0; } td { padding: 0.25em 2em 0.25em 0em; border: 0 none; } </style> </head> <body> <h1>Register here!</h1> <p>Fill in your name and email address, then click <strong>Submit</strong> to register.</p> <form method="post" action="index.php" enctype="multipart/form-data" > Name <input type="text" name="name" id="name"/></br> Email <input type="text" name="email" id="email"/></br> <input type="submit" name="submit" value="Submit" /> </form> <?php ?> </body> </html> Inside PHP tags, add PHP code to connect to the database.
// DB connection info $host = "localhost\sqlexpress"; $user = "user name"; $pwd = "password"; $db = "registration"; // Connect to database. try { $conn = new PDO( "sqlsrv:Server= $host ; Database = $db ", $user, $pwd); $conn->setAttribute( PDO::ATTR_ERRMODE, PDO::ERRMODE_EXCEPTION ); } catch(Exception $e){ die(var_dump($e)); } Note. You will need to update the values again with a local MySQL username and password.
After the code to connect to the database, add the code to insert the registration data into the database.
if(!empty($_POST)) { try { $name = $_POST['name']; $email = $_POST['email']; $date = date("Ymd"); // Insert data $sql_insert = "INSERT INTO registration_tbl (name, email, date) VALUES (?,?,?)"; $stmt = $conn->prepare($sql_insert); $stmt->bindValue(1, $name); $stmt->bindValue(2, $email); $stmt->bindValue(3, $date); $stmt->execute(); } catch(Exception $e) { die(var_dump($e)); } echo "<h3>Your're registered!</h3>"; } Finally, after the above code, add code to extract data from the database.
$sql_select = "SELECT * FROM registration_tbl"; $stmt = $conn->query($sql_select); $registrants = $stmt->fetchAll(); if(count($registrants) > 0) { echo "<h2>People who are registered:</h2>"; echo "<table>"; echo "<tr><th>Name</th>"; echo "<th>Email</th>"; echo "<th>Date</th></tr>"; foreach($registrants as $registrant) { echo "<tr><td>".$registrant['name']."</td>"; echo "<td>".$registrant['email']."</td>"; echo "<td>".$registrant['date']."</td></tr>"; } echo "</table>"; } else { echo "<h3>No one is currently registered.</h3>"; } Now you can go to the file http: //localhost/registration/index.php to test the application.
Application Publishing
By testing the application locally, you can publish it on the Windows Azure website using Git. However, you must first update the database connection information in the application. Using the database connection information obtained earlier (in the "Obtaining SQL Database Connection Information" section ), update the following information in both the - and - files with the appropriate values.
// DB connection info $host = "tcp:<value of SERVER>"; $user = "<value of USERNAME>@<server ID>"; $pwd = "<your password>"; $db = "<value of DATABASE>"; Note. The value of the SERVER should be added, and the value combines the values of USERNAME, '@', and the server identifier. The server identifier consists of the first 10 characters of the SERVER value.
You are now ready to set up Git publishing and publish the application.
Note. Perform the same steps that are described at the end of the sections “Creating a Windows Azure Website” and “Setting Up Git Publishing”.
Open GitBash (or a terminal if you have Git in), change directories to the root directory of the application, and run the following commands.
git init
git add.
git commit -m "initial commit"
git remote add azure [URL for remote repository]
git push azure master
You will be prompted to enter a password created earlier.
Go to http: // [site_name] .azurewebsites.net / createtable.php to create a MySQL table for the application. Go to http: // [site_name] .azurewebsites.net / index.php to start using the application.
You can make changes to a published application and publish them with Git.
Posting changes to the app
To post your app changes, follow these steps:
Modify the application locally.
Open GitBash (or a terminal if you have Git in), change directories to the root directory of the application, and run the following commands.
git add.
git commit -m "commenting changes"
git push azure master
You will be prompted to enter a password created earlier.
Go to http: // [site_name] .azurewebsites.net / index.php to view the changes.
Source: https://habr.com/ru/post/151773/
All Articles