As I wrote Futboloid under iOS
I greet the most honorable Habraludey!

Not so long ago, while searching for a new job, I received a very interesting test task from ZeptoLab : write an Arkanoid for iOS in a couple of working days without using third-party libraries like Cocos2d / Box2d, etc., that is, on “pure” OpenGL , which seemed to me very interesting. By the way, they already wrote about this task on Habré, and even arranged a debriefing . So, I challenged fate and took up game development for the first time after school exercises with you in graphical mode!
I will specify that I already had some knowledge of OpenGL, but very, very superficial. We can say that they were not there well, almost completely, I just knew what a viewport is and there are some sprites there, that there are transformation matrices ... So this article could be entitled “ How to write a simple game under iOS on pure OpenGL without knowing it ", but it is too long.
')
In general, if you are interested in how I did it in ~ 10 hours of development and ~ 2 hours of reading, I ask for cat. (careful! a lot of code! few pictures! link to githab and relaxing video at the end!)
Let's be honest. Picture_to_tool_vlemaniya ™ is not a screenshot of what happened to me. And this is what happened to me:
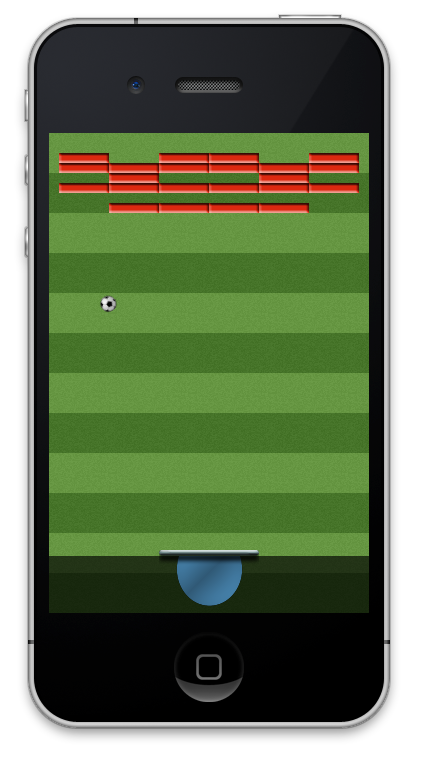
Forgive me for this deception, but you are still interested in my article, right? )
How do you start writing a program that uses technologies that are new to you? That's right, from reading the documentation, examples and articles (well, like the one before you). After a couple of minutes of sitting in Google, a wonderful article was discovered (by Ray Wenderlich), which described in detail the process of creating a simple toy. Here, if you like, you can close my article and start reading the Ray's article, but for those who still came for the arkanoid and explanations in their native language, I will continue the narration.
To begin, create an empty project for the game. In Xcode, click File -> New -> Project ... , select the iOS template -> Application -> OpenGL Game . Personally, I chose a project with ARC and without StoryBoard, but you, dear reader, are free to do as you like. Well, the project was created, we can now immediately run Run and admire the spinning cubes. But this is not exactly what we wanted to do, so we delete almost everything that we inserted into the template, leaving only the necessary. First we remove the added shaders, from the ViewController.m we delete all enums and global variables that go to the
Next, we throw away all the excess of all the remaining methods.
Further. We make a primitive game with a primitive architecture, so let our ViewController control the whole game at all. In an amicable way, it would be necessary to create a GameController and assign all these functions to it, but for the time being we will manage it this way. Therefore, we add the following properties and methods to our ViewController:
What they are responsible for - and without comment is clear. Well, now is the time to think about the logic of the game, more precisely, about the logic of the program. What and how will we do? What objects will we have? What do you need to do for this?
A lot of questions, yes. But by simple reflections (and the knowledge that there are some sprites ) we come to this model: there is a “beat” that the player controls, there are bricks that need to be broken and there is a ball that bounces off everything and breaks the bricks. In addition, there is a background, and there is a menu - where we can start the game and see its results (whether we won or lost). Everything we see on the screen is drawn with the help of sprites, which are the basic objects for drawing, something like windows in the system. Well, or the buttons in the window. They can have various attributes: coordinates, dimensions, a picture that they draw. Looking ahead, add here the speed and direction of movement. Well, let's arm ourselves with these properties and boldly click ⌘N in Xcode! Let's create a new class inherited from NSObject , let's call it GameSprite. And add to it the following properties and methods:
Actually, we will be able to create sprites based on a picture or texture, draw them, update them depending on time, get its borders. As well as ask and get its position, size and speed. But in the implementation of the sprite begins interesting! We will need vertices and quads. What it is? Well, if simple, then a vertex is a point in space, and a quad is a collection of four vertices. And the vertex contains actually two points - for the sprite itself and for its texture. Declare the appropriate structures:
The following feature should be taken into account: the coordinates of the texture are normalized, that is, they always change in the interval from 0 to 1. We need this quad to draw our texture with the sprite, so for the GameSprite class we will declare such private properties:
Thus, we have the effect and information about the texture will be stored in the same properties, but not public. Well, now you can begin to implement the initialization of the sprite:
Nothing tricky, just assigning or loading a texture from a picture and setting a quad. Here you can see that for each of the four vertices, the coordinates of the geometry and texture are set in different units.
Now let's get to the most interesting part - to render the sprite, which is responsible for the
Here we prepare the texture for drawing through the effect (about the transformation matrix - a little later, until you read this line), turn on the necessary OpenGL parameters (position and texture), transfer our quad to OpenGL using tricky transformations and finally draw! Everything seems to be simple, but a detailed explanation of what these lines do is beyond the scope of this article, I just send you, dear reader, to the documentation ( glVertexAttribPointer and glDrawArrays ).
We now turn to the transformation matrix, which will be responsible for everything: for coordinates, rotation, scaling and other things. But, for now, we just need to move our sprite to the desired part of the playing field, so let's go:
Here, too, everything is simple: take the Identity matrix (the one that does nothing), translate the origin of coordinates into self.position, and then move it to the middle of the sprite. This is very handy when manipulating a bunch of sprites. Now, having made a stub for

Well, not bad? On our playing field one picture is now drawn. Yes, we can call friends and boast that we almost wrote the game! =)
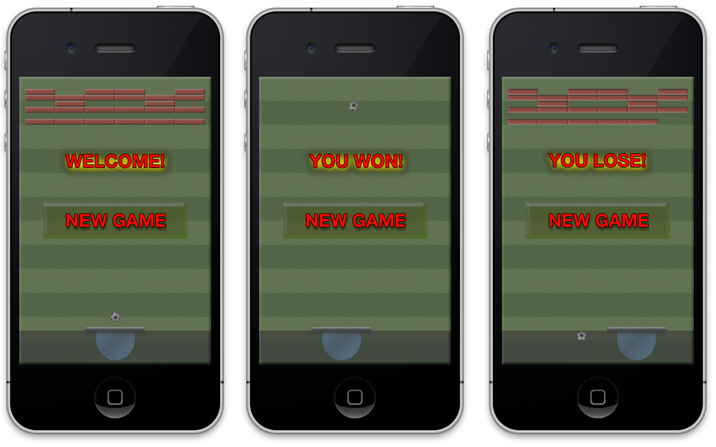
But, in fact, it is too early to rejoice. Sprite we have one and he does not move. We’ll remove it completely and do something interesting, for example, think up what sprites we need. First, a beat. Secondly, the ball. Third, a bunch of sprites for bricks. Something else? Oh yeah, another background. And also - the menu! And how to do it? Sprite for blackout, sprite for the word “won”, sprite for the word “lost”, sprite for the word “well”, sprite for the “play” button. Well, everything seems to be, fuh. Well, let's go, we set the properties to our controller:
For all these elements we will create pictures of suitable sizes in the gimp / photoshop / other. Let the bricks we have 50x10 pixels, a very good size. You can draw a ball, or you can find it on the net, which I actually did. Comrade Junior podsobil with the background (by the way, and invented to completely take a football theme), well, I drew the bricks and the bat myself. I will not give completely the initialization code of all sprites, it is identical to the one already mentioned, only the coordinates differ. But what about bricks? Their location somehow does not want to hardcode, right? And if you want to add another level? Let's better think up our own file format in which these levels will be stored. My format is very simple, but you are free to give free rein to fantasy. So, here is my file for the first (and so far only) level:
It seems that the format is self-evident, right? 0 - no bricks, 1 - there is. Well, if you want to make the second type of bricks, then enter the numbers 2, 3, 4, and so on. But this is the way of the future. The function of loading bricks is also very clear:
Well, now we loaded the bricks. You can run our game and admire even rows of bricks, our bat and ball, and all this against the background of our background. Oh yeah, we won't see it, because we forgot to add the drawing to
But how so? Why doesn't the ball move? This is not a picture, this is a game, which means that the ball must fly somewhere! In order for the ball to fly, it needs to set the speed, and in the sprite
And in the
Now you can set the ball to a non-zero speed in
Well, now let's call this method in
The logic is simple, even tigonometry is not required: in a collision with the left and right wall, we reverse the horizontal velocity component, with the upper wall - the vertical one. The angle of incidence is equal to the angle of reflection - and therefore the laws of physics are observed. Well, when crossing the lower boundary, we count the loss. Alas. By the way, we also “correct” the position of the ball in order to avoid gaps.
Run! The ball bounced off the right wall, from the top - and we lost, although we did not know about it. Already not bad! Now we need to make a rebound from the bat, and, as is customary in Arkanoid, the angle of incidence will not always be equal to the angle of reflection, which will depend on the place where the ball falls on the bat. Here we already use trigonometry to calculate this angle itself:
Primitive enough. But now the most interesting will begin: the definition of a collision with bricks, their destruction and a ball bounce.
Here, the logic is already more cunning: we determine which side of the ball hit the brick, and depending on this, we change the necessary component of speed, and mark the brick as broken. Well, then all the broken ones are simply deleted, and if they are not left, we finish the game, we won!
Well, now you can start the game and see how the ball jumps, breaks bricks and ... Yes, but how to beat it, then? Bit there, but we do need to manage it? I chose the easiest way to control the bat: I allocated a place under it for an “ear”, for which you can carry it with your thumb. In order to change the position of the bits, we need to receive the events of pressing and moving the finger, and for this we need gesture recognizers! Install them:
Are you ready to play? Launched, broke all the bricks! So, what is next? It would be necessary to show the player the result of his labors, and therefore display the menu. Usually for such things do separate scenes, implemented using the GameScene class, inherited from GameSprite, but I decided not to bother and leave the code as simple as possible. So the menu is going from different sprites. Well, in
Here again, everything is extremely simple, I do not even want to comment. It remains to process the click on the "play" button, for this in the
Everything! Run, play, win and lose! And most importantly - rejoice! We rejoice in our own, self-written game for iPhone on a pure OpenGL!
Fuh, everything seems to be.Now I can take a break and give a link to what happened to me, as usual, the sources on the githaba . (The attentive reader has already noticed that the ball rotates on the video? Well, there is a code for this on the githaba, but I didn’t want to overload the article)
Of course, this game is far from perfect. It lacks the animation of breaking bricks, falling bonuses, scoring, changing levels, better definition of collisions, attacks of the same sounds. Well, you can still add a table of records, integration with the Game Center, saving the results in iCloud, sending to Facebook / Twitter, achievements and other things, without which the modern game is not taken seriously. But in my plans there was no release of the game in the App Store, so I didn’t bother with all this, since the test task didn’t provide for this either.
PS or WhatWhereFore: And then there was nothing interesting. I went to the interview in ZeptoLab, but very quickly fell on the ignorance of OpenGL at a deep level. But I got my profit: now I know that I can make a simple game if necessary, and in general I figured out a little in a new area for myself. I hope that now you can write a game and you, my dear reader! For this, let me leave, goodbye.
Not so long ago, while searching for a new job, I received a very interesting test task from ZeptoLab : write an Arkanoid for iOS in a couple of working days without using third-party libraries like Cocos2d / Box2d, etc., that is, on “pure” OpenGL , which seemed to me very interesting. By the way, they already wrote about this task on Habré, and even arranged a debriefing . So, I challenged fate and took up game development for the first time after school exercises with you in graphical mode!
I will specify that I already had some knowledge of OpenGL, but very, very superficial. We can say that they were not there well, almost completely, I just knew what a viewport is and there are some sprites there, that there are transformation matrices ... So this article could be entitled “ How to write a simple game under iOS on pure OpenGL without knowing it ", but it is too long.
')
In general, if you are interested in how I did it in ~ 10 hours of development and ~ 2 hours of reading, I ask for cat. (careful! a lot of code! few pictures! link to githab and relaxing video at the end!)
Let's be honest. Picture_to_tool_vlemaniya ™ is not a screenshot of what happened to me. And this is what happened to me:
Forgive me for this deception, but you are still interested in my article, right? )
How do you start writing a program that uses technologies that are new to you? That's right, from reading the documentation, examples and articles (well, like the one before you). After a couple of minutes of sitting in Google, a wonderful article was discovered (by Ray Wenderlich), which described in detail the process of creating a simple toy. Here, if you like, you can close my article and start reading the Ray's article, but for those who still came for the arkanoid and explanations in their native language, I will continue the narration.
To begin, create an empty project for the game. In Xcode, click File -> New -> Project ... , select the iOS template -> Application -> OpenGL Game . Personally, I chose a project with ARC and without StoryBoard, but you, dear reader, are free to do as you like. Well, the project was created, we can now immediately run Run and admire the spinning cubes. But this is not exactly what we wanted to do, so we delete almost everything that we inserted into the template, leaving only the necessary. First we remove the added shaders, from the ViewController.m we delete all enums and global variables that go to the
interface ViewController () Now remove the extra methods: loadShaders, compileShader:type:file:, linkProgram:, validateProgram: in our simplest example we will not use shaders. Of course, you can use them if you know how and why, but I did not bother with it =).Next, we throw away all the excess of all the remaining methods.
setupGL and tearDownGL we bring to the form: - (void)setupGL { [EAGLContextsetCurrentContext:self.context]; self.effect = [[GLKBaseEffectalloc] init]; } - (void)tearDownGL { [EAGLContextsetCurrentContext:self.context]; self.effect = nil; } Further. We make a primitive game with a primitive architecture, so let our ViewController control the whole game at all. In an amicable way, it would be necessary to create a GameController and assign all these functions to it, but for the time being we will manage it this way. Therefore, we add the following properties and methods to our ViewController:
#define kGameStateNone 0 #define kGameStateLose 1 #define kGameStateWon 2 @property (assign) int gameState; // see kGameState... @property (assign) BOOL gameRunning; - (void)loadBricks; - (void)startGame; - (void)endGameWithWin:(BOOL)win; What they are responsible for - and without comment is clear. Well, now is the time to think about the logic of the game, more precisely, about the logic of the program. What and how will we do? What objects will we have? What do you need to do for this?
A lot of questions, yes. But by simple reflections (and the knowledge that there are some sprites ) we come to this model: there is a “beat” that the player controls, there are bricks that need to be broken and there is a ball that bounces off everything and breaks the bricks. In addition, there is a background, and there is a menu - where we can start the game and see its results (whether we won or lost). Everything we see on the screen is drawn with the help of sprites, which are the basic objects for drawing, something like windows in the system. Well, or the buttons in the window. They can have various attributes: coordinates, dimensions, a picture that they draw. Looking ahead, add here the speed and direction of movement. Well, let's arm ourselves with these properties and boldly click ⌘N in Xcode! Let's create a new class inherited from NSObject , let's call it GameSprite. And add to it the following properties and methods:
@interface GameSprite : NSObject - (id)initWithTexture:(GLKTextureInfo *)textureInfo effect:(GLKBaseEffect *)effect; - (id)initWithImage:(UIImage *)image effect:(GLKBaseEffect *)effect; - (void)render; - (void)update:(float)dt; - (CGRect)boundingRect; @property (assign) GLKVector2 position; @property (assign) CGSize contentSize; @property (assign) GLKVector2 moveVelocity; // points/sec @end Actually, we will be able to create sprites based on a picture or texture, draw them, update them depending on time, get its borders. As well as ask and get its position, size and speed. But in the implementation of the sprite begins interesting! We will need vertices and quads. What it is? Well, if simple, then a vertex is a point in space, and a quad is a collection of four vertices. And the vertex contains actually two points - for the sprite itself and for its texture. Declare the appropriate structures:
typedef struct { CGPoint geometryVertex; CGPoint textureVertex; } TexturedVertex; typedef struct { TexturedVertex bl; TexturedVertex br; TexturedVertex tl; TexturedVertex tr; } TexturedQuad; The following feature should be taken into account: the coordinates of the texture are normalized, that is, they always change in the interval from 0 to 1. We need this quad to draw our texture with the sprite, so for the GameSprite class we will declare such private properties:
@interface GameSprite() @property (strong) GLKBaseEffect *effect; @property (assign) TexturedQuad quad; @property (strong) GLKTextureInfo *textureInfo; - (void)initQuadAndSize; @end Thus, we have the effect and information about the texture will be stored in the same properties, but not public. Well, now you can begin to implement the initialization of the sprite:
- (id)initWithTexture:(GLKTextureInfo *)textureInfo effect:(GLKBaseEffect *)effect { if ((self = [super init])) { self.effect = effect; self.textureInfo = textureInfo; if (self.textureInfo == nil) { NSLog(@"Error loading texture! Texture info is nil!"); return nil; } [self initQuadAndSize]; } return self; } - (id)initWithImage:(UIImage *)image effect:(GLKBaseEffect *)effect { if ((self = [super init])) { self.effect = effect; NSDictionary *options = [NSDictionary dictionaryWithObjectsAndKeys:[NSNumber numberWithBool:YES], GLKTextureLoaderOriginBottomLeft, nil]; NSError *error; self.textureInfo = [GLKTextureLoader textureWithCGImage:image.CGImage options:options error:&error]; if (self.textureInfo == nil) { NSLog(@"Error loading image: %@", [error localizedDescription]); return nil; } [self initQuadAndSize]; } return self; } - (void)initQuadAndSize { self.contentSize = CGSizeMake(self.textureInfo.width, self.textureInfo.height); TexturedQuad newQuad; newQuad.bl.geometryVertex = CGPointMake(0, 0); newQuad.br.geometryVertex = CGPointMake(self.textureInfo.width, 0); newQuad.tl.geometryVertex = CGPointMake(0, self.textureInfo.height); newQuad.tr.geometryVertex = CGPointMake(self.textureInfo.width, self.textureInfo.height); newQuad.bl.textureVertex = CGPointMake(0, 0); newQuad.br.textureVertex = CGPointMake(1, 0); newQuad.tl.textureVertex = CGPointMake(0, 1); newQuad.tr.textureVertex = CGPointMake(1, 1); self.quad = newQuad; } Nothing tricky, just assigning or loading a texture from a picture and setting a quad. Here you can see that for each of the four vertices, the coordinates of the geometry and texture are set in different units.
Now let's get to the most interesting part - to render the sprite, which is responsible for the
render method! - (void)render { self.effect.texture2d0.name = self.textureInfo.name; self.effect.texture2d0.enabled = YES; self.effect.transform.modelviewMatrix = self.modelMatrix; [self.effect prepareToDraw]; long offset = (long)&_quad; glEnableVertexAttribArray(GLKVertexAttribPosition); glEnableVertexAttribArray(GLKVertexAttribTexCoord0); glVertexAttribPointer(GLKVertexAttribPosition, 2, GL_FLOAT, GL_FALSE, sizeof(TexturedVertex), (void *) (offset + offsetof(TexturedVertex, geometryVertex))); glVertexAttribPointer(GLKVertexAttribTexCoord0, 2, GL_FLOAT, GL_FALSE, sizeof(TexturedVertex), (void *) (offset + offsetof(TexturedVertex, textureVertex))); glDrawArrays(GL_TRIANGLE_STRIP, 0, 4); } Here we prepare the texture for drawing through the effect (about the transformation matrix - a little later, until you read this line), turn on the necessary OpenGL parameters (position and texture), transfer our quad to OpenGL using tricky transformations and finally draw! Everything seems to be simple, but a detailed explanation of what these lines do is beyond the scope of this article, I just send you, dear reader, to the documentation ( glVertexAttribPointer and glDrawArrays ).
We now turn to the transformation matrix, which will be responsible for everything: for coordinates, rotation, scaling and other things. But, for now, we just need to move our sprite to the desired part of the playing field, so let's go:
- (GLKMatrix4)modelMatrix { GLKMatrix4 modelMatrix = GLKMatrix4Identity; modelMatrix = GLKMatrix4Translate(modelMatrix, self.position.x, self.position.y, 0); modelMatrix = GLKMatrix4Translate(modelMatrix, -self.contentSize.width / 2, -self.contentSize.height / 2, 0); return modelMatrix; } Here, too, everything is simple: take the Identity matrix (the one that does nothing), translate the origin of coordinates into self.position, and then move it to the middle of the sprite. This is very handy when manipulating a bunch of sprites. Now, having made a stub for
update: we can create our first sprite and load a picture from resources into it. And in our ViewController to draw it: - (void)viewDidLoad { [super viewDidLoad]; self.context = [[EAGLContext alloc] initWithAPI:kEAGLRenderingAPIOpenGLES2]; if (!self.context) { NSLog(@"Failed to create ES context"); } [self setupGL]; GLKView *view = (GLKView *)self.view; view.context = self.context; GLKMatrix4 projectionMatrix = GLKMatrix4MakeOrtho(0, 320, 0, 480, -1024, 1024); self.effect.transform.projectionMatrix = projectionMatrix; // initializing game state self.gameRunning = NO; self.gameState = kGameStateNone; // initializing sprites self.testSprite = [[GameSpritealloc] initWithImage:[UIImageimageNamed:@"myImage"] effect:self.effect]; self.testSprite .position = GLKVector2Make(160, 35); } - (void)glkView:(GLKView *)view drawInRect:(CGRect)rect { glClearColor(1.f, 1.f, 1.f, 1.0f); glClear(GL_COLOR_BUFFER_BIT); glBlendFunc(GL_SRC_ALPHA, GL_ONE_MINUS_SRC_ALPHA); glEnable(GL_BLEND); [self.testSprite render]; } Well, not bad? On our playing field one picture is now drawn. Yes, we can call friends and boast that we almost wrote the game! =)
But, in fact, it is too early to rejoice. Sprite we have one and he does not move. We’ll remove it completely and do something interesting, for example, think up what sprites we need. First, a beat. Secondly, the ball. Third, a bunch of sprites for bricks. Something else? Oh yeah, another background. And also - the menu! And how to do it? Sprite for blackout, sprite for the word “won”, sprite for the word “lost”, sprite for the word “well”, sprite for the “play” button. Well, everything seems to be, fuh. Well, let's go, we set the properties to our controller:
@property (strong, nonatomic) GameSprite *playerBat; @property (strong, nonatomic) GameSprite *ball; @property (strong, nonatomic) GameSprite *background; @property (strong, nonatomic) GameSprite *menuDimmer; @property (strong, nonatomic) GameSprite *menuCaption; @property (strong, nonatomic) GameSprite *menuCaptionWon; @property (strong, nonatomic) GameSprite *menuCaptionLose; @property (strong, nonatomic) GameSprite *menuStartButton; @property (strong, nonatomic) NSMutableArray *bricks; For all these elements we will create pictures of suitable sizes in the gimp / photoshop / other. Let the bricks we have 50x10 pixels, a very good size. You can draw a ball, or you can find it on the net, which I actually did. Comrade Junior podsobil with the background (by the way, and invented to completely take a football theme), well, I drew the bricks and the bat myself. I will not give completely the initialization code of all sprites, it is identical to the one already mentioned, only the coordinates differ. But what about bricks? Their location somehow does not want to hardcode, right? And if you want to add another level? Let's better think up our own file format in which these levels will be stored. My format is very simple, but you are free to give free rein to fantasy. So, here is my file for the first (and so far only) level:
101101 111111 010010 111111 000000 111111 It seems that the format is self-evident, right? 0 - no bricks, 1 - there is. Well, if you want to make the second type of bricks, then enter the numbers 2, 3, 4, and so on. But this is the way of the future. The function of loading bricks is also very clear:
- (void)loadBricks { // assuming 6x6 brick matrix, each brick is 50x10 NSError *error; [NSBundle mainBundle] ; NSStringEncoding encoding; NSString *filePath = [[NSBundle mainBundle] pathForResource:@"level1" ofType:@"txt"]; NSString *levelData = [NSString stringWithContentsOfFile:filePath usedEncoding:&encoding error:&error]; if (levelData == nil) { NSLog(@"Error loading level data! %@", error); return; } levelData = [[levelData componentsSeparatedByCharactersInSet: [NSCharacterSet whitespaceAndNewlineCharacterSet]] componentsJoinedByString: @""]; if ([levelData length] < (6*6)) { NSLog(@"Level data has incorrect size!"); return; } NSMutableArray *loadedBricks = [NSMutableArray array]; UIImage *brickImage = [UIImage imageNamed:@"brick1"]; NSDictionary *options = [NSDictionary dictionaryWithObjectsAndKeys:[NSNumber numberWithBool:YES], GLKTextureLoaderOriginBottomLeft, nil]; GLKTextureInfo *textureInfo = [GLKTextureLoader textureWithCGImage:brickImage.CGImage options:options error:&error]; if (textureInfo == nil) { NSLog(@"Error loading image: %@", [error localizedDescription]); return; } for (int i = 0; i < 6; i++) { for (int j = 0; j < 6; j++) { if ([levelData characterAtIndex:j + i * 6] == '1') { GameSprite *brickSprite = [[GameSprite alloc] initWithTexture:textureInfo effect:self.effect]; brickSprite.position = GLKVector2Make((j + 1) * 50.f - 15.f, 480.f - (i + 1) * 10.f - 15.f); [loadedBricks addObject:brickSprite]; } } } self.bricks = loadedBricks; } Well, now we loaded the bricks. You can run our game and admire even rows of bricks, our bat and ball, and all this against the background of our background. Oh yeah, we won't see it, because we forgot to add the drawing to
glkView:drawInRect: Add a drawing in order: first the background, then the beat, then all the bricks, and at the end the ball. And now you can and admire! =)But how so? Why doesn't the ball move? This is not a picture, this is a game, which means that the ball must fly somewhere! In order for the ball to fly, it needs to set the speed, and in the sprite
update: method update: you need to take this speed into account and change the coordinates: - (void)update:(float)dt { GLKVector2 curMove = GLKVector2MultiplyScalar(self.moveVelocity, dt); self.position = GLKVector2Add(self.position, curMove); } And in the
update method of our ViewController, you need to update the ball sprite: [self.ball update:self.timeSinceLastUpdate]; Now you can set the ball to a non-zero speed in
startGame - and the ball will fly! - (void)startGame { self.gameRunning = YES; self.gameState = kGameStateNone; [selfloadBricks]; self.ball.position = GLKVector2Make(160, 80); self.ball.moveVelocity = GLKVector2Make(120, 240); } Well, now let's call this method in
viewDidLoad - and the ball will fly, but - will quickly fly off the screen. Hmm, sad! Well, we start thinking about handling collisions and collisions of a ball with walls. In the ready-made update method, add the first ball collision with walls: // checking for walls // left if (self.ball.boundingRect.origin.x <= 0) { self.ball.moveVelocity = GLKVector2Make(-self.ball.moveVelocity.x, self.ball.moveVelocity.y); self.ball.position = GLKVector2Make(self.ball.position.x - self.ball.boundingRect.origin.x, self.ball.position.y); } // right if (self.ball.boundingRect.origin.x + self.ball.boundingRect.size.width >= 320) { self.ball.moveVelocity = GLKVector2Make(-self.ball.moveVelocity.x, self.ball.moveVelocity.y); self.ball.position = GLKVector2Make(self.ball.position.x - (self.ball.boundingRect.size.width + self.ball.boundingRect.origin.x - 320), self.ball.position.y); } // top if (self.ball.boundingRect.origin.y + self.ball.boundingRect.size.height >= 480) { self.ball.moveVelocity = GLKVector2Make(self.ball.moveVelocity.x, -self.ball.moveVelocity.y); self.ball.position = GLKVector2Make(self.ball.position.x, self.ball.position.y - (self.ball.boundingRect.origin.y + self.ball.boundingRect.size.height - 480)); } // bottom (player lose) if (self.ball.boundingRect.origin.y + self.ball.boundingRect.size.height <= 70) { [self endGameWithWin:NO]; } The logic is simple, even tigonometry is not required: in a collision with the left and right wall, we reverse the horizontal velocity component, with the upper wall - the vertical one. The angle of incidence is equal to the angle of reflection - and therefore the laws of physics are observed. Well, when crossing the lower boundary, we count the loss. Alas. By the way, we also “correct” the position of the ball in order to avoid gaps.
Run! The ball bounced off the right wall, from the top - and we lost, although we did not know about it. Already not bad! Now we need to make a rebound from the bat, and, as is customary in Arkanoid, the angle of incidence will not always be equal to the angle of reflection, which will depend on the place where the ball falls on the bat. Here we already use trigonometry to calculate this angle itself:
// player strikes! if (CGRectIntersectsRect(self.ball.boundingRect, self.playerBat.boundingRect)) { float angleCoef = (self.ball.position.x - self.playerBat.position.x) / (self.playerBat.contentSize.width / 2); float newAngle = 90.f - angleCoef * 80.f; GLKVector2 ballDirection = GLKVector2Normalize(GLKVector2Make(1 / tanf(GLKMathDegreesToRadians(newAngle)), 1)); float ballSpeed = GLKVector2Length(self.ball.moveVelocity); self.ball.moveVelocity = GLKVector2MultiplyScalar(ballDirection, ballSpeed); self.ball.position = GLKVector2Make(self.ball.position.x, self.ball.position.y + (self.playerBat.boundingRect.origin.y + self.playerBat.boundingRect.size.height - self.ball.boundingRect.origin.y)); } Primitive enough. But now the most interesting will begin: the definition of a collision with bricks, their destruction and a ball bounce.
// checking for broken bricks NSMutableArray *brokenBricks = [NSMutableArray array]; GLKVector2 initialBallVelocity = self.ball.moveVelocity; for (GameSprite *brick in self.bricks) { if (CGRectIntersectsRect(self.ball.boundingRect, brick.boundingRect)) { [brokenBricks addObject: brick]; if ((self.ball.position.y < brick.position.y - brick.contentSize.height / 2) || (self.ball.position.y > brick.position.y + brick.contentSize.height / 2)) { self.ball.moveVelocity = GLKVector2Make(initialBallVelocity.x, -initialBallVelocity.y); } else { self.ball.moveVelocity = GLKVector2Make(-initialBallVelocity.x, initialBallVelocity.y); } } } // removing them for (GameSprite *brick in brokenBricks) { [self.bricks removeObject:brick]; } if (self.bricks.count == 0) { [self endGameWithWin:YES]; } Here, the logic is already more cunning: we determine which side of the ball hit the brick, and depending on this, we change the necessary component of speed, and mark the brick as broken. Well, then all the broken ones are simply deleted, and if they are not left, we finish the game, we won!
Well, now you can start the game and see how the ball jumps, breaks bricks and ... Yes, but how to beat it, then? Bit there, but we do need to manage it? I chose the easiest way to control the bat: I allocated a place under it for an “ear”, for which you can carry it with your thumb. In order to change the position of the bits, we need to receive the events of pressing and moving the finger, and for this we need gesture recognizers! Install them:
- (void)viewDidLoad { // ... // gestures UIPanGestureRecognizer *panRecognizer = [[UIPanGestureRecognizer alloc] initWithTarget:self action:@selector(handlePanGesture:)]; UITapGestureRecognizer *tapRecognizer = [[UITapGestureRecognizer alloc] initWithTarget:self action:@selector(handleTapGestureFrom:)]; [self.view addGestureRecognizer:panRecognizer]; [self.view addGestureRecognizer:tapRecognizer]; } - (void)handleTapGestureFrom:(UITapGestureRecognizer *)recognizer { CGPoint touchLocation = [recognizer locationInView:recognizer.view]; if (self.gameRunning) { GLKVector2 target = GLKVector2Make(touchLocation.x, self.playerBat.position.y); self.playerBat.position = target; } } - (void)handlePanGesture:(UIGestureRecognizer *)gestureRecognizer { CGPoint touchLocation = [gestureRecognizer locationInView:gestureRecognizer.view]; if (self.gameRunning) { GLKVector2 target = GLKVector2Make(touchLocation.x, self.playerBat.position.y); self.playerBat.position = target; } } Are you ready to play? Launched, broke all the bricks! So, what is next? It would be necessary to show the player the result of his labors, and therefore display the menu. Usually for such things do separate scenes, implemented using the GameScene class, inherited from GameSprite, but I decided not to bother and leave the code as simple as possible. So the menu is going from different sprites. Well, in
glkView:drawInRect: we need to check the state of the game and draw everything as it should: - (void)glkView:(GLKView *)view drawInRect:(CGRect)rect { glClearColor(1.f, 1.f, 1.f, 1.0f); glClear(GL_COLOR_BUFFER_BIT); glBlendFunc(GL_SRC_ALPHA, GL_ONE_MINUS_SRC_ALPHA); glEnable(GL_BLEND); [self.background render]; [self.playerBat render]; for (GameSprite *brick in self.bricks) { [brick render]; } [self.ball render]; if (!self.gameRunning) { [self.menuDimmer render]; [self.menuStartButton render]; switch (self.gameState) { case kGameStateWon: [self.menuCaptionWon render]; break; case kGameStateLose: [self.menuCaptionLose render]; break; case kGameStateNone: default: [self.menuCaption render]; break; } } } Here again, everything is extremely simple, I do not even want to comment. It remains to process the click on the "play" button, for this in the
handleTapGestureFrom: the "else" block: else if (CGRectContainsPoint(self.menuStartButton.boundingRect, touchLocation)) { [self startGame]; } Everything! Run, play, win and lose! And most importantly - rejoice! We rejoice in our own, self-written game for iPhone on a pure OpenGL!
Fuh, everything seems to be.Now I can take a break and give a link to what happened to me, as usual, the sources on the githaba . (The attentive reader has already noticed that the ball rotates on the video? Well, there is a code for this on the githaba, but I didn’t want to overload the article)
Of course, this game is far from perfect. It lacks the animation of breaking bricks, falling bonuses, scoring, changing levels, better definition of collisions, attacks of the same sounds. Well, you can still add a table of records, integration with the Game Center, saving the results in iCloud, sending to Facebook / Twitter, achievements and other things, without which the modern game is not taken seriously. But in my plans there was no release of the game in the App Store, so I didn’t bother with all this, since the test task didn’t provide for this either.
PS or WhatWhereFore: And then there was nothing interesting. I went to the interview in ZeptoLab, but very quickly fell on the ignorance of OpenGL at a deep level. But I got my profit: now I know that I can make a simple game if necessary, and in general I figured out a little in a new area for myself. I hope that now you can write a game and you, my dear reader! For this, let me leave, goodbye.
Source: https://habr.com/ru/post/151762/
All Articles