Using Visual Studio 2010 shell to compile projects using gcc on Linux
It's no secret that Microsoft Visual Studio 2010 is a powerful IDE that, among other things, allows you to replace the project build commands of a project by making changes to .vcxproj files. As it turned out, you can use this feature to force Visual Studio to build projects using gcc running on another Linux computer. In this case, the appeal to gcc on Linux should occur over the network, for example, via ssh. In this article we will tell you about the experiment we did on such an unusual setting of Visual Studio.
Suppose we have a program:
')
This program should be built in a Linux environment and using gcc. Of course, this is just an example, in fact, we can talk about a large project for Linux with hundreds of thousands of files and an established build system on a makefile, which does not change the essence of the proposed solution. Our task is to provide the ability to edit the program code in Visual Studio and use the code analysis tools and other tools included in it.
First, let's make a simple makefile for this program:
NAME = test
OBJS = main.o
.SUFFIXES: .cpp
.SUFFIXES: .o
all: $ (NAME)
clean:
rm -rf * .o
cleanall: clean
rm -rf * .d map dep * ~ $ (NAME)
rebuild: cleanall all
@ esho Rebuild done.
$ (NAME): $ (OBJS)
echo Compiling $ (NAME).
g ++ -o $ (NAME) $ (OBJS)
.cpp.o:
gcc -c $ *. cpp
Now we need to solve the following problem: the code should be edited on the Windows platform (Visual Studio), and compiled on Linux. To do this, you can use virtual machines and shared folders. For example, on a Windows host system, you can install any virtualization tool (Oracle VirtualBox or VMware Workstation), then create a virtual machine and install Linux in it. As a result, it is possible to work simultaneously with both Windows and Linux. The Shared Folders feature allows you to access Windows host OS files from a Linux virtual machine.
For VMware Workstation, you can configure shared folders by forwarding, for example, D: \ proj \ in Linux as a folder proj. Then from Windows, you can edit the program file main.c, located on the Windows D: \ proj \ main.c disk and, at the same time, compile it using gcc on Linux in the / mnt / hgfs / proj / folder.
In Visual Studio, you can replace the project build commands:
• Build - build.
• Rebuild - clean and rebuild the project.
• Clean - clean project files (delete all binary files).
plus a team to start a project
For the Linux environment, they will correspond to the following:
• Build: make all
• Rebuild: make rebuild
• Clean: make clean
• Running: ./test
Our task is to run in Windows as if they were launched in the usual cmd, while the input / output of the commands should be redirected back to Windows if we want to see compilation errors right in the environment from Visual Studio. To solve this problem, you can use the plink.exe utility (downloaded from the official website www.chiark.greenend.org.uk/~sgtatham/putty/download.html ) from the Putty package. This utility can execute one ssh command, while correctly redirecting input / output to the current cmd terminal.
Suppose Linux is configured in a virtual machine so that it can be accessed from Windows via ssh using the IP address 192.168.1.8, the user name is user, and the password is 123456. Then, by running cmd, you can successfully execute the command in Windows:
D: \ proj \ tools> plink -batch -pw 123456 user@192.168.1.8 pwd
/ home / user
The result of the program tells us that the 'pwd' was executed in the user's home directory. This means that right in cmd you can compile the test program as follows:
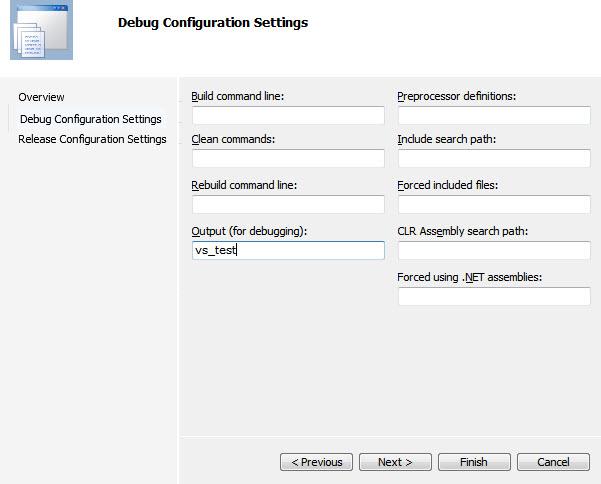
Now we need to integrate the specified method in Visual Studio. To do this, create an empty Solution called vs_test in the proj directory. Add the project 'vs_test' to the created Solution. The project must be of type Makefile (all other default settings).

The result is the following file tree:
D: \ proj \ main.c
D: \ proj \ makefile
D: \ proj \ tools \ plink.exe
D: \ proj \ vs_test \ vs_test.sln
D: \ proj \ vs_test \ vs_test.suo
D: \ proj \ vs_test \ vs_test.sdf
D: \ proj \ vs_test \ vs_test \ vs_test.vcxproj
D: \ proj \ vs_test \ vs_test \ vs_test.vcxproj.filters
D: \ proj \ vs_test \ vs_test \ vs_test.vcxproj.user
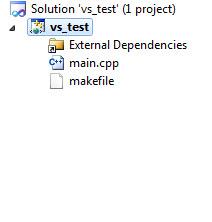
Next you need to add to the project 'vs_test' our makefile and main.c. To do this, use the project option 'Add-> Existing Item ...'. Thus we will receive the following picture in Solution Explorer:
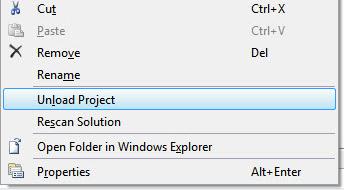
Further, using the option 'Unload project', we unload the project from the solution.
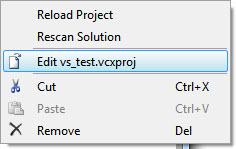
Now open the project file for editing with the option 'Edit vs_test.vcxproj'
Now with the help of 'File-> New-> File ...' we create a text file, and call it make_vs.props, placing it in D: \ proj \ make_vs.props.
Next, using the 'Import' tag, we include the text of the make_vs.props file in vs_test.vcxproj. To do this, in the vs_test.vcxproj file, add a line that imports additional project settings from make_vs.props:
In the file make_vs.props we can override any project settings or add our own. We have such a file make_vs.props:
Restarting the project using the 'Reload project'. And just press F5. Everything should look after this as follows:
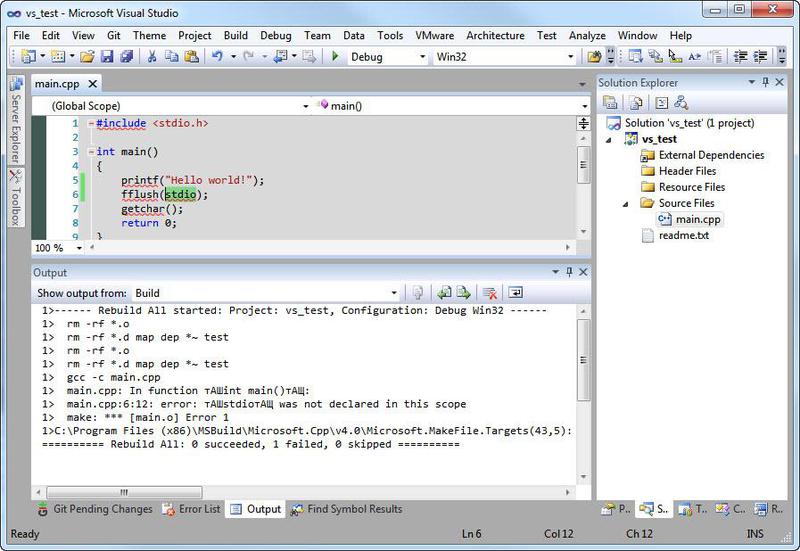

Hooray! Visual Studio itself compiled to make and gcc from Linux, and we got the output from gcc in the IDE window and started our test program, which can also be run from Windows.
Now briefly analyze the main file make_vs.props (start from the end ..). The file is divided into groups of settings in order to avoid unnecessary copying of text from one project to another (the methodology has been tested in practice for Solution from more than a hundred projects of this type).
The first (actually the last) block is the block of settings that Visual Studio uses to build the project, which consists of two duplicate groups for Debug and Release configurations.
As it is not difficult to guess, the tag values are as follows:
• NMakeBuildCommandLine - command Build (make all).
• NMakeReBuildCommandLine - Rebuild command (make rebuild).
• NMakeCleanCommandLine - Clean (make clean) command.
• IncludePath - Include directories list. Without a valid list, VS will not be able to properly process and parse your code.
• LocalDebuggerCommand - the command to start the program after compilation.
• LocalDebuggerCommandArguments - arguments of the command when the program is started after compilation.
At this stage, all values are referenced for other settings. It is convenient to highlight this group of settings in Common.props and include always in all projects of this type.
The next group of settings corresponds to the task of the commands that must be executed during the build.
.
Tag values are as follows:
• RbToolArgs - standard arguments of the plink utility that will always be used.
• RbToolExe - the total value of the beginning of all commands that will be used later.
• RbBuildCmd is a simple build command.
• RbRebuildAllCmd - a simple Rebuild command.
• RbCleanCmd is a simple Clean command.
• RbExecuteCmd - to run the test program after the assembly, everything is divided into a command and arguments - this part is responsible for the arguments.
• RbIncludePath - redefined list of Include directories.
The described group of settings is convenient to select the same Common.props.
The next group of settings, common to all projects, but some parameters will vary depending on the stand settings.
As you can see, the host name, user ID and password are listed, as well as the path to the directory with the Linux project files. These settings are conveniently highlighted in a special user.props and include it in Common.props using the Import tag.
The last group of settings applies only to a specific project.
Tag values are as follows:
• RblFolder - folder where project files are located (for Linux).
• RblIncludePath - list of Include directories (for Windows).
• RblExecute - command to run.
Note that with each Build command, an ssh connection is established, which takes some time (for example, I’ve got about 2-5 seconds).
In the end, we managed to get Visual Studio to build the project using a makefile and gcc from Linux.
Suppose we have a program:
#include <stdio.h> int main() { printf("Hello world!"); fflush(stdout); getchar(); return 0; } ')
This program should be built in a Linux environment and using gcc. Of course, this is just an example, in fact, we can talk about a large project for Linux with hundreds of thousands of files and an established build system on a makefile, which does not change the essence of the proposed solution. Our task is to provide the ability to edit the program code in Visual Studio and use the code analysis tools and other tools included in it.
First, let's make a simple makefile for this program:
NAME = test
OBJS = main.o
.SUFFIXES: .cpp
.SUFFIXES: .o
all: $ (NAME)
clean:
rm -rf * .o
cleanall: clean
rm -rf * .d map dep * ~ $ (NAME)
rebuild: cleanall all
@ esho Rebuild done.
$ (NAME): $ (OBJS)
echo Compiling $ (NAME).
g ++ -o $ (NAME) $ (OBJS)
.cpp.o:
gcc -c $ *. cpp
Now we need to solve the following problem: the code should be edited on the Windows platform (Visual Studio), and compiled on Linux. To do this, you can use virtual machines and shared folders. For example, on a Windows host system, you can install any virtualization tool (Oracle VirtualBox or VMware Workstation), then create a virtual machine and install Linux in it. As a result, it is possible to work simultaneously with both Windows and Linux. The Shared Folders feature allows you to access Windows host OS files from a Linux virtual machine.
For VMware Workstation, you can configure shared folders by forwarding, for example, D: \ proj \ in Linux as a folder proj. Then from Windows, you can edit the program file main.c, located on the Windows D: \ proj \ main.c disk and, at the same time, compile it using gcc on Linux in the / mnt / hgfs / proj / folder.
In Visual Studio, you can replace the project build commands:
• Build - build.
• Rebuild - clean and rebuild the project.
• Clean - clean project files (delete all binary files).
plus a team to start a project
For the Linux environment, they will correspond to the following:
• Build: make all
• Rebuild: make rebuild
• Clean: make clean
• Running: ./test
Our task is to run in Windows as if they were launched in the usual cmd, while the input / output of the commands should be redirected back to Windows if we want to see compilation errors right in the environment from Visual Studio. To solve this problem, you can use the plink.exe utility (downloaded from the official website www.chiark.greenend.org.uk/~sgtatham/putty/download.html ) from the Putty package. This utility can execute one ssh command, while correctly redirecting input / output to the current cmd terminal.
Suppose Linux is configured in a virtual machine so that it can be accessed from Windows via ssh using the IP address 192.168.1.8, the user name is user, and the password is 123456. Then, by running cmd, you can successfully execute the command in Windows:
D: \ proj \ tools> plink -batch -pw 123456 user@192.168.1.8 pwd
/ home / user
The result of the program tells us that the 'pwd' was executed in the user's home directory. This means that right in cmd you can compile the test program as follows:
  D: \ proj \ tools> plink -batch -pw 123456 user@192.168.1.8 cd / mnt / hgfs / proj /;  make rebuild
 rm -rf * .o
 rm -rf * .d map dep * ~ test
 gcc -c main.cpp
 Compiling test.
 g ++ -o test main.o
 Rebuild done.
Now we need to integrate the specified method in Visual Studio. To do this, create an empty Solution called vs_test in the proj directory. Add the project 'vs_test' to the created Solution. The project must be of type Makefile (all other default settings).
The result is the following file tree:
D: \ proj \ main.c
D: \ proj \ makefile
D: \ proj \ tools \ plink.exe
D: \ proj \ vs_test \ vs_test.sln
D: \ proj \ vs_test \ vs_test.suo
D: \ proj \ vs_test \ vs_test.sdf
D: \ proj \ vs_test \ vs_test \ vs_test.vcxproj
D: \ proj \ vs_test \ vs_test \ vs_test.vcxproj.filters
D: \ proj \ vs_test \ vs_test \ vs_test.vcxproj.user
Next you need to add to the project 'vs_test' our makefile and main.c. To do this, use the project option 'Add-> Existing Item ...'. Thus we will receive the following picture in Solution Explorer:
Further, using the option 'Unload project', we unload the project from the solution.
Now open the project file for editing with the option 'Edit vs_test.vcxproj'
Now with the help of 'File-> New-> File ...' we create a text file, and call it make_vs.props, placing it in D: \ proj \ make_vs.props.
Next, using the 'Import' tag, we include the text of the make_vs.props file in vs_test.vcxproj. To do this, in the vs_test.vcxproj file, add a line that imports additional project settings from make_vs.props:
<Import Project="$(VCTargetsPath)\Microsoft.Cpp.props" /> <Import Project="$(SolutionDir)..\make_vs.props" /> <ImportGroup Label="ExtensionSettings"> </ImportGroup> In the file make_vs.props we can override any project settings or add our own. We have such a file make_vs.props:
<?xml version="1.0" encoding="utf-8"?> <Project xmlns="http://schemas.microsoft.com/developer/msbuild/2003"> <PropertyGroup Label="RemoteBuildLocals"> <RblFolder>proj</RblFolder> <RblIncludePath>$(SolutionDir)\..\inc\</RblIncludePath> <RblExecute>./test</RblExecute> </PropertyGroup> <PropertyGroup Label="RemoteBuildSettings"> <RbHost>192.168.1.8</RbHost> <RbUser>user</RbUser> <RbPassword>123456</RbPassword> <RbRoot>test_src</RbRoot> </PropertyGroup> <PropertyGroup Label="RemoteBuild"> <RbToolArgs> -pw $(RbPassword) $(RbUser)%40$(RbHost) cd $(RbRoot); cd $(RblFolder);</RbToolArgs> <RbToolExe>$(SolutionDir)..\tools\plink -batch $(RbToolArgs)</RbToolExe> <RbBuildCmd>$(RbToolExe) make all</RbBuildCmd> <RbRebuildAllCmd>$(RbToolExe) make rebuild</RbRebuildAllCmd> <RbCleanCmd>$(RbToolExe) make cleanall</RbCleanCmd> <RbExecuteCmd>$(RbToolArgs) $(RblExecute)</RbExecuteCmd> <RbIncludePath>$(RblIncludePath)</RbIncludePath> </PropertyGroup> <PropertyGroup Condition="'$(Configuration)|$(Platform)'=='Debug|Win32'"> <NMakeBuildCommandLine>$(RbBuildCmd)</NMakeBuildCommandLine> <NMakeReBuildCommandLine>$(RbRebuildAllCmd)</NMakeReBuildCommandLine> <NMakeCleanCommandLine>$(RbCleanCmd)</NMakeCleanCommandLine> <IncludePath>$(RbIncludePath)</IncludePath> <LocalDebuggerCommand>$(SolutionDir)..\tools\plink</LocalDebuggerCommand> <LocalDebuggerCommandArguments>$(RbExecuteCmd)</LocalDebuggerCommandArguments> </PropertyGroup> <PropertyGroup Condition="'$(Configuration)|$(Platform)'=='Release|Win32'"> <NMakeBuildCommandLine>$(RbBuildCmd)</NMakeBuildCommandLine> <NMakeReBuildCommandLine>$(RbRebuildAllCmd)</NMakeReBuildCommandLine> <NMakeCleanCommandLine>$(RbCleanCmd)</NMakeCleanCommandLine> <IncludePath>$(RbIncludePath)</IncludePath> <LocalDebuggerCommand>$(SolutionDir)..\tools\plink</LocalDebuggerCommand> <LocalDebuggerCommandArguments>$(RbExecuteCmd)</LocalDebuggerCommandArguments> </PropertyGroup> </Project> Restarting the project using the 'Reload project'. And just press F5. Everything should look after this as follows:
Hooray! Visual Studio itself compiled to make and gcc from Linux, and we got the output from gcc in the IDE window and started our test program, which can also be run from Windows.
Now briefly analyze the main file make_vs.props (start from the end ..). The file is divided into groups of settings in order to avoid unnecessary copying of text from one project to another (the methodology has been tested in practice for Solution from more than a hundred projects of this type).
The first (actually the last) block is the block of settings that Visual Studio uses to build the project, which consists of two duplicate groups for Debug and Release configurations.
<PropertyGroup Condition="'$(Configuration)|$(Platform)'=='Debug|Win32'"> <NMakeBuildCommandLine>$(RbBuildCmd)</NMakeBuildCommandLine> <NMakeReBuildCommandLine>$(RbRebuildAllCmd)</NMakeReBuildCommandLine> <NMakeCleanCommandLine>$(RbCleanCmd)</NMakeCleanCommandLine> <IncludePath>$(RbIncludePath)</IncludePath> <LocalDebuggerCommand>$(SolutionDir)..\tools\plink</LocalDebuggerCommand> <LocalDebuggerCommandArguments>$(RbExecuteCmd)</LocalDebuggerCommandArguments> </PropertyGroup> <PropertyGroup Condition="'$(Configuration)|$(Platform)'=='Release|Win32'"> <NMakeBuildCommandLine>$(RbBuildCmd)</NMakeBuildCommandLine> <NMakeReBuildCommandLine>$(RbRebuildAllCmd)</NMakeReBuildCommandLine> <NMakeCleanCommandLine>$(RbCleanCmd)</NMakeCleanCommandLine> <IncludePath>$(RbIncludePath)</IncludePath> <LocalDebuggerCommand>$(SolutionDir)..\tools\plink</LocalDebuggerCommand> <LocalDebuggerCommandArguments>$(RbExecuteCmd)</LocalDebuggerCommandArguments> </PropertyGroup> As it is not difficult to guess, the tag values are as follows:
• NMakeBuildCommandLine - command Build (make all).
• NMakeReBuildCommandLine - Rebuild command (make rebuild).
• NMakeCleanCommandLine - Clean (make clean) command.
• IncludePath - Include directories list. Without a valid list, VS will not be able to properly process and parse your code.
• LocalDebuggerCommand - the command to start the program after compilation.
• LocalDebuggerCommandArguments - arguments of the command when the program is started after compilation.
At this stage, all values are referenced for other settings. It is convenient to highlight this group of settings in Common.props and include always in all projects of this type.
The next group of settings corresponds to the task of the commands that must be executed during the build.
.
<PropertyGroup Label="RemoteBuild"> <RbToolArgs> -pw $(RbPassword) $(RbUser)%40$(RbHost) cd $(RbRoot); cd $(RblFolder);</RbToolArgs> <RbToolExe>$(SolutionDir)..\tools\plink -batch $(RbToolArgs)</RbToolExe> <RbBuildCmd>$(RbToolExe) make all</RbBuildCmd> <RbRebuildAllCmd>$(RbToolExe) make rebuild</RbRebuildAllCmd> <RbCleanCmd>$(RbToolExe) make cleanall</RbCleanCmd> <RbExecuteCmd>$(RbToolArgs) $(RblExecute)</RbExecuteCmd> <RbIncludePath>$(RblIncludePath)</RbIncludePath> </PropertyGroup> Tag values are as follows:
• RbToolArgs - standard arguments of the plink utility that will always be used.
• RbToolExe - the total value of the beginning of all commands that will be used later.
• RbBuildCmd is a simple build command.
• RbRebuildAllCmd - a simple Rebuild command.
• RbCleanCmd is a simple Clean command.
• RbExecuteCmd - to run the test program after the assembly, everything is divided into a command and arguments - this part is responsible for the arguments.
• RbIncludePath - redefined list of Include directories.
The described group of settings is convenient to select the same Common.props.
The next group of settings, common to all projects, but some parameters will vary depending on the stand settings.
<PropertyGroup Label="RemoteBuildSettings"> <RbHost>192.168.1.8</RbHost> <RbUser>user</RbUser> <RbPassword>123456</RbPassword> <RbRoot>test_src</RbRoot> </PropertyGroup> As you can see, the host name, user ID and password are listed, as well as the path to the directory with the Linux project files. These settings are conveniently highlighted in a special user.props and include it in Common.props using the Import tag.
The last group of settings applies only to a specific project.
<PropertyGroup Label="RemoteBuildLocals"> <RblFolder>proj</RblFolder> <RblIncludePath>$(SolutionDir)\..\inc\</RblIncludePath> <RblExecute>./test</RblExecute> </PropertyGroup> Tag values are as follows:
• RblFolder - folder where project files are located (for Linux).
• RblIncludePath - list of Include directories (for Windows).
• RblExecute - command to run.
Note that with each Build command, an ssh connection is established, which takes some time (for example, I’ve got about 2-5 seconds).
In the end, we managed to get Visual Studio to build the project using a makefile and gcc from Linux.
Source: https://habr.com/ru/post/151712/
All Articles