Publish applications in the Windows Store. Part One - Register in the Windows Store
The Windows Store (Windows Store) has opened its doors to all developers who want to show their applications to a growing audience with the largest potential in history. During the availability of Windows 8 Developer Preview, Consumer Preview and Release Preview, these distributions have been downloaded only from the Microsoft website more than 16 million times, of which more than 7 million are the Release Preview. While some are proud that the latest version of their OS was installed on 7 million computers, we see that only the preliminary release of Windows 8 in the absence of new devices on the market has already been installed by 7 million people. However, this article is intended primarily for those who do not need to be convinced of the great potential of Windows 8 for developers. If you have already started developing a Windows 8 application for the purpose of publishing it in the Windows Store or, even more so, have already developed such an application, this article is for you.
So, what are the basic rules and features of registration in the Windows Store and the subsequent publication of applications.

Actually, many people have been waiting for the opportunity to make this step for many months. First you need three things:
By the way, about tokens. Three categories of developers can register for free at the Windows Store:
If you are a MSDN subscriber of the appropriate level, then in the “Subscription Benefits” section you have this section

This is where you can get the registration code (token) for Windows Store. This is a sequence of 6-10 letters and numbers.
')
Go to https://appdev.microsoft.com/StorePortals/Account/Signup/Start and log in with your Microsoft ID, which was discussed above.
By the way, during the authentication process in the Windows Store (and not only during the registration process), the Microsoft ID subsystem will sometimes ask you for a Security Code. Before that, he will be sent to the mail or via SMS. An “additional” address from the Microsoft ID profile will be selected as the mailing address.

You can add more additional addresses and phone numbers on this page . If you are not authenticating for the first time, the “I trust this PC” option will eliminate the need to enter the code for quite a long time (cookies must be enabled).
After successful authentication you have to choose the country of registration and the type of account.
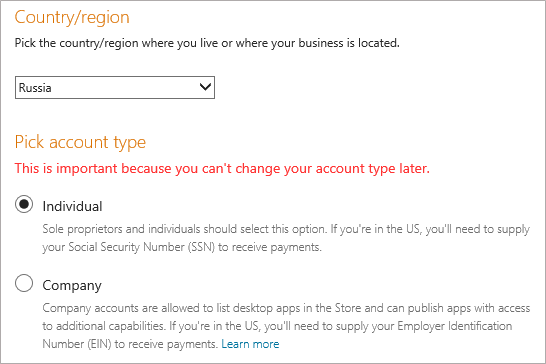
As already mentioned, the country should be chosen based on your real residence, as well as the country of issue of the bank card. For legal entities, this is even more critical, since they have yet to confirm their existence - to undergo the validation procedure.
With account type everything is easier. Individual - an individual (individual account), Company - a legal entity (organization account).
Organizational accounts require a bit more sophisticated validation, as Microsoft must be sure that you are authorized to create an account on behalf of the organization. This is the only type of account that can send desktop applications to the store. In addition, organization accounts can send applications that use several additional features:
Learn more about these features in MSDN, in the Capability section.
Go to the next step.
This is the most important step in registering with the Windows Store.
In the contact details, in addition to the obvious first and last names, the most important is the Email field.
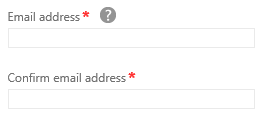
This address will be used as the primary in all correspondence with the Windows Store team. Check your email carefully and regularly, including Junk Email.
All contact details are used solely to contact you with questions related to your account. For example, the first message you receive will be a confirmation of the completion of your registration. Then messages will be sent when you transfer our payments to you or when you need to make corrections to your account.
Most of the data entered into the registration form does not require additional explanations, however, the content of some fields may not be clear.
Specify the website that you would like to link to a developer account. Customers will not be able to see the data you entered in this field until you enter the same data on the application description page.
Publisher name (publisher display name) is the name under which your applications will be placed in the Store. Customers will see this name when purchasing applications. The name of the publisher must be unique, while in the case of checking your account you will not be able to change this name until the verification is completed.
If you cannot back up the name of the publisher that you used in another account of Microsoft Developer Services, see the instructions in Selecting a Microsoft Account for the Windows Store . You may need to start registration again. Take responsibility for choosing your publisher name responsibly, as it will become your trademark in the Store. From this name, customers will receive the first information about your applications, so choose a name that reflects your personality and nature of your products. Make sure that the publisher name you choose does not belong to another user. If the name you chose was previously registered as a trademark or copyrighted by another user, your account may be closed.
Developer Account Information
Developer account information contains developer contact information for the account. For both individual and corporate account, you must enter information about the contact person who will receive notifications about this account.
Corporate account information
Unlike individual accounts, corporate accounts require additional information.
For organization accounts, a check will immediately begin after registration, which is performed by Microsoft contractors - Symantec and GeoTrust. Check your email carefully and regularly, including Junk Email, so as not to miss important instructions. You may be asked for copies of documents confirming the registration of the company (Articles of Association, Memorandum of Association, certificate of registration). In some cases, you may need notarization of the copies and sending them by regular mail.
Go to the next step.
You must accept the Windows Store App Developer Agreement . This will take us to the next step.
If you have a registration code (token), enter it. As a result of entering the code, the amount for registration payment may decrease. Please note that the token can only be used once!
Data entry for payment
Regardless of whether you used the registration code and what type of account you have, in this step you need to enter your bank card details to pay for the registration in the Windows Store. Please note again that we have prepared for you a set of tips for registering virtual bank cards .
The validity and validity of the entered data will be verified by blocking a small amount. This retention transaction is performed solely for the purpose of checking your account and verifying your authenticity. However, this may cause a temporary decrease in the amount of available credit in your account. Retention of this amount for your account after a short period of time is canceled. The exact time of retention of the said amount from your account depends on the particular financial institution.
Immediately after completing the registration at https://appdev.microsoft.com/StorePortals/en-us/Home, you will see a link, clicking on which you will need to enter the code sent via SMS or the exact amount taken from the bank card.
Go to the next step.
View the so-called order data again and click "Purchase". If everything went well, you will find yourself in the “Dashboard” section (Dashboard).
Congratulations! You are registered!

Now you can reserve a name for your first application. This is an important step for many reasons. Here are just some of them:
Click " Submit an app ". In the application publishing panel that opens, select the first section - " App name ". In the field “App name” enter the name of the application. This is exactly the name that potential buyers will see. Click “Reserve app name”.
After successful reservation of the name above the Save button, you will see the following inscription:

Why do you need it? Reserving additional names is necessary to enter the application name in all languages for which you decide to localize the application interface. This can be done in this section.
Running a little ahead, it is worth saying that you can (and should) localize not only the application interface and its description in the Store, but also the name and even the tile.
However, we will discuss the preparation of an application for publication in the Windows Store in the next article.
Details on registering and managing a developer account are published on MSDN in the section How to become a Windows Store developer .
If you’re just going to develop applications for Windows 8, it’s best to start here .
So, what are the basic rules and features of registration in the Windows Store and the subsequent publication of applications.
Step one. Check in.
Actually, many people have been waiting for the opportunity to make this step for many months. First you need three things:
- Microsoft ID (also known as Live ID). If you do not already have a Microsoft ID, create it . You can use any valid e-mail address for the login or get a new one, for example, at outlook.com . We strongly recommend that you specify a valid mobile phone in your Microsoft ID profile. It can receive important SMS. It is also necessary that the country Microsoft ID (there is such a parameter) coincides with the country in which your credit card is issued. Which card? About this next point.
- Regardless of which account you register, you need a valid bank card. If you register with a token that gives you the right to register for free on some lines, a small amount will still be blocked on the card. This is necessary to verify it. If for some reason it is not possible to use the card, we have prepared for you a set of tips on registering virtual bank cards .
- And finally, you need a valid email address, which will be chosen as the primary email address for correspondence with the Windows Store team. This may be the same address, which is tied to the Microsoft ID.
By the way, about tokens. Three categories of developers can register for free at the Windows Store:
- Students - through the program DreamSpark .
- Startups - via BizSpark .
- MSDN subscribers (Visual Studio Professional, Test Professional, Premium and Ultimate levels).
If you are a MSDN subscriber of the appropriate level, then in the “Subscription Benefits” section you have this section
This is where you can get the registration code (token) for Windows Store. This is a sequence of 6-10 letters and numbers.
')
Begin registration.
Go to https://appdev.microsoft.com/StorePortals/Account/Signup/Start and log in with your Microsoft ID, which was discussed above.
By the way, during the authentication process in the Windows Store (and not only during the registration process), the Microsoft ID subsystem will sometimes ask you for a Security Code. Before that, he will be sent to the mail or via SMS. An “additional” address from the Microsoft ID profile will be selected as the mailing address.
You can add more additional addresses and phone numbers on this page . If you are not authenticating for the first time, the “I trust this PC” option will eliminate the need to enter the code for quite a long time (cookies must be enabled).
Select account type
After successful authentication you have to choose the country of registration and the type of account.
As already mentioned, the country should be chosen based on your real residence, as well as the country of issue of the bank card. For legal entities, this is even more critical, since they have yet to confirm their existence - to undergo the validation procedure.
With account type everything is easier. Individual - an individual (individual account), Company - a legal entity (organization account).
Organizational accounts require a bit more sophisticated validation, as Microsoft must be sure that you are authorized to create an account on behalf of the organization. This is the only type of account that can send desktop applications to the store. In addition, organization accounts can send applications that use several additional features:
- enterpriseAuthentication . Uses your Windows credentials to access your corporate intranet.
- sharedUserCertificates . Allows you to use software and hardware certificates or a smart card to identify users in the application.
- documentsLibrary . Allows access to a library of user documents, including the ability to add, change, and delete files.
Learn more about these features in MSDN, in the Capability section.
Go to the next step.
Enter Account Information
This is the most important step in registering with the Windows Store.
In the contact details, in addition to the obvious first and last names, the most important is the Email field.
This address will be used as the primary in all correspondence with the Windows Store team. Check your email carefully and regularly, including Junk Email.
All contact details are used solely to contact you with questions related to your account. For example, the first message you receive will be a confirmation of the completion of your registration. Then messages will be sent when you transfer our payments to you or when you need to make corrections to your account.
Most of the data entered into the registration form does not require additional explanations, however, the content of some fields may not be clear.
- Web site
- Publisher name (publisher display name)
Specify the website that you would like to link to a developer account. Customers will not be able to see the data you entered in this field until you enter the same data on the application description page.
Publisher name (publisher display name) is the name under which your applications will be placed in the Store. Customers will see this name when purchasing applications. The name of the publisher must be unique, while in the case of checking your account you will not be able to change this name until the verification is completed.
If you cannot back up the name of the publisher that you used in another account of Microsoft Developer Services, see the instructions in Selecting a Microsoft Account for the Windows Store . You may need to start registration again. Take responsibility for choosing your publisher name responsibly, as it will become your trademark in the Store. From this name, customers will receive the first information about your applications, so choose a name that reflects your personality and nature of your products. Make sure that the publisher name you choose does not belong to another user. If the name you chose was previously registered as a trademark or copyrighted by another user, your account may be closed.
Developer Account Information
Developer account information contains developer contact information for the account. For both individual and corporate account, you must enter information about the contact person who will receive notifications about this account.
Corporate account information
Unlike individual accounts, corporate accounts require additional information.
- VAT ID If your company has a value added tax (VAT) payer code, enter it in this field.
- Microsoft Approver or Approver verifies corporate accounts by contacting the company's official representative listed in the Approver info section. Accurate and valid information in Approver info helps eliminate delays in the approval process.
For organization accounts, a check will immediately begin after registration, which is performed by Microsoft contractors - Symantec and GeoTrust. Check your email carefully and regularly, including Junk Email, so as not to miss important instructions. You may be asked for copies of documents confirming the registration of the company (Articles of Association, Memorandum of Association, certificate of registration). In some cases, you may need notarization of the copies and sending them by regular mail.
Go to the next step.
Developer Agreement
You must accept the Windows Store App Developer Agreement . This will take us to the next step.
Enter Registration Code (Token)
If you have a registration code (token), enter it. As a result of entering the code, the amount for registration payment may decrease. Please note that the token can only be used once!
Data entry for payment
Regardless of whether you used the registration code and what type of account you have, in this step you need to enter your bank card details to pay for the registration in the Windows Store. Please note again that we have prepared for you a set of tips for registering virtual bank cards .
The validity and validity of the entered data will be verified by blocking a small amount. This retention transaction is performed solely for the purpose of checking your account and verifying your authenticity. However, this may cause a temporary decrease in the amount of available credit in your account. Retention of this amount for your account after a short period of time is canceled. The exact time of retention of the said amount from your account depends on the particular financial institution.
Immediately after completing the registration at https://appdev.microsoft.com/StorePortals/en-us/Home, you will see a link, clicking on which you will need to enter the code sent via SMS or the exact amount taken from the bank card.
Go to the next step.
the confirmation
View the so-called order data again and click "Purchase". If everything went well, you will find yourself in the “Dashboard” section (Dashboard).
Congratulations! You are registered!
Application Name Reservation
Now you can reserve a name for your first application. This is an important step for many reasons. Here are just some of them:
- While there are not many applications in the Windows Store yet, you can choose new attractive titles for yourself.
- This can be done by your competitors.
- You should be careful to choose a name, respecting registered trademarks and, in general, the laws of the countries where you intend to make your application available.
Click " Submit an app ". In the application publishing panel that opens, select the first section - " App name ". In the field “App name” enter the name of the application. This is exactly the name that potential buyers will see. Click “Reserve app name”.
After successful reservation of the name above the Save button, you will see the following inscription:
Why do you need it? Reserving additional names is necessary to enter the application name in all languages for which you decide to localize the application interface. This can be done in this section.
Running a little ahead, it is worth saying that you can (and should) localize not only the application interface and its description in the Store, but also the name and even the tile.
However, we will discuss the preparation of an application for publication in the Windows Store in the next article.
Details on registering and managing a developer account are published on MSDN in the section How to become a Windows Store developer .
If you’re just going to develop applications for Windows 8, it’s best to start here .
Source: https://habr.com/ru/post/151615/
All Articles