Wiring Alternative for Arduino - BASCOM-AVR
Well, I do not like this your wiring. And for some reason, he also compiles me very slowly, and then he thinks for a long time before the firmware.
I will try to talk about an alternative environment for programming AVR controllers, which combines a code editor, compiler, and debugger simulator. In addition, in the latest versions, the environment without unnecessary gestures can be used with the Arduino bootloader (that is, without reworking the board, flashing the bootloader, etc.)

Installation
We go to Offsite , or simply follow the second link at the end of the topic - the demo version of the environment will immediately start loading (30Mb). The demo only means that it will allow you to collect projects whose compiled weight does not exceed 4K. For most projects, this is enough (yeah, especially for Attiny2313 ), and if not - the crack for the latest version on the rutreker will have to be bought, since it costs not so much - 89 euros .
The installation is completely normal, if someone does not run in Win7 and above - set the compatibility mode with XP. Vain works perfectly fine. Actually, you can not install - just copy the folder, quite a portable version.
Using
Main window:
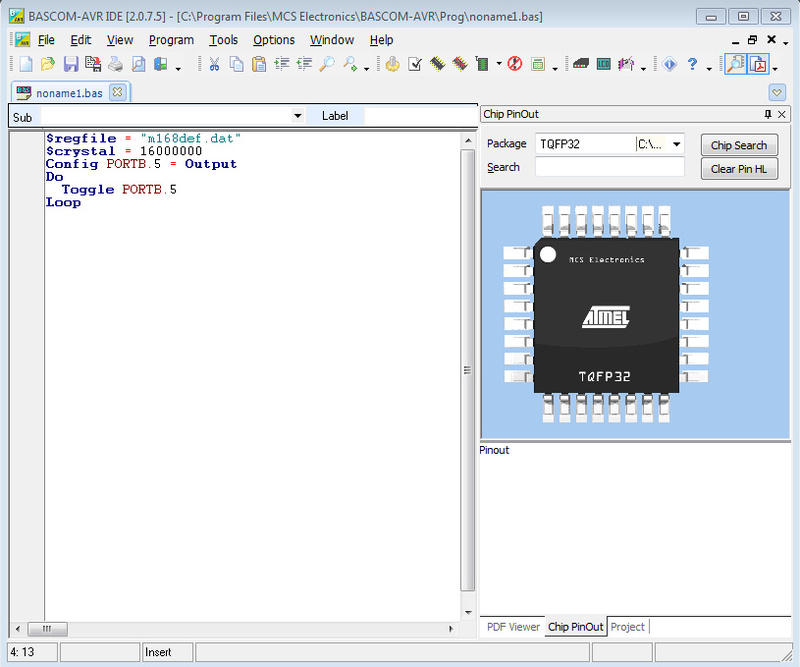
All buttons are prompted, and I think there is no need to explain what and where is located.
In the latest versions, she was very decently translated into Russian, which can be included in Options - Environment - IDE - Language - Russian.
')
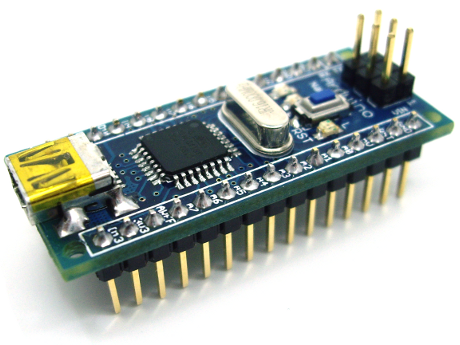
Here I have a copy of the Arduino Nano board, which I used for a long time when debugging, flashing directly through the connector of the programmer, because of dislike for the Arduino IDE.
Let's try to write something for her. First you need to set the type of MK - Atmega168, this is done here with this line:
Why such a line, thinking it is clear. Of course, you can set the type of controller in Settings - Compiler - MK, but in the text it is more convenient. You can see how the files for different controllers are called in the program folder (c: \ Program Files \ MCS Electronics \ BASCOM-AVR \ *. Dat).
Set the clock frequency:
16MHz Does not affect anything, except for counting time intervals (waitms). Does not set the frequency for the controller. You still have to expose it yourself, I program the Fuse block. However, for Arduino this can not bother.
Configuring ports:
No number pins, only hardcore. We look at the specific controller, and see the names of the ports:
PD1 = portd.1, pb4 = portb.4
You can set each port separately, but simply write: Config Portb = Output
We start an unconditional cycle (it can be done without it, then the program will be executed only once when the controller is started)
And inside it, for example, we blink an LED:
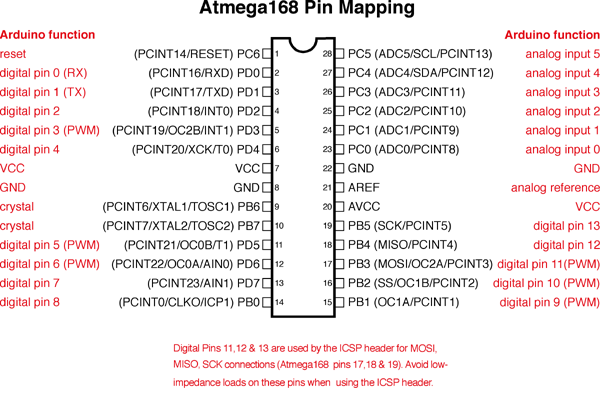
Portb.5 is the same as pin 13 in arduine. Compliance (if you are used to the name of the port) can be found here:
The syntax is very simple and resembles basic. 7 types of variables: Bit, Byte, Integer, Word, Long, Single, String.
Which are announced at the beginning of the program like this: Dim A as Single
A very simple connection to the screens on the HD44780 controller:
And the same simple text output to them:
But despite the simplicity, there is a cursor control, built-in character editor, support for the Cyrillic alphabet.
Simple sound generation:
That means, to issue on PB0 a meander with a frequency of 500 Hz and a duration of 100 ms.
DTMF tone generation:
15th tone for 100ms.
Work with UART (both with hardware and software):
Interrupt handling:
With timers:
Arduino firmware
In the latest version, developers have added support for the Arduine bootloader, and we only need to make a few settings.
Options - Programmer - ARDUINO . After that, specify the com-port, and speed.

In my case, the speed had to be sure to specify exactly 19200, otherwise the board was not flashing. You can view the parameters of all the boards in the file at arduino-1.0.1 \ hardware \ arduino \ boards.txt
By the way, there is also the size of the memory, and the frequency of the crystal:
An alternative way to boot (I do not like the built-in flash driver with its slowness) - using AVRDUDE, the most powerful console programmer.
Download the latest version from here , for example avrdude-5.11.tar.gz . We unpack in a folder with the program.
Go to Options - Programmer - External Programmer , and specify the path to the executable file after Programm :
"C: \ Program Files \ MCS Electronics \ BASCOM-AVR \ ARVDUDE \ avrdude.exe"
And in the following, the parameters are as follows:
-C "C: \ Program Files \ MCS Electronics \ BASCOM-AVR \ ARVDUDE \ avrdude.conf" -p atmega168 -P com2 -c arduino -b 19200 -U flash: w: {FILE}: i
Everything is clear from the names, we show where the config lies, indicate the type of controller, port, protocol, speed, work with flash, record, and file. Put a tick Use HEX file.
For greater joy, you can also mention the item Program after compile - to compile and flash with one button.
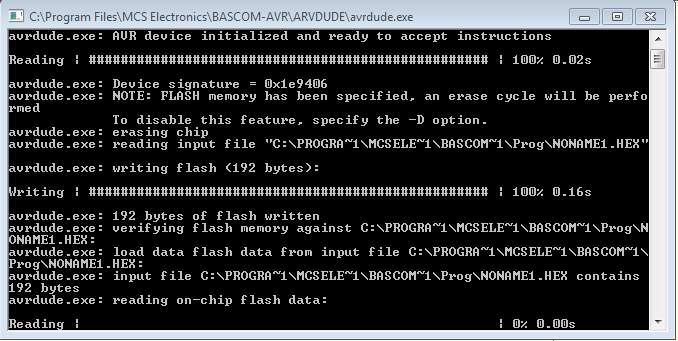
When assembling, the program shows the consumption of available flash:

And then ARVDUDE starts up:
You can also turn on the help on the pins of the selected controller (there is a default, and if not, then View - Pin Layout is enabled):

When you hover over the pin, shows its name and description.
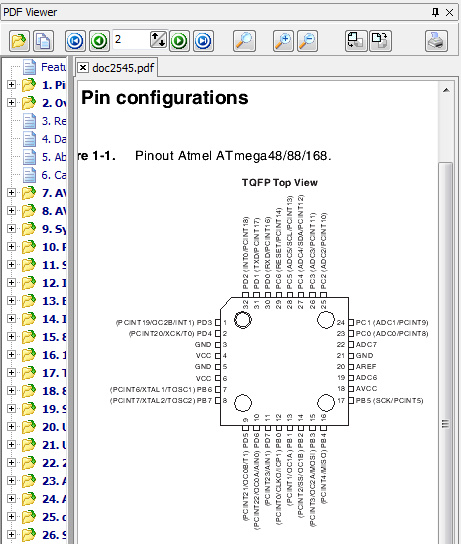
If this is not enough, then you can download the datasheet and enable View - PDF Viewer :
Another cool thing is the built-in debugger with iron simulation, break-points and step-by-step execution.
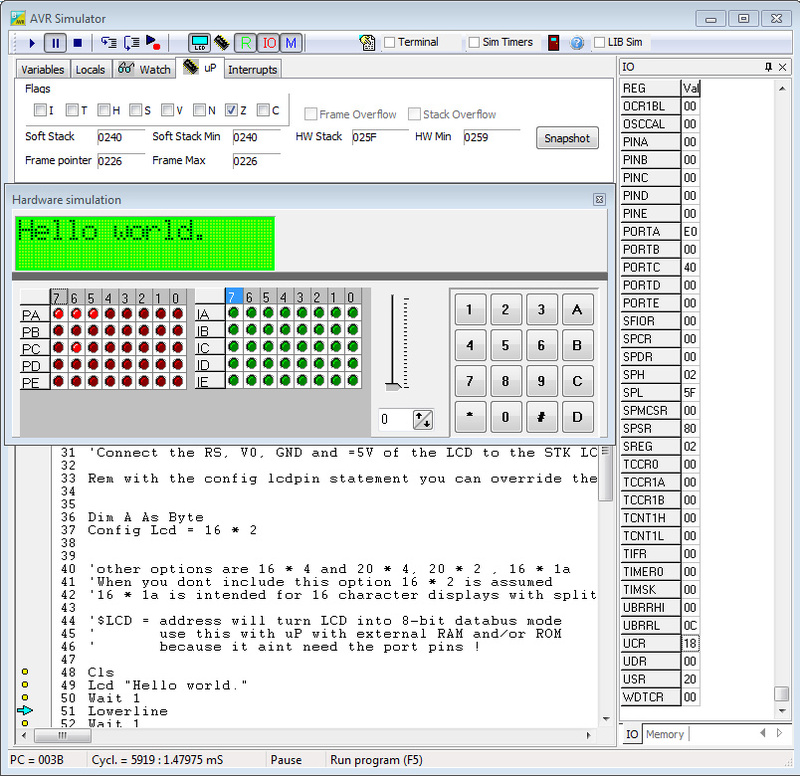
It is activated by pressing a button with a red microcircuit, of course, you must first compile the program.
And for sweetness, the code compiled in bascom is much smaller in size and is often executed faster than the code from the Arduino IDE.
For example, the standard blink (flashing LED):
For Arduino:
It is compiled into a hex with the size of 3078 (!!!) bytes, and it pulls the pin with a frequency of 210kHz:

And in Bascom, written like this:
It takes 553 bytes (five times less) hex, and already flashes at 1.6 MHz:
References:
I will try to talk about an alternative environment for programming AVR controllers, which combines a code editor, compiler, and debugger simulator. In addition, in the latest versions, the environment without unnecessary gestures can be used with the Arduino bootloader (that is, without reworking the board, flashing the bootloader, etc.)
Installation
We go to Offsite , or simply follow the second link at the end of the topic - the demo version of the environment will immediately start loading (30Mb). The demo only means that it will allow you to collect projects whose compiled weight does not exceed 4K. For most projects, this is enough (yeah, especially for Attiny2313 ), and if not - the The installation is completely normal, if someone does not run in Win7 and above - set the compatibility mode with XP. Vain works perfectly fine. Actually, you can not install - just copy the folder, quite a portable version.
Using
Main window:All buttons are prompted, and I think there is no need to explain what and where is located.
In the latest versions, she was very decently translated into Russian, which can be included in Options - Environment - IDE - Language - Russian.
')
Here I have a copy of the Arduino Nano board, which I used for a long time when debugging, flashing directly through the connector of the programmer, because of dislike for the Arduino IDE.
Let's try to write something for her. First you need to set the type of MK - Atmega168, this is done here with this line:
$regfile = "m168def.dat" Why such a line, thinking it is clear. Of course, you can set the type of controller in Settings - Compiler - MK, but in the text it is more convenient. You can see how the files for different controllers are called in the program folder (c: \ Program Files \ MCS Electronics \ BASCOM-AVR \ *. Dat).
Set the clock frequency:
$crystal = 16000000 16MHz Does not affect anything, except for counting time intervals (waitms). Does not set the frequency for the controller. You still have to expose it yourself, I program the Fuse block. However, for Arduino this can not bother.
Configuring ports:
Config Portb.5 = Output No number pins, only hardcore. We look at the specific controller, and see the names of the ports:
PD1 = portd.1, pb4 = portb.4
You can set each port separately, but simply write: Config Portb = Output
We start an unconditional cycle (it can be done without it, then the program will be executed only once when the controller is started)
Do Loop And inside it, for example, we blink an LED:
Toggle Portb.5 Portb.5 is the same as pin 13 in arduine. Compliance (if you are used to the name of the port) can be found here:
The syntax is very simple and resembles basic. 7 types of variables: Bit, Byte, Integer, Word, Long, Single, String.
Which are announced at the beginning of the program like this: Dim A as Single
A very simple connection to the screens on the HD44780 controller:
Config lcd = 16*2 Config lcdpin = PIN, DB4 = PORTB.1,DB5=PORTB.2,DB6=PORTB.3,DB7=PORTB.4,E=PORTB.5,RS=PORTB.6 Config lcdmode = PORT And the same simple text output to them:
Lcd "Hello, habr! " ; time But despite the simplicity, there is a cursor control, built-in character editor, support for the Cyrillic alphabet.
Simple sound generation:
Sound, Portb.0, 100, 500 That means, to issue on PB0 a meander with a frequency of 500 Hz and a duration of 100 ms.
DTMF tone generation:
Dtmfout, 15, 100 15th tone for 100ms.
Work with UART (both with hardware and software):
Dim Name as String * 10 $Baud = 9600 Input "Hello, print you name", Name Print "Name: " ; Name Interrupt handling:
On Int0 Button - Config Int0 = Low Level - Enable Interrupts - Enable Int0 Button: Incr Cntr Return With timers:
Config Timer0 = Timer , Prescale = 64 - On Timer0 Pulse: - Enable Interrupts - Enable Timer0 Pulse: Incr Cntr Return Arduino firmware
In the latest version, developers have added support for the Arduine bootloader, and we only need to make a few settings.Options - Programmer - ARDUINO . After that, specify the com-port, and speed.
In my case, the speed had to be sure to specify exactly 19200, otherwise the board was not flashing. You can view the parameters of all the boards in the file at arduino-1.0.1 \ hardware \ arduino \ boards.txt
By the way, there is also the size of the memory, and the frequency of the crystal:
nano.name=Arduino Nano w/ ATmega168 nano.upload.maximum_size=14336 nano.upload.speed=19200 nano.bootloader.low_fuses=0xff nano.bootloader.high_fuses=0xdd nano.bootloader.extended_fuses=0x00 nano.build.mcu=atmega168 nano.build.f_cpu=16000000L An alternative way to boot (I do not like the built-in flash driver with its slowness) - using AVRDUDE, the most powerful console programmer.
Download the latest version from here , for example avrdude-5.11.tar.gz . We unpack in a folder with the program.
Go to Options - Programmer - External Programmer , and specify the path to the executable file after Programm :
"C: \ Program Files \ MCS Electronics \ BASCOM-AVR \ ARVDUDE \ avrdude.exe"
And in the following, the parameters are as follows:
-C "C: \ Program Files \ MCS Electronics \ BASCOM-AVR \ ARVDUDE \ avrdude.conf" -p atmega168 -P com2 -c arduino -b 19200 -U flash: w: {FILE}: i
Everything is clear from the names, we show where the config lies, indicate the type of controller, port, protocol, speed, work with flash, record, and file. Put a tick Use HEX file.
For greater joy, you can also mention the item Program after compile - to compile and flash with one button.
When assembling, the program shows the consumption of available flash:
And then ARVDUDE starts up:
You can also turn on the help on the pins of the selected controller (there is a default, and if not, then View - Pin Layout is enabled):
When you hover over the pin, shows its name and description.
If this is not enough, then you can download the datasheet and enable View - PDF Viewer :
Another cool thing is the built-in debugger with iron simulation, break-points and step-by-step execution.
It is activated by pressing a button with a red microcircuit, of course, you must first compile the program.
And for sweetness, the code compiled in bascom is much smaller in size and is often executed faster than the code from the Arduino IDE.
For example, the standard blink (flashing LED):
For Arduino:
void setup() { pinMode(13, OUTPUT); } void loop() { digitalWrite(13, HIGH); digitalWrite(13, LOW); } It is compiled into a hex with the size of 3078 (!!!) bytes, and it pulls the pin with a frequency of 210kHz:
And in Bascom, written like this:
$regfile = "m168def.dat" $crystal = 16000000 Config Portb.5 = Output Do Toggle Portb.5 Loop It takes 553 bytes (five times less) hex, and already flashes at 1.6 MHz:
References:
- Offsite
- The latest version of Bascom-AVR
- About 100 examples with detailed diagrams and code listings
- Wonderful Russian textbook from WildCat (you should follow the link even just for the sake of reading the introduction)
- Another textbook in Russian . And there is also a microC and microPascal textbook written by a respected moriam that does not have an invite (yes, this is a hint)
- Russian site with projects
- Active Russian forum
- Another bunch of articles, books and projects
- The topic of discussion on radiokot
- Cqham discussion thread
- Do not go here , much less read. Site "for search engines", which in the examples a bunch of errors. And all in order to resell a couple of modules.
Source: https://habr.com/ru/post/151544/
All Articles