Using XML to generate a menu bar in Swing
Good day, dear habravchane.
Recently I encountered the problem of creating a menu bar - a standard panel that is present in almost every more or less functional UI. And not with the problem that it is difficult to create, on the contrary, in Swing, creating a UI is quite trivial, most interface elements are created in a couple of lines of code (this also applies to the menu). And with the problem of creating a multifunctional, complex menu, which translates into an incredible amount of code, which later is not something to accompany, and sometimes even impossible to read.
To store the entire process of generating menus of any complexity, I decided to resort to the force called XML. With it, you can describe the menu, how we want to see it, and thanks to the utility class, which we will not fail to create, our XML will be parsed and in the end we will get what all this is being done for - a menu of any complexity. If you are interested, welcome to habrokat ...
So, first we will describe the menu that we want to link to our UI. As an example, I decided to use a slightly truncated menu, which was based on the menu that many of us watched on Google Docs (forgive me Google):
In addition to the structure, some of the elements described will have a picture, a keyboard shortcut and a mnemonic. Here is a plain menu and try to create.
')
Before starting the creation of an XML file, describing our partially borrowed (just as an example), beautiful menu, we will determine which elements are present in it.
First of all it is JMenuBar, the panel on which the elements described below will be located. And this panel we will pull out after processing XML.
Then we follow the representatives of JMenu - the menu and submenus of his own person (File, Edit, Paragraph Styles, etc.). And also JMenuItem - items of all menus and submenus (Open, Copy, Paste, Report abuse, etc.). And of course, separators (separators) are horizontal lines, with the help of which menu elements are combined into logical groups.
Each element has a number of properties, such as - the name of the element (by it we can refer to the element of interest from the code), the text, the presence of a picture next to the text, the key combination, by which you can focus on the element using the keyboard (so called mnemonics - are displayed as an underlined item in the name and are called by the combination alt + selected_symbol_v_name.For example, alt + F, to open the File menu and the keyboard shortcut (so-called accelerator - is displayed as a shortcut next to the menu item to quickly ispo zovaniya, without entering the menu itself. For example, Ctrl + O to open the file). An element can also be active and inactive (Edit -> Cut if no text is selected).
With the building blocks of the menu, read. It remains to consider the XML tags and property names that will correspond to the elements described above.
Tags: JMenuBar - <menubar>, JMenu - <menu>, JMenuItem - <menuitem>, separator - <separator />
Properties: name - name, text - text, image - image, mnemonic - mnemonic, accelerator - accelerator, accessibility of the element - isEnabled.
Having decided on the XML elements of our menu, you can immediately proceed to the description of the menu, which we want to end up with:
Now that we have described our menu as part of XML, it only remains to parse it. To work with our XML, we use the Java package org.xml.sax (the API can be found here and here ). The processing of the elements of our XML structure will be the responsibility of the XMLMenuHandler class, which extends the DefaultHandler class, which in turn implements the ContentHandler interface and a number of other equally useful interfaces:
We describe the class that will be responsible for loading XML and actively use our handler:
And now let's look at the work done in the business - apply the menu described in the XML to a simple UI:
By launching our application, we will get something like the following window with a menu (the structure of which is the same as described above):
Now, if there is a need to build a branchy menu, all that needs to be done is to create the corresponding XML file, which will describe all menu line items with their properties, and also connect two classes XMLMenuHandler and XMLMenuParser to the project (you can even combine them by making XMLMenuHandler an internal class) and use this soup set, as shown in the example above.
Thank you for your attention and congratulations on the programmer’s day.
Project sources can be found here: http://www.google.com/url?q=https%3A%2F%2Fdocs.google.com%2Fopen%3Fid%3D0B1I02TclzMD_RTVtNVFNVkkxU1U
Recently I encountered the problem of creating a menu bar - a standard panel that is present in almost every more or less functional UI. And not with the problem that it is difficult to create, on the contrary, in Swing, creating a UI is quite trivial, most interface elements are created in a couple of lines of code (this also applies to the menu). And with the problem of creating a multifunctional, complex menu, which translates into an incredible amount of code, which later is not something to accompany, and sometimes even impossible to read.
To store the entire process of generating menus of any complexity, I decided to resort to the force called XML. With it, you can describe the menu, how we want to see it, and thanks to the utility class, which we will not fail to create, our XML will be parsed and in the end we will get what all this is being done for - a menu of any complexity. If you are interested, welcome to habrokat ...
So, first we will describe the menu that we want to link to our UI. As an example, I decided to use a slightly truncated menu, which was based on the menu that many of us watched on Google Docs (forgive me Google):
- File -> New -> List of documents to create
- File -> Open
- File -> Download as -> download options
- File -> Print
- Edit -> Undo
- Edit -> Redo
- Edit -> Cut
- Edit -> Copy
- Edit -> Paste
- Format -> Paragraph Styles -> Normal Text -> plain text format options
- Format -> Paragraph Styles -> Heading -> Header Format Options
- Format -> Paragraph Styles -> Options -> different style settings
- Help -> Report an issue
- Help -> Report abuse
- Help -> Keyboard shortcuts
In addition to the structure, some of the elements described will have a picture, a keyboard shortcut and a mnemonic. Here is a plain menu and try to create.
')
Description of menu items in XML format
Before starting the creation of an XML file, describing our partially borrowed (just as an example), beautiful menu, we will determine which elements are present in it.
First of all it is JMenuBar, the panel on which the elements described below will be located. And this panel we will pull out after processing XML.
Then we follow the representatives of JMenu - the menu and submenus of his own person (File, Edit, Paragraph Styles, etc.). And also JMenuItem - items of all menus and submenus (Open, Copy, Paste, Report abuse, etc.). And of course, separators (separators) are horizontal lines, with the help of which menu elements are combined into logical groups.
Each element has a number of properties, such as - the name of the element (by it we can refer to the element of interest from the code), the text, the presence of a picture next to the text, the key combination, by which you can focus on the element using the keyboard (so called mnemonics - are displayed as an underlined item in the name and are called by the combination alt + selected_symbol_v_name.For example, alt + F, to open the File menu and the keyboard shortcut (so-called accelerator - is displayed as a shortcut next to the menu item to quickly ispo zovaniya, without entering the menu itself. For example, Ctrl + O to open the file). An element can also be active and inactive (Edit -> Cut if no text is selected).
With the building blocks of the menu, read. It remains to consider the XML tags and property names that will correspond to the elements described above.
Tags: JMenuBar - <menubar>, JMenu - <menu>, JMenuItem - <menuitem>, separator - <separator />
Properties: name - name, text - text, image - image, mnemonic - mnemonic, accelerator - accelerator, accessibility of the element - isEnabled.
Meet the XML that describes the menu!
Having decided on the XML elements of our menu, you can immediately proceed to the description of the menu, which we want to end up with:
<?xml version="1.0" encoding="utf-8"?> <menubar name="ourMenu"> <!--File--> <menu name="file" text="File" mnemonic="F"> <menu name="new" text="New" mnemonic="N"> <menuitem name="doc" text="Document" image="./data/MenuXML/img1.jpg"/> </menu> <menuitem name="open" text="Open..." mnemonic="O" accelerator="control O"/> <separator/> <menu name="download" text="Download as"> <menuitem name="msword" text="Microsoft Word (.docx)"/> </menu> <separator/> <menuitem name="print" text="Print" mnemonic="P" accelerator="control P"/> </menu> <!--Edit--> <menu name="edit" text="Edit" mnemonic="d"> <menuitem name="undo" text="Undo" image="./data/MenuXML/img1.jpg" accelerator="control Z" isEnabled="false"/> <menuitem name="redo" text="Redo" image="./data/MenuXML/img1.jpg" accelerator="control Y" isEnabled="false"/> <separator/> <menuitem name="cut" text="Cut" image="./data/MenuXML/img1.jpg" accelerator="control X" isEnabled="false"/> <menuitem name="copy" text="Copy" image="./data/MenuXML/img1.jpg" accelerator="control C" isEnabled="false"/> <menuitem name="paste" text="Paste" image="./data/MenuXML/img1.jpg" accelerator="control V" isEnabled="false"/> </menu> <!--Format--> <menu name="format" text="Format" mnemonic="o"> <menu name="styles" text="Paragraph styles"> <menu name="normalText" text="Normal text"> <menuitem name="applyNormText" text="Apply normal text" accelerator="control alt 0"/> </menu> <menu name="heading" text="Heading"> <menuitem name="applyHeading" text="Apply heading" accelerator="control alt 1"/> </menu> <separator/> <menu name="options" text="Options" image="./data/MenuXML/img1.jpg"> <menuitem name="saveOptions" text="Save options"/> </menu> </menu> </menu> <!--Help--> <menu name="help" text="Help" mnemonic="H"> <menuitem name="issue" text="Report an issue"/> <menuitem name="abuse" text="Repor abuse"/> <separator/> <menuitem name="shortcuts" text="Keyboard shortcuts" accelerator="control SLASH"/> </menu> </menubar> XML handler
Now that we have described our menu as part of XML, it only remains to parse it. To work with our XML, we use the Java package org.xml.sax (the API can be found here and here ). The processing of the elements of our XML structure will be the responsibility of the XMLMenuHandler class, which extends the DefaultHandler class, which in turn implements the ContentHandler interface and a number of other equally useful interfaces:
public class XMLMenuHandler extends DefaultHandler { private Map menuMap = new HashMap(); private JMenuBar menuBar; private LinkedList menuList = new LinkedList(); @Override public void startElement(String uri, String localName, String qName, Attributes atts) throws SAXException { // (menu, menubar, menuitem separator) if(qName.equals("menu")) { parseMenu(atts); } else if(qName.equals("menubar")) { parseMenubar(atts); } else if(qName.equals("menuitem")) { parseMenuitem(atts); } else if(qName.equals("separator")) { parseSeparator(); } } // </menu> . @Override public void endElement(String uri, String localName, String qName) throws SAXException { if(qName.equals("menu")) { menuList.removeFirst(); } } private void parseSeparator() { // ((JMenu)menuList.getFirst()).addSeparator(); } private void parseMenuitem(Attributes atts) { // JMenuItem menuItem = new JMenuItem(); String menuItemName = atts.getValue("name"); // parseAttributes(menuItem, atts); menuMap.put(menuItemName, menuItem); // ((JMenu)menuList.getFirst()).add(menuItem); } private void parseMenubar(Attributes atts) { // JMenuBar tempMenuBar = new JMenuBar(); String menuBarName = atts.getValue("name"); menuMap.put(menuBarName, tempMenuBar); menuBar = tempMenuBar; } private void parseMenu(Attributes atts) { // JMenu menu = new JMenu(); String menuName = atts.getValue("name"); // parseAttributes(menu, atts); menuMap.put(menuName, menu); // , -. if (menuList.size() == 0) { menuBar.add(menu); } else { // ((JMenu)menuList.getFirst()).add(menu); } // - menuList.addFirst(menu); } private void parseAttributes(JMenuItem item, Attributes atts) { // String text = atts.getValue("text"); String image = atts.getValue("image"); String mnemonic = atts.getValue("mnemonic"); String accelerator = atts.getValue("accelerator"); String isEnabled = atts.getValue("isEnabled"); // XML item.setText(text); if(image != null) { item.setIcon(new ImageIcon(image)); } if(mnemonic != null) { item.setMnemonic(mnemonic.charAt(0)); } if(accelerator != null) { item.setAccelerator(KeyStroke.getKeyStroke(accelerator)); } if(isEnabled != null) { item.setEnabled(Boolean.parseBoolean(isEnabled)); } } public Map getMenuMap() { return menuMap; } We describe the class that will be responsible for loading XML and actively use our handler:
public class XMLMenuParser { //XML, private InputSource inputSource; //XML private SAXParser saxParser; // XML private XMLMenuHandler xmlMenuHandler; public XMLMenuParser(InputStream inputStream) { // XML XML . try { Reader reader = new InputStreamReader(inputStream); inputSource = new InputSource(reader); saxParser = SAXParserFactory.newInstance().newSAXParser(); xmlMenuHandler = new XMLMenuHandler(); } catch (Exception e) { System.out.println("Something went wrong during SAXParser initialization: " + e.getMessage()); throw new RuntimeException(e); } } public void parseXML() throws IOException, SAXException { saxParser.parse(inputSource, xmlMenuHandler); } public JMenuBar getMenuBar(String name) { return (JMenuBar)xmlMenuHandler.getMenuMap().get(name); } } And now let's look at the work done in the business - apply the menu described in the XML to a simple UI:
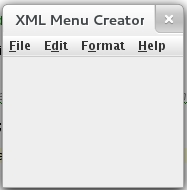
public class XMLMenuCreator extends JFrame { public XMLMenuCreator() { super("XML Menu Creator"); setDefaultCloseOperation(WindowConstants.EXIT_ON_CLOSE); try { FileInputStream in = new FileInputStream("./data/MenuXML/menu.xml"); XMLMenuParser xmlParser = new XMLMenuParser(in); xmlParser.parseXML(); //, XML , ( <menubar>), // UI setJMenuBar(xmlParser.getMenuBar("ourMenu")); } catch (Exception e) { System.out.println("Exception: " + e.getMessage()); } setSize(200, 200); setVisible(true); } } By launching our application, we will get something like the following window with a menu (the structure of which is the same as described above):
Conclusion
Now, if there is a need to build a branchy menu, all that needs to be done is to create the corresponding XML file, which will describe all menu line items with their properties, and also connect two classes XMLMenuHandler and XMLMenuParser to the project (you can even combine them by making XMLMenuHandler an internal class) and use this soup set, as shown in the example above.
Thank you for your attention and congratulations on the programmer’s day.
Project sources can be found here: http://www.google.com/url?q=https%3A%2F%2Fdocs.google.com%2Fopen%3Fid%3D0B1I02TclzMD_RTVtNVFNVkkxU1U
Source: https://habr.com/ru/post/151403/
All Articles