Hard Drive Soldering Stand
Introduction
Before starting, I want to note a few points that, in one way or another, influenced further technical decisions:
- I do not consider myself a homely and good owner. I do not have in stock tools of all colors and sizes, a garage with milling machines and circular saws. The ordinary task of the type “Drill a hole in concrete at three o'clock in the morning for the shelf” is an impossible mission for me, since I need to find a drill somewhere. In stock there is only elementary - screwdrivers, mini hammer, pliers, nippers;
- Rarely I throw out something even broken. It is a lot of computer stuff, which constantly should be hidden, that the wife would not find and did not utilize;
- I do not live in a village that allows you to order something on the global network, and in five minutes a cheerful courier will solemnly hand you a package with the ordered goods;
- A bit stingy. It is difficult to attract me with a brand, or with beautiful products, if its main purpose, in my opinion, is not worth the money.
Therefore, the stand was assembled from the fact that you can always find and from the tools you need only a knife and screwdrivers.
Main
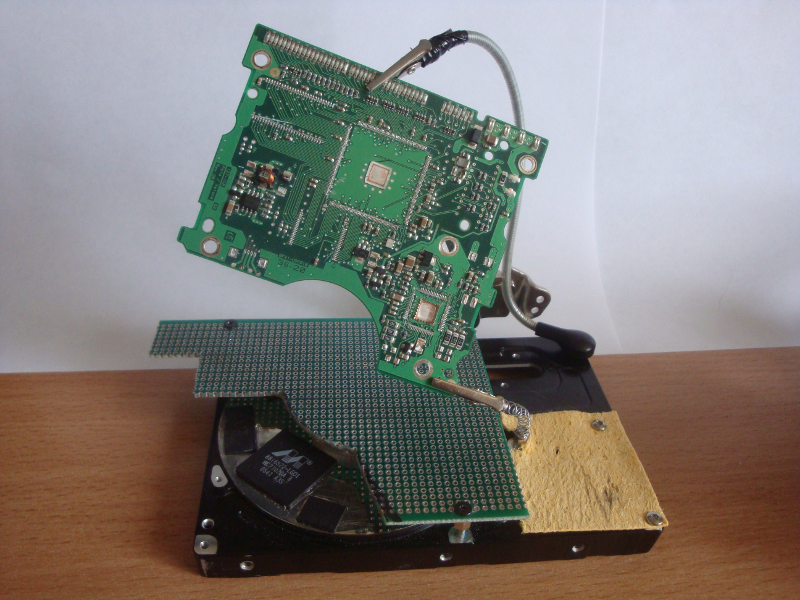
It all started with the fact that I needed a “third hand” clamp for soldering. I do not often solder, therefore, as such, I did not even have a stand, on which to solder. I had a payal on what I had to (the truth had not yet reached my knee) and every time I caught myself thinking that it was not enough of that clamp. Recently, attacks of soldering have become more frequent, and have already decided to make a device for myself from improvised means.
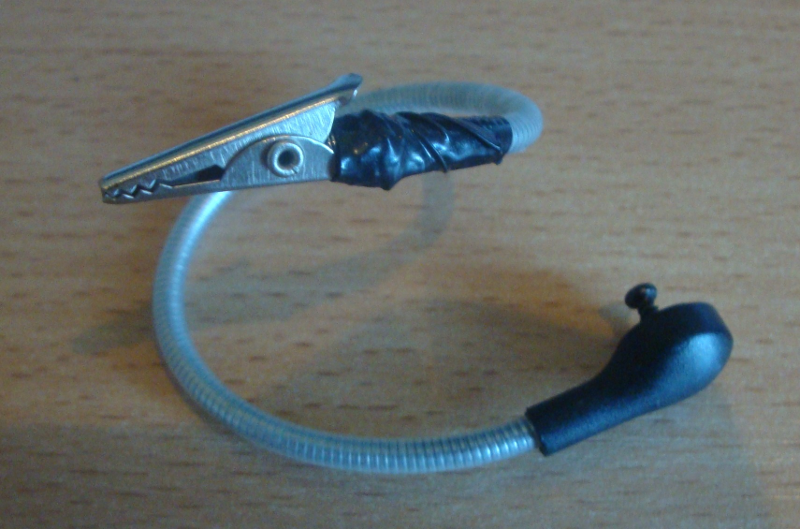
I quickly found the solution for myself: take the crocodile clip to attach it to the flexible microphone base from the headphones and fix it to the table with a stationery clip.
The first two components found quickly, but behind the stationery clip I had to climb into the depth of the cabinet. At the second meter of excavation, I stumbled upon my old hard drive. I remembered the sad story of how he lay back suddenly, without visible symptoms, and thus left a lot of important information. He did not dare to throw it out, secretly hoping "What if he is resurrected ...". Already a few years have passed and the miracle did not happen. I wanted to throw back already, but his weightyness suggested the idea that he would make a good foundation, instead of clamping a clerical one. In addition, there are already threaded holes on it. Yes, and it will be possible to solder anything.
')
I decided to dissect it and take out the excess. At the disassembly stage, the Winchester left me the last surprise - because of one bolt I could not unscrew the engine from the base. I decided not to break it out - let it be for weight. And then the ideas came when I saw how many technical holes there were. And almost everyone can screw in the bolt.
Next is the process of assembling the stand. I think it should be noted that I am left-handed, so I arranged everything on the assumption that the soldering iron will be in my left hand.
Step 1
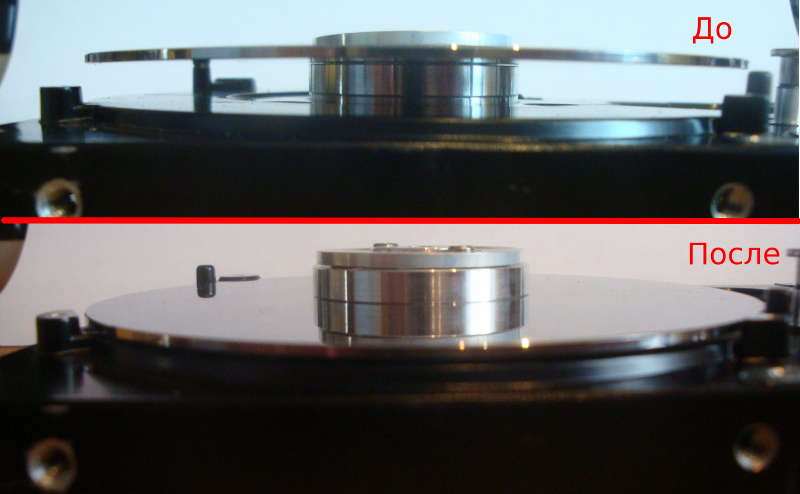
The hard drive itself is placed as close as possible to the surface.
The surface of the hard disk was decided to use as a place for tinning and for soldering with a heat sink. Therefore, visually divided the disc into two parts. And on one half:
- I ripped the microchips from the hard drive board and glued them to the surface of the disc with superglue. I will wire them on them. You can even rosin "drip";
- I also wanted to adapt a rag for the sting for cleaning, but then changed my mind due to the fact that sooner or later it would have to be changed.
Easy butting a soldering iron tip is enough to scroll the disk to the desired half.
Step 2
I decided to make a platform for soldering on top of the disk, which would have a relatively low thermal conductivity. I came across a piece of breadboard. Even the sizes were suitable. The idea to use it seemed successful, since the presence of holes allows you to put soldered products in the raskoryaku arbitrary shape, limiting their maneuverability clips.
Cut a triangle from the board, leaving disk access.

Step 3
Then I describe how I supplied my Frankenstein.
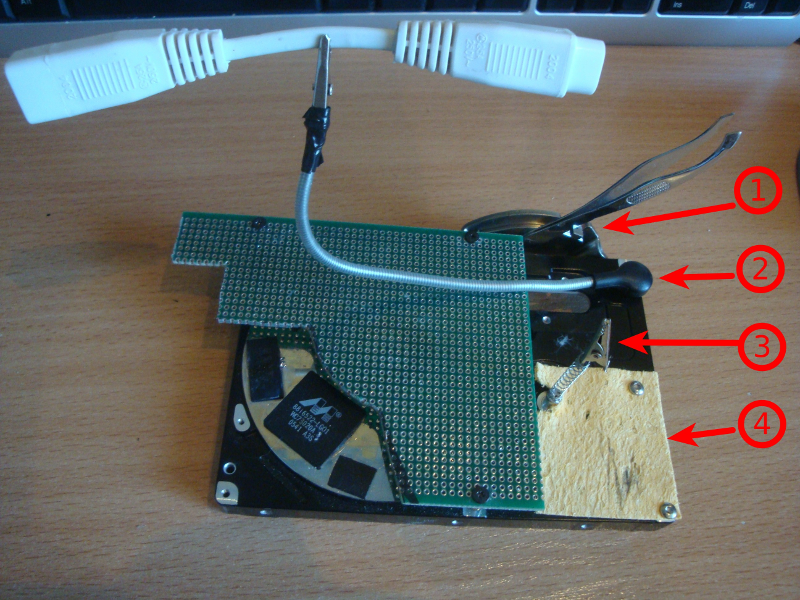
- One half of the extracted magnet from the viscera was screwed on the side. I will use it for fastening tweezers, bolts, etc., so as not to get lost. By the way, the other half of the magnet was screwed on the edge of his computer desk, thereby deciding for himself the eternal question: “Well, where is the pen, what would write down a brilliant idea ...”. The power of the magnet makes it possible to fasten even a completely plastic handle with only one feather in the rod;
- In the far right corner he secured the very thing for which he did all this;
- On the axis, on which the reading head was spinning, planted another “crocodile”. I took the spring from a fountain pen. I planned to use it to fix the solder wire, so that it would be convenient to snip off the pieces. But further experiments showed that the spring of a fountain pen is not the most successful option, since any light kick turns a “crocodile for feeding solder” into a “sagging crocodile with solder in the teeth”. So the fastener method will change over time;
- On two bolts screwed a cloth for wiping the sting. If necessary, replace it is not difficult.
What else...
At this stage, I stopped for myself, since this is all I need. But there are still a lot of holes left, so there is a place for an update. Offhand, I figured the following.
On the reverse side of the base there was an indecent lot of space. And next to the place of attachment of the "third hand" there is a large technical hole, with two holes nearby. It is right to bring the power supply, and insert the switch panel into the hole. Then you can:
- Make the backlight at the base of the LED using the same flexible hose from the microphone. Considering that there is already a wire inside the hose, and the implementation of the plastic microphone mount allows direct light to be made - the idea has the right to life. But I prefer it when I have a star in my forehead in the form of an LED flashlight;
- Take the small cooler on the same microphone hose, so that the harmful evaporation from soldering would immediately drive away from the nostrils towards the exhaust;
- Make a slingshot and pull on the nichrome thread. When supplying power, use for stripping the wire. As it will all look like, I will leave for your hectic imagination.
- Magnifying glass. The main thing to find on what to mount.
Here it is. On this, perhaps, that's all.
PS When I was preparing an article for Habr, I was looking for similar materials to make sure that I was not accused of plagiarism and copy-paste. Stumbled upon a better solution in terms of the ratio of "flexibility" vs "hold weight" for the "third hand" here the Homemade clip "The Third Hand" for soldering. Part one . But the lack of delivery in my area and the price of materials made me content with what I have.
Source: https://habr.com/ru/post/151161/
All Articles