Code Inspection Using Code Collaborator
 Every developer wants to make code inspections take a minimum of time, the inspection process is simple and convenient - and this is quite realistic. Today, as promised in the previous topic , we will talk about automating the process of inspecting code using CodeBollaborator from SmartBear.
Attention! In this article, we do not mention the advantages or disadvantages of working with other inspection automation tools (Crucible, Gerrit) - due to the lack of experience with them. Therefore, do not wait for an objective comparison :)
The inspection scheme through mailing patches is very inconvenient for the following reasons:
- It takes a lot of manual work on patching.
- There are no convenient tools for dialogue with reference to blocks of code, especially if there are more than two participants.
- There is no control of the actual inspection code.
Understanding that this option does not suit us, made us think about solving these problems.
')
Are you still boiling? Then we go to you!
Our experience suggests that if the implementation of inspections is time consuming, they will be carried out formally: “I looked. Seems to be OK". With this approach, the inspection turns into a bureaucratic burden for developers and is carried out as if for a tick, and the exchange of knowledge and experience, improvement of the quality of the code takes place on the side.
The inspection process should bring a sense of general progress, joy and positive - we set ourselves this goal. We were faced with the following tasks of automation and ensuring the comfort of the participants in the inspection process.
Ease of creating an inspection document:
- adding files;
- the appointment of participants;
- Description of changes made by the code or link to the bug-tracker.
Automatic notifications to participants:
- on appointment to the inspection;
- about adding new code changes to the inspection;
- about new comments;
- about overdue inspection.
Convenient inspection navigation:
- code navigation;
- the possibility of extending the displayed code areas around changes on demand;
- view and navigate conversations;
- highlighting and navigation only for unread comments.
Convenience of interaction between participants:
- the organization of the conversation of several participants about one block of code;
- ease of navigation through the conversation branches;
- convenient addition of corrections and linking conversations to them.
Finally, the ability to collect metrics for feedback and a report to management to demonstrate the economic benefits of inspections.
It is very important not just to study all the indicators once, but to be able to do this at any time and for any period with minimal time spent on the whole process. And here appears odeollaborator on the scene. It consists of a server part, web clients and a desktop client. Installation is quick and easy, only Java SE is required for server and desktop clients.
Local desktop clients written in Java pleased with their cross-platform. The main functionality of CodeCollaborator is concentrated in the web interface, so it is well suited for Mac OS and Unix systems. For convenience, part of the functionality is duplicated in local desktop applications and in plug-ins to Visual Studio and Eclipse.
We omit the installation and the initial configuration of the CC, since it is simple and well documented. Let's analyze work with CodeCollaborator on a test project.
Situation: the developer added three files to the project and sends them for inspection to colleagues who find several defects. After that, the author corrects the detected errors and sends the updates to the repeated inspection. His colleagues verify the correctness of the correction of defects and approve these changes, allowing the author to include the changes in the general repository.
Inspection is created in a few clicks. Plug-ins to Visual Studio or Eclipse direct us to the inspection creation window (it also adds files to an existing inspection).
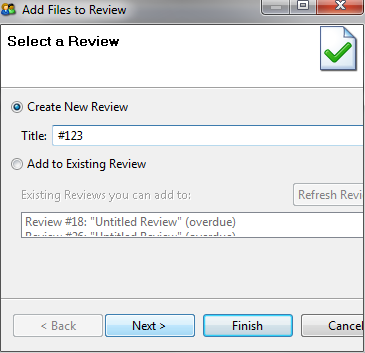
Add files to be sent for inspection:
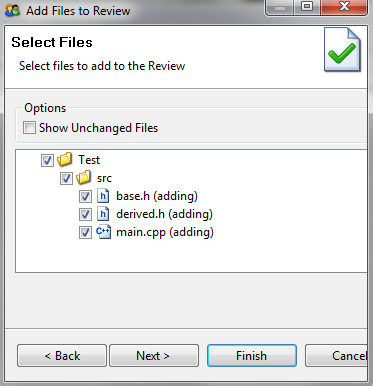
odeCollaborator runs on top of the version control system (in our case, it’s SVN). The program supports most common version control systems.
By default, all added and modified files in the local working copy will be added to the inspection.
Tip: it’s very convenient to have your working copy for different tasks, for example, to add an entire list of files by default, rather than ticking them one at a time.
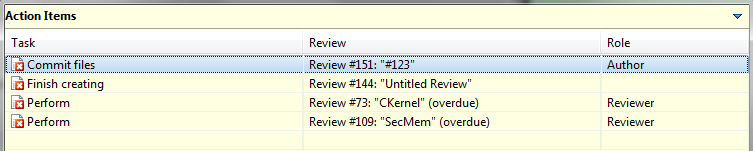
After that, the desktop client automatically redirects us to the inspector appointment page, where we indicate the inspection participants and start the inspection process itself.

Notifications are sent to all inspection participants by mail, all of them change the desktop client icon in the tray. For convenience, the desktop client shows the current active inspections and redirects the user to the desired one. In addition, you can go to the inspection by the link from the letter of notification or choose the desired one from the list of active from the main page of the web interface. In general, it is difficult to get lost.
The inspector checks the code and writes his review. A convenient inspection navigation panel greatly simplifies this task: the transition to the next (previous) file, to the next (previous) conversation is implemented.

The buttons on the navigation bar are duplicated by hotkeys.
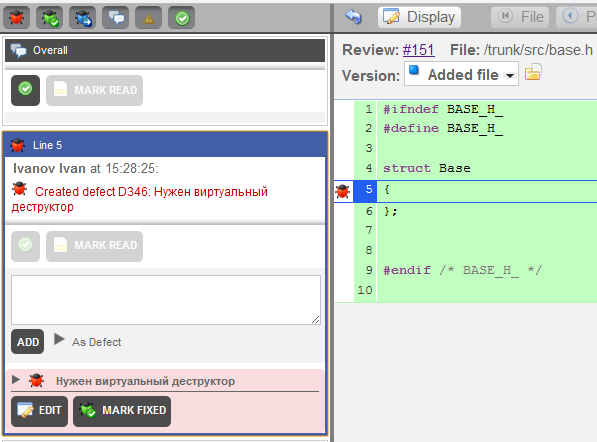
To create a comment or fix a defect, simply click the mouse on the required line of code and write the comment text in the appeared window, and in the case of a defect, specify its importance and type additionally.

After viewing the entire code, the inspector marks the end of the inspection process. If there are open defects, the system automatically transfers the inspection to the “Work on bugs” mode; if all defects are closed, the inspection is transferred to the “Completed” state. Moreover, the inspector will be able to mark that he has completed the inspection, only after reading all the comments and approving all the files in the inspection (it is difficult to miss something by chance).
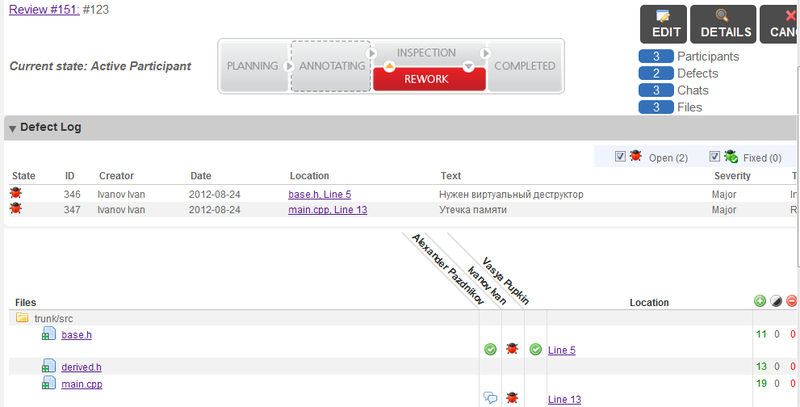
The author of the code sees that the inspectorate has been transferred to the “Rework” state, all open defects are tabulated, icons with defects and comments have appeared in front of each file. All participants see the same summary.
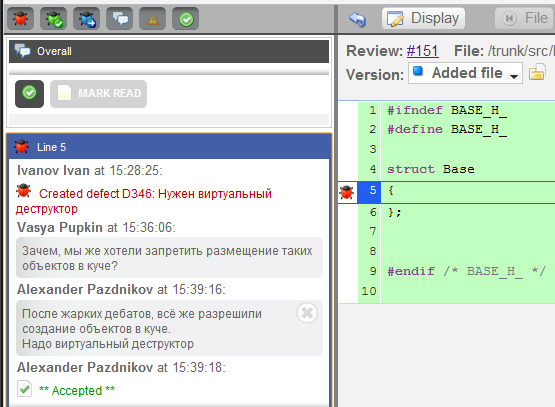
It is convenient to browse the conversation.
The author conducts work on the bugs and adds the modified code to the inspection. The procedure for adding a code is identical to the procedure for creating an inspection, only instead of a new inspection, the existing one is indicated; files are also added by default.
Voilà! Further CodeCollaborator will figure it out - where and what changes have been made. Then inspectors are again notified that the reviews are waiting for new changes. Easy navigation allows you to choose to compare any version of the file.
The inspection is completed after the defects are closed by the inspectors and the approval of all modified files.

Now the author can add his code to the general repository. Standard CodeCollaborator reports are sufficient for efficient operation: the tool offers a large number of filters.
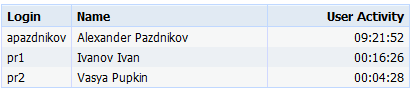
Here are a couple of useful reports. Time spent on inspection:
Defect report with Severity = Major for a period of time:

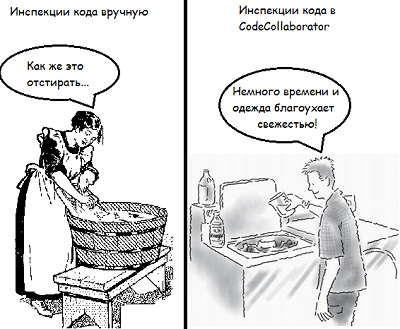
If you compare the exchange of patches by mail or viewing diffs in VCS with inspections using CodeCollaborator, such a comparison comes to mind: you can wash things manually, or you can in a washing machine. It is only necessary to choose the best option for a particular situation.
Tip: it is convenient to have a separate working copy for each developed functionality. As a result, there is no need to select the necessary files, since all modified files in the working copy are added to the default inspection.
Source: https://habr.com/ru/post/150995/
All Articles