Caché Studio development using Subversion

An extension of Caché Studio called Caché-SVN was developed. This extension allows you to work with the repository (storage) SVN, without leaving Caché Studio. With it, you can perform checkout, commit and update.
Caché-SVN does not work with individual files (classes, programs, csp-pages, etc.), but with the project as a whole.
Caché-SVN creates a temporary folder on the server where Caché is installed, uploads the project files there and executes svn commit. Similarly, with svn update, the received xml file descriptions are imported into Caché.
')
Caché-SVN is based on the% Studio.Extension.Base class, which comes with Caché and allows you to add your own menus to Caché Studio.
Where to get
Caché-SVN can be downloaded from subversion.assembla.com/svn/intersystems/cache-svn/svn-0.26.xml.zip
How to install
Actually SVN
On the server where Caché is located (and not on the machine where Caché Studio is running) the svn.exe file must be available.
Comments for commits are sent to the server in UTF-8 encoding, so you need to set the parameter log-encoding = UTF-8 in the svn settings config file.
If you install Tortoise SVN, then during installation you need to tick the “Install command files” checkbox.
Caché-svn
At the time of installation, you must include the ability to write to the database CACHELIB. This is done through the "System Management Portal". Select "Configuration> System Configuration> Local Databases." Click the “edit” link in the line with CACHELIB and in the “Read only?” Drop-down list, select “No”. After installing the Caché-SVN flag can be returned back.
In Caché Studio, select the% SYS area and import (“Tools> Import locally”) the file with Caché-SVN. Everything, you can again prohibit writing to CACHELIB.
Now you need to set the areas in which Caché-SVN will be used for version control. To do this, in the "System Management Portal", select "Configuration> Advanced Settings> Version Control System". For the areas you need, mark the class% SourceControl.SVN and click “OK”. The example in this tutorial will work with the SAMPLES area, so select the% SourceControl.SVN class as the version control system class for it. After installation, in Caché Studio, when you select the area in which Caché-SVN is selected as the version control system, the Version Control System menu appears.
How to make the first checkout
Let's unload our first project in SVN. For this you will need: a) project and b) svn-repository. As a project, take the cinema project from the SAMPLES area. You can create a local repository, and you can choose any server that provides private or public svn repositories. In our example, we will use the site assembla.com (yes, this is an advertisement).
So, register at assembla.com and create an SVN repository. Assembla itself will create you a folder of the trunk, let's and there we will put the source code. Next I will assume that the repository is located at subversion.assembla.com/svn/cache-cinema/trunk .
Open the SAMPLES area in Caché Studio. If you have correctly installed and configured Caché-SVN, then in Studio there will be a “Version Control System” menu.
Open the Cinema project and in the menu “Project> Settings” in the Description section add the line svn-repo = https: //subversion.assembla.com/svn/cache-cinema/trunk. Save the project (“File> Save Project”). Thus, the parameter with the repository is bound to the project. Now when exporting a project (menu “Tools> Export”) this line will be unloaded along with it.
Now you need to perform local settings. Open the menu item "Version Control System> Project Settings" and enter
- The path to the svn.exe file. If the svn.exe file is not in the system% PATH%, then you need to specify the full path (for example, c: \ svn \ bin \ svn.exe). Additionally, you must explicitly specify the folder in which the SVN settings are stored. This is done with the --config-dir option. As a result, the line should look like this: svn.exe --config-dir c: \ svn \ conf. This path is used for all projects.
- Temporary folder. This folder contains xml class descriptions that are loaded from and downloaded to SVN. The folder structure is as follows: RegionName \ ProjectName \ Project Files. Whenever a project is checked out, the contents of the corresponding folder will be cleared. This folder is also the same for all projects.
- The “Path to SVN repository” parameter is not edited in this window and is taken from the project description. But here you can check whether you specified it correctly.
- The parameter “Put all classes into one folder” corresponds to the string all-classes-in-one-folder, which, like svn-repo, is specified in the project description. By default, this flag is not checked and all class descriptions are grouped into subfolders according to packages. If in the project description add the line all-classes-in-one-folder = 1, then all the class descriptions will be in the same folder.
- Username - SVN username
- Password - SVN user password
- The option "Delete password after first use" can be set if the SVN caches passwords (usually it does). In this case, the password after the first use (usually, this checkout) will be removed from the server and in the future SVN will get it from the cache.

The username, password, and password removal flag are stored in the corresponding area in the ^ SVN global in the node with the project name.
The path to svn.exe and the temporary folder are stored in the ^ SVN global in the% SYS area.
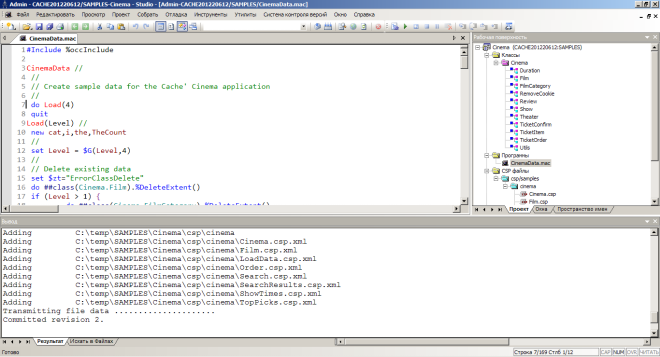
So, all the preparations have been made, the last thing that remains is to select the menu item “Version Control System> Checkout”. If you did everything correctly, then in the Output window you will get the following lines:

How to make a commit
Select the menu item “Version Control System> Commit”. Enter a comment, for example, “Initial Upload” and click “Yes”.
In the "Output" window, the lines will run, and everything will end successfully with this picture:
How to connect to the repository
Well. Project uploaded. Imagine now that another developer wants to connect to it. In order not to install another version of Caché, we will assume that this developer works in the field of USER, and not in the field of SAMPLES. Set% SourceControl.SVN as the class of version control system in the USER area (if you have not done this before).
Create a new project with the same name as the project stored in the repository and configure it - specify the repository address, login and password and perform Checkout (“Version Control System> Checkout”).

Pay attention to the last line, if you created a project with a name different from the name of the project that is stored in the repository, the project from the repository will still be loaded. You will need to find him in the field, open, configure and make a checkout for him.
Also note that in the SAMPLES area, the csp files were in the csp / samples application. When importing into the USER area, all csp-files are moved to the default csp-application for the USER area - csp / user.
Teamwork
Great, the project is loaded in both areas. Let's see how the two users work together on a project.
In the USER area, open the Search.csp file and change its title to “Search page title”. If you want to change something else or add a new class / program to the project. Make a commit.

See you We made changes in only one file, and it went to nine. Information about the Cinema project (the Cinema.prj.xml file) has changed because in the project description the csp files stored on the server are in the csp / samples application, and our csp files are in the csp / user application.
Therefore descriptions of all csp-files are also sent. In their xml-description there is a line that indicates to which csp-application this file belongs. The application has changed - the file must be sent back to the server.
If you now again change the title of the Search.csp page and commit, then only Search.csp will go - changes to the csp application from csp / samples to csp / user have already been committed.

How to Update
Let's now load the changes into the SAMPLES area. Go to it and run Update (“Version Control System> Update”). The title of the Search.csp page has changed. Caché-SVN does not recompile the project at startup. You need to do it yourself.
Conflict resolution
When conflicts occur during Update or Commit, the SVN inserts its markers with changes into the file. The content of the classes (or programs, or csp-pages) is loaded into Caché along with these markers. In some cases, markers break the xml markup of file descriptions and import of these files becomes impossible. Then the xml-description is completely loaded into the temporary program.
Example 1
In the SAMPLES area, open the Cinema.Film class and, in the TopFilms query, add the condition "AND (Rating = 'G')" to the WHERE. Make a commit.
Now open the USER area and in the same Cinema.Film class and in the same TopFilms query add another condition to WHERE - “AND (Rating in ('G', 'PG'))”. Run Update.

After you leave only the necessary lines in the file, select the menu item “Version Control System> Mark conflict as resolved”. A conflict in an open file will close and will not interfere with the execution of a commit. Make a commit.
Example 2
In the SAMPLES area, open the Cinema.Film class and in the first line of the TopCategory query, change “Top 3” to “Top 6” and commit. In the USER area, open the same Cinema.Film class and in the same TopCategory query, change “Top 3” to “Top 7” and make Update.

The markup of the xml description with this Update will be broken and the import will fail. In this case, a temporary program DIFF.Cinema.Film.cls.xml will be created, an xml-file that could not be imported will be loaded into it.

After the conflict for the Cinema.Film.xls file is marked as resolved, this temporary program will be removed.
Other menu commands
The following Caché-SVN features are not mentioned:
- At any time, you can roll back the changes made after the last update by selecting the “Discard Changes” menu.
- You can view comments on commits through the “Change History” menu.
- You can return to the previous revision using the “Update to revision” menu. You will need to specify the revision number.
Conclusion
Caché-SVN has been tested on svn 1.7.5 and Caché 2012.2 versions for Windows and Linux. It will work similarly on Ensemble.
Comments, suggestions and errors found leave in the comments or send to the box akoblov@gmail.com.
Source: https://habr.com/ru/post/150992/
All Articles