We deploy a local server on Windows

A few days ago I was once again visited by the Thought. The thought was not new and quite intrusive: “let's move on to Windows8. Well pozhaaaluysta. And since it was impossible to drive it away, I stocked up with tea and cookies and proceeded.
The installation of the system and all the necessary programs took no more than two hours, but then the most interesting moment came: I needed to deploy the working environment, namely, GIT + local server (Apache, MySQL, PHP, nginx, memcached, mongodb). Remembering the experience of previous installations, this time I decided to document the whole process and save it for posterity.
')
Disclaimer number one time: “I am not a programmer” (c), but an interface designer and a frontend technologist (but in some cases I can help my colleagues and add some sort of something, and even then they won’t beat me for it)
Disclaimer number two: yes, I perfectly imagine that in Ubuntu all this is done many times faster. But I work on Windows, historically.
So let's get started.
Our work plan includes the installation of the following products:
- PuTTY
- Git
- Denwer (Apache, MySQL, PHP)
- Nginx
- Memcached
- MongoDB
1. PuTTY
PuTTY is a free client for various remote access protocols, including SSH, Telnet, rlogin.
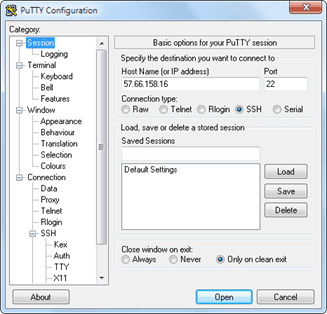
There are several utilities in PuTTY, but I only need Pegeant and myself (an SSH authentication agent that stores the keys to git repositories).
Offsite: go to
If you do not need any SSH, forget about this item and go on.
2. GIT
For the first year I have been using TortoiseGit , which is stable for working with git , and it covers all my needs by 146%. In general, I recommend.

Offsite: go to
2.1 TortoiseGit requires git for Windows , which can be picked up on google ;
2.2 install TortoiseGit from here
3. Denwer
Denver - The Gentleman Web Development Kit (“D.W.r.”, read Denver) is a project by Dmitry Koterov, a set of distributions (Apache, PHP, MySQL, Perl, etc.) and a software shell used by the Web - developers to develop sites on the "home" (local) Windows-machine.
Offsite: go to
3.1 Installation
We will need to download the basic bundle and additional PHP5 modules .
Lyrical digression:
No, not just download, but get download links by email! That is, you will have to drive in your mail, as well as the name and surname twice in the form under the large heading "Registration". “Registration is required in connection with the future release of Denver-4.” For several years now, the form has apologized, but I no longer believe it (.
Usually the installation of Denver is quick and painless, but on Windows8 I was attacked by an error that swore at the missing msvcr71.dll library. The library can be picked up here and put into the folder "\ Windows \ System32 \" (x32) or "\ Windows \ SysWOW64 \" (x64). After the file has gone to the folder, open its properties and click the "Unblock" button.
3.2 Verification
After installing Denver, we will create a test script on which we will check the performance of all that we install later.
Let's go to Z: \ home and add a new site: create a folder test.local , in it a folder “www” , to which we add the index.php file with incredibly creative text:
<?php echo 'Test me <br>'; Restart Denver, open it in the www.test.local browser, type in and go further.
4. Memcached
Memcached is middleware that implements in-memory data caching service based on a hash table paradigm.

Offsite: go to
Memcache is an extension for php that provides a convenient procedural and object-oriented interface to memcached, a high-performance caching daemon that was specifically designed to reduce database load in dynamic web applications.
4.1 Installing memcached
A. Download the binary archive: Memcached 1.4.5 for Windows from here
V. unpack the contents of the archive in \ usr \ local \ memcached
4.2 Installing memcache
A. Download the archive from the library from here.
V. unpack the contents of the archive in \ usr \ local \ php5 \ ext \
C. open the file php.ini ( \ usr \ local \ php5 \ php.ini ) and include the extension:
extension=php_memcache.dll4.3 Configuring the launch of Memcached with the launch of Denwer
To run the script with Denver we need:
- write a script containing the command to start and stop the application / service and put it in the \ denwer \ scripts \ init.d folder
- create a link to this script in the start / stop configuration folder \ denwer \ scripts \ main \
A. create a file named “memcached.pl” in the \ denwer \ scripts \ init.d \ directory
#!perl -w package Starters::Memcached; BEGIN { unshift @INC, "../lib"; } use StartManager; my $basedir = '/usr/local/memcached/'; chdir($basedir); StartManager::action $ARGV[0], start => sub { ### ### START. ### print "Starting memcached\n"; system("memcached.exe -d"); print " Started!\n"; }, stop => sub { ### ### STOP. ### print "Stopping memcached\n"; system("TASKKILL /F /IM memcached.exe"); print " Stopped!\n"; }; return 1 if caller; B. Now we will create a link to the script - a plain text file containing an indication that when starting, restarting and stopping Denver, you need to execute init.d / memcached.pl
In the text editor we write
init.d/memcachedand save the file under the name "40_memcached" in the following folders:
- \ denwer \ scripts \ main \ start
- \ denwer \ scripts \ main \ stop
- \ denwer \ scripts \ main \ restart
4.4 Checking the result
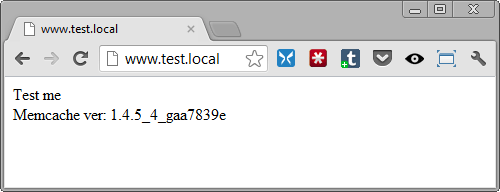
In our test script (index.php) we add:
$memcache = new Memcache; $memcache->connect('127.0.0.1', 11211); echo 'Memcache ver: ' . $memcache->getVersion(); Restart Denver and see what happens.
5. Nginx
Nginx is a simple, fast and reliable server, not overloaded with functions.

Offsite: go to
5.1 Configuring Nginx
A. Download the Windows version from offsite and unpack it in \ usr \ local \ nginx
B. Set up a virtual host for our test site. To do this, open \ usr \ local \ nginx \ conf \ nginx.conf and add there
server { listen 127.0.0.1:80; server_name www.test.local test.local; if ($host = 'test.local'){ rewrite ^/(.*)$ http://www.test.local$1 permanent; } location ~* \.(jpeg|jpg|gif|png|css|js|pdf|txt|tar)$ { root Z:\home\/test.local\www; } location / { ssi on; proxy_pass http://127.0.0.1:8080/; proxy_set_header X-REQUEST_URI $request_uri; proxy_set_header X-Real-IP $remote_addr; proxy_set_header X-Forwarded-for $remote_addr; proxy_set_header Host $host; proxy_connect_timeout 60; proxy_send_timeout 90; proxy_read_timeout 90; proxy_redirect off; proxy_set_header Connection close; proxy_pass_header Content-Type; proxy_pass_header Content-Disposition; proxy_pass_header Content-Length; root Z:\home\/test.local\www; } } This is an example of settings from a real project, your settings obviously may differ.
5.2 Configuring Apache
By default, Apache works on port 80, but we just gave this port to Nginx, so now you need to change the template for the virtual host in Apache settings and assign it a port other than 80th (for example, 8080).
Open \ usr \ local \ apache \ conf \ httpd.conf and change the port number
## ## . ## ## Apache , 80, ## . ## #Listen $&{ip:-127.0.0.1}:$&{port:-8080} #NameVirtualHost $&{ip:-127.0.0.1}:$&{port:-8080} #<VirtualHost $&{ip:-127.0.0.1}:$&{port:-8080}> # DocumentRootMatch "/home/(?!cgi-)(.*)^1/(?!cgi$|cgi-)(.*)" # DocumentRootMatch "/home/(?!cgi-)(.*)/public_html^1" # DocumentRootMatch "/home/(?!cgi-)(.*)/public^1" # DocumentRootMatch "/home/(?!cgi-)(.*)^1/html/(.*)" # DocumentRootMatch "/home/(?!cgi-)(.*)^1/domains/(?!cgi$|cgi-)(.*)" # DocumentRootMatch "/var/www/html/(?!cgi-)~(.*)^1/(?!cgi$|cgi-)(.*)" # DocumentRoot "$&" # ServerName "%&/-www" # ServerAlias "%&/-www" "%&/-www/www" $&{host:-} # # $&{directives:-} # # ScriptAlias /cgi/ "$^1/cgi/" # ScriptAlias /cgi-bin/ "$^1/cgi-bin/" # AllowEncodedSlashes on #</VirtualHost> 5.3 Configuring the launch of Nginx with the launch of Denwer
A. Create a file named “nginx.pl” in the \ denwer \ scripts \ init.d \ directory
#!perl -w package Starters::Nginx; BEGIN { unshift @INC, "../lib"; } use StartManager; my $basedir = '/usr/local/nginx/'; chdir($basedir); StartManager::action $ARGV[0], start => sub { ### ### START. ### print "Starting Nginx\n"; system("start nginx.exe"); print " Started!\n"; }, stop => sub { ### ### STOP. ### print "Stopping Nginx\n"; system("nginx.exe -s stop"); print " Stopped!\n"; }; return 1 if caller; B. in a text editor write
init.d/nginxand save the file under the name "50_memcached" in the following folders:
- \ denwer \ scripts \ main \ start
- \ denwer \ scripts \ main \ stop
- \ denwer \ scripts \ main \ restart
5.4 Checking the result
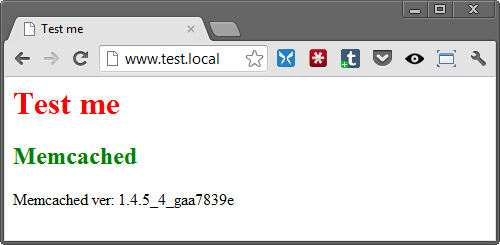
Put next to the script file style.css content
h1{ color: red; } h2{ color: green; } And improve our index.php :
<html> <head> <title>Test me</title> <link rel="stylesheet" type="text/css" href="style.css"> <meta http-equiv="content-type" content="text/html; charset=utf-8"> </head> <body> <h1>Test me</h1> <h2>Memcached</h2> <?php $memcache = new Memcache; $memcache->connect('127.0.0.1', 11211); echo 'Memcached ver: ' . $memcache->getVersion(); ?> </body> </html> Now restart Denver and admire the result. If the CSS file is connected, Nginx works fine.
6. MongoDB
MongoDB is an open source document-oriented database management system (DBMS) that does not require a description of the table schema.

Offsite: go to
6.1 PHP-driver
A. Download the php_mongo.dll library from this site : and drop it into the \ usr \ local \ php5 \ ext \ folder
By trial and error, it was found that the appropriate driver is contained in the archive mongo-1.2.5.zip/mongo-1.2.5-php5.3vc9ts.zip . If you for some reason do not start, try other versions.
B. connect the extension to php.ini
extension=php_mongo.dll6.2 Installing Mongo
A. Download the archive from Mongo and unpack it into the \ usr \ local \ mongodb folder . In the same folder we create two more folders:
- db
- logs
B. install the service
> cd C:\WebServers\usr\local\mongodb\bin\> mongod.exe --install --dbpath=C:\WebServers\usr\local\mongodb\db\ --logpath=C:\WebServers\usr\local\mongodb\logs\6.3 Configuring MongoDB launch together with Denver
A. create a file named “mongod.pl” in the \ denwer \ scripts \ init.d \ directory
#!perl -w package Starters::mongoDB; BEGIN { unshift @INC, "../lib"; } use StartManager; StartManager::action $ARGV[0], start => sub { ### ### START. ### print "Starting mongoDB\n"; system("net start mongoDB"); print " Started!\n"; }, stop => sub { ### ### STOP. ### print "Stopping mongoDB\n"; system("net stop mongoDB"); print " Stopped!\n"; }; return 1 if caller; B. in a text editor write
init.d/mongodand save the file under the name "60_mongod" in folders already familiar to us:
- \ denwer \ scripts \ main \ start
- \ denwer \ scripts \ main \ stop
- \ denwer \ scripts \ main \ restart
6.4 Checking the result
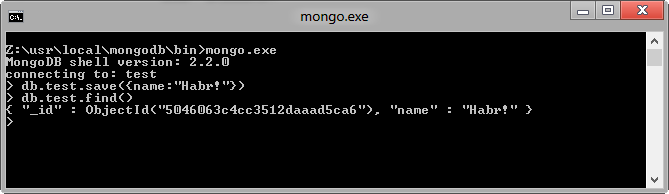
Run the mongo console interface
> Z:\usr\local\mongodb\bin\mongo.exeand perform the insertion and output of the test value in the database “test”
> db.test.save( { name: “Habr!” } )> db.test.find()The result should be the following:
6.5. Installing the Mongo database management interface
Offline MongoDB has a list and short overviews of admins , so you can choose to your taste.
I chose RockMongo for myself, so it is with its help that we will finally make sure that everything works and does not fall anywhere.
A. download the archive with admin panel from this page . We choose, of course, the version for Windows . At the time of this writing, this is RockMongo-on-Windows v0.0.4
B. From the archive, take the folder \ rockmongo-on-windows \ web \ rockmongo and copy it to the directory of our test site
Open config.php and change the value of the parameter
$MONGO["servers"][$i]["control_auth"] = true; on
$MONGO["servers"][$i]["control_auth"] = false; C. Check the result at the link www.test.local / rockmongo / index.php
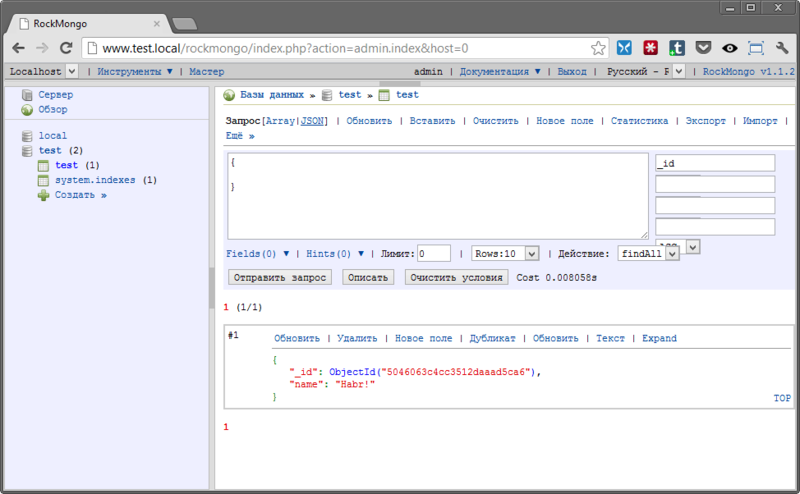
Congratulations! Now we are the final and irrevocable good fellows.
Bonus number 1. Working with php from the Windows console
Perhaps someone will come in handy. It came in handy for me when our evil technical leader decided that “SQL files are a great time, let's use migrations”. Of course, for the sake of decency, I tried to portray a complete misunderstanding and even let a tear, but was exposed and sent to figure out how it works on Windows.
It turned out that all that is needed for happiness is to set the PHP directory in the PATH .
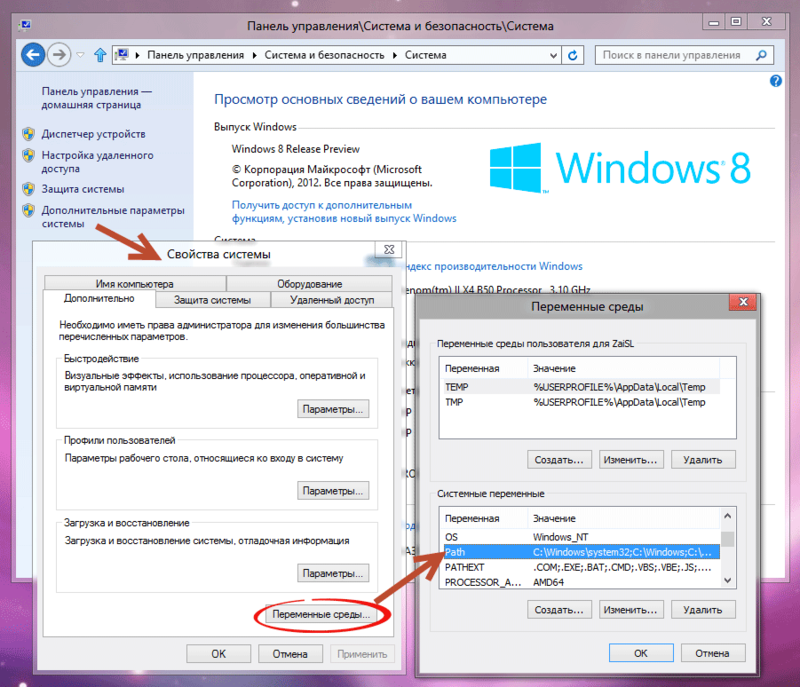
Click on "Change" and add to the end of the line
;Z:\usr\local\php5Now check that it worked.
Create a console.php file in the test site directory
<?php if ($argv[0] == basename(__FILE__)) { unset($argv[0]); } echo 'Hello ' . $argv[1] . '!'; Open the console (you can directly from the same folder - right-click with the SHIFT jammed on an empty place and select the "Open command window" item).
Enter:
> php console.php “UserName”The console responds:
> “Hello, UserName!”
PHP is defeated, universal jubilation, applause, curtain.
Bonus number 2.
All files and examples mentioned in the article in one archive
I hope that this material will be useful.
I would be grateful for comments and suggestions.
Source: https://habr.com/ru/post/150972/
All Articles