Button with outlined (stroke) font on Android

I needed one specific element for the project - a button with a circled font. It would seem that there is this - google just had to provide for it. But, as it turned out, it cannot be done in standard ways and you need to dig under the hood of the Button. I began my search with the shadow for the font.
But an attempt to make the stroke font in such a way fail
first, the line around the letters will be blurred the more, the more you specify the number in shadowRadius;
secondly, you can not change the width of the line.
A little thought, I implemented a class that does everything that is required. Anyone interested - please under the cat.
I looked everywhere for a solution and could not find it, so I decided to show my solution and, perhaps, it would be useful to someone. Of the requirements was the ability to set the font color and stroke width from XML. Now go to the code.
To begin with, in the res / values / attrs.xml file, we will describe the parameters that our ButtonStrokeText button will take (let's call it that way).
<? xml version = "1.0" encoding = "utf-8" ?>
<resources >
<declare-styleable name = "ButtonStrokeText" >
<attr name = "textStrokeColor" format = "color" />
<attr name = "textStrokeWidth" format = "dimension" />
</ declare-styleable >
')
</ resources >
We will take the textStrokeColor stroke color in the color format (as well as the text color in the usual button), we will make the stroke width as it should in dimensions (sp, dp and all that). Let me remind you that google recommends using sp for text size.
So, the parameters for XML are described, we move on to the ButtonStrokeText class itself. Create a class with the same name and inherit it from Button. Rewriting a couple of constructors and one onDraw method. Here is the code itself:
import android.content.Context ;
import android.content.res.TypedArray ;
import android.graphics.Canvas ;
import android.graphics.Color ;
import android.graphics.Paint.Join ;
import android.graphics.Paint.Style ;
import android.text.TextPaint ;
import android.util.AttributeSet ;
import android.widget.Button ;
public class ButtonStrokeText extends Button
{
private int strokeColor = Color . TRANSPARENT ;
private int strokeWidth = 2 ;
public ButtonStrokeText ( Context context )
{
super ( context ) ;
}
public ButtonStrokeText ( Context context, AttributeSet attrs )
{
super ( context, attrs ) ;
TypedArray a = context. obtainStyledAttributes ( attrs, R. styleable . ButtonStrokeText ) ;
strokeColor = a. getColor ( R. styleable . ButtonStrokeText_textStrokeColor , strokeColor ) ;
strokeWidth = a. getDimensionPixelSize ( R. styleable . ButtonStrokeText_textStrokeWidth , strokeWidth ) ;
a. recycle ( ) ;
}
Override
public void onDraw ( Canvas canvas )
{
final ColorStateList textColor = getTextColors ( ) ;
TextPaint paint = this . getPaint ( ) ;
paint. setStyle ( Style . STROKE ) ;
paint. setStrokeJoin ( Join. ROUND ) ;
paint. setStrokeMiter ( 10 ) ;
this . setTextColor ( strokeColor ) ;
paint. setStrokeWidth ( strokeWidth ) ;
super . onDraw ( canvas ) ;
paint. setStyle ( Style . FILL ) ;
setTextColor ( textColor ) ;
super . onDraw ( canvas ) ;
}
}
The code is quite simple - in the ButtonStrokeText (Context context, AttributeSet attrs) constructor, we process the parameters and save them. The last parameter in the getColor and getDimensionPixelSize methods is the default type, if we forget or do not specify it in XML.
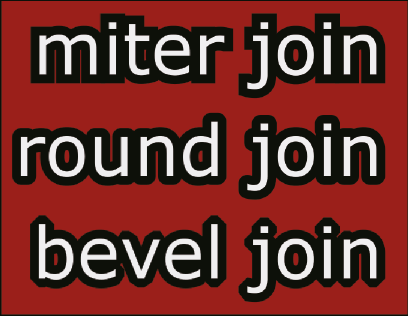
The most interesting thing we have is in the method that is responsible for rendering. In it, we just draw a stroke and call the parent method in the last line. I will also mention that setStrokeJoin affects the type of stroke, I chose a rounded one. The picture shows the stroke options, depending on the parameters (carefully look at the edges and corners of the stroke). All options can look at the picture.
That's all. Now you can use this class in your XML. Example usage below.
- <com.unlim.components.ButtonStrokeText android: text = "@ string / menu_quit"
- android: textColor = "android: color / white"
- app: textStrokeWidth = "5sp" app: textStrokeColor = "android: color / black"
- android: textSize = "20sp" android: layout_width = "220dip"
- android: layout_height = "40dip" android: layout_gravity = "center_horizontal" />
Well, as usual, throwing stones not big - wrote the first time. With hope of understanding.
Source: https://habr.com/ru/post/150871/
All Articles