Deploying the Node.js cloud application from the Cloud9 development environment
This tutorial describes the development, compilation, and deployment of Node.js applications in Windows Azure using the Cloud9 integrated development environment (IDE).
What will be discussed in this guide:
- How to create a project in Cloud9 IDE.
- How to deploy a project in Windows Azure.
- How to update a deployed application in Windows Azure.
- How to move projects between test and work deployments.
Cloud9 IDE is a cross-platform, web-based development environment. One of the Cloud9 functions for Node.js-based projects allows you to directly deploy applications to Windows Azure. In addition, Cloud9 is integrated with the GitHub and BitBucket repositories, which makes it easy to share projects with other developers.
')
With Cloud9, you can develop and deploy applications in Windows Azure from most modern browsers and operating systems, without the need to install additional tools or an SDK on your local computer. The following describes the work in the Google Chrome browser on a Mac computer.
Subscription
To get started with Cloud9, you must subscribe . You can log in with existing GitHub or BitBucket accounts, or create an account with Cloud9. Available as a free subscription, and paid (with enhanced functionality). For more information, see Cloud9 IDE .
Creating a Node.js project
Log into Cloud9, click the + icon next to My Projects and select Create a new project .

In the Create a new project dialog box, specify the name and type of the project, as well as the access method. Click Create to create a project.

Note. Some settings are only available in the paid version of Cloud9.
Note. When deploying a Cloud9 project in Windows Azure, its name is not used.
After creating the project, click Start Editing . If Cloud9 is launched for the first time, the system will offer a brief overview of the features. To skip a review or watch it later, select Just the editor, please .

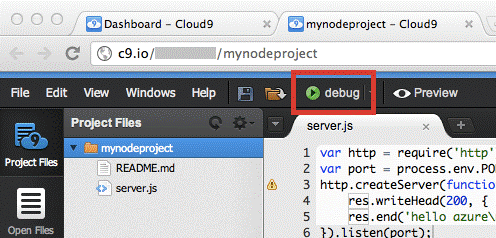
To create a Node application, click File and select New File .

A new tab Untitled1 will appear. To create the Node application, on the Untitled1 tab, enter the following code:
var http = require('http'); var port = process.env.PORT; http.createServer(function(req,res) { res.writeHead(200, { 'Content-Type': 'text/plain' }); res.end('hello azure\n'); }).listen(port); Note. The process.env.PORT variable ensures that the application will use the correct port both when debugging on Cloud9 and when deploying to Windows Azure.
To save the code, select File and then Save as . In the Save As dialog box, specify server.js as the file name and click Save .
Note. In some cases, a warning icon appears indicating that the req variable is not used. Ignore him.

Application launch
Note. The procedure described in this section is suitable for creating the simplest applications. If the application uses external modules, then a different version of Node.js will be needed for the debugging environment. To connect it, select Configure ... from the debug drop-down list and select the desired version of Node.js. For example, when using a version of Node.js other than 0.6.x, authentication errors may occur when working with the azure module.
To start the application in the Cloud9 debugger, click Debug .
A results window will appear. Click the specified URL to open the application in a browser window.

The application will look something like this:

To stop debugging, click stop .
Create a Windows Azure account
An account is required to deploy an application to Windows Azure. If you do not already have a Windows Azure account, sign up for a trial subscription. To do this, go to http://www.windowsazure.com and click Free Trial in the upper right corner.
Create Deployment
To create a new deployment, select Deploy and click + to create a deployment server.

In the Add a deploy target dialog box, enter a deployment name and then select Windows Azure in the Choose type list. This name will be used to identify the deployment in the Cloud9 environment, but will not be associated with the deployment name in Windows Azure.
If this is your first time deploying Cloud9 for Windows Azure, configure your Windows Azure publish settings. To do this, download and install the Cloud9 settings, as described below.
Click Download Windows Azure Settings .

The Windows Azure Management Portal will open, where you will be prompted to load the Windows Azure publishing settings. Before you begin, log in to your Windows Azure account.
Save the publish settings file to local disk.
In the Add a deploy target dialog box, select Choose File and specify the path to the downloaded file.
Then click Upload .
Click + Create new to create a hosted service. Hosted service is the container in which the application resides when deployed to Windows Azure. For more information, see the section about creating a hosted service for Windows Azure .

The system prompts you to enter the hosted service name and configuration settings (number of instances, OS, and data center). The specified deployment name will be used as the name of the hosted service in Windows Azure. This name must be unique in Windows Azure.

Note. The Add a deploy target dialog box in the Choose an deployment section lists all the hosted Windows Azure services. To deploy a project to a specific service, select it from this list.
Note. To enable remote desktop for deployment, select Enable RDP and specify credentials.
Deploy to Windows Azure Desktop
Select the deployment created in the previous steps. A dialog box opens with information about this deployment and a working URL that will be deployed to Windows Azure.

Select Deploy to Production environment . To start a deployment, click Deploy .
If this project is being deployed in Windows Azure for the first time, the error message No web.config found appears. Click Yes to create the missing file. As a result, the Web.cloud.config file will be added to the project.

If this project is being deployed in Windows Azure for the first time, the error message No 'csdef' file present will appear. Click Yes to create the missing .csdef file. As a result, the ServiceDefinition.csdef file will be added to the project. The ServiceDefinition.csdef file is required for publishing an application to Windows Azure. For more information, see the section about creating a hosted service for Windows Azure .
The system will ask you to specify the size of the instance for this application. Select Small and click Create . For more information about the size of a Windows Azure virtual machine, see "How to adjust the size of a virtual machine . "

The deployment status will display the progress of the process. After deployment is complete, Active appears.

Note. Projects deployed to Windows Azure via Cloud 9 are assigned a GUID as their name.
The deployment dialog shows the work URL. After the process is complete, click the URL to open the application deployed in Windows Azure in a browser.

App update
To make changes to an application, you can update it on the same hosted Windows Azure service using Cloud9.
In the server.js file, change the code so that the message hello azure v2 appears on the screen. For example, replace the existing code with the one below.
var http = require('http'); var port = process.env.PORT; http.createServer(function(req,res) { res.writeHead(200, { 'Content-Type': 'text/plain' }); res.end('hello azure v2\n'); }).listen(port); To save the code, select File and then Save .
Deploying the update in a Windows Azure test environment
Select Deploy to Staging . To start a deployment, click Deploy .
All hosted Windows Azure services support two environments - test and work. The test environment is similar to the working one, except that access to the application in the test environment is carried out using the conditional GUID-based URL created by Windows Azure. You can test the application first in a test environment, and then move it to the work environment by swapping over a virtual IP address (VIP), as described below.
When you deploy an application in a test environment, a GUID-based test URL will be displayed in the console, as shown in the screenshot below. To open an application in a test environment in a browser, click this URL.

Moving an update to the workbench using VIP swapping
When deployed in a test or production environment, each service is assigned a virtual IP address (VIP). Therefore, instead of redeploying the service, you can perform a VIP swap to move the service from the test environment to the production one. At the same time, the application will be moved from the test environment to the desktop without stopping its operation. For details, see "Deployment Management Overview in Windows Azure".
In the deployment dialog, click the Open portal link to go to the Windows Azure Management Portal.

Log in with your credentials.
On the left side of the webpage, select Hosted Services , Storage Accounts & CDN, and click Hosted Services .

The results pane displays the name of the hosted service specified in Cloud9, and two deployments — one with the Environment Staging value and the other with the Production .
To perform a VIP swap, select a hosted service and click Swap VIP on the ribbon.

In the VIP swap dialog box that opens, click OK .
Navigate to the application in a production environment. Please note that the application has moved from the test environment to the desktop.

Using Remote Desktop
If you used to create an RDP deployment and also specified a username and password, you can now connect to the hosted service via remote desktop by selecting the required instance and clicking Connect on the ribbon.

When you click the Connect button, the system prompts you to download the .RDP file. This file contains the information needed to create a remote desktop session. Open this file in a Windows system, enter the username and password that you specified when creating the deployment, and then connect to the desktop of the selected instance.
Note. The .RDP file used to communicate with hosted application instances only works with the Windows Remote Desktop Tool.
Stop and delete an application
Windows Azure registers role instances every server hour, and the server runtime includes the deployment period, even if the instances were not running. In addition, the server runtime takes into account deployment in both test and production environments.
Cloud9 is only a development environment and does not allow you to directly stop or delete an application deployed in Windows Azure. To remove an application from Windows Azure, follow these steps:
In the deployment dialog, click the Open portal link to go to the Windows Azure Management Portal.
Log in with your credentials. On the left side of the webpage, select Hosted Services , Storage Accounts & CDN, and click Hosted Services .
Select a test environment (see the value of the Environment field). To delete an application, click Delete on the ribbon.

Similarly, to delete an application, select the work environment and press Delete .
Additional resources
Source: https://habr.com/ru/post/150622/
All Articles