The practice of obtaining and using digital signatures when submitting reports to government agencies

For a long time, the Ukrainian tax authorities (as well as other bodies) began to accept documents in electronic form. For the delivery of such documents they must be signed with a digital signature. It was moving slowly enough - signatures were worth the money, everyone was too lazy to learn how to use them, there were no good programs, etc. Over the past year and a half, everything, surprisingly, has changed dramatically:
- Normal laws and open standards have appeared - now anybody can write a program for generating documents (and a lot of them have already been written)
- Tax began to issue signatures for free
- Again, technical support is provided free of charge.
- The same signature can be used in all state. organs
- Tax began to hint that soon will not accept paper documents (this is not true, but people are pushing)
This article describes in detail the process of obtaining a digital signature and its use when sending documents to the tax office. Yes, on Habré about something like this already written , but it was either advertising posts paid programs, or short little useful notes. And there will be a lot of screenshots and stories about the
What does this post do on Habré? Many IT professionals are registered as private entrepreneurs and have to spend about half a day on tax reports for about 5 times a year. Now this time can be reduced to 5-10 minutes. In addition, we will pay some attention to the information security issues of this whole mechanism.
Foreword
Everything is not as scary as it seems. Do not be intimidated by the volume of this article - there are many pictures and details in it. Tax behaves in relation to digital signatures quite friendly, does not require money for them, data formats are standardized, programs work, in general, everything turned out better than it seems at first glance. At some stages, however, strange things happen, but they do not spoil the overall pleasant impression. In any case, it is much more pleasant to submit reports in electronic form than to push in queues.
')
Where to begin
Sign up for a tax on receiving an electronic signature. To do this, go here: www.cskidd.gov.ua/contacts and look for your tax. Then call them. You may be recorded immediately, or may be asked to call back later. My tax record only happened on Mondays before lunch. Because many are willing. To sign up you do not need any documents, you will be asked for the last name and set a date and time. Different tax burdens are different, somewhere the date may be “today”, and somewhere they will be asked to wait two months. Do you want faster - go to a paid key certification center.
What documents are needed
- Completed and signed Application - accession to the EDS Agreement
Form
Sample fill - Completed and signed Application for registration for EDS
Form
Sample fill - A copy of the passport (p. 1-4), on each page you need to sign
- A copy of the identification code
- Original passport (sometimes asked, sometimes - no, but better take - somewhere in the rules it is written that it is needed)
I was also asked to bring a daddy (cardboard one, on ties), they put all the above documents in it and wrote my name on it. Daddy is obligatory or not - I do not know. I bought, and you, if you want, specify in advance (it will be a pity if you send for a daddy - you don’t get back in the queue, everything is arranged by the minute)
Attention! Answers to frequently asked questions:
No, it is not necessary to notarize copies of a passport. No, a copy of the page with registration is not needed. No, no copies of documents on registration of state of emergency and certificate of single tax payer are needed.
Digital Signature Generation
As you may know, an electronic digital signature (EDS) consists of two parts - public and private keys.
With a private key you sign the documents. It must be protected as the apple of one's eye, since, according to the laws of Ukraine, it completely replaces your signature (seal). Those. any documents signed by him (reports, declarations, contracts) are considered officially signed by you and will not be disputed.
The public key is distributed freely. The only thing for which it is needed - with its help, you can verify that the document is signed with your private key.
Keys can be generated independently on your computer (our law allows it) or in tax. Here you need to decide for yourself whether you trust the tax so that such an important thing as generating a private key on their computer. Depending on the solution, read one of the following two sections: either “Generation of keys in tax” or “Independent generation of keys”. I personally consider key generation in tax evasion on the lofty ideals of cryptography and security, but you decide for yourself.
Key generation in tax
Just come at the appointed time in tax. With you take the documents from the list at the beginning and a clean USB flash drive. They will put you behind a "secure computer", stand behind you and tell you step by step where to press the buttons. Create a password in advance (English letters and numbers, no symbol repetitions, at least 8 characters). On the USB flash drive you will write a private key, the public key will be registered on the tax server. After installing all the necessary programs (described below), you should search and download it here: www.cskidd.gov.ua/certificates-search (the easiest way to search is to enter your identification code in the field “DRPOU Code”). The certificate file must be saved in the “C: \ My Certificates and CRLs” folder - without this, nothing will work!
Self-generation of keys
Download and install this program .
Attention! Important: during installation, the program will ask for a directory for storing certificates. By default, it says “C: \ My Certificates and CRLs”. Do not change this directory! Attempting to transfer it to disk D cost me an hour of time trying to make the program work and it never succeeded. Change only if you are bored
Run the program. We see this window:

We insert a USB flash drive into the computer (in general, the keys can also be generated on a hard disk, but this is long and pointless - you need to carry all the same on a USB flash drive to a tax public key, and a private program also requires signing a document from a USB flash drive).
Click "Particular key" - "Zgeneruvati key". In the window that opens, we change nothing and click "Far." This window opens here:
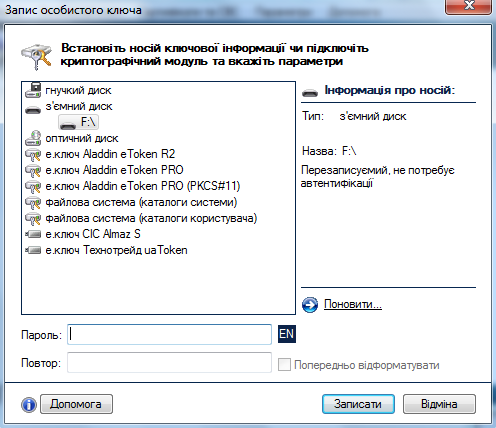
In it, select the "Zimny disk" and your flash drive. We enter the password and its repetition in the fields below (from 8 characters, without repetitions, the English alphabet and numbers).
Lyrical digression about password security
The program has a very specific understanding of password security. Your password can be of any length, but if it contains the same character twice or two characters on the keyboard one after the other (for example, “qw”), this password will be recognized as weak. Yes, it protects against qwerty and 111 passwords, but why did my favorite password like gj2kLSsdfj4kGOjklZs8dfjldf36FB54ho4 suddenly become weak because the number 4 in it is found twice? In addition, a potential hacker can no longer use exhaustive search, but eliminate all passwords falling under the above rules. My knowledge of combinatorics has already fallen a bit in the dust - maybe someone in the comments will help assess the reduction in the exhaustive search time for, say, an 8-digit password?
Further, "OK", "Save the file", "Dali", "Dali", "Complete".
Now you have:
- File “Key-6.dat” on a flash drive. This is your private key - take care of it! It has the attribute “hidden”, so depending on the settings of the file manager you may not see it.
- The file “EU-A4858C3A.p10” (the name may differ) in the folder “C: \ My Certificates and CRLs”. This is a "request for the formation of a certificate of enhanced security," but do not think about this name. This file must be recorded on a USB flash drive and take with you to the tax. It goes without saying that the private key is better to move somewhere from this flash drive, and it turns out that the chickens laugh - they generated the private key themselves, and then both went to tax :)
Once again - we only take a flash drive with a single file (with the extension “p10”) and documents that were mentioned at the beginning.
At the appointed time we go to the tax. We say the following: “I generated the keys myself. Here on the flash drive a certificate request. ” Depending on the level of your luck and the professionalism of the tax officers that you came across, there are two options:
- They say “ok” to you, take a flash drive, read a certificate request from it, generate a certificate and insert it into the database
- You are told “No, what are you! Keys are generated only by us, here on this computer! ". To this you need to answer the following: “According to clause 6.1 of the regulations of your Key Certification Center, I have the right to generate keys on my own.” In this place, people feel terribly embarrassed that they do not know their own work regulations and they run away to call / consult somewhere. Then come back and it all comes down to item number 1.
Attention : in this case they don’t give you anything - no papers, no files on the flash drive. Your private key is already with you, remember? And the generated certificate is on the tax server. You should search and download it here: www.cskidd.gov.ua/certificates-search (the easiest way to search is to enter your identification code in the field “DRPOU Code”). The certificate file must be saved in the “C: \ My Certificates and CRLs” folder - without this, nothing will work!
Installing software for working with digital signatures
Programs are paid and there are free. Paid seems to be a little better. Free tax distributes and with their help, you can also do everything you need. Since we use these programs only 5 times a year for 5-10 minutes - I see no reason to buy paid ones.
Download from the tax server and install these two programs:
DPS "Zahist zv_nostі"
OPZ
(OPZ versions are updated from time to time, so the link is not directly to the file, but to the download page, choose the latest version)
DPS "Zahist zv_nostі"
It is set as standard. Attention : in the settings of this program there is also a path to the certificate directory “C: \ My Certificates and CRLs”. You have already guessed that it is better not to change it.
OPZ
It is put with songs and dances. It offers to update Internet Explorer to version 6.0 (I'm not kidding!), It requires installing Java, Acrobat Reader, Windows Installer, Windows Script (there are links to everything in the installer). When I first started it told me that I also need to install MS XML Parser 4.0 (downloaded from the Microsoft site). In general - a fairy tale.
Starting work with EDS - signing and sending the Agreement
First of all, you need to sign with your electronic signature the “Contract for the Electronic Documents for the Financial Businesses”. It is you who agree with the tax that you will believe the documents signed by each other’s keys. Actually, it seems to me that this is just such a “sandbox” where you can practice signing and sending documents without risking sending out some important nonsense and running into a fine. Well done, in general, what they did.
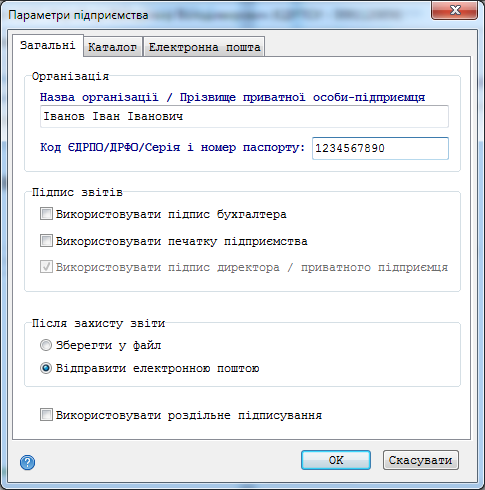
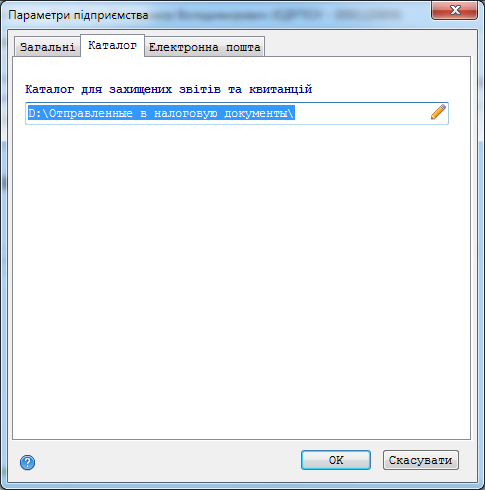
We start traffic police "Zakhist zv_nost_". We select in the menu "New Company". Fill in samples:

Attention!
- In the field "Code DRPOU / DRFO / Serіya і passport number" the identification code is written! Yes, I am sure. Yes, it is strange. No, if you write the passport number - it does not work. I checked.
- Signed files can be saved to disk and sent from your favorite email client or sent directly from the program. Works and so and so. For some reason, tax officers are advised to save to a file and send it through another email client. They even suggest to register mail on ukr.net right on the spot :)
- If you want to send mail directly from the program - you need to register your mailbox in it (settings, password). Gmail mail is supported. The password from the mail to the left is not sent anywhere - I carefully watched the program work with a sniffer. You do not need to prescribe the mail of the tax server - it is constant and cannot be changed. If you plan to send files from your mailer - you need to send to zvit@sta.gov.ua
- Where to send reports - does not matter. At least every time from the new address. You are certified by your electronic signature, not a box.
After filling in the data about yourself, click on the main menu “Sound and Receipt” - “Contract about life. docs for fіz. Osib. Fill in the sample:
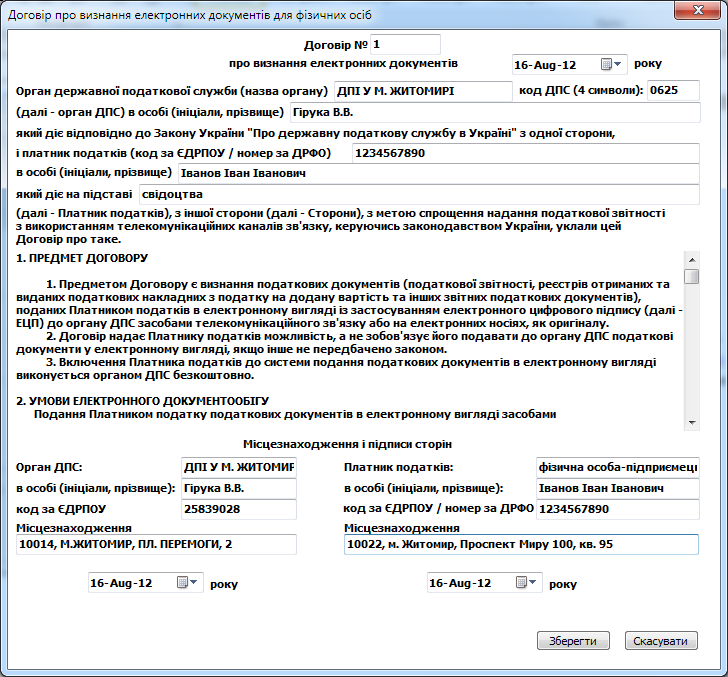
* All names and addresses are invented by accident - do not forget to enter your real data!
Mysterious fields “DPS Code”, “DPS Authority for Individuals” and tax details should be clarified in your tax authority. You can call on the same phone, which in the beginning recorded the receipt of the signature. You will either be answered or told where to turn. Do not trust the Internet - even on my tax website, incorrect data was written, and even in any reference books on the left sites - anything can be written at all.
Press "Save", "Appointment", insert the USB flash drive with a private key, select "Home Disk", enter the password, "Read". In this place, depending on the settings of the send settings that you made before, the file is either signed and sent directly from the program, or signed and saved to disk (in this case, you should send it to zvit@sta.gov.ua yourself) .
Attention! Your document has been sent. But not yet the fact that adopted. There may be interruptions in the Internet, in the mail, the tax server often lies breathless: sending the document does not mean anything - you need to wait for two letters with confirmation of receipt (receipts). They will come by mail to the same address from which you sent the document. The first confirmation is, roughly speaking, evidence that the document was received by the tax mail server, that it is safe, intact and put in a queue for processing. The second confirmation means that the document passed the verification of the digital signature, the verification of the validity of the content and transferred from the central server to your local tax authority. Only the presence of a second confirmation gives a guarantee of receiving a tax document.
The first confirmation comes within a couple of minutes. The second is sometimes much longer. For example, for the above contract, the deadline for waiting for the second confirmation is 3 days. For other documents, it is recommended to repeat sending if you have not received a second confirmation within a day.
If you sent the document directly from the Zakhist Zvistnost DPS program, then it can also check for the presence of receipts (“Receive Receipts” button on the main form). If you sent from your email client - there you are and look for letters from the tax, then save the files from them to disk and import them into the Zakhist Zvnost DPS to decrypt with the same button “Receive Receipts”.
Read the text of the receipt with confirmations! They may say that the document was rejected and for what reasons. Messages are often understandable and help.
Delivery of the quarterly single tax declaration
Launch the program "Podatkova zvіtnіst." First of all, fill in the data about yourself “Service” - “Personal parameters”. This needs to be done only once - then the program will offer to use the data from here to auto-fill the caps of all created documents.

Now we create a declaration: “Document” - “Novy” and look for a document with the code “F01 033”. We set the quarter and year correctly, click “Send confirmation”.
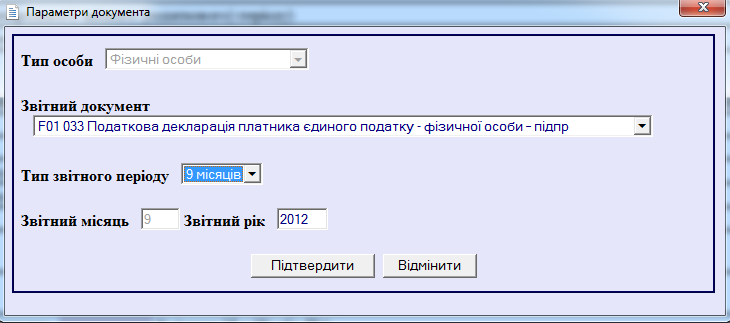
Fill out the document, just as you would fill out the paper. The cap of the document should be filled automatically with data from the settings.
Attention!
- Fields marked in purple are calculated automatically. If you do not have any important reasons to consider the amount or percentage of tax in its own way - do not do it.
- Fields marked with "*" are required. Do not forget them.
- Pay attention to the field "area, misto" - these are 2 different fields and both are required. The document is made poorly and this is not very clear. It is necessary to fill both, otherwise the document will not be accepted.
After filling out the document, click "Control" and perform both checks.
- “Perevirka structure” checks the validity of the received document (if all required fields are filled, have you entered a letter in the field where there should be a number). The document must pass this test. If it does not, you can not even try to send it, it will not be accepted.
- “Cameral translation” - checks the consistency of the entered data. Those. did you correctly sum up the amount for 2 quarters, whether the tax amount was correctly calculated. Theoretically, there may be circumstances when this check may not pass (well, maybe you have some kind of tax debts / overpayments or something else). Tax promises to accept such documents and consider manually. If you have no "tricky" circumstances, the document should pass this check, too.
Attention!
- During the checks, the program may report an error. The error can be understandable - such as “Field No. 5 should be the sum of fields No. 3 and No. 4” —in this case, it should be corrected. Or incomprehensible - something in the spirit of "The element: 'HNACTL' has invalid value according to its data type". An incomprehensible error most likely means one of two things:
- You did not fill in any required parameter.
- You entered a value of the wrong type in a field (a letter in a digital field
- Check. Sometimes the error text is googled (it helped me a couple of times).
- The fact that the document has passed both checks does not mean anything. One such document that passed both checks was returned to me twice by the tax server with an indication of additional errors. I am glad that the letter from the tax still clearly indicates the reason for the refusal of admission - the document is really correct.
When the document has passed both checks - save it “Document” - “Save” and get the xml-file. Start the DPS Zahist ZvNostnosti program, click on the Vidravit Zvity window in the main window, add the xml file you received in the previous step - and then everything is like when you signed and sent the Agreement in the first paragraph - insert a USB flash drive with a private key, enter the password, etc. If you forget - reread the previous section.
Attention!
- Be sure to wait for two receipts. Only having them you know for sure that the document is accepted tax.
- By law, receipt files must be kept for 3 years.
- If even the first receipt did not come, it means either you have problems with the Internet, or something is bad with your mail or the tax server is lying (try later or call the tax service)
- If the second receipt did not come - glitches inside the tax. You can call them (on the same phone from the page www.cskidd.gov.ua/contacts ) and they either look at the status of the document themselves, or they will tell where to call back.
- If the receipt is written about some kind of error - it needs to be corrected, sign the document again and send again. There is nothing wrong with that, there are no fines for it.
- Valid receipt No. 1 must contain a text of the type “The document was delivered to the central district of the State Tax Service”
- Valid receipt No. 2 must contain a text of the type “DOCUMENT ACCEPTED ON DISTRICT RIVNI.”
Source: https://habr.com/ru/post/150598/
All Articles