nanoCAD 3.7 vs 4.0 - work optimization (part №2)
We continue to review the differences between free nanoCAD 3.7 and paid nanoCAD 4.0. After we have reviewed the innovations that have appeared in the nanoCAD platform, we will consider the optimized functionality - here, too, there is something related only to the 4th version.
The one who just started to read us, we recommend starting with the articles " Double star nanoCAD: free 3.7 and paid 4.0 " and " nanoCAD 3.7 vs 4.0 - what is new? (Part number 1) ".
The Raster Contour command for quick control of the IMGFRAME variable
 The question " how to disable the frame around the bitmap? »We were asked on the forum once a month with regularity - there is always a user who does not know that the contour mapping depends on the value of the IMGFRAME variable. I had to implement new menu items. At the same time, we tried to optimize the frame on / off, make it more convenient compared to alternative CAD systems - you immediately select the variable value from the menu items and see the result on the screen (Fig. 1), but do not call the “ SETVAR IMGFRAME ” command , enter a new value and press the ENTER button.
. 1. nanoCAD 4.0 IMGFRAME: ?  And in nanoCAD 3.7, a more “classic” way of defining a frame for a bitmap contour is implemented - the Contour command is simply called up in the menu (see Figure 2), which transmits “ SETVAR IMGFRAME ” to the command line. Change the value of the variable from “1” to “0” (or vice versa), make REGEN (screen update) and the frame is turned off. As a result, the actions are more, but the result is the same as with nanoCAD 4.0.
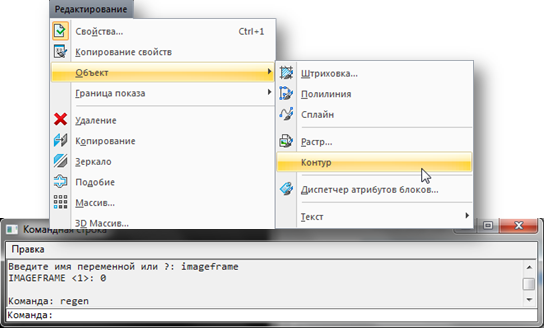
. 2. nanoCAD 3.7 «SETVAR IMGFRAME» - , nanoCAD 4.0, ')
Manage the weight of lines on the screen
According to numerous requests from users in version 4.0, a new submenu View \ Weight of lines on the screen appeared , which sets the scale for displaying the thickness of lines on the screen. The advantage is clear - thinner lines allow you to better display the drawing with a large separation from it. And this is an extra comfort when working with saturated drawings - see fig. 3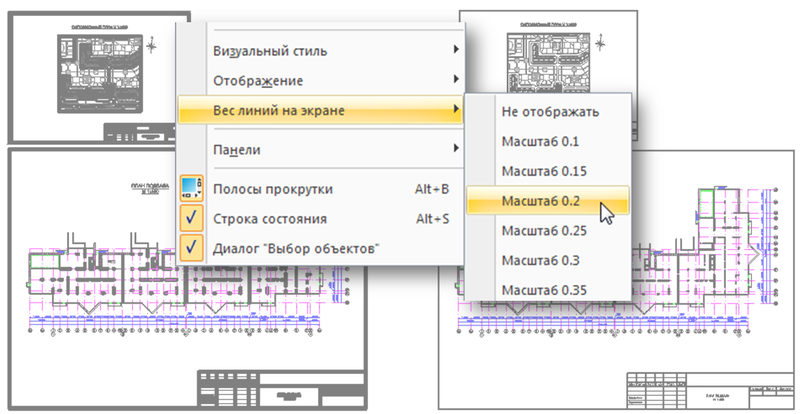
. 3. \ . In nanoCAD 3.7, working with the weight of the lines is more difficult to implement - via the command line and setting the variable LWDISPSCALE . This variable can take any fractional value in the range from 0 (do not display line weights) to 1 (100% display). Accordingly, after that you give the command REGEN (refresh the screen) and the thickness of the lines is displayed as indicated by you. Again, there is more action, but the result is the same as in nanoCAD 4.0.The default font is CS_Gost2304.shx
 If the DWG-drawing contains a shx-font that is not installed on the user's computer, then usually when opening such a file, the missing font is replaced with a universal license-free txt.shx . This is done in all AutoCAD-like systems, it was the same in the first versions of nanoCAD. But now both in nanoCAD 4.0, and in nanoCAD 3.7, the missing font is replaced by CS_Gost2304.shx , which most closely complies with GOST 2.304.
) CS_Gost2304.shx txt.shx 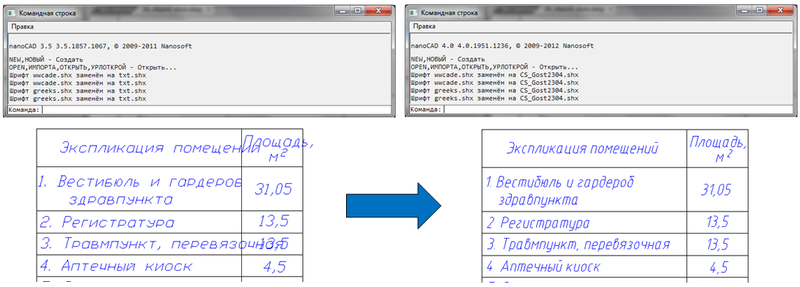
) … . 4. nanoCAD DWG , CS_Gost2304.shx, 2.304. In most cases, this leads to less destruction of a design drawn up in accordance with national standards and to a smaller modification of documentation - see fig. 4 shows an example of how the GOST-table was opened earlier and how it is now in new versions of nanoCAD. Without a doubt, it will be useful for people working in accordance with GOST (and these are all designers in Russia).In addition, drawing fonts corresponding to GOST 2.304-81 and used in nanoCAD, you put in free access on our forum (both SHX and TTF): forum.nanocad.ru/index.php?showtopic=4713 .
A scattering of improvements
Working on a drawing, I really want to reduce routine operations and optimize the actions of teams - there are a lot of such requests coming to our forum, and we analyze them very carefully. According to the results of this analysis, a huge number of small, seemingly not very significant optimizations are implemented, which generally add up to one big powerful improvement - working with nanoCAD becomes easier from month to month. Let's list a number of similar optimizations in the usual list - I think that their necessity is understandable without additional description:- Added the Settings item to the context menu of the command line, calling the Settings dialog (Fig. 5):

. 5. – . - For more convenient work with profiles, the Quick Profile command has been added to the Service \ Interface Settings submenu, which allows you to quickly set the current profile or create a new one.
- At the suggestion of users, the keyboard shortcut CTRL + F is assigned to quickly open the Find and Replace dialog.
- The opening / closing of the Properties window by double-clicking on an object is disabled, and the Properties command in the right-click context menu now only works on opening the Properties window.
- Taking into account the wishes of users, the algorithm of binding to the center of a circle, arc, ellipse or elliptical arc has been changed: now the binding of the Center is triggered immediately when you hover the cursor on the circle.
- For the Direct command, two additional construction methods have been added: angle and bisector.
- For the Chamfer and Mate commands, a new L-polyline option has been added, allowing you to chamfer or mate for all vertices of the selected polyline.
- The Chamfer and Conjugate commands can now be used to quickly trim or lengthen selected objects. To do this, when selecting objects, you must hold down the SHIFT key: the current values of the chamfer or radius of the pairing are replaced by 0 and the objects are cut or extended to the intersection point (the chamfer line or the arc of the pairing are not constructed).
- Added the ability to pair parallel segments for the Pairing command. The current value of the conjugation radius is temporarily replaced with a value equal to half the distance between parallel segments.
- In the Tools \ Details menu, the Coordinates command has been added, which displays the coordinates of the point indicated by the cursor in the graphics area on the command line.
- Improved program performance when working with drawings containing complex blocks.
As you can see, almost all the improvements have touched both 3.7 and 4.0 versions. This is understandable, all these improvements can be attributed to the basic drawing, which is necessary for all who use CAD - both professionals and beginners.
Enhanced compatibility mode
Another important optimization of the program is the new mode, which is a software emulation of the OpenGL libraries with the basic Windows tools (enhanced compatibility mode). This mode will help in cases where the video subsystem of the computer does not cope with the display of CAD graphics - loses the cursor, parts of the image, displays artifacts on the screen, etc. If you or your colleagues encounter similar problems, then try enabling this mode in the program settings ( Tools \ Settings \ System settings ) - perhaps your computer’s configuration will work better with nanoCAD.Redesigned Help menu
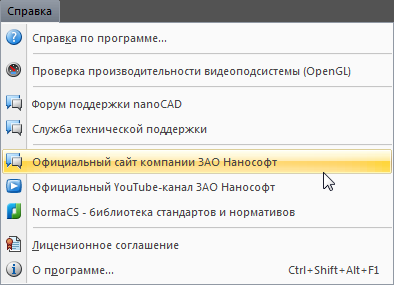
I would like to separately tell about the revised Help menu, which gathered the most useful resources for the designer and user nanoCAD (Fig. 6).Official YouTube-channel ZAO Nanosoft
In the Help menu you will find a link to the company's official YouTube channel — a very useful resource for users. Take a look, for example, in the Playlists section - there is a video tutorial for novice users posted there, which was created during this year. The textbook consists of 43 video lessons that consistently tell about the basic tools and design methods in nanoCAD. We strongly recommend to get a free subscription to the channel - the materials will be replenished!Checking the performance of the video subsystem
In the previous version, we added the command VPERFTEST , which analyzes the video subsystem of the computer. In the new version, we brought this command to the Help menu - now the user can conduct a performance test at any time convenient for him. Tune nanoCAD for maximum performance!NanoCAD support forum and technical support service
In previous posts, I talked about how a community of product users gathers at the Nanosoft CJSC forum , who quickly answer most of the basic questions — share knowledge, materials, projects, templates and settings. If you have questions about nanoCAD, then look at the forum - we will be happy to talk.And if you use the licensed version, then a specialized team will redirect you to the page to register an appeal to technical support - your request will be registered and processed in a regular manner. Take a few minutes to complete your application and help us improve the software!
. 6. – . Conclusion of the 2nd part
Without a doubt, nanoCAD seriously stepped forward towards the users - everyone will find something of their own, convenient and useful to him. In many ways, this success of the product is ensured by the openness of developers to discuss the program, in many respects by the mass distribution of the free version and feedback from users. We invite you to evaluate new versions - believe me, we have done a lot to make nanoCAD your indispensable assistant.How to get new versions?
This section is for those who still do not know anything about us :-)If you are registered on the website www.nanocad.ru , then to install nanoCAD you only need to download the version that suits you - 3.7 or 4.0. Both versions can be installed in the following modes:
- Demo (without serial number). This is a full-featured mode with limited printing and does not grant commercial use rights;
- commercial (requires input serial number). This full featured mode grants commercial use. And for version 3.7 the commercial mode is provided free of charge (request it in the Personal Account). And for 4.0, after the purchase of either a subscription (5,000 rubles / year) or a boxed version (15,000 rubles).
An educational version of the program is also available (after registering and approving an educational institution on the site www.nanocad.ru ) and a development version (after registering on developer.nanocad.ru ).
Source: https://habr.com/ru/post/150536/
All Articles