Quick start of the first project in Windows Azure. Web sites. Deployment methods
The following deployment options are available to the developer for deploying a website in Windows Azure Web Sites: Visual Studio Web Deploy, GitHub, FTP, Team Foundation Services (TFS), Microsoft WebMatrix. Deployment using FTP was described in Part 2 of this series, so all other options will be described in this part.
The first five parts of the cycle are available here , the 6th is here . This is the final part of the cycle.
Sign in to the Windows Azure Management Portal ( http://manage.windowsazure.com ) using your Windows Live ID credentials (Figure 1).
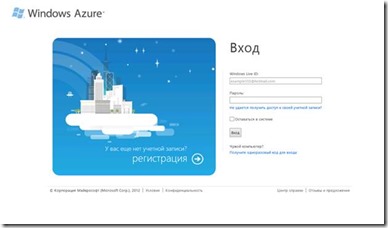
Fig. 1. Login page
')
Entering the management portal (Fig. 2), click the New button in the lower left corner of the page to open the New form dialog box.

Fig. 2. Windows Azure Management Portal
Select Web Site to create a new website. Select Quick Create (fig. 3).
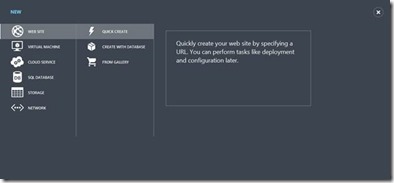
Fig.3. Choosing a website creation option
Enter the URL for your future website (Figure 4).

Fig. 4. Initial Website Setup
In a short time, your new website will be deployed, after which the Status field value will take the Running value (Fig. 5).

Fig. 5. Website Information Panel
Click the link in the URL box of your website to make sure that the site has been created and is working (Fig. 6).

Fig.6. The first page of the created site
Go to the Dashboard page and click the Set up TFS publishing link on the Quick Glance panel .
Now, since integration is only supported with TFS Preview, you need to create an account. In the Authorize TFS Connection window that opens (Figure 7), click Create a TFS account now.
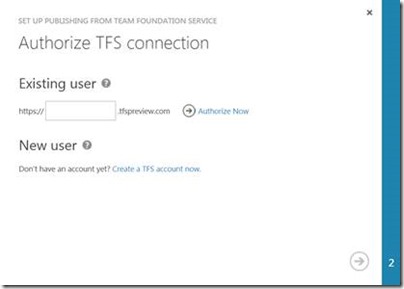
Fig. 7. Authorize TFS connection window
In the Account Creation window that opens (Figure 8), enter the Account URL . Click Create Account.
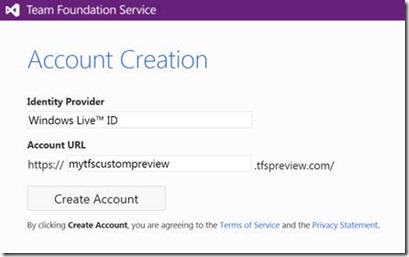
Fig. 8. Creating a TFS Preview Account
After creating your account, you will be taken to the Recent Project and Teams page (Fig. 9). Click Create a team project .
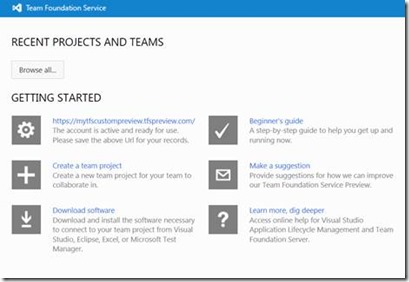
Fig. 9. TFS account admin panel
In the Create New Team Project window (Fig. 10), enter the required data. Click Create Project .

Fig. 10. Creating a new project
Wait until the project is created and go to the Dashboard page of your website. Click Set up TFS publishing . In the window that opens, enter the URL of your TFS and click Authorize now .
In the window that opens, click Accept (fig.11) to allow the connection of the TFS account. Click OK .
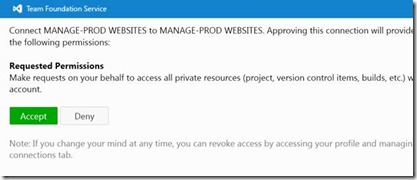
Fig. 11. Connecting a project to TFS
Select your project and click OK . After binding the TFS project, a corresponding message will be displayed (Fig. 12).
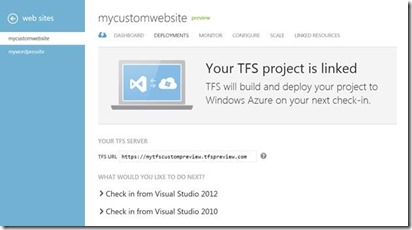
Fig. 12. Confirmation of the project connection to TFS
In the event that you are using Visual Studio 2010 you must install SP1 and KB2581206 . For Visual Studio 2012, no additional actions are required. Go to Visual Studio 2012.
Click Connect to TFS (Figure 13).
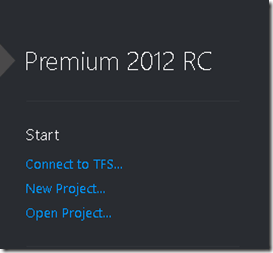
Fig. 13. Menu Visual Studio 2012
In the Connect To Team Foundation Server window that opens (Figure 14), click Servers.
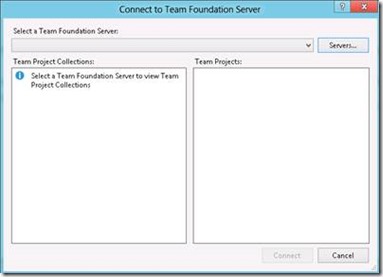
Fig. 14. Connecting to Team Foundation Server
Click Add.
Enter the required data (Fig. 15). Click OK . Click Close .
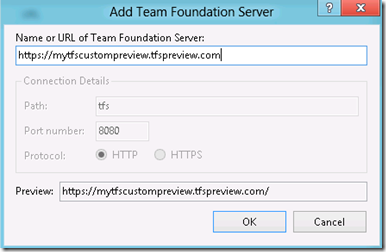
Fig. 15. Adding Team Foundation Server
After connecting to TFS, select your project (Fig. 16). Click Connect .
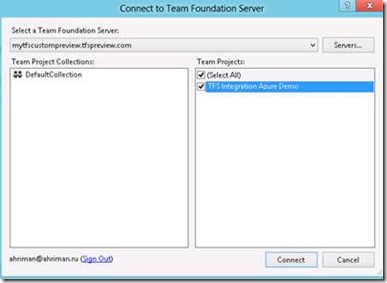
Fig. 16. Connect to Team Foundation Server
Click New Project . Choose an ASP.NET MVC 4 Web Application template . Choose Internet Application
After creating the project, right-click on Solution.
Click Add Solution to Source Control (Figure 17).

Fig. 17. Adding a project to TFS
In the Add Solution [projectname] to Source Control dialog box that opens (Figure 18), click OK.
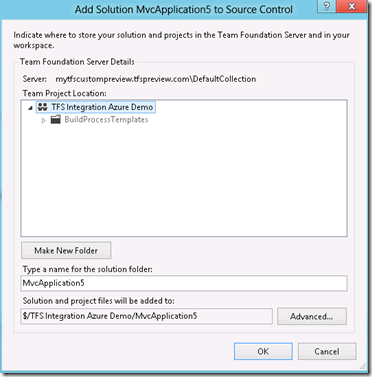
Fig. 18. Adding a project to TFS
Open Source Control Explorer . Pay attention to your project (Fig. 19).
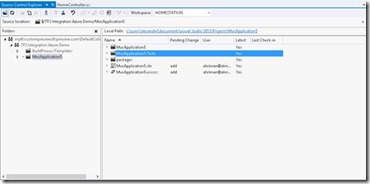
Fig. 19. Source Control Explorer
Open Team Explorer and click Pending Changes. Enter a comment and click Check in (fig. 20). In the confirmation dialog that opens, click Yes .
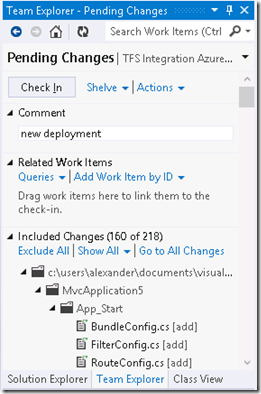
Fig. 20. Check in project
Go to the Windows Azure Management Portal on the Deployments tab (Figure 21) and notice that its state has changed - it now shows that your project is deployed in Windows Azure Web Sites.
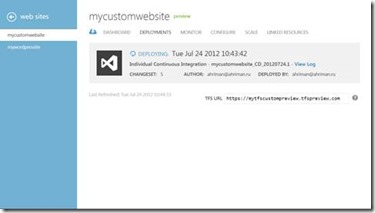
Fig. 21. Deployments tab
After the deployment is completed, a corresponding message will appear on the page (Figure 22).

Fig. 22. Message about the expanded project
By configuring TFS integration with your Visual Studio, you get the benefit of continuous deployment. Now, if you changed the code in Visual Studio and clicked Check in, the project will be updated automatically with the deployment history saved. At the same time, you can always roll back to the previous version by selecting the deployment and clicking the Redeploy button.
Windows Azure Web Sites support deployment using Git.
Open the Dashboard page and click Set up Git publishing (Figure 1).
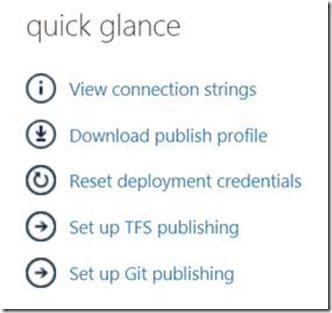
Fig. 1. Quick Glance
Wait for the creation of the Git repository.
Download and install GitHub for Windows at http://windows.github.com/ .
Launch GitHub for Windows. Open a Git Bash command prompt and enter git clone [repository address]. Enter password. After some time, the repository will be cloned into the folder of your choice (Fig. 2).
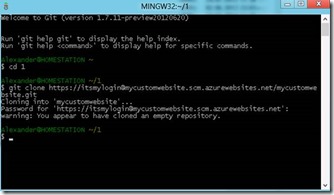
Fig. 2. Clone repository
Open the folder with the cloned repository and transfer it to Github for Windows. After that, a record of your repository should appear (Fig. 3).

Fig. 3. Github for Windows
Add your website to the repository folder.
Double-click on your repository name in Github for Windows.
Enter the login and password to access the repository (Fig. 4). Click OK .

Fig. 4. Authentication in Github for Windows
In the dialog box that appears, enter the commit message and click Commit (Figure 5).
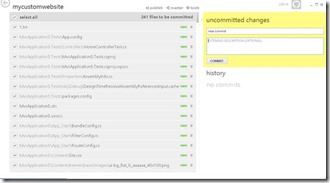
Fig. 5. Commit to repository
Click Publish .
WebMatrix is a lightweight Microsoft development tool using WebDeploy or FTP deployment.
Download and install WebMatric 2 using Web Platform Installer 4.0.
In order to obtain credentials for further deployment via FTP, go to the admin panel of the website by clicking on its name. On the Dashboard page, click Reset deployment credentials (Figure 1). Enter the credentials to be used to deploy the website in the dialog box that appears.
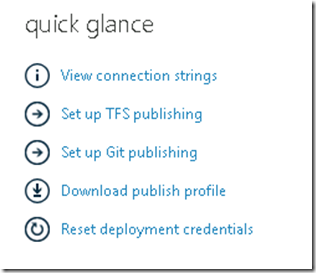
Fig.1. Website Action Menu
To download a deployment profile that will be used later in WebMatrix, click Download publish profile .
Launch WebMatrix.
Click Open Site, Deleted Site . Click Publish Import Settings and select the deployment profile file downloaded from the Windows Azure portal (Figure 2).
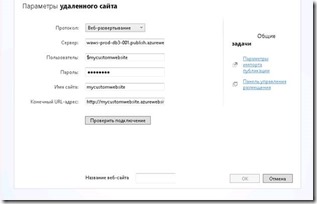
Fig. 2. Remote site settings
Enter a website name.
Click Test Connection . If the connection is ok, click OK .
In WebMatrix, you cannot edit anything except web pages, so open the Views \ Home \ Index file . cshtml and make any changes (Fig. 3). Press CTRL + S.

Fig. 3. Editing a web page in WebMatrix
Launch Visual Studio 2012.
Click New Project . Select the ASP.NET MVC 4 Web Application template (Figure 1). Select Internet Application (Fig. 2).

Fig. 1. List of web project templates in Visual Studio 2012
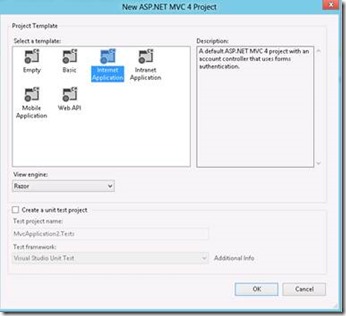
Fig. 2. Basic settings of the ASP.NET MVC 4 project
Right-click on the project. Select Publish . In the dialog that opens, click Import ... and select the deployment profile downloaded from the Windows Azure Management Portal for your website. Select the Web Deploy deployment option .
To validate the entered values (Fig. 3), click Validate Connection . If the verification is successful, click Publish .
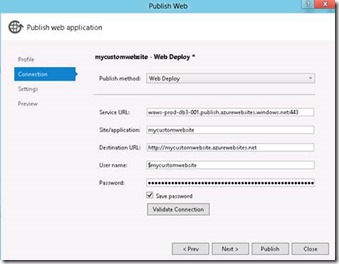
Fig. 3. Web Deploy Deployment Settings Window
Next, in the Output view, you will see the deployment log of your web site via Web Deploy (Fig. 4).

Fig. 4. Output view
Make any changes to your project.
Click Publish on your project. Please note that you immediately went to the Preview tab. Click Start Preview (Fig.5).
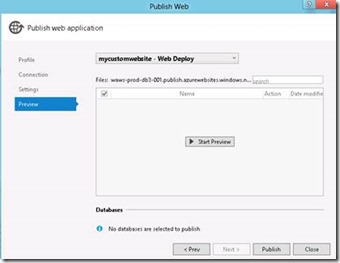
Fig. 5. Preview Tab
You can determine which updated files to upload to the Windows Azure platform (Figure 6).

Fig. 6. Publishing a project using Web Deploy
Click Publish .
Windows Azure Web Sites is a new Windows Azure cloud platform functionality that allows developers to quickly and easily deploy websites to a highly scalable environment using familiar programming languages and tools, such as FTP, Git, or TFS. In Web Sites, you can use Windows Azure services: SQL Database, Caching, CDN. As the load on the website increases, the developer can quickly scale it.
The entire cycle of articles, formatted and saved in PDF-format, can be downloaded here .
Thanks for attention!
The first five parts of the cycle are available here , the 6th is here . This is the final part of the cycle.
Team Foundation Services
Sign in to the Windows Azure Management Portal ( http://manage.windowsazure.com ) using your Windows Live ID credentials (Figure 1).

Fig. 1. Login page
')
Entering the management portal (Fig. 2), click the New button in the lower left corner of the page to open the New form dialog box.

Fig. 2. Windows Azure Management Portal
Select Web Site to create a new website. Select Quick Create (fig. 3).

Fig.3. Choosing a website creation option
Enter the URL for your future website (Figure 4).

Fig. 4. Initial Website Setup
In a short time, your new website will be deployed, after which the Status field value will take the Running value (Fig. 5).

Fig. 5. Website Information Panel
Click the link in the URL box of your website to make sure that the site has been created and is working (Fig. 6).

Fig.6. The first page of the created site
Go to the Dashboard page and click the Set up TFS publishing link on the Quick Glance panel .
Now, since integration is only supported with TFS Preview, you need to create an account. In the Authorize TFS Connection window that opens (Figure 7), click Create a TFS account now.

Fig. 7. Authorize TFS connection window
In the Account Creation window that opens (Figure 8), enter the Account URL . Click Create Account.

Fig. 8. Creating a TFS Preview Account
After creating your account, you will be taken to the Recent Project and Teams page (Fig. 9). Click Create a team project .

Fig. 9. TFS account admin panel
In the Create New Team Project window (Fig. 10), enter the required data. Click Create Project .

Fig. 10. Creating a new project
Wait until the project is created and go to the Dashboard page of your website. Click Set up TFS publishing . In the window that opens, enter the URL of your TFS and click Authorize now .
In the window that opens, click Accept (fig.11) to allow the connection of the TFS account. Click OK .

Fig. 11. Connecting a project to TFS
Select your project and click OK . After binding the TFS project, a corresponding message will be displayed (Fig. 12).

Fig. 12. Confirmation of the project connection to TFS
In the event that you are using Visual Studio 2010 you must install SP1 and KB2581206 . For Visual Studio 2012, no additional actions are required. Go to Visual Studio 2012.
Click Connect to TFS (Figure 13).

Fig. 13. Menu Visual Studio 2012
In the Connect To Team Foundation Server window that opens (Figure 14), click Servers.

Fig. 14. Connecting to Team Foundation Server
Click Add.
Enter the required data (Fig. 15). Click OK . Click Close .

Fig. 15. Adding Team Foundation Server
After connecting to TFS, select your project (Fig. 16). Click Connect .

Fig. 16. Connect to Team Foundation Server
Click New Project . Choose an ASP.NET MVC 4 Web Application template . Choose Internet Application
After creating the project, right-click on Solution.
Click Add Solution to Source Control (Figure 17).

Fig. 17. Adding a project to TFS
In the Add Solution [projectname] to Source Control dialog box that opens (Figure 18), click OK.

Fig. 18. Adding a project to TFS
Open Source Control Explorer . Pay attention to your project (Fig. 19).

Fig. 19. Source Control Explorer
Open Team Explorer and click Pending Changes. Enter a comment and click Check in (fig. 20). In the confirmation dialog that opens, click Yes .

Fig. 20. Check in project
Go to the Windows Azure Management Portal on the Deployments tab (Figure 21) and notice that its state has changed - it now shows that your project is deployed in Windows Azure Web Sites.

Fig. 21. Deployments tab
After the deployment is completed, a corresponding message will appear on the page (Figure 22).

Fig. 22. Message about the expanded project
By configuring TFS integration with your Visual Studio, you get the benefit of continuous deployment. Now, if you changed the code in Visual Studio and clicked Check in, the project will be updated automatically with the deployment history saved. At the same time, you can always roll back to the previous version by selecting the deployment and clicking the Redeploy button.
Git github
Windows Azure Web Sites support deployment using Git.
Open the Dashboard page and click Set up Git publishing (Figure 1).

Fig. 1. Quick Glance
Wait for the creation of the Git repository.
Download and install GitHub for Windows at http://windows.github.com/ .
Launch GitHub for Windows. Open a Git Bash command prompt and enter git clone [repository address]. Enter password. After some time, the repository will be cloned into the folder of your choice (Fig. 2).

Fig. 2. Clone repository
Open the folder with the cloned repository and transfer it to Github for Windows. After that, a record of your repository should appear (Fig. 3).

Fig. 3. Github for Windows
Add your website to the repository folder.
Double-click on your repository name in Github for Windows.
Enter the login and password to access the repository (Fig. 4). Click OK .

Fig. 4. Authentication in Github for Windows
In the dialog box that appears, enter the commit message and click Commit (Figure 5).

Fig. 5. Commit to repository
Click Publish .
WebMatrix 2
WebMatrix is a lightweight Microsoft development tool using WebDeploy or FTP deployment.
Download and install WebMatric 2 using Web Platform Installer 4.0.
In order to obtain credentials for further deployment via FTP, go to the admin panel of the website by clicking on its name. On the Dashboard page, click Reset deployment credentials (Figure 1). Enter the credentials to be used to deploy the website in the dialog box that appears.

Fig.1. Website Action Menu
To download a deployment profile that will be used later in WebMatrix, click Download publish profile .
Launch WebMatrix.
Click Open Site, Deleted Site . Click Publish Import Settings and select the deployment profile file downloaded from the Windows Azure portal (Figure 2).

Fig. 2. Remote site settings
Enter a website name.
Click Test Connection . If the connection is ok, click OK .
In WebMatrix, you cannot edit anything except web pages, so open the Views \ Home \ Index file . cshtml and make any changes (Fig. 3). Press CTRL + S.

Fig. 3. Editing a web page in WebMatrix
Web deploy
Launch Visual Studio 2012.
Click New Project . Select the ASP.NET MVC 4 Web Application template (Figure 1). Select Internet Application (Fig. 2).

Fig. 1. List of web project templates in Visual Studio 2012

Fig. 2. Basic settings of the ASP.NET MVC 4 project
Right-click on the project. Select Publish . In the dialog that opens, click Import ... and select the deployment profile downloaded from the Windows Azure Management Portal for your website. Select the Web Deploy deployment option .
To validate the entered values (Fig. 3), click Validate Connection . If the verification is successful, click Publish .

Fig. 3. Web Deploy Deployment Settings Window
Next, in the Output view, you will see the deployment log of your web site via Web Deploy (Fig. 4).

Fig. 4. Output view
Make any changes to your project.
Click Publish on your project. Please note that you immediately went to the Preview tab. Click Start Preview (Fig.5).

Fig. 5. Preview Tab
You can determine which updated files to upload to the Windows Azure platform (Figure 6).

Fig. 6. Publishing a project using Web Deploy
Click Publish .
Conclusion
Windows Azure Web Sites is a new Windows Azure cloud platform functionality that allows developers to quickly and easily deploy websites to a highly scalable environment using familiar programming languages and tools, such as FTP, Git, or TFS. In Web Sites, you can use Windows Azure services: SQL Database, Caching, CDN. As the load on the website increases, the developer can quickly scale it.
The entire cycle of articles, formatted and saved in PDF-format, can be downloaded here .
Thanks for attention!
Source: https://habr.com/ru/post/150494/
All Articles