Windows Azure Virtual Machines - a review of new functionality
Good afternoon, dear colleagues.
In the near future, we will consider another aspect of the new Windows Azure functionality - virtual machines. Virtual machines are a new service provided by the Windows Azure platform, and they make it much easier and more flexible to transfer local infrastructures to the cloud or create new software solutions that are critical to persistent storage (not cleaned up after every reboot of the run instance)
What will you see in this article?
1. Differences of the new service from the VM role
2, Virtual Machine Architecture
3. Virtual networks
4. Virtual Machine Availability and Warranties
Practice - creating a web server farm in Windows Azure
')
Windows Azure Virtual Machines
Virtual machines are a new service provided by the Windows Azure platform, and they make it much easier and more flexible to transfer local infrastructures to the cloud or create new software solutions that are critical to persistent storage (not cleaned up after each reboot of the run instance). In fact, after June 7, 2012, Windows Azure can hardly be called SaaS, PaaS, or any platform, now it is rather an umbrella term that combines many abbreviations.
Practically all types of applications that can be used in the local infrastructure can be attributed to the use cases of virtual machines in Windows Azure: business applications, CRM, Active Directory, own applications, as well as allowing to combine local and cloud infrastructure, creating a hybrid solution.
Differences of a new service from a VM role

Fig. 1. Differences VM from VM roles
After the announcement of the new service, the question arose - how does it differ from what we saw before, namely the VM role in the Cloud Services role model (then Hosted Services). Let's first see what a VM role is.
The VM role was introduced into the platform for use in cases where the capabilities of the Web / Worker roles were not sufficient to implement certain solutions, such as, for example, transfer of complex applications to the cloud (Sharepoint, ...). At the same time, no SLA was provided for the operating system in the virtual machine, since the user loaded his own VHD disk. However, the SLA on the virtual machines themselves was preserved - it was possible to load two virtual machines and get 99.95% SLA for the accessibility of the role.
However, suppose if you loaded several virtual machines and something was happening with one of the virtual machines (for example, hardware failure), everything that was on this machine disappeared - all the unique data that was saved to disk and in memory, and other This was due to the fact that in response to an error, Windows Azure deployed a new virtual machine, before doing this, sysprep on the image downloaded by the user.
This is all seemingly normal for a simple application, but it turned into a big problem — given the inconstant storage, you had to redesign your application in this way to take this feature into account.
So, the differences include:

Fig.2. The life cycle of a virtual machine in the cloud
Virtual Machine Architecture
In general, Windows Azure virtual machines are based on the service model used by Web / Worker roles for a long time, with major modifications such as persistent storage and one instance = one role.
When creating a virtual machine, the Cloud Service is automatically created, which acts as a container for this virtual machine. At the same time, if there are two deployment cells (Staging / Production) in the Cloud Service, in the case of a virtual machine it is deployed only in Production (which means that the VIP swap is unavailable) (Fig. 3).

Fig. 3. Cloud Service as a container for virtual machines
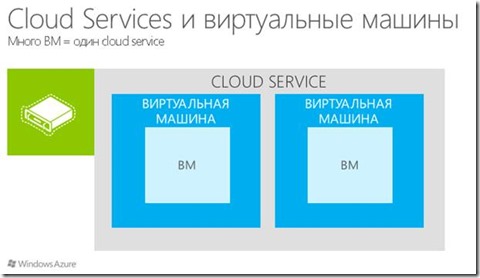
Fig. four.
As for where the virtual machines are stored, these are page blobs in the Windows Azure storage. When creating a virtual machine, VHD is placed in a page blob with the possibility of further recording. There are several disks available:
The maximum size of the operating system can be up to 127 gigabytes, but a certain amount (depending on the size of the virtual machine) of additional data disks (Fig. 8) can be attached to the virtual machine, including during the execution of the virtual machine.

Fig. 5. Sizes of the virtual machine
Virtual machines located within the same Cloud Service have a direct communication channel with each other - there is no need to configure something separately, as is the case with separate virtual machines, when in order to provide a connection, it is necessary to open ports in the service model. Of course, we must not forget about firewalls on operating systems. With this, everything is clear - you need to think only about firewalls and to fine-tune them (since the forums occasionally had questions about why the traffic did not “go”). So what if you need to set up so-called endpoints? Here, too, everything is simple. Each endpoint is associated with a virtual machine and indicates whether to allow traffic.
The properties of the final entry point include:
Name - a logical name in the system.
Protocol - tcp / udp
Local port
Public port
Configure the same load balancing port (Fig. 9), i.e. the one that the user will come to and then later go to one of the virtual machines in the set, you can use the definition of one entry point on all the necessary virtual machines and the special property LoadBalancedEndpointSetName.

Fig. 6. Load Balancing and Virtual Machine Endpoint
As you have probably already seen, there is room for setting up port forwarding. Since each Cloud Service has one public IP address, but many virtual machines are inside, port forwarding is exactly what is needed in order to gain access to a specific machine from the outside (Figure 7).

Fig. 7. Port Forwarding in Windows Azure Virtual Machines
For example, as in the image numbered 5, the port forwarding is configured for the system — an external client, initiating a request for 5586, goes to the RDP port (for example) to virtual machine No. 1, initiating the same request to 5587, goes to virtual machine No. 2, and etc.
Virtual networks
The most important function was the emergence of virtual networks. Virtual Networks is a functionality that allows both connecting your local infrastructure with a cloud network and setting up a network within a deployed service. If the first scenario is more or less clear (you need a VPN that supports Site-To-Site VPN), then what are the benefits of using virtual networks inside a deployed service? First, this is a permanent IP scenario (not static, but permanent). When you need to transfer Active Directory to Windows Azure, do not use the same standard mode when the IP will change? Here you can use VNET, with which you can determine the general IP addressing scheme for your cloud network. In this case, you will determine the address space, subnets and ownership of virtual machines. Thus, each deployed virtual machine belonging to a particular VNET will have the same IP address regardless of its state (reboot, other actions leading to a change of IP). This IP is non-static because it is not prescribed by statics (an indisputable fact), but is issued as if by DHCP with an infinite leasing time. In this case, of course, there may be a question about the resolution of names. By default, there is no name resolution when a virtual machine is placed in a virtual network - it is considered that you will take care of this yourself. There are three options for resolving the problem: manually configure DNS on the network adapter for each machine (the main drawback, of course, in the phrase “configure for each”), define the DNS server in the network configuration (which is also inconvenient, since it is not possible to override DNS) -servers without the need to redeploy the added virtual machines to the virtual network) and specify the DNS during the initial deployment of the virtual machine (for example, using Powershell, which is quite convenient).

Fig. 8. Hybrid Solution Using Virtual Networks
To deploy a virtual machine to a virtual network, you need to remember a few simple rules:
1) You can not transfer an already deployed virtual machine, you need to deploy it directly into a virtual network.
2) DNS settings - if you do not plan everything in advance, you can come to the conclusion that for an already deployed virtual machine it will be impossible to change these settings without redeploying.
3) Each virtual network needs an affine group. In addition, the storage account must be located in the same region as the affine group, or in this affine group.
Virtual Machine Availability and Warranties
Cloud Services SLA as it was 99.95%, and remained, given the minimum number of copies of the application (it is equal to two). With virtual machines, the situation is a bit more confusing - it was decided that several virtual machines for most applications would not be necessary, therefore 99.9% SLA is offered for one instance, and if 99.95% is used for the Availability Set.
Availability Set
The Availability Set concept is similar to the concept of update domains and error domains, but somewhat expands it — virtual machines in the AS are physically located in different rivers (racks) and when updating the host operating system, not all virtual machines in the AS are updated at the same time (Fig. 9).

Fig. 9. Unified Error and Update Domains and Availability Set
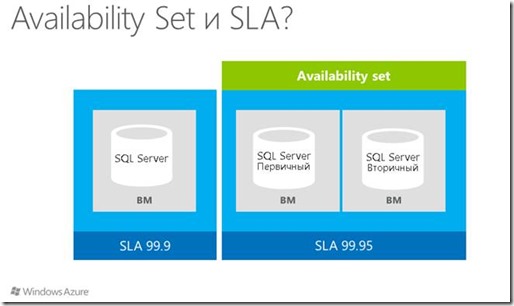
Fig.10. Visual image of various SLA scenarios
That, in fact, allows for fault tolerance and redundancy at all levels.
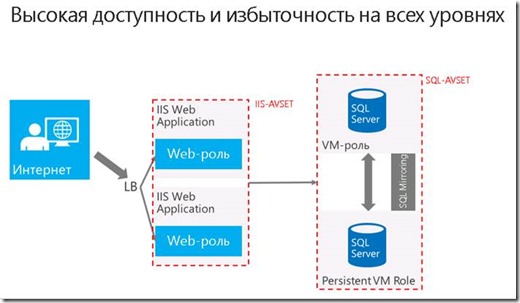
Fig. 11. Fault tolerance at all levels
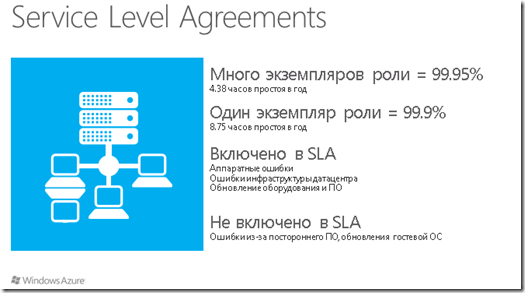
Fig. 12. What is included and what is not included in Windows Azure Virtual Machines SLA
Practice
There are several methods for creating a virtual machine in Windows Azure, and we’ll cover everything.
Virtual machine from the image
Actually, the simplest and most understandable method is that there is already an image gallery in the cloud, which currently supports a specific set of operating systems (Fig. 16). Please note that this list is from a preview version, that is, it will be constantly replenished even by switching to Production.
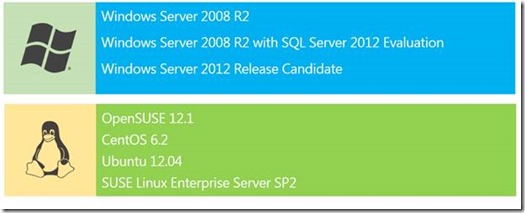
Fig. 13. Gallery of images of virtual machines
Let's move on to practice. Sign in to the Windows Azure Management Portal ( http : // manage . Windowsazure . Com ) using your Windows Live ID credentials (Figure 14).

Fig. 14. Login page
Entering the management portal (Fig. 15), click the New button located in the lower left corner of the page to open the New form dialog box (Fig. 16).
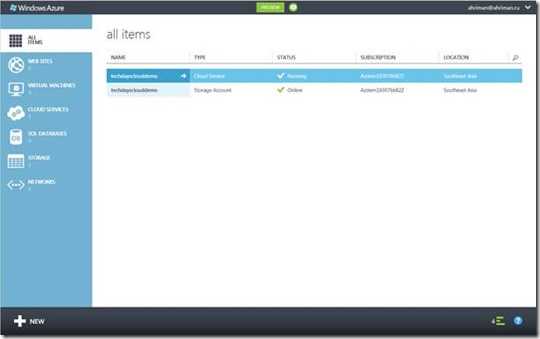
Fig. 15. Windows Azure Management Portal
Select the Virtual Machine dialog that opens. Choose From Gallery (fig. 16)
.
Fig. 16. New form
Notice that the VM OS Selection dialog box has four display options — All (all images), Platform Images (platform image gallery), My Images (customer-provided images), and My Disks (virtual machine disks). Now select Windows Server 2008 R2 SP1, July 2012 and click Next .
In the VM Configuration dialog box (Figure 17), enter the required data, select the instance size (since virtual machines require serious resources, select the smallest instance) and click Next .

Fig. 17. Initial Virtual Machine Configuration
In the VM Mode dialog box (Figure 18), select Standalone Virtual Machine , since we do not have any virtual machines. Enter a DNS Name and select a storage account and region, either an affine group or a virtual network. Click Next .
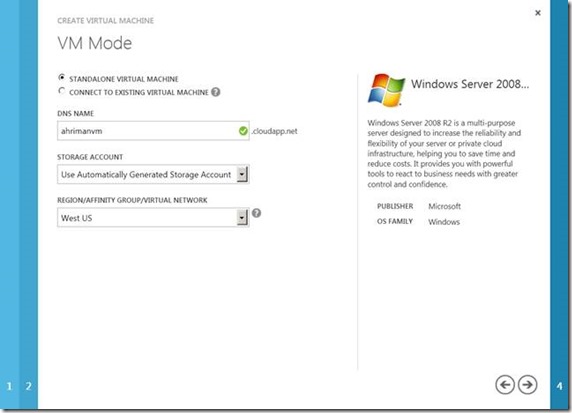
Fig. 18. Initial Virtual Machine Settings
Select Create Availability Set and enter a name. Click Next to begin deploying the virtual machine. After a while, the virtual machine will start.
Now let's connect to the created virtual machine via Remote Desktop Connection.
Go to the Windows Azure Management Portal and select the virtual machine you created. Click the Connect button in the control panel below. In fact, this is a link to the file of connection to your virtual machine, and after clicking you should download the .rdp file with the name of the virtual machine. Run it and enter the administrator password.
Logging on to a virtual machine, you will see the interface of the OS configured for this virtual machine. We configured Windows Server 2008 R2.
Click Add Roles . Click Next . Select the Web Server ( IIS ) role - we will place in the IIS virtual machine and create a farm of web servers from two virtual servers.

Fig. 22
Click Next and select all necessary components (fig. 19).
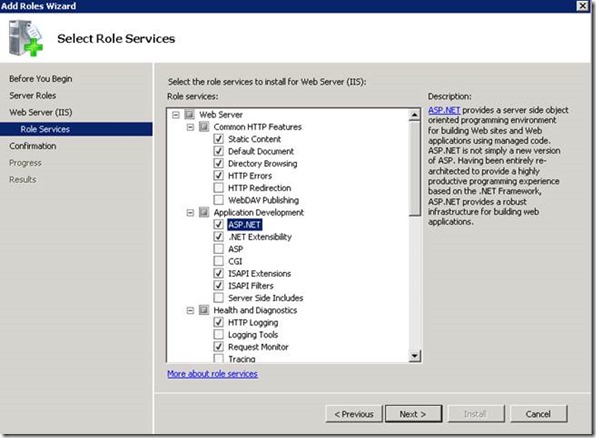
Fig. nineteen.
On it we will finish this point and we will pass to the following.
Creation from own image
The second way to create a virtual machine: create your own image and deploy virtual machines from it. All this can be done directly on the platform - once you have created a virtual machine from a pre-configured image, you can customize it as you please, then use sysprep for Windows and waagent for Linux and click Capture, first turning off this virtual machine. Naturally, this process can also be done offline by creating a VHD and downloading it using csupload.exe from Windows Azure SDK 1.7.
Since we have already deployed the virtual machine, we will use it.
Go to the created virtual machine via RDP and open the Windows \ System32 \ sysprep directory. Run sysprep (fig. 20), select the generalize option
and shutdown as shutdown options . Click OK.
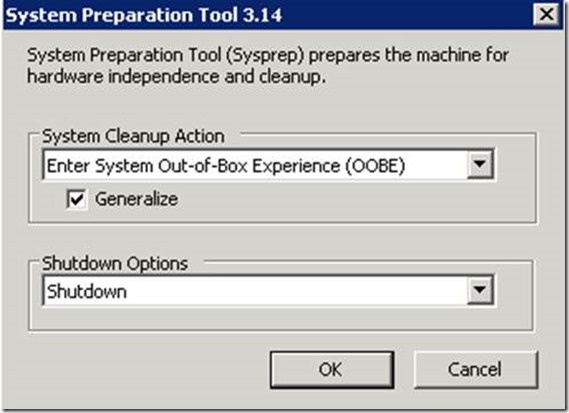
Fig.20. Sysprep interface
After losing the connection to the virtual machine, wait a few minutes before shutting it down - monitor the status of the machine in the Windows Azure management portal - then select the virtual machine and click the Capture button on the control panel.
In the dialog box that appears, enter the image name. Check the “I have sysprepped the virtual machine” option. Click OK .
After the process is completed, the created virtual machine will be deleted, but a new image will appear in the Images section (Fig. 21).

Fig. 21. New Virtual Machine Image
Now you can create a new virtual machine.
Click the New button in the lower left corner of the page to open the New form dialog box. Select the Virtual Machine dialog that opens. Select From Gallery . Select your image (fig. 22).
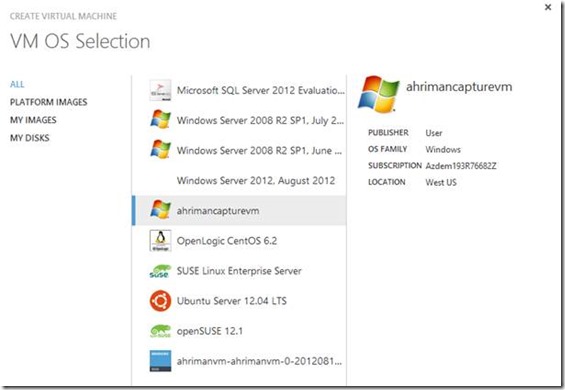
Fig. 22. Gallery of images
On the following Configuration pages, fill in the required fields (Fig. 23, 24).
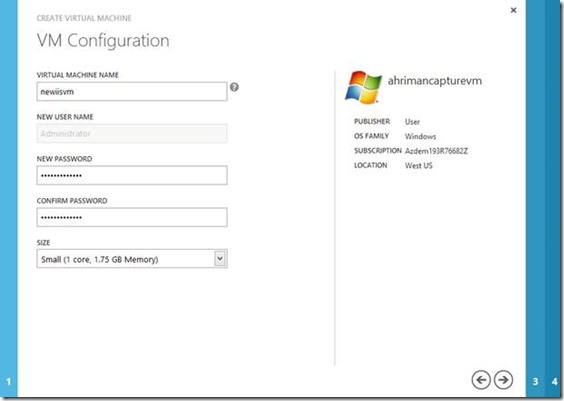
Fig. 23. Initial Virtual Machine Configuration
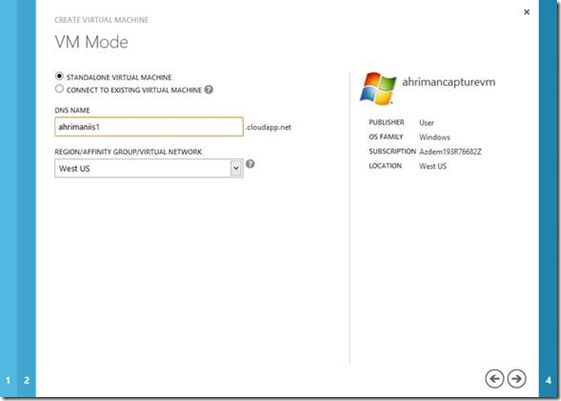
Fig. 24
On the Availability Sets page, select Create Availability Set . Click OK.
Create a second virtual machine from the same image, but on the VM Mode page, tick the Connect to existing virtual machine (Figure 25).
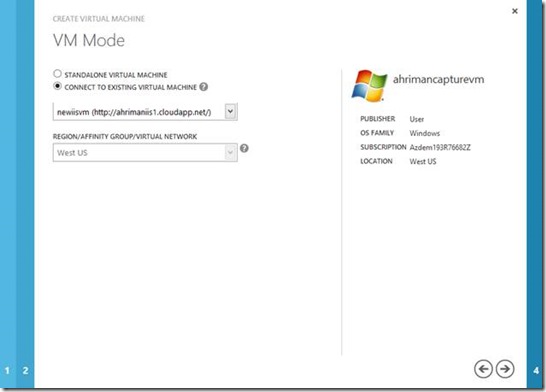
Fig. 25
On the Availability Sets page, select the previously created Set .
After everything is created and running, configure the end points for both machines. To do this, go to the virtual machine control panel, on the Endpoints tab. Click Add Endpoint . On the Specify Endpoint details page (Figure 26), type http, 80.80.
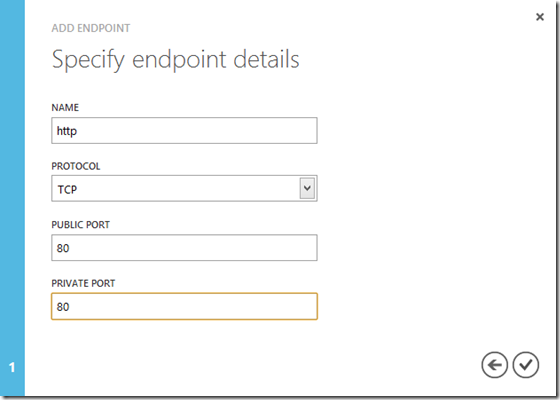
Fig. 27. Configure Endpoint Entry
Repeat the setting for the second virtual machine, specifying the load point on the first endpoint on the first configuration page and selecting the created entry point.
Wait until the update process is complete and click the link in the DNS Name field to make sure that IIS is working and balancing the load between two instances of our service.
Uploading your own VHD
The third option that has already been available in Windows Azure for a long time is to load an existing virtual machine in VHD format using csupload.exe or VHDupload from the Windows Azure Training Kit. We will use the first option.
Open Disk Management console: in the Start menu, type diskmgmt.msc in the search bar and press Enter .
In the Disk Management console, open the Action menu and select Create VHD .
In the Create and Attach Virtual Hard Disk dialog box, click Browse , specify the location and name of the future disk, and then click Save . Specify the size of the Virtual hard disk size as 16 MB , Virtual hard disk format as Fixed size , then click OK to create and connect the virtual hard disk. Pay attention to the size of the disk - we will not create a disk for the operating system at this point, we will create it as a data disk, upload it to the cloud, connect it to the virtual machine and view its contents. If you want to create a disk with the OS, there is nothing easier - create a larger disk, format it in NTFS and upload it to the cloud.
Before using a new disk, you must initialize it: right-click on the disk icon for the created disk in the bottom panel of Disk Management and click Initialize Disk .
In the Initialize Disk dialog box, make sure that the drive corresponding to the connected VHD is selected, specify the MBR (Master Boot Record) and click OK .
Right-click on the unallocated Unallocated area of the connected virtual hard disk and click New Simple Volume . In the New Simple Volume Wizard, click Next . On the next page, leave the Simple volume size value the same — it should match the Maximum disk space — and click Next . Assign a drive letter and click Next . Select the formatting type of the new partition. Specify the File system as NTFS , leave the default Allocation unit size, and define the Volume label as OurVHD . Make sure you turn on the Perform a quick format option and leave it off. Enable file and folder compression . Click Next .
Check the information on the Summary page and click Finish to create a new volume.
Wait until the end of formatting, which should take a few seconds. When AutoPlay is on, you will be asked if you need to view the attached drive. In this case, click Open folder to view files . If the question is not asked, right-click on the volume in the Disk Management console and click Open . Leave the window open. Copy there any files.
Switch to the Disk Management console, right-click on the mounted disk — click on the disk, not on the partition area — and click Detach VHD .
In the Detach Virtual Hard Disk dialog box, make sure that the option to remove the disk is unchecked , and then click OK .
Now you need to load a virtual hard disk (VHD) into your Windows Azure storage. Let me remind you that virtual hard disks are stored in page blobs in Windows Azure, as well as the fact that you can load or create a hard disk using the repository library API.
Before downloading VHD, you need to determine the name and access key to your account — to do this, go to the management portal and select the subscription in which your application will be deployed. Select the storage service from the list of services and record the name value (the first entry point URL segment) and the Primary Access Key access key by clicking the View button (use the Copy to Clipboard button to copy the key to the clipboard). On the new portal, you can see the keys by going to the storage account and clicking Manage Keys .
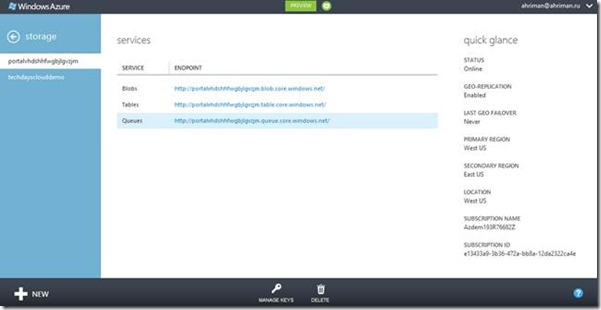
Fig. 28. View Windows Azure Storage Account Information
Open the Windows Azure Command Prompt with administrator rights and go to the bin folder - there will be a csupload utility, which we will use to load the disk into the cloud.
Create a certificate using the makecert utility or using the appropriate snap-in in Visual Studio or IIS.
makecert -sky exchange -r -n "CN = <CertificateName>" -pe -a sha1 -len 2048 -ss My "<CertificateName> .cer"
Download it using the old Windows Azure Management Portal in the Management Certificates certificate store. Copy the thumbnail of the downloaded certificate. So you should have the following data: Subscription ID, certificate thumbnail, storage key and storage account name.
Run the following commands in sequence:
csupload Set-Connection "SubscriptionID = <Subscriptionid>; CertificateThumbprint = <Thumbprint>; ServiceManagementEndpoint = https: //management.core.windows.net"
csupload.exe Add-Disk -Destination “http: // [accountname] .blob.core.windows.net / mydisks / mydisk.vhd" -Label ourvhd -LiteralPath "c: \ temp \ ourvhd.vhd"
When the message “ Disk ' ourvhd . vhd ' is registered successfully ” , this will mean that your data disk has been uploaded to the image gallery.
Please note that you need to use other parameters to load virtual machine images. Learn more about csupload: msdn.microsoft.com/en-us/library/windowsazure/gg466228.aspx
Switch back to the new Windows Azure Management Portal to the control panel of a virtual machine. Click Attach and connect the disk from the storage, and then log into the virtual machine via RDP and notice the increased number of disks. This feature allows you to quickly upload huge amounts of data to the cloud, as well as migrate data to and from the cloud to the local infrastructure.
Linux
And now let's create a Linux virtual machine and connect to it via SSH. There is nothing easier. Repeat the process to create an image from the image gallery, but this time choose openSUSE 12.1. Do not tick off various advanced options like Upload SSH Keys.
Connecting to a newly created virtual machine is easy - via ssh, vnc or using putty (Windows), which we will use. To connect, go to the control panel of the virtual machine and in the Quick Glance panel (Fig. 29) there will be all the data for connection.
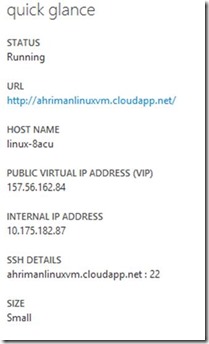
Fig. 29. Quick Glance Data Panel
Now start Putty and fill in the required fields with information obtained from the Quick Glance panel (Fig. 30).

Fig. 30. Interface Putty
Click Open . On the security warning, click Yes . Actually, that's all - enter your administrator credentials, and you are inside a virtual machine.
To create a dummy image from this virtual machine, you will need to use the Windows Azure Linux Agent (waagent –deprovision). To do this, run the command sudo / usr / sbin / waagent - deprovision (Fig. 31).

Fig. 31. Generalization of the image
Turn off the virtual machine using the Shutdown button on the virtual machine control panel. After shutdown, click Capture . All other actions are identical to what we performed for the Windows machine. As you can imagine, we can easily configure load balancing for Linux machines.
Summary
In general, with the launch of new functionality of virtual machines and virtual networks, there are much more opportunities for simple migration of existing local infrastructures to the cloud, with the possibility of partial migration and further integration of infrastructure parts using virtual networks.
In the near future, we will consider another aspect of the new Windows Azure functionality - virtual machines. Virtual machines are a new service provided by the Windows Azure platform, and they make it much easier and more flexible to transfer local infrastructures to the cloud or create new software solutions that are critical to persistent storage (not cleaned up after every reboot of the run instance)
What will you see in this article?
1. Differences of the new service from the VM role
2, Virtual Machine Architecture
3. Virtual networks
4. Virtual Machine Availability and Warranties
Practice - creating a web server farm in Windows Azure
')
Windows Azure Virtual Machines
Virtual machines are a new service provided by the Windows Azure platform, and they make it much easier and more flexible to transfer local infrastructures to the cloud or create new software solutions that are critical to persistent storage (not cleaned up after each reboot of the run instance). In fact, after June 7, 2012, Windows Azure can hardly be called SaaS, PaaS, or any platform, now it is rather an umbrella term that combines many abbreviations.
Practically all types of applications that can be used in the local infrastructure can be attributed to the use cases of virtual machines in Windows Azure: business applications, CRM, Active Directory, own applications, as well as allowing to combine local and cloud infrastructure, creating a hybrid solution.
Differences of a new service from a VM role

Fig. 1. Differences VM from VM roles
After the announcement of the new service, the question arose - how does it differ from what we saw before, namely the VM role in the Cloud Services role model (then Hosted Services). Let's first see what a VM role is.
The VM role was introduced into the platform for use in cases where the capabilities of the Web / Worker roles were not sufficient to implement certain solutions, such as, for example, transfer of complex applications to the cloud (Sharepoint, ...). At the same time, no SLA was provided for the operating system in the virtual machine, since the user loaded his own VHD disk. However, the SLA on the virtual machines themselves was preserved - it was possible to load two virtual machines and get 99.95% SLA for the accessibility of the role.
However, suppose if you loaded several virtual machines and something was happening with one of the virtual machines (for example, hardware failure), everything that was on this machine disappeared - all the unique data that was saved to disk and in memory, and other This was due to the fact that in response to an error, Windows Azure deployed a new virtual machine, before doing this, sysprep on the image downloaded by the user.
This is all seemingly normal for a simple application, but it turned into a big problem — given the inconstant storage, you had to redesign your application in this way to take this feature into account.
So, the differences include:
- Type of storage . Since the VM role, in essence, was some kind of service with a virtual machine, it did not have permanent storage — with a hardware one, for example, an error, you lost all data from this machine. With virtual machines, it is a little different - now you can add permanent storage in the form of a data disk, in addition, the disk of your virtual machine is constantly replicated in three replicas.
- Types of deployment . You had to create your VHD locally and upload it to the cloud, after which you could use it. With the new service, you can create and upload VHDs as well as use them as well as any other available in the image gallery.
- Network configuration The settings for the VM role needed to be made in the service model, while the new virtual machine service can be configured on the Windows Azure management portal and even automated with Powershell or scripts.

Fig.2. The life cycle of a virtual machine in the cloud
Virtual Machine Architecture
In general, Windows Azure virtual machines are based on the service model used by Web / Worker roles for a long time, with major modifications such as persistent storage and one instance = one role.
When creating a virtual machine, the Cloud Service is automatically created, which acts as a container for this virtual machine. At the same time, if there are two deployment cells (Staging / Production) in the Cloud Service, in the case of a virtual machine it is deployed only in Production (which means that the VIP swap is unavailable) (Fig. 3).

Fig. 3. Cloud Service as a container for virtual machines

Fig. four.
As for where the virtual machines are stored, these are page blobs in the Windows Azure storage. When creating a virtual machine, VHD is placed in a page blob with the possibility of further recording. There are several disks available:
- C: - operating system;
- D: - physical data on the storage, which is not reserved and used only for temporary storage;
- E: - user data;
- F: - logs.
The maximum size of the operating system can be up to 127 gigabytes, but a certain amount (depending on the size of the virtual machine) of additional data disks (Fig. 8) can be attached to the virtual machine, including during the execution of the virtual machine.

Fig. 5. Sizes of the virtual machine
Virtual machines located within the same Cloud Service have a direct communication channel with each other - there is no need to configure something separately, as is the case with separate virtual machines, when in order to provide a connection, it is necessary to open ports in the service model. Of course, we must not forget about firewalls on operating systems. With this, everything is clear - you need to think only about firewalls and to fine-tune them (since the forums occasionally had questions about why the traffic did not “go”). So what if you need to set up so-called endpoints? Here, too, everything is simple. Each endpoint is associated with a virtual machine and indicates whether to allow traffic.
The properties of the final entry point include:
Name - a logical name in the system.
Protocol - tcp / udp
Local port
Public port
Configure the same load balancing port (Fig. 9), i.e. the one that the user will come to and then later go to one of the virtual machines in the set, you can use the definition of one entry point on all the necessary virtual machines and the special property LoadBalancedEndpointSetName.

Fig. 6. Load Balancing and Virtual Machine Endpoint
As you have probably already seen, there is room for setting up port forwarding. Since each Cloud Service has one public IP address, but many virtual machines are inside, port forwarding is exactly what is needed in order to gain access to a specific machine from the outside (Figure 7).

Fig. 7. Port Forwarding in Windows Azure Virtual Machines
For example, as in the image numbered 5, the port forwarding is configured for the system — an external client, initiating a request for 5586, goes to the RDP port (for example) to virtual machine No. 1, initiating the same request to 5587, goes to virtual machine No. 2, and etc.
Virtual networks
The most important function was the emergence of virtual networks. Virtual Networks is a functionality that allows both connecting your local infrastructure with a cloud network and setting up a network within a deployed service. If the first scenario is more or less clear (you need a VPN that supports Site-To-Site VPN), then what are the benefits of using virtual networks inside a deployed service? First, this is a permanent IP scenario (not static, but permanent). When you need to transfer Active Directory to Windows Azure, do not use the same standard mode when the IP will change? Here you can use VNET, with which you can determine the general IP addressing scheme for your cloud network. In this case, you will determine the address space, subnets and ownership of virtual machines. Thus, each deployed virtual machine belonging to a particular VNET will have the same IP address regardless of its state (reboot, other actions leading to a change of IP). This IP is non-static because it is not prescribed by statics (an indisputable fact), but is issued as if by DHCP with an infinite leasing time. In this case, of course, there may be a question about the resolution of names. By default, there is no name resolution when a virtual machine is placed in a virtual network - it is considered that you will take care of this yourself. There are three options for resolving the problem: manually configure DNS on the network adapter for each machine (the main drawback, of course, in the phrase “configure for each”), define the DNS server in the network configuration (which is also inconvenient, since it is not possible to override DNS) -servers without the need to redeploy the added virtual machines to the virtual network) and specify the DNS during the initial deployment of the virtual machine (for example, using Powershell, which is quite convenient).

Fig. 8. Hybrid Solution Using Virtual Networks
To deploy a virtual machine to a virtual network, you need to remember a few simple rules:
1) You can not transfer an already deployed virtual machine, you need to deploy it directly into a virtual network.
2) DNS settings - if you do not plan everything in advance, you can come to the conclusion that for an already deployed virtual machine it will be impossible to change these settings without redeploying.
3) Each virtual network needs an affine group. In addition, the storage account must be located in the same region as the affine group, or in this affine group.
Virtual Machine Availability and Warranties
Cloud Services SLA as it was 99.95%, and remained, given the minimum number of copies of the application (it is equal to two). With virtual machines, the situation is a bit more confusing - it was decided that several virtual machines for most applications would not be necessary, therefore 99.9% SLA is offered for one instance, and if 99.95% is used for the Availability Set.
Availability Set
The Availability Set concept is similar to the concept of update domains and error domains, but somewhat expands it — virtual machines in the AS are physically located in different rivers (racks) and when updating the host operating system, not all virtual machines in the AS are updated at the same time (Fig. 9).

Fig. 9. Unified Error and Update Domains and Availability Set

Fig.10. Visual image of various SLA scenarios
That, in fact, allows for fault tolerance and redundancy at all levels.

Fig. 11. Fault tolerance at all levels

Fig. 12. What is included and what is not included in Windows Azure Virtual Machines SLA
Practice
There are several methods for creating a virtual machine in Windows Azure, and we’ll cover everything.
Virtual machine from the image
Actually, the simplest and most understandable method is that there is already an image gallery in the cloud, which currently supports a specific set of operating systems (Fig. 16). Please note that this list is from a preview version, that is, it will be constantly replenished even by switching to Production.

Fig. 13. Gallery of images of virtual machines
Let's move on to practice. Sign in to the Windows Azure Management Portal ( http : // manage . Windowsazure . Com ) using your Windows Live ID credentials (Figure 14).

Fig. 14. Login page
Entering the management portal (Fig. 15), click the New button located in the lower left corner of the page to open the New form dialog box (Fig. 16).

Fig. 15. Windows Azure Management Portal
Select the Virtual Machine dialog that opens. Choose From Gallery (fig. 16)
.

Fig. 16. New form
Notice that the VM OS Selection dialog box has four display options — All (all images), Platform Images (platform image gallery), My Images (customer-provided images), and My Disks (virtual machine disks). Now select Windows Server 2008 R2 SP1, July 2012 and click Next .
In the VM Configuration dialog box (Figure 17), enter the required data, select the instance size (since virtual machines require serious resources, select the smallest instance) and click Next .

Fig. 17. Initial Virtual Machine Configuration
In the VM Mode dialog box (Figure 18), select Standalone Virtual Machine , since we do not have any virtual machines. Enter a DNS Name and select a storage account and region, either an affine group or a virtual network. Click Next .

Fig. 18. Initial Virtual Machine Settings
Select Create Availability Set and enter a name. Click Next to begin deploying the virtual machine. After a while, the virtual machine will start.
Now let's connect to the created virtual machine via Remote Desktop Connection.
Go to the Windows Azure Management Portal and select the virtual machine you created. Click the Connect button in the control panel below. In fact, this is a link to the file of connection to your virtual machine, and after clicking you should download the .rdp file with the name of the virtual machine. Run it and enter the administrator password.
Logging on to a virtual machine, you will see the interface of the OS configured for this virtual machine. We configured Windows Server 2008 R2.
Click Add Roles . Click Next . Select the Web Server ( IIS ) role - we will place in the IIS virtual machine and create a farm of web servers from two virtual servers.

Fig. 22
Click Next and select all necessary components (fig. 19).

Fig. nineteen.
On it we will finish this point and we will pass to the following.
Creation from own image
The second way to create a virtual machine: create your own image and deploy virtual machines from it. All this can be done directly on the platform - once you have created a virtual machine from a pre-configured image, you can customize it as you please, then use sysprep for Windows and waagent for Linux and click Capture, first turning off this virtual machine. Naturally, this process can also be done offline by creating a VHD and downloading it using csupload.exe from Windows Azure SDK 1.7.
Since we have already deployed the virtual machine, we will use it.
Go to the created virtual machine via RDP and open the Windows \ System32 \ sysprep directory. Run sysprep (fig. 20), select the generalize option
and shutdown as shutdown options . Click OK.

Fig.20. Sysprep interface
After losing the connection to the virtual machine, wait a few minutes before shutting it down - monitor the status of the machine in the Windows Azure management portal - then select the virtual machine and click the Capture button on the control panel.
In the dialog box that appears, enter the image name. Check the “I have sysprepped the virtual machine” option. Click OK .
After the process is completed, the created virtual machine will be deleted, but a new image will appear in the Images section (Fig. 21).

Fig. 21. New Virtual Machine Image
Now you can create a new virtual machine.
Click the New button in the lower left corner of the page to open the New form dialog box. Select the Virtual Machine dialog that opens. Select From Gallery . Select your image (fig. 22).

Fig. 22. Gallery of images
On the following Configuration pages, fill in the required fields (Fig. 23, 24).

Fig. 23. Initial Virtual Machine Configuration

Fig. 24
On the Availability Sets page, select Create Availability Set . Click OK.
Create a second virtual machine from the same image, but on the VM Mode page, tick the Connect to existing virtual machine (Figure 25).

Fig. 25
On the Availability Sets page, select the previously created Set .
After everything is created and running, configure the end points for both machines. To do this, go to the virtual machine control panel, on the Endpoints tab. Click Add Endpoint . On the Specify Endpoint details page (Figure 26), type http, 80.80.

Fig. 27. Configure Endpoint Entry
Repeat the setting for the second virtual machine, specifying the load point on the first endpoint on the first configuration page and selecting the created entry point.
Wait until the update process is complete and click the link in the DNS Name field to make sure that IIS is working and balancing the load between two instances of our service.
Uploading your own VHD
The third option that has already been available in Windows Azure for a long time is to load an existing virtual machine in VHD format using csupload.exe or VHDupload from the Windows Azure Training Kit. We will use the first option.
Open Disk Management console: in the Start menu, type diskmgmt.msc in the search bar and press Enter .
In the Disk Management console, open the Action menu and select Create VHD .
In the Create and Attach Virtual Hard Disk dialog box, click Browse , specify the location and name of the future disk, and then click Save . Specify the size of the Virtual hard disk size as 16 MB , Virtual hard disk format as Fixed size , then click OK to create and connect the virtual hard disk. Pay attention to the size of the disk - we will not create a disk for the operating system at this point, we will create it as a data disk, upload it to the cloud, connect it to the virtual machine and view its contents. If you want to create a disk with the OS, there is nothing easier - create a larger disk, format it in NTFS and upload it to the cloud.
Before using a new disk, you must initialize it: right-click on the disk icon for the created disk in the bottom panel of Disk Management and click Initialize Disk .
In the Initialize Disk dialog box, make sure that the drive corresponding to the connected VHD is selected, specify the MBR (Master Boot Record) and click OK .
Right-click on the unallocated Unallocated area of the connected virtual hard disk and click New Simple Volume . In the New Simple Volume Wizard, click Next . On the next page, leave the Simple volume size value the same — it should match the Maximum disk space — and click Next . Assign a drive letter and click Next . Select the formatting type of the new partition. Specify the File system as NTFS , leave the default Allocation unit size, and define the Volume label as OurVHD . Make sure you turn on the Perform a quick format option and leave it off. Enable file and folder compression . Click Next .
Check the information on the Summary page and click Finish to create a new volume.
Wait until the end of formatting, which should take a few seconds. When AutoPlay is on, you will be asked if you need to view the attached drive. In this case, click Open folder to view files . If the question is not asked, right-click on the volume in the Disk Management console and click Open . Leave the window open. Copy there any files.
Switch to the Disk Management console, right-click on the mounted disk — click on the disk, not on the partition area — and click Detach VHD .
In the Detach Virtual Hard Disk dialog box, make sure that the option to remove the disk is unchecked , and then click OK .
Now you need to load a virtual hard disk (VHD) into your Windows Azure storage. Let me remind you that virtual hard disks are stored in page blobs in Windows Azure, as well as the fact that you can load or create a hard disk using the repository library API.
Before downloading VHD, you need to determine the name and access key to your account — to do this, go to the management portal and select the subscription in which your application will be deployed. Select the storage service from the list of services and record the name value (the first entry point URL segment) and the Primary Access Key access key by clicking the View button (use the Copy to Clipboard button to copy the key to the clipboard). On the new portal, you can see the keys by going to the storage account and clicking Manage Keys .

Fig. 28. View Windows Azure Storage Account Information
Open the Windows Azure Command Prompt with administrator rights and go to the bin folder - there will be a csupload utility, which we will use to load the disk into the cloud.
Create a certificate using the makecert utility or using the appropriate snap-in in Visual Studio or IIS.
makecert -sky exchange -r -n "CN = <CertificateName>" -pe -a sha1 -len 2048 -ss My "<CertificateName> .cer"
Download it using the old Windows Azure Management Portal in the Management Certificates certificate store. Copy the thumbnail of the downloaded certificate. So you should have the following data: Subscription ID, certificate thumbnail, storage key and storage account name.
Run the following commands in sequence:
csupload Set-Connection "SubscriptionID = <Subscriptionid>; CertificateThumbprint = <Thumbprint>; ServiceManagementEndpoint = https: //management.core.windows.net"
csupload.exe Add-Disk -Destination “http: // [accountname] .blob.core.windows.net / mydisks / mydisk.vhd" -Label ourvhd -LiteralPath "c: \ temp \ ourvhd.vhd"
When the message “ Disk ' ourvhd . vhd ' is registered successfully ” , this will mean that your data disk has been uploaded to the image gallery.
Please note that you need to use other parameters to load virtual machine images. Learn more about csupload: msdn.microsoft.com/en-us/library/windowsazure/gg466228.aspx
Switch back to the new Windows Azure Management Portal to the control panel of a virtual machine. Click Attach and connect the disk from the storage, and then log into the virtual machine via RDP and notice the increased number of disks. This feature allows you to quickly upload huge amounts of data to the cloud, as well as migrate data to and from the cloud to the local infrastructure.
Linux
And now let's create a Linux virtual machine and connect to it via SSH. There is nothing easier. Repeat the process to create an image from the image gallery, but this time choose openSUSE 12.1. Do not tick off various advanced options like Upload SSH Keys.
Connecting to a newly created virtual machine is easy - via ssh, vnc or using putty (Windows), which we will use. To connect, go to the control panel of the virtual machine and in the Quick Glance panel (Fig. 29) there will be all the data for connection.

Fig. 29. Quick Glance Data Panel
Now start Putty and fill in the required fields with information obtained from the Quick Glance panel (Fig. 30).

Fig. 30. Interface Putty
Click Open . On the security warning, click Yes . Actually, that's all - enter your administrator credentials, and you are inside a virtual machine.
To create a dummy image from this virtual machine, you will need to use the Windows Azure Linux Agent (waagent –deprovision). To do this, run the command sudo / usr / sbin / waagent - deprovision (Fig. 31).

Fig. 31. Generalization of the image
Turn off the virtual machine using the Shutdown button on the virtual machine control panel. After shutdown, click Capture . All other actions are identical to what we performed for the Windows machine. As you can imagine, we can easily configure load balancing for Linux machines.
Summary
In general, with the launch of new functionality of virtual machines and virtual networks, there are much more opportunities for simple migration of existing local infrastructures to the cloud, with the possibility of partial migration and further integration of infrastructure parts using virtual networks.
Source: https://habr.com/ru/post/150341/
All Articles