Installing a screw 3.5 "inside the body of a chipboxed Xbox 360
In the summer of 2009, the Xbox 360 Elite 120GB (Jasper) was acquired.
For two years, was used as intended with licensed games. Then it got a bit fed up, decided on the firmware of the drive, flashed, cut the blanks, everything seemed to be fine, but something was missing, there was not enough freedom of action with this “box”.
And in the winter of 2012, he decided to chip console the console, just at that time the Matrix Glitcher V2 chip came out with a more stable console launch, with the choice of revision of the console on the board with switches. I ordered 2 jokes (me and a colleague) and a programmer.
This chip came:

')
I will not tell you the details of the installation of the chip and the console firmware, as well as the capabilities of the console after chipset, because there are a lot of manuals, I will say only a couple of directions:
- A stable start of the console will depend on the location of the chip, for me it is on a microcircuit near the connectors screen, and not on it (the screen), as many recommend.
- Also, the launch speed of the console depends on the length and location of the point A wire (white in the photo)
- You need to be very careful when soldering point C (and it is better to fix it immediately with glue, orange in the photo)
I have an installed chip and wire laying point A looks like this:

As you can see, the SATA cable was lit up in the previous photo, this photo is already an upgrade to install a 3.5 format screw inside the case.
I decided to get rid of the drive, since I didn’t need it at all on the chip console, and it was decided to install a screw for 2TB from a media extender that was idle for it.
For a start, I rang the case of the original box for HDD Xbox, then the connector on the board and 8 pads on the board, it turned out that they are located in the "correct" order:
Earth, A +, A-, Earth, Earth, B-, B +, Earth
Roughly speaking, we cut the SATA cable and go to the contact tracks in a row (the ground should not be soldered, but I got soldered)

The power for the screw is taken from the drive power:
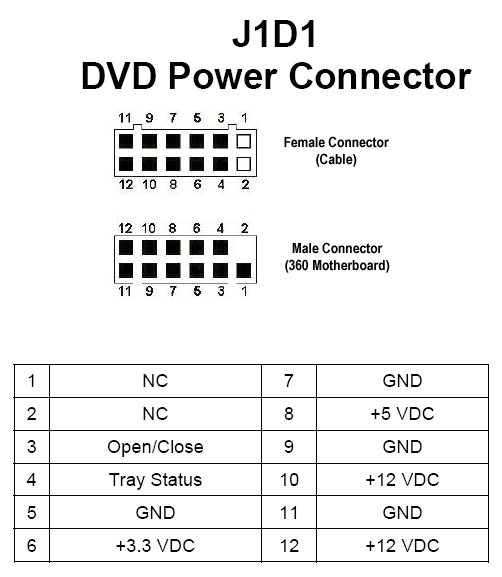
Just solder +5, +12, GND to SATA power cable (Yellow +12, Red +5, Black - GND)
The screw is placed close to the side wall, the ventilation holes just fit the screw mounting holes

I had to file a little ventilation cover:

In this position, the screw “hangs” over the radiator, it was necessary to put something under it, and so as not to impair heat transfer. The solution was the fan 60 * 60 * 15:

I connected it to the power connector of the main cooler through the splitter that came with the DEEPCOOL cooler, it was like this:

It should be borne in mind that the pinout there is non-standard, I had to change a couple of wires with my hands.
In the photo, the colors are perfectly visible, I think there will be no questions here.
The installed screw in the console looks like this:

It remains only to slightly upgrade the top cover of the Xbox, namely to remove or make a cut in the metal screen and cut off several stiffeners with a clerical knife so that they do not interfere with the installation.
I don’t have a photo of this process, since I cut my finger badly by cutting plastic, be careful!
View consoles with closed housing:

It is also necessary to glue or otherwise secure the front panel from the DVD-drive.
I just melted it with a soldering iron inside to keep it:

We put the front panel in place and enjoy the "new" xbox 360 with 2TB on board!

It remains only to format the screw with the standard means of the system:

With this upgrade, it is possible to use the original Xbox 360 screw (of course, if the internal one is not connected).
In the future, I plan to modify the console's cooling system in order to reduce the noise level.
For two years, was used as intended with licensed games. Then it got a bit fed up, decided on the firmware of the drive, flashed, cut the blanks, everything seemed to be fine, but something was missing, there was not enough freedom of action with this “box”.
And in the winter of 2012, he decided to chip console the console, just at that time the Matrix Glitcher V2 chip came out with a more stable console launch, with the choice of revision of the console on the board with switches. I ordered 2 jokes (me and a colleague) and a programmer.
This chip came:
')
I will not tell you the details of the installation of the chip and the console firmware, as well as the capabilities of the console after chipset, because there are a lot of manuals, I will say only a couple of directions:
- A stable start of the console will depend on the location of the chip, for me it is on a microcircuit near the connectors screen, and not on it (the screen), as many recommend.
- Also, the launch speed of the console depends on the length and location of the point A wire (white in the photo)
- You need to be very careful when soldering point C (and it is better to fix it immediately with glue, orange in the photo)
I have an installed chip and wire laying point A looks like this:
As you can see, the SATA cable was lit up in the previous photo, this photo is already an upgrade to install a 3.5 format screw inside the case.
I decided to get rid of the drive, since I didn’t need it at all on the chip console, and it was decided to install a screw for 2TB from a media extender that was idle for it.
For a start, I rang the case of the original box for HDD Xbox, then the connector on the board and 8 pads on the board, it turned out that they are located in the "correct" order:
Earth, A +, A-, Earth, Earth, B-, B +, Earth
Roughly speaking, we cut the SATA cable and go to the contact tracks in a row (the ground should not be soldered, but I got soldered)
The power for the screw is taken from the drive power:
Just solder +5, +12, GND to SATA power cable (Yellow +12, Red +5, Black - GND)
The screw is placed close to the side wall, the ventilation holes just fit the screw mounting holes
I had to file a little ventilation cover:
In this position, the screw “hangs” over the radiator, it was necessary to put something under it, and so as not to impair heat transfer. The solution was the fan 60 * 60 * 15:
I connected it to the power connector of the main cooler through the splitter that came with the DEEPCOOL cooler, it was like this:
It should be borne in mind that the pinout there is non-standard, I had to change a couple of wires with my hands.
In the photo, the colors are perfectly visible, I think there will be no questions here.
The installed screw in the console looks like this:
It remains only to slightly upgrade the top cover of the Xbox, namely to remove or make a cut in the metal screen and cut off several stiffeners with a clerical knife so that they do not interfere with the installation.
I don’t have a photo of this process, since I cut my finger badly by cutting plastic, be careful!
View consoles with closed housing:
It is also necessary to glue or otherwise secure the front panel from the DVD-drive.
I just melted it with a soldering iron inside to keep it:
We put the front panel in place and enjoy the "new" xbox 360 with 2TB on board!
It remains only to format the screw with the standard means of the system:
With this upgrade, it is possible to use the original Xbox 360 screw (of course, if the internal one is not connected).
In the future, I plan to modify the console's cooling system in order to reduce the noise level.
Source: https://habr.com/ru/post/150249/
All Articles