Linking your domain to Windows Azure (for example, RU-CENTER)

By default, Windows Azure offers its own names and internal DNS for services, sites and repositories being created, which resolves second-level names within cloudapp.net, azurewebsites.net, blob.core.windows.net, etc. But the question of your own domain name arises for almost any serious cloud application or service. In addition to the issue of prestige, sometimes there are also purely technical reasons, for example, a workaround with cross domain scripts.
You can link your domain (Custom Domain Name) to Windows Azure services in the following ways:
- using CNAME records of your domain;
- using A record.
In the case of CNAME, you are insured against problems associated with changing the VIP (Public Virtual IP Address), which is assigned to the service deployed in Windows Azure, tk. mapping occurs at the alias level: yourservice.cloudapp.net (Windows Azure) and
www.mydomain.ru www.mydomain.ru (CNAME - www ), not IP. But here binding to the root domain is not possible, i.e. mydomain.com mydomain.com (because it must be www or another alias).')
In the case of c A record, binding to the root domain is possible, but there is a dependence on the VIP address of the service, since A record is mapped to a specific IP address. And the IP address of the service may change, for example, with a new deployment or reboot of the OS. You can, by the way, apply a combined approach, i.e. specify CNAME and A records. For more information about IP addresses in Windows Azure, see Habrostatie Static IP address lifetime in Windows Azure .
Note You can also use third-party services, for example, DNS Azure , which do roughly the same thing that will be described below, but automatically and transparently for the client.
The article contains a lot of pictures.
The following are steps for:
- Domain settings for cloud services (Cloud Service).
- Domain settings for storage and CDN.
- Domain settings for websites (We Sites).
Setting up a domain for cloud services (Cloud Service)
Input data : domain name - natale2008.ru (registered through nic.ru ), DNS hosting (I have the same name, nic.ru, so we will create all the records in its panel).
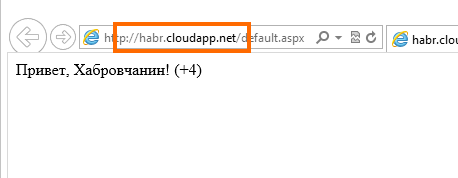
1. We create application in Windows Azure: on .Net, PHP or other supported language. I have this - habr.cloudapp.net . By default, appeals to the application (habr.cloudapp.net) will be resolved via the internal Windows Azure DNS.
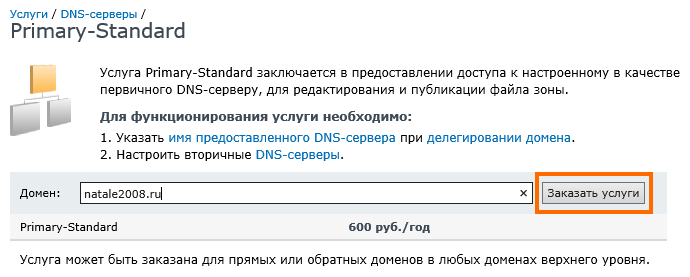
2. Go to the DNS editing panel, for nic.ru is Services -> View and modify data -> DNS-master . I note that if they have purchased only the domain name itself, then the DNS-master will not be available by default, you also need DNS hosting. For DNS hosting from nic.ru, you can purchase the Primary-Standard service.
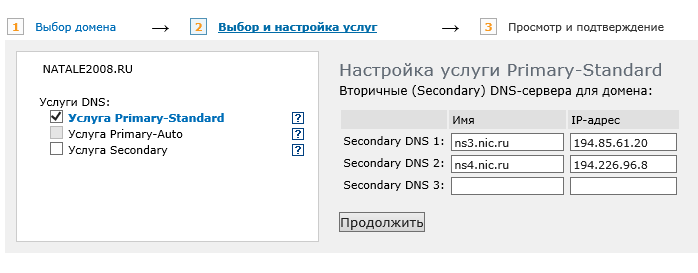
Setting up a Primary-Standard service: Order a service -> DNS, Redirection, Mobilizer -> Primary-Standard
DNS editing: Services -> DNS-master
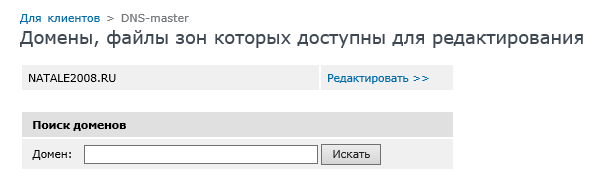
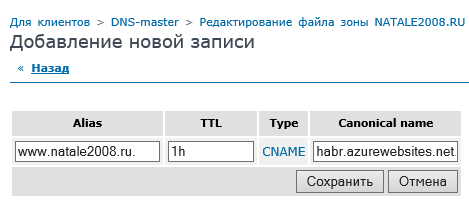
Add a new entry with type CNAME:
- Alias - www .natale2008.ru.
- Canonical name - habr.cloudapp.net.
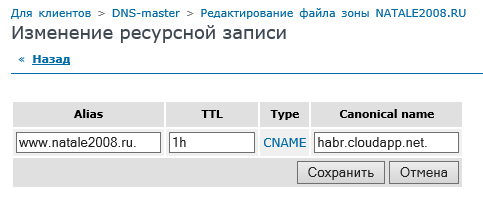
Click save, and then again “save” (this means closing the DNS wizard and saving all changes, otherwise nothing will be saved).

3. We are waiting for the changes to take effect.
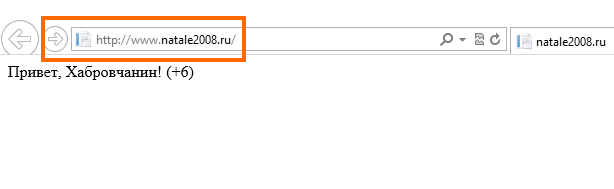
4. Check by running the navigation on www.natale2008.ru (c www ).
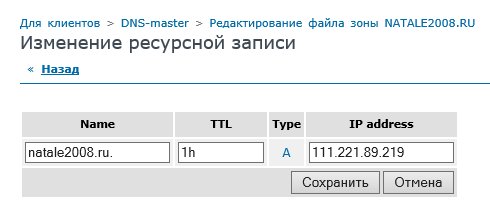
5. Similarly, you can create an A entry for the VIP service, then we will be able to log in on natale2008.ru (without www). VIP can be obtained from the Windows Azure panel.
Setting up a domain for storage and CDN
The procedure for linking a domain (second level) to a repository is slightly longer, since Sub-domain preliminary validation required. Input data : storage of Windows Azure - habr, a subdomain - storage.natale2008.ru.
1. Go to the old Windows Azure portal : Hosted Services, Storage Accounts & CDN -> Storage Accounts , select the storage and click Add domain .
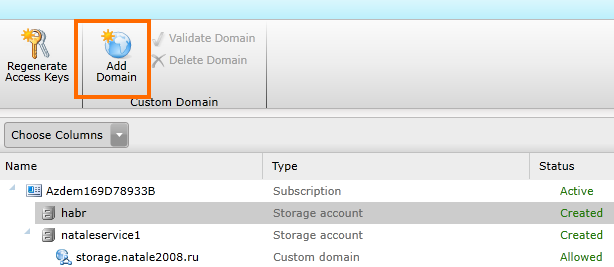
2. In the Custom Domain Name field we drive in storage.natale2008.ru.

3. Get the key for verification and copy it.
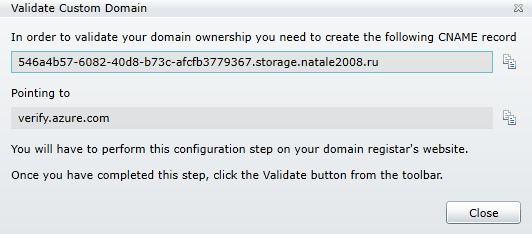
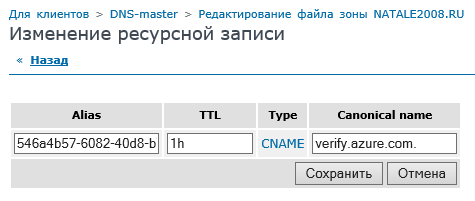
4. In the DNS Master make the appropriate entries:
- Alias - 546a4b57-6082-40d8-b73c-afcfb3779367.storage.natale2008.ru.
- Canonical name - verify.azure.com.
5. We are waiting for updates (you can check through network-tools.com ).
6. Go to the old Windows Azure portal: Hosted Services, Storage Accounts & CDN -> Storage Accounts , select the storage and click Validate Domain . We receive a message about successful validation (the status in the Status column with Pending will change to Allowed).
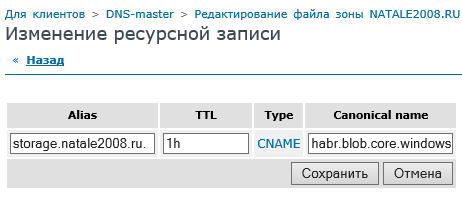
7. Add another CNAME record to DNS Master:
- Alias - storage.natale2008.ru.
- Canonical name - habr.blob.core.windows.net. (Custom Domain Name for BLOB storage)
8. Perform a check - storage.natale2008.ru/test/habralogo.jpg . The page with the Habr logo should open.
9. For CDN, setting up a domain is similar to setting up for storage.
Note . However, sometimes there are still questions about the work of SSL in conjunction with the Custom Domain Name. For Cloud Services, this is supported; for storage, unfortunately, not yet (although SSL without a Custom Domain Name for storage works).
Setting up a domain for websites (We Sites)
At the moment, for the domain binding it is possible only for the Reserved mode, for the Shared-mode there is no such possibility during the Windows Azure Preview.
1. The first thing to do is switch to the Reserved mode. This setting is in the Web Sites -> <your site> -> Scale .
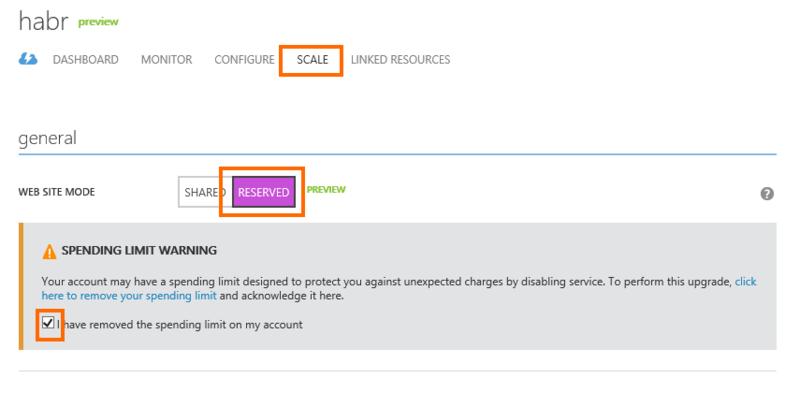
Do not forget to tick and save the changes.
2. Next, configure the CNAME specified above (Setting up a domain for cloud services (Cloud Service)). If www is not busy, then bind www.
3. Configure the created CNAME on the Windows Azure portal. This setting is in the Web Sites -> <your site> -> Configure .

That's how it is configured.
Source: https://habr.com/ru/post/150089/
All Articles