Publishing Windows Azure sites with Git

Git is a popular open source distributed version control system. New Windows Azure sites can use the Git repository to quickly and easily transfer code changes to the site. In this article, we will explain how to use Git to publish to the Windows Azure website from any operating system.
Note. Many of the Git commands described in this article are executed automatically when you create a website using the Windows Azure command line tools for Mac and Linux .
')
Do the following:
- Git installation
- Creating a local repository
- Adding a webpage
- Enable website repository
- Adding a website as a remote repository
- Publish and republish website
- Troubleshooting
Install git
The steps to install Git depend on the operating system. Details on specific operating system distributions and installation guide are provided in the “Installing a Git System” section .
Note. On some operating systems, both the command line version and the Git GUI will be available. The instructions in this manual use the command line version.
Creating a local repository
To create a Git repository, complete the following tasks.
- Open a command window, such as GitBash (Windows) or Bash (Unix Shell). In OS X, the command line is accessed using the Terminal application.
- On the command line, specify the directory in which the website will be created. For example,
cd needsmoregit. - To initialize a new Git repository, use the following command:
git init
It should return a message of the form Initialized empty Git repository in [path] .
Adding a webpage
Windows Azure websites support applications created using various programming languages. In this example, we will use a static HTML file. For information on publishing websites created using other programming languages in Windows Azure, see the Windows Azure Developer Center .
- Using a text editor, create a file called index.html in the root folder of the Git repository. Add the phrase Hello Git! as content and then save the file.
- Check on the command line that the directory created in the repository is used. Using the following command, add the index.html file to the repository:
git add index.html - Then commit the changes to the repository using the command:
git commit -m "Adding index.html to the repository"
The result of the team will look like this:
[master (root-commit) 369a79c] Adding index.html to the repository 1 file changed, 1 insertion (+) create mode 100644 index.html
Enable website repository
To enable the Git repository for your website using the Windows Azure portal, follow these steps:
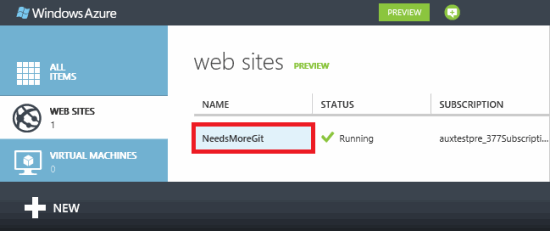
Sign in to the Windows Azure portal . On the left side of the page, select Web Sites , and then select the website for which you want to enable the repository.

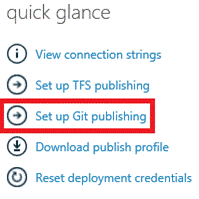
At the bottom of the page in the quick glance section, select Setup Git publishing .

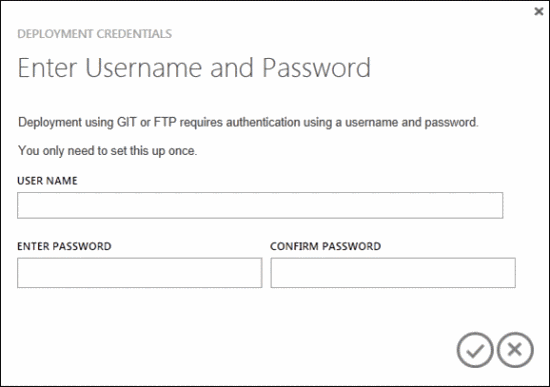
If the publication for the Windows Azure website is included for the first time, you will be prompted to enter credentials for the deployment. Enter the username and password that will be required to further publish websites.

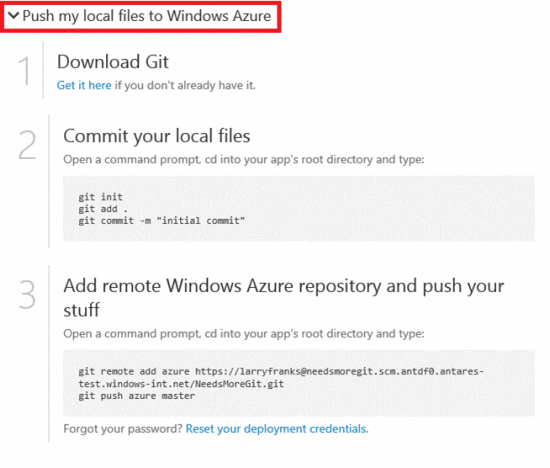
After a while, a message about the readiness of the repository. Under the message in the section Push my local files to Windows Azure there will be a list of commands used to send local files to the Windows Azure application.

Adding a website as a remote repository
Since the local repository has already been initialized and files have been added to it, skip steps 1 and 2 of the instructions displayed on the portal. Using the command line, navigate to the website directory and execute the commands listed in step 3 of the instructions on the portal. For example:
The remote command adds a named link to a remote repository –– in this case, it is a link named azure to the repository of the Windows Azure website.
Publish and republish website
Use the following command to move the current repository content from the local repository to the azure remote repository:
You will be prompted to enter a password created earlier when configuring the repository. Enter password. The result of the actions will look like this:
Note. It is assumed that requests for placement in the repository created for the Windows Azure website will be sent to its main branch and then used as the content of the website.
On the portal at the bottom, click the BROWSE link to check if the index.html file is maximized. The Hello Git! Welcome page will open.

Using a text editor, add the word Yay !, to the index.html file, and then save the file.
At the command prompt, run the following commands to add and commit the changes, and then place them in the remote repository:
After running the push command, refresh the browser. Notice that the page now shows the last committed change.

Troubleshooting
When using Git to publish to the Windows Azure website, the following errors and problems occur.
Symptom Unable to resolve host hostname.
Reason This error occurs if the wrong address was entered when creating the remote repository azure.
The decision . Use the
git remote –v command to specify all remote repositories and related URLs. Make sure that the correct URL is provided for the azure remote repository. If necessary, delete and re-create the deleted repository using the correct URL.Symptom No links indicated; Nothing happens. Perhaps you should specify a branch as 'master'.
Reason This error occurs when the branch operation does not specify a branch and does not specify the ush.default value used by the Git system.
The decision . Perform the room operation again, specifying the main branch. For example:
git push azure master
Symptom src refspec [branch_name] has no matches.
Reason This error occurs when an attempt is made to place a branch other than the master in the remote repository azure.
The decision . Perform the room operation again, specifying the main branch. For example:
git push azure master
Symptom Error: The changes are recorded in the remote repository, but the website has not been updated.
Reason This error occurs if you deploy the Node.js application containing the package.json file, which contains the additional required modules.
The decision . Before this error appears, messages containing the text npm ERR must be logged! .. They may contain an additional context for the cause of the failure. The following are known causes of this error and the output of the npm ERR! Message.
- Incorrectly formed package.json file . npm ERR! Couldn't read dependencies.
- Built-in module that does not have a binary distribution for Windows .
- o npm ERR! `cmd" / c "" node-gyp rebuild "` failed with
OR - o npm ERR! [modulename @ version] preinstall: `make || gmake`
- o npm ERR! `cmd" / c "" node-gyp rebuild "` failed with
Additional resources
Source: https://habr.com/ru/post/150086/
All Articles