Configuring SSL for an application in Windows Azure

SSL (Secure Socket Layer) encryption protocol is the most common way to protect data on the Internet. This example shows how to set an HTTPS endpoint for a web role and load an SSL certificate to protect the application.
This process includes the following steps:
')
- Step 1. Get an SSL certificate
- Step 2: Change the service definition and configuration files
- Step 3: Download the deployment package and certificate
- Step 4: Connect to the role instance using HTTPS
Step 1. Get an SSL certificate
To configure SSL for an application, you must first obtain an SSL certificate signed by an authorized and independent Certificate Authority. If you do not have an SSL certificate, purchase it from the company that sells them.
SSL certificate in Windows Azure must meet the following requirements:
- Contain a private key;
- Support key exchange (.pfx file);
- The recipient name in the certificate must match the domain from which the service is accessed. It is impossible to obtain an SSL certificate for the cloudapp.net domain, therefore the recipient name in the certificate must match the domain name through which you provide access to the application;
- The certificate must use encryption with a key of 2048 bits and higher.
You can create a self-signed certificate for testing. For details on how to create a self-signed certificate in IIS Manager, see the "How to Create a Certificate for a Role " section .
You then need to add certificate information to the service definition and its configuration files.
Step 2: Change the service definition and configuration files
You must configure the application to use the certificate and add an HTTPS endpoint. As a result, the definition and configuration files of the service will need to be updated.
Open the service definition file (CSDEF) in the development environment, add the Certificates subsection in the WebRole section, and then specify the following certificate information:
<WebRole name="CertificateTesting" vmsize="Small"> ... <Certificates> <Certificate name="SampleCertificate" storeLocation="LocalMachine" storeName="CA" /> </Certificates> ... </WebRole> In the Certificates subsection, specify the name of the certificate, its location, and the name of the store where it is located. In this example, the certificate is stored in the Certificate Authority, but you can choose a different location. For more information, see “How to associate a certificate with a service . ”
Open the service definition file and add the InputEndpoint element to the Endpoints section to enable the use of HTTPS:
<WebRole name="CertificateTesting" vmsize="Small"> ... <Endpoints> <InputEndpoint name="HttpsIn" protocol="https" port="443" certificate="SampleCertificate" /> </Endpoints> ... </WebRole> Open the service definition file and add the Binding element to the Sites section. As a result, an HTTPS binding will be created between the endpoint and your site:
<WebRole name="CertificateTesting" vmsize="Small"> ... <Sites> <Site name="Web"> <Bindings> <Binding name="HttpsIn" endpointName="HttpsIn" /> </Bindings> </Site> </Sites> ... </WebRole> Now all the necessary changes to the service definition file have been made. It remains to add the certificate information to the service configuration file.
Open the service configuration file (CSCFG) and add the Certificates subsection to the Role section, replacing the fingerprint below with the appropriate value from your certificate:
<Role name="Deployment"> ... <Certificates> <Certificate name="SampleCertificate" thumbprint="9427befa18ec6865a9ebdc79d4c38de50e6316ff" thumbprintAlgorithm="sha1" /> </Certificates> ... </Role> After updating the service definition and configuration files, create an application installation package and load it into Windows Azure. If you use the cspack tool, make sure that the / generateConfigurationFile flag is disabled, otherwise the certificate information you specify will be overwritten.
Step 3: Download the deployment package and certificate
The installation package uses the correct certificate and the HTTPS endpoint is added. Now you can upload the package and certificate to Windows Azure through the Management Portal.
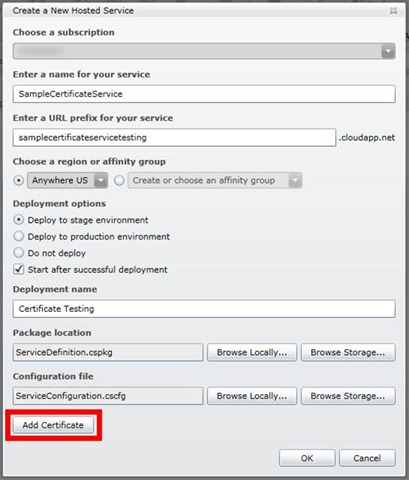
Log into the Windows Azure Management Portal and open the Hosted Services section. Click New Hosted Service , enter the necessary information about your service, and click Add Certificate .

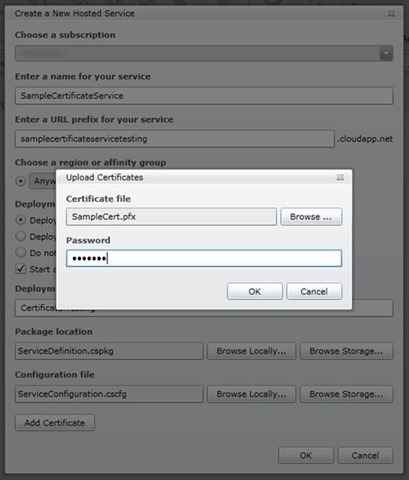
In the Upload Certificates section, specify the path to the SSL certificate file (.pfx) and the password for the certificate, and then click OK .

To create a service, click OK . When the status is Ready , go to the next step.
Step 4: Connect to the role instance using HTTPS
After deploying and running an application in Windows Azure, you need to connect to it via HTTPS.
In the Management Portal, select your application, right-click the link with the DNS name in the Properties panel and select Copy .

Paste this address into your web browser window, make sure the address starts with https , not http , and go to the page.
The browser will display the address in green, informing you that you are using an HTTPS connection. It also means that the application works correctly with SSL.
Note. If you use a self-signed certificate, the browser will display an error when connecting to the HTTPS endpoint associated with the self-signed certificate. You can solve this problem by signing the certificate at an authorized center, or simply ignore it.

Additional resources
Source: https://habr.com/ru/post/149939/
All Articles