How to make Time Machine back up to a network drive
Recently I decided to separate from “Wi-Fi neighbors” and move to 5 Ghz, for which the Cisco Linksys EA4500 router was purchased. USB storage can be connected to the router, which is distributed via SMB and FTP. I wanted to force Time Machine to back up this miracle device. As a result of googling, it didn’t take long to force Time Machine from Mac OS X Mountain Lion to please me until I came across one article , the adaptive translation of which I present to you for perusal below.
Suppose you have a NAS, a hard disk router, or even an old Windows machine with free disk space. You want to use this disk space for backup Time Machine. You open the settings of your Time Machine and it turns out that you can add a network drive only if it is connected to the AirPort router or add TimeCapsule. What's next? If you are the owner of Mac OS X Lion (or Mountain Lion - approx. Translation), then there is a way out. We continue to read.
To create backups on third-party network drives using Time Machine, you need to do the following steps:
1) Create an HFS + disk image and place it on a network drive. It can be like SMB (Windows) or AFP (Mac) so that your Mac can write there.
2) Mount this image and use the tmutil utility to tell Time Machine where it is located.
3) Give the command to your Time Machine to start the backup and make sure everything is in order.
')
And now more.
1) Open the disk utility
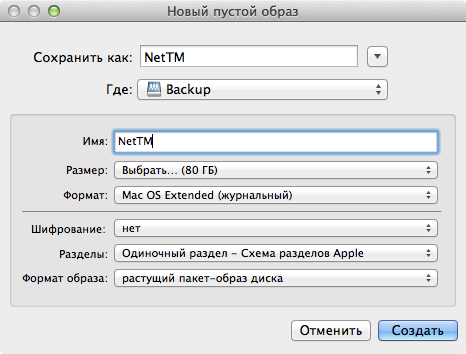
2) Click File> New> Empty Disk Image
3) Specify the size of the image, the type of the file system “Mac OS X Extended (Journaled)” and the type of the image “growing package-disk image”
1) Open Finder
2) Go to the network drive where you saved the image
3) Mount the image by double clicking
4) Open the terminal and enter the command:
That's all! Now we are launching Time Machine. Thus, you can make backups on NTFS disks, if you have MacFUSE + NTFS-3g or Tuxera's NTFS driver installed.
Suppose you have a NAS, a hard disk router, or even an old Windows machine with free disk space. You want to use this disk space for backup Time Machine. You open the settings of your Time Machine and it turns out that you can add a network drive only if it is connected to the AirPort router or add TimeCapsule. What's next? If you are the owner of Mac OS X Lion (or Mountain Lion - approx. Translation), then there is a way out. We continue to read.
To create backups on third-party network drives using Time Machine, you need to do the following steps:
1) Create an HFS + disk image and place it on a network drive. It can be like SMB (Windows) or AFP (Mac) so that your Mac can write there.
2) Mount this image and use the tmutil utility to tell Time Machine where it is located.
3) Give the command to your Time Machine to start the backup and make sure everything is in order.
')
And now more.
Creating a disk image
1) Open the disk utility
2) Click File> New> Empty Disk Image
3) Specify the size of the image, the type of the file system “Mac OS X Extended (Journaled)” and the type of the image “growing package-disk image”
Say Time Machine to use disk image
1) Open Finder
2) Go to the network drive where you saved the image
3) Mount the image by double clicking
4) Open the terminal and enter the command:
sudo tmutil setdestination /Volumes/--That's all! Now we are launching Time Machine. Thus, you can make backups on NTFS disks, if you have MacFUSE + NTFS-3g or Tuxera's NTFS driver installed.
Source: https://habr.com/ru/post/149916/
All Articles