Core Data in iOS 5: how to load and import existing data
Hello Habr. I offer you a translation of the article, through which I became apparent the main features of Core Data.
Note:
A member of the iOS tutorial team, Adam Burkepile, kindly updated the Core Data series in iOS 5. - In this post, I’ll tell you a little about this.
')
This tutorial has been completely rewritten to show a more elegant way to preload data using only your iPhone’s Core Date.
Before you start, download the project .
Preload / import existing data
First, we preload data into Core Data. There are two popular solutions to this problem:
1. Fill in the Core Date when starting from an external source . The application may notice that the database has not yet been imported, and begins to read data from an external source (such as a SQLite database or XML file) and then begin to insert data into Core Data.
2. Provide a pre-populated SQLite database. To do this, we will allow Core Data to create a model-based database structure for us, and then we will fill our database with a utility program. The utility can be our Mac or another iPhone program that uses Core Data to populate the database through the Core Data API, or some other program that populates the SQLite database directly. Once the database is full, include it along with the application and force the application to use it as the default database, if there is no other database already.
Next, I will show you how you can make a simple utility application that will create a preloaded Core Data database that you can use in your application.
Start
The main advantage of the method we are going to use is that Core Data on iOS is the same Core Data on OS X, and they can use the same models and classes.
This means that we can write a simple console application on OS X, associate this application with Core Data data storage, and then use it to transfer data from the storage to the data of our project on iOS. Neither is it wonderful ?!
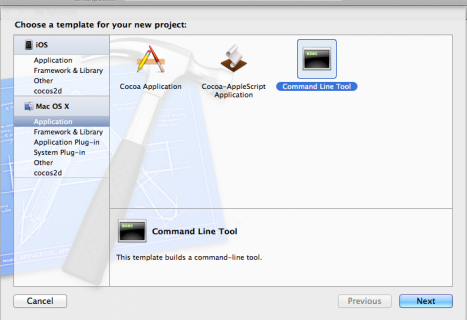
Let's check it out. To do this, create a console application on Mac to preload our data. Open Xcode and create a new project, and select the Mac OS X \ Application \ Command Line Tool template.
Enter “CoreDataTutorial2” as the project name, change the type to “Core Data” and to enable “Use Automatic Reference Counting”.

Finish creating the project, then select “CoreDataTutorial2.xcdatamodeld” and delete it. Select “Move to Trash” when asked.

Then enter the directory from the archive that downloaded the files and find the following files:
- FailedBankCD.xcdatamodeld
- FailedBankInfo.h
- FailedBankInfo.m
- FailedBankDetails.h
- FailedBankDetails.m
Copy these files into the directory of this project, and then drag and drop them into Xcode.


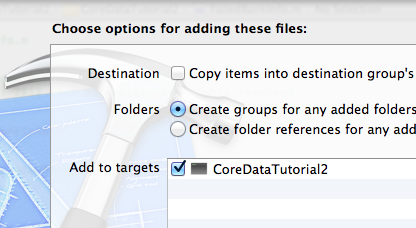
Check that the “Copy items into destination group's folder (if needed)” checkbox is enabled, if not, then make sure to check the “CoreDataTutorial2” checkbox in “Add to target”.
Select main.m. You will notice that we have chosen Core Data as the base data type. Now we need to make some changes to use our class models from the iOS project and generate Core Data objects.
In managedObjectModel (), replace the method:
on
This points to the FailedBankCD.xdatamodeld application, which we added instead of CoreDataTutorial2.xdatamodeld, which we deleted at the beginning.
Compile and run, and check that you have no errors.
If you created and executed it earlier, you will get a model mismatch error.
To remove sqlite db, select the option (alt) and go to the menu and select “Products” and “Clean Build Folder ...”.
If you see an error like this:
This is because the code is looking for the 'momd' file (the file where there is the required version of Core Data),
but if your model does not have the correct version, it will be saved as a simple 'mom'. As this article explains, the fastest commit should replace the string in managedObjectModel () with this:
Now it should compile and work well (no output yet).
Data import
For our example, we will import data from a JSON file. In your applications, you can import data from various formats,
but the central idea shown here (using a Mac application to read the file and load it into Core Data) will still apply.
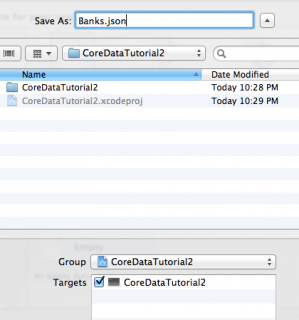
Let's try it out! Right click on the project and select “New File”. Select the categories “Other” and “Empty”.

Name the file “Banks.json” and make sure that you include the file in the target “CoreDataTutorial2”.
Insert the following into the new file:
This is a JSON encoded string containing 4 dictionaries in an array. Each dictionary has a couple of properties that correspond to the properties that we have in our FailedBankInfo / FailedBankDetails objects.
If you don't understand how JSON works, check out this guide .
Next, we need to tell the application to copy this file into dictory products. Select the project file, then target “CoreDataTutorial2”. Select the “Build Phases” tab
click, “Add Build Phase”, and select, “Add Copy Files”. Change destintion to “Products Directory”. Finally, drag the “Banks.json” file into the “Add files” section.

Now we have an application that runs, initializes Core Data using our FailedBank model, and there are classes that have a data source with the Banks.json file. Now we have:
- Download JSON file
- JSON conversion to Objective-C array
- Loop through an array that creates a managed object for each element
- Saving objects in Core Data!
Get coding! Open main.m and add the following code to the main function (at the end of the autoreleasepool block):
So your main function should now look like this:
Now uses the new NSJSONSerialization built-in API to easily convert a JSON document to basic types such as NSArray,
NSDictionary, etc. To learn more, read this guide.
Let us run the application:
So we see that we now have data in Objective-C objects,
and that we can easily manage them. Now we can easily import these objects into CoreData.
First, add some files to the top of the file:
Then add the following code, which you just added earlier:
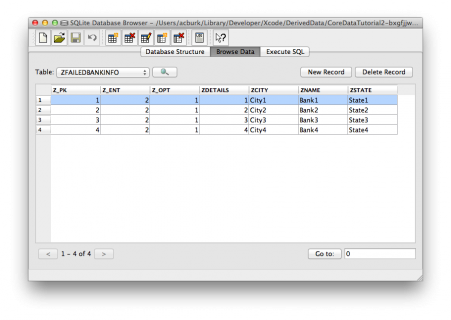
We use the enumerateObjectsUsingBlock: method to cycle through an array of banks and enter one bank and keep the context. Then we issue a sample request and list all the banks.
Ta-da! This is your Core Date data. The capturing part is you, you can fully customize the way data enters. Instead of a small static json file,
which we used, you could use many pairs of larger / a json files, xml file, export the spreadsheet file as a CSV file. The possibilities are really endless.
“Doctor, what you needed in Xcode”
Now we do brain surgery. We have to take the sqlite database we just generated in the OS X applicaiton console and transplant it into an iPhone application.
The easiest way to find a sqlite database is to right-click on the CoreDataTutorial2 product and select “Show in Finder”.

A new Finder window will now open where the project has been developed. Here, you can see four files:
- Banks.json - json bank information file
- CoreDataTutorial2 - This application
- FailedBankCD.momd (or only .com) - this is the compiled version of the Managed Object Model (FailedBankCD.xdatamodeld)
- CoreDataTutorial2.sqlite - sqlite database generated by the application.
This “CoreDataTutorial2.sqlite” file is the juicey bit we need. Copy this file to the project directory from the tutorial 1.
Drag the “CoreDataTutorial2.sqlite” file from the Finder to the Xcode project (“Copy items into destination group's folder (if needed)” is NOT checked, but “Add to targets” is checked for “FailedBanksCD”).


Finally open “FBCDAppDelegate.m”. Scroll down to the persistentStoreCoordinator method. Right under
This is a code check to see if the sqlite database already existed for this application. If it does not exist, then a path is searched for the previously loaded sqlite database,
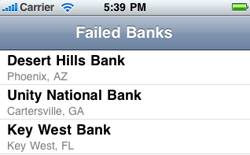
which we downloaded and try to copy the database to the path for a normal dB application. IT THAT SIMPLE! Run it. It must be something like this:
That's all. Thanks to all.
Note:
A member of the iOS tutorial team, Adam Burkepile, kindly updated the Core Data series in iOS 5. - In this post, I’ll tell you a little about this.
')
This tutorial has been completely rewritten to show a more elegant way to preload data using only your iPhone’s Core Date.
Before you start, download the project .
Preload / import existing data
First, we preload data into Core Data. There are two popular solutions to this problem:
1. Fill in the Core Date when starting from an external source . The application may notice that the database has not yet been imported, and begins to read data from an external source (such as a SQLite database or XML file) and then begin to insert data into Core Data.
2. Provide a pre-populated SQLite database. To do this, we will allow Core Data to create a model-based database structure for us, and then we will fill our database with a utility program. The utility can be our Mac or another iPhone program that uses Core Data to populate the database through the Core Data API, or some other program that populates the SQLite database directly. Once the database is full, include it along with the application and force the application to use it as the default database, if there is no other database already.
Next, I will show you how you can make a simple utility application that will create a preloaded Core Data database that you can use in your application.
Start
The main advantage of the method we are going to use is that Core Data on iOS is the same Core Data on OS X, and they can use the same models and classes.
This means that we can write a simple console application on OS X, associate this application with Core Data data storage, and then use it to transfer data from the storage to the data of our project on iOS. Neither is it wonderful ?!
Let's check it out. To do this, create a console application on Mac to preload our data. Open Xcode and create a new project, and select the Mac OS X \ Application \ Command Line Tool template.
Enter “CoreDataTutorial2” as the project name, change the type to “Core Data” and to enable “Use Automatic Reference Counting”.
Finish creating the project, then select “CoreDataTutorial2.xcdatamodeld” and delete it. Select “Move to Trash” when asked.
Then enter the directory from the archive that downloaded the files and find the following files:
- FailedBankCD.xcdatamodeld
- FailedBankInfo.h
- FailedBankInfo.m
- FailedBankDetails.h
- FailedBankDetails.m
Copy these files into the directory of this project, and then drag and drop them into Xcode.
Check that the “Copy items into destination group's folder (if needed)” checkbox is enabled, if not, then make sure to check the “CoreDataTutorial2” checkbox in “Add to target”.
Select main.m. You will notice that we have chosen Core Data as the base data type. Now we need to make some changes to use our class models from the iOS project and generate Core Data objects.
In managedObjectModel (), replace the method:
NSString *path = [[[NSProcessInfo processInfo] arguments] objectAtIndex:0]; path = [path stringByDeletingPathExtension]; on
NSString *path = @"FailedBankCD"; This points to the FailedBankCD.xdatamodeld application, which we added instead of CoreDataTutorial2.xdatamodeld, which we deleted at the beginning.
Compile and run, and check that you have no errors.
If you created and executed it earlier, you will get a model mismatch error.
To remove sqlite db, select the option (alt) and go to the menu and select “Products” and “Clean Build Folder ...”.
If you see an error like this:
NSInvalidArgumentException', reason: 'Cannot create an NSPersistentStoreCoordinator with a nil model' This is because the code is looking for the 'momd' file (the file where there is the required version of Core Data),
but if your model does not have the correct version, it will be saved as a simple 'mom'. As this article explains, the fastest commit should replace the string in managedObjectModel () with this:
NSURL *modelURL = [NSURL fileURLWithPath:[path stringByAppendingPathExtension:@"mom"]]; Now it should compile and work well (no output yet).
Data import
For our example, we will import data from a JSON file. In your applications, you can import data from various formats,
but the central idea shown here (using a Mac application to read the file and load it into Core Data) will still apply.
Let's try it out! Right click on the project and select “New File”. Select the categories “Other” and “Empty”.
Name the file “Banks.json” and make sure that you include the file in the target “CoreDataTutorial2”.
Insert the following into the new file:
[{ "name": "Bank1", "city": "City1", "state": "State1", "zip": 11111, "closeDate": "1/1/11" }, { "name": "Bank2", "city": "City2", "state": "State2", "zip": 22222, "closeDate": "2/2/12" }, { "name": "Bank3", "city": "City3", "state": "State3", "zip": 33333, "closeDate": "3/3/13" }, { "name": "Bank4", "city": "City4", "state": "State4", "zip": 44444, "closeDate": "4/4/14" } ] This is a JSON encoded string containing 4 dictionaries in an array. Each dictionary has a couple of properties that correspond to the properties that we have in our FailedBankInfo / FailedBankDetails objects.
If you don't understand how JSON works, check out this guide .
Next, we need to tell the application to copy this file into dictory products. Select the project file, then target “CoreDataTutorial2”. Select the “Build Phases” tab
click, “Add Build Phase”, and select, “Add Copy Files”. Change destintion to “Products Directory”. Finally, drag the “Banks.json” file into the “Add files” section.
Now we have an application that runs, initializes Core Data using our FailedBank model, and there are classes that have a data source with the Banks.json file. Now we have:
- Download JSON file
- JSON conversion to Objective-C array
- Loop through an array that creates a managed object for each element
- Saving objects in Core Data!
Get coding! Open main.m and add the following code to the main function (at the end of the autoreleasepool block):
NSError* err = nil; NSString* dataPath = [[NSBundle mainBundle] pathForResource:@"Banks" ofType:@"json"]; NSArray* Banks = [NSJSONSerialization JSONObjectWithData:[NSData dataWithContentsOfFile:dataPath] options:kNilOptions error:&err]; NSLog(@"Imported Banks: %@", Banks); So your main function should now look like this:
int main(int argc, const char * argv[]) { @autoreleasepool { // Create the managed object context NSManagedObjectContext *context = managedObjectContext(); // Custom code here... // Save the managed object context NSError *error = nil; if (![context save:&error]) { NSLog(@"Error while saving %@", ([error localizedDescription] != nil) ? [error localizedDescription] : @"Unknown Error"); exit(1); } NSError* err = nil; NSString* dataPath = [[NSBundle mainBundle] pathForResource:@"Banks" ofType:@"json"]; NSArray* Banks = [NSJSONSerialization JSONObjectWithData:[NSData dataWithContentsOfFile:dataPath] options:kNilOptions error:&err]; NSLog(@"Imported Banks: %@", Banks); } return 0; } Now uses the new NSJSONSerialization built-in API to easily convert a JSON document to basic types such as NSArray,
NSDictionary, etc. To learn more, read this guide.
Let us run the application:
2012-04-14 22:01:34.995 CoreDataTutorial2[18388:403] Imported Banks: ( { city = City1; closeDate = "1/1/11"; name = Bank1; state = State1; zip = 11111; }, { city = City2; closeDate = "2/2/12"; name = Bank2; state = State2; zip = 22222; }, { city = City3; closeDate = "3/3/13"; name = Bank3; state = State3; zip = 33333; }, { city = City4; closeDate = "4/4/14"; name = Bank4; state = State4; zip = 44444; } ) So we see that we now have data in Objective-C objects,
and that we can easily manage them. Now we can easily import these objects into CoreData.
First, add some files to the top of the file:
#import "FailedBankInfo.h" #import "FailedBankDetails.h" Then add the following code, which you just added earlier:
[Banks enumerateObjectsUsingBlock:^(id obj, NSUInteger idx, BOOL *stop) { FailedBankInfo *failedBankInfo = [NSEntityDescription insertNewObjectForEntityForName:@"FailedBankInfo" inManagedObjectContext:context]; failedBankInfo.name = [obj objectForKey:@"name"]; failedBankInfo.city = [obj objectForKey:@"city"]; failedBankInfo.state = [obj objectForKey:@"state"]; FailedBankDetails *failedBankDetails = [NSEntityDescription insertNewObjectForEntityForName:@"FailedBankDetails" inManagedObjectContext:context]; failedBankDetails.closeDate = [NSDate dateWithString:[obj objectForKey:@"closeDate"]]; failedBankDetails.updateDate = [NSDate date]; failedBankDetails.zip = [obj objectForKey:@"zip"]; failedBankDetails.info = failedBankInfo; failedBankInfo.details = failedBankDetails; NSError *error; if (![context save:&error]) { NSLog(@"Whoops, couldn't save: %@", [error localizedDescription]); } }]; // Test listing all FailedBankInfos from the store NSFetchRequest *fetchRequest = [[NSFetchRequest alloc] init]; NSEntityDescription *entity = [NSEntityDescription entityForName:@"FailedBankInfo" inManagedObjectContext:context]; [fetchRequest setEntity:entity]; NSArray *fetchedObjects = [context executeFetchRequest:fetchRequest error:&error]; for (FailedBankInfo *info in fetchedObjects) { NSLog(@"Name: %@", info.name); FailedBankDetails *details = info.details; NSLog(@"Zip: %@", details.zip); } We use the enumerateObjectsUsingBlock: method to cycle through an array of banks and enter one bank and keep the context. Then we issue a sample request and list all the banks.
2012-04-14 22:15:44.149 CoreDataTutorial2[18484:403] Name: Bank1 2012-04-14 22:15:44.150 CoreDataTutorial2[18484:403] Zip: 11111 2012-04-14 22:15:44.150 CoreDataTutorial2[18484:403] Name: Bank2 2012-04-14 22:15:44.151 CoreDataTutorial2[18484:403] Zip: 22222 2012-04-14 22:15:44.152 CoreDataTutorial2[18484:403] Name: Bank3 2012-04-14 22:15:44.152 CoreDataTutorial2[18484:403] Zip: 33333 2012-04-14 22:15:44.153 CoreDataTutorial2[18484:403] Name: Bank4 2012-04-14 22:15:44.153 CoreDataTutorial2[18484:403] Zip: 44444 Ta-da! This is your Core Date data. The capturing part is you, you can fully customize the way data enters. Instead of a small static json file,
which we used, you could use many pairs of larger / a json files, xml file, export the spreadsheet file as a CSV file. The possibilities are really endless.
“Doctor, what you needed in Xcode”
Now we do brain surgery. We have to take the sqlite database we just generated in the OS X applicaiton console and transplant it into an iPhone application.
The easiest way to find a sqlite database is to right-click on the CoreDataTutorial2 product and select “Show in Finder”.
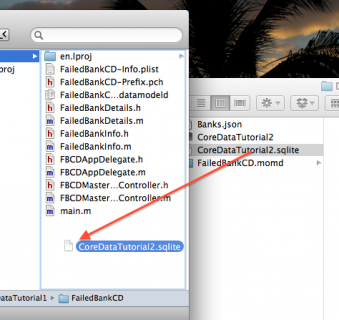
A new Finder window will now open where the project has been developed. Here, you can see four files:
- Banks.json - json bank information file
- CoreDataTutorial2 - This application
- FailedBankCD.momd (or only .com) - this is the compiled version of the Managed Object Model (FailedBankCD.xdatamodeld)
- CoreDataTutorial2.sqlite - sqlite database generated by the application.
This “CoreDataTutorial2.sqlite” file is the juicey bit we need. Copy this file to the project directory from the tutorial 1.
Drag the “CoreDataTutorial2.sqlite” file from the Finder to the Xcode project (“Copy items into destination group's folder (if needed)” is NOT checked, but “Add to targets” is checked for “FailedBanksCD”).
Finally open “FBCDAppDelegate.m”. Scroll down to the persistentStoreCoordinator method. Right under
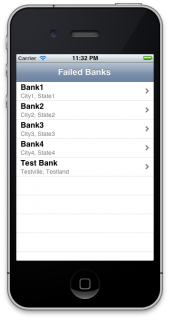
NSURL *storeURL = [[[[self app... line, add: if (![[NSFileManager defaultManager] fileExistsAtPath:[storeURL path]]) { NSURL *preloadURL = [NSURL fileURLWithPath:[[NSBundle mainBundle] pathForResource:@"CoreDataTutorial2" ofType:@"sqlite"]]; NSError* err = nil; if (![[NSFileManager defaultManager] copyItemAtURL:preloadURL toURL:storeURL error:&err]) { NSLog(@"Oops, could copy preloaded data"); } } This is a code check to see if the sqlite database already existed for this application. If it does not exist, then a path is searched for the previously loaded sqlite database,
which we downloaded and try to copy the database to the path for a normal dB application. IT THAT SIMPLE! Run it. It must be something like this:
That's all. Thanks to all.
Source: https://habr.com/ru/post/149867/
All Articles