Practice AngularJS - development of the administrative panel
 When creating websites, there is often a task to create an admin for editing content. The task is, in general, trivial, but to make a comfortable admin panel is not so easy.
Convenience first of all means the ability to sort the table with the list of materials and work without reloading the page. If there is a lot of materials in the table, then the problem arises of breaking it into pages.
The well-known jQuery plugin tablesorter with tablesorterPager and less well-known, but much more functional DataTables are good, but have some drawbacks. The main one is the complexity of dynamically adding new rows to the table (after adding a row to the table, the new row will be lost the next time the sort is called). tablesorter does not provide the means to add a line to its cache at all, DataTables provides a wide and functional API for managing the internal presentation of a table, but this API is quite verbose and not very flexible.
')
I want to provide the public with the implementation of the admin panel on a relatively new javascript framework AngularJS. A page will be created to edit the list of questions divided into categories and answered. The article does not compare with other similar frameworks, but there is no simple repetition of official documentation, I will try to share my experience in using the framework and talk about several interesting techniques for working with it.
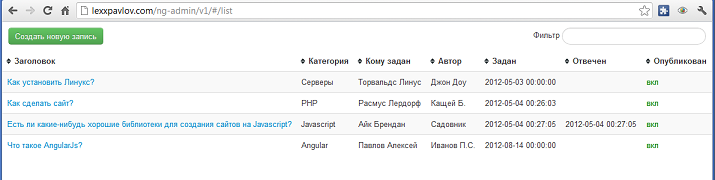
Immediately give what happens in the end (clickable):
Introduction
A few words about the framework, I still bring. AngularJS is a Javascript MVC framework, a project based on Google. It includes its own high-level implementation of ajax, built-in tools for unit-and e2e-tests (Jasmine for unit-testing, for the end-to-end tests a special testing server is launched). I will not consider testing, this is a topic for a separate article. More information about the framework recently wrote aav in his post .
I first met him in the article " 7 reasons why AngularJS is cool ." Unfortunately, besides the official documentation (by the way, quite good), I found only one article describing working with AngularJS (but not the newest version). Also for the initial acquaintance with the framework I recommend to go through an official tour .
AngularJS Framework Basics
Let's move to the actual development of the admin. The index file index.html is loaded into the browser, and then we will not leave it anywhere, all work will be done using dynamic loading. The file itself does not contain anything special. There are two important points in it - the ng-app = "admin" attribute of the <html> tag and the <div ng-view> </ div> section in which our pages will be placed.
<!doctype html> <html lang="ru" ng-app="admin"> <head> <meta charset="utf-8"> <title>Admin page - Questions</title> <link rel="stylesheet" href="css/app.css"/> <link rel="stylesheet" href="css/bootstrap.css"/> <link rel="stylesheet" href="css/bootstrap-responsive.css"/> </head> <body> <div ng-view></div> <script type="text/javascript" src="http://ajax.googleapis.com/ajax/libs/jquery/1.7.2/jquery.min.js"></script> <script>!window.jQuery && document.write(unescape('%3Cscript src="/js/jquery.js"%3E%3C/script%3E'))</script> <script src="lib/angular/angular.js"></script> <script src="lib/angular/angular-resource.js"></script> <script src="js/app.js"></script> <script src="js/services.js"></script> <script src="js/controllers.js"></script> <script src="js/directives.js"></script> </body> </html> As you can see, AngularJS operates with extended tags attributes - directives. Directives can be written in several ways, the following records are identical: ng-app = ”admin”, data-ng-app = ”admin”, there are also several other methods. It is also possible to develop your directives.
AngularJS offers to split the application code into several files. app.js - application initialization, routing, services.js - creating various services, describing remote resources (for example, for ajax-loading data), which can then be used in controllers, controllers.js - controllers themselves, filters.js - filters, used in data output, directives.js - creating your own directives for html.
App.js file:
'use strict'; angular.module('admin', ['admin.services','admin.filters']) .config(['$routeProvider', function($routeProvider) { $routeProvider .when('/list', {template: 'views/list.html', controller: ListCtrl}) .when('/new', {template: 'views/edit.html', controller: NewCtrl}) .when('/edit/:id', {template: 'views/edit.html', controller: EditCtrl}) .otherwise({redirectTo: '/list'}); }, ]); Here we assign routes for our views. By the way, it will look like myadmin.com/#/list ( you can also make #!, Which Google accepted as the standard for indexing, thanks aav for the comment). I placed the views in the / views / folder (as opposed to the one offered by the creators / partials /). Interestingly, AngularJS proposes to enable strict 'use strict' everywhere ( in this article about use strict more).
Then I will give a simplified version of the list of materials, which will be supplemented in the course of the article. I believe that step-by-step development will be more useful and understandable for readers.
File /views/list.html:
<div id="table-wrapper"> <div class="filter tools pull-right"> <input ng-model="filterStr" class="search-query"> </div> <div class="tools pull-left"> <a href="#/new" class="btn btn-success"> </a> </div> <table class="table table-striped"> <thead> <tr> <th ng-repeat="head in tablehead" >{{head.title}}</th> </tr> </thead> <tbody> <tr ng-repeat="item in items | filter:filterStr"> <td><a href="#/edit/{{item.id}}">{{item.title}}</a></td> <td>{{item.category}}</td> <td>{{item.answerer}}</td> <td>{{item.author}}</td> <td>{{item.created}}</td> <td>{{item.answered}}</td> <td><span class="disable-item" style="color:{{['red','green'][+item.shown]}};" ng-click="disableItem()">{{['',''][+item.shown]}}</span></td> </tr> </tbody> </table> </div> Here you should pay attention to the construction ['off', 'on'] [+ item.shown] - it substitutes the string from the array ['off', 'on'], depending on the value of item.shown (0 or 1), the unary operation “+” returns a number - the array index. It was necessary to record the selection of the desired line in this way, since AngularJS does not allow the use of a trenar conditional operator (item.shown> 0? 'On': 'off') in braces. Instead of an expression with an array, you can use the expression item.shown> 0 && 'on' || 'off. Hopefully, in future versions, the creators will add support for coaching operators. Item in items | filter: filterStr passes the items array to the built-in filter function, which filters the transferred data, returning only those elements that contain a substring from the filterStr variable (defined by the element with the ng-model = “filterStr” attribute).
Let's go to the controller controllers.js:
'use strict'; function ListCtrl($scope, Items, Data) { $scope.items = Items.query(function(data){ var i = 0; angular.forEach(data, function(v,k) { data[k]._id = i++; }); }); $scope.categories = Data('categories'); $scope.answerers = Data('answerers'); $scope.tablehead = [ {name:'title', title:""}, {name:'category', title:""}, {name:'answerer', title:" "}, {name:'author', title:""}, {name:'created', title:""}, {name:'answered', title:""}, {name:'shown', title:""} ]; $scope.disableItem = function() { var item = this.item; Items.toggle({id:item.id}, function() { if (data.ok) item.shown = item.shown>0?0:1; }); }; } In this function, the parameters: $ scope - the scope of variables in the template used in brackets {{}} and in the ng-model directive, Items and Data are the services defined in the services.js file. Accordingly, Items is a model of questions, Data is a tool for getting service lists (categories of questions and responding). $ scope - the variable sticking the controller and view. It is impossible to transfer data from the controller to the view otherwise than through this variable (sometimes it is even annoying). The tablehead array contains objects describing the table header. Later we will expand it.
Consider now the services.js file:
'use strict'; angular.module('admin.services', ['ngResource']) .factory('Items', function($resource){ return $resource('back/questions/:id/:action', {}, { create: {method:'PUT'}, saveData: {method:'POST'}, toggle: {method:'GET', params:{action:'toggle'}} }); }) .factory('Data', function($resource){ var load = $resource('back/list/:name', {}); var loadList = ['answerers','categories']; var data = {}; for (var i=0; i<loadList.length; i++) data[loadList[i]] = load.get({name:loadList[i]}); return function(key){ return data[key]; }; }); This file uses the factory () function, which in this case is a resource generator. The $ resource resource is an embedded object that encapsulates work with XMLHttpRequest. It contains default get (), save (), delete () methods and allows you to define your own methods. In essence, objects returned by factories are a data model. The Items service loads data from the server each time it is accessed. The Data service, when loading the page, caches the loaded lists and returns them from the cache as prompted.
In principle, what is already there will ensure the work of the list, but there are significant shortcomings that we will fix later. Now let's move on to the page for creating and editing a question.
Adding and editing entries
The /views/edit.html template is quite trivial (at least for those familiar with the Bootstrap css framework):
<form name="saveForm" class="form-horizontal"> <fieldset> <div class="control-group"> <div class="controls"> <h3>{{["",""][(item.id>0)+0]}} </h3> </div> </div> <div class="control-group" ng-class="{error: saveForm.category.$invalid}"> <label class="control-label" for="category"></label> <div class="controls"> <select name="category" ng-model="item.category" required ng-options="key as value for (key, value) in categories"></select> </div> </div> <div class="control-group" ng-class="{error: saveForm.title.$invalid}"> <label class="control-label" for="title"></label> <div class="controls"> <input name="title" ng-model="item.title" required> </div> </div> <div class="control-group" ng-class="{error: saveForm.author.$invalid}"> <label class="control-label" for="author"></label> <div class="controls"> <input name="author" ng-model="item.author" required> </div> </div> <div class="control-group" ng-class="{error: saveForm.answerer.$invalid}"> <label class="control-label" for="answerer"> </label> <div class="controls"> <select name="answerer" ng-model="item.answerer" required ng-options="key as value for (key, value) in answerers"></select> </div> </div> <div class="control-group" ng-class="{error: saveForm.answerer.$invalid}"> <label class="control-label" for="text"></label> <div class="controls"> <textarea id="text" ng-model="item.text" required></textarea> </div> </div> <div class="control-group"> <label class="control-label" for="answer"></label> <div class="controls"> <textarea id="answer" ng-model="item.answer"></textarea> </div> </div> <div class="form-actions"> <input type="button" ng-disabled="saveForm.$invalid||saveForm.$pristine" href="#/list" ng-click="save()" class="btn btn-success" value=""> <a href="#/list" class="btn"></a> </div> </fieldset> </form> This template has some interesting points. A directive that creates list options <select> from an object is written like this: ng-options = "key as value for (key, value) in categories". The part after for refers to the source, the expression before for determines which value to use as the value attribute of the option, and which value as the text of the option.
The directive ng-class = "{error: saveForm.title. $ Invalid}" exposes the error class to the tag when saveForm.title. $ Invalid == true. In general, an object is used here, the keys of which are the names of the classes, which will be set if its value is true. The “Save” button uses a similar directive ng-disabled = “saveForm. $ Invalid || saveForm. $ Pristine”, which sets the disabled attribute on the button when the condition is met, in this case, if the form contains invalid attributes (saveForm. $ Invalid ) or the form has not yet been changed (saveForm. $ pristine). I hope the attentive reader will guess the purpose of the expression <h3> {{["Adding", "Changing"] [(item.id> 0) +0]}} records </ h3> ...
As you can see from the app.js file, two controllers are connected to this one template, which need to be placed in the controllers.js file (the other one can also be used, as long as they are connected to the page). Here is the controller code (controllers.js file):
... function EditCtrl($scope, $routeParams, $location, Items, Data) { $scope.item = Items.get({id:$routeParams.id}); $scope.categories = Data('categories'); $scope.answerers = Data('answerers'); $scope.save = function() { $scope.item.$save({id:$scope.item.id}, function(){ $location.path('/list'); }); }; } function NewCtrl($scope, $location, Items, Data) { $scope.item = {id:0,category:'',answerer:'',title:'',text:'',answer:'',author:''}; $scope.categories = Data('categories'); $scope.answerers = Data('answerers'); $scope.save = function() { Items.create($scope.item, function(){ $location.path('/list'); }); }; } Both controllers are very similar, use the built-in $ routeParams provider to get data from the page address (their names are marked in the route in app.js) and the $ location.path ('/ list') function to switch to another page. Note! In this function, you do not need to use the # symbol, but in the links in the href attribute it is necessary to put it.
What we have already done, you can see on this page . But in the current implementation, instead of the category name, its number is displayed. We eliminate this drawback.
Data substitution from lists
First of all, let's set up so that in the Categories and To whom columns the data from lists received from the server are given. To do this, create a special module admin.filters, in which we place our filters.
File filters.js:
'use strict'; angular.module('admin.filters', []) .filter('list', function() { return function(value,list) { return list?list[value]: value; }; }) ... At the input, the function receives the value of the current (filtered) element and an additional parameter specified in the template through a colon. To connect filters to the application, you need to add the module containing them to the list of application dependencies (app.js file):
... angular.module('admin', ['admin.services','admin.filters']) ... In the list.html template, add a filter call with a parameter — the required list:
... <td>{{item.category|list:categories}}</td> <td>{{item.answerer|list:answerers}}</td> ... Now, if you run the page with the changes, you can see that the right lines appeared in place of the numeric indexes, but bad luck - the standard filter filter in the <tr> element does not know anything about these lines, because it is not filtered by our new filter. data. For proper filtering, we will write another filter, adding it also to the filters.js file:
... .filter('filterEx', function() { var find = function(arr,name) { for(var i=0; i<arr.length; i++) if (arr[i].name==name) return arr[i].list; }; return function(items,tablehead,str) { if (!str) return items; var result = [], list, ok, regexp = new RegExp(str,'i'); for (var i in items) { ok = false; for (var k in items[i]) if (items[i].hasOwnProperty(k) && k[0]!='$') { list = find(tablehead,k); if (list && regexp.test(list[items[i][k]]) || regexp.test(items[i][k])) {ok = true; break;} } if (ok) result.push(items[i]); } return result; }; }); And add a call to this filter in the list.html template:
... <tr ng-repeat="item in items | filterEx:tablehead:filterStr"> ... The filter code is quite simple; it takes three parameters — an array of strings and two variables listed in the template — a tablehead and a string to search for. Then, in the loop, it iterates all the elements of the array and all the keys in the record, and checks through the regularity the presence of the search string in all elements of the record, and if a list is specified for the element in the tablehead array, then a value from it is used. You also need to remember to make changes to the tablehead array by adding the list key with an array of strings to the desired elements (controllers.js file):
... $scope.tablehead = [ {name:'title', title:""}, {name:'category', title:"", list:$scope.categories}, {name:'answerer', title:" ", list:$scope.answerers}, ... The base part is over, the application is already quite functional. I’ll leave the development of the backend behind brackets, everything is rather trivial.
Thus, we considered the creation of basic functions of the administrative page using the framework AngularJs. Outside the article remained sorting tables and pagination. About this, I wanted to write the following article, if the respected Habrasoobschestvo supports my desire.
A working demo is available here: http://lexxpavlov.com/ng-admin/v1/ (read-only)
Sources can be viewed on GitHub: https://github.com/lexxpavlov/angular-admin
The second part of
Source: https://habr.com/ru/post/149757/
All Articles