RabbitMQ tutorial 1 - Hello World
RabbitMQ allows you to interact with different programs using the AMQP protocol. RabbitMQ is an excellent solution for building SOA (Service Oriented Architecture) and the distribution of deferred resource-intensive tasks.
Under the cut translation of the first of the six lessons of the official site. Examples in python, but his knowledge is not at all necessary. Similar to the example program can be played on almost any popular PL. [This is how translator comments look, i.e. me]
')
Introduction
RabbitMQ is a message broker. His main goal is to receive and give messages. You can think of it as a post office: when you drop a letter in the box, you can be sure that sooner or later the postman will deliver it to the addressee [apparently, the author has never dealt with Russian Post] . In this analogy, RabbitMQ is simultaneously a mailbox, post office, and postman.
The biggest difference between RabbitMQ and the post office is that it does not deal with paper envelopes - RabbitMQ accepts, stores and gives binary data - messages.
RabbitMQ, as well as messaging in general, uses the following terminology:
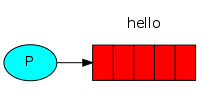
- Producer (supplier) - a program that sends messages. In the diagrams, it will be represented by a circle with the letter “P”:

- Queue - the name of the “mailbox”. It exists inside RabbitMQ. Although messages pass through RabbitMQ and applications, they are stored only in queues. The queue has no restrictions on the number of messages, it can take an arbitrarily large number of them - it can be considered an endless buffer. Any number of suppliers can send messages to one queue, and any number of subscribers can receive messages from one queue. In the schemes, the queue will be indicated by the stack and signed with the name:

- Consumer (subscriber) - a program that receives messages. Typically, the subscriber is in a message waiting state. In the diagrams, it will be represented by a circle with the letter “C”:

The supplier, subscriber and broker are not required to be on the same physical machine, usually they are on different ones.
Hello World!
The first example will not be particularly difficult - let's just send a message, accept it and display it. For this we need two programs: one will send messages, the other will receive and display them on the screen.
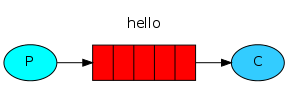
The general scheme is as follows:
The provider sends messages to the queue with the name "hello", and the subscriber receives messages from this queue.
RabbitMQ library
RabbitMQ uses the AMQP protocol. RabbitMQ requires a library that supports this protocol. Such libraries can be found for almost every programming language. Python is not an exception; there are several libraries for it:
The examples will use the pika library. It can be installed using the pip package manager:
$ sudo pip install pika==0.9.5 If pip or git-core is missing, you must first install them:
- For Ubuntu:
$ sudo apt-get install python-pip git-core - For Debian:
$ sudo apt-get install python-setuptools git-core $ sudo easy_install pip - For Windows (to install easy_install, you must run MS Windows Installer for setuptools):
> easy_install pip > pip install pika==0.9.5
Sending messages
Our first send.py program will simply send one message to the queue.
#!/usr/bin/env python import pika connection = pika.BlockingConnection(pika.ConnectionParameters( 'localhost')) channel = connection.channel() We have connected to a message broker located on the local host. To connect to a broker located on another machine, it is enough to replace “localhost” with the IP address of this machine.
Before sending a message, we must make sure that the queue receiving the message exists. If you send a message to a nonexistent queue, RabbitMQ will ignore it. Let's create a queue to which the message will be sent, let's call it “hello”:
channel.queue_declare(queue='hello') Now everything is ready to send a message. Our first message will contain the string
In general, in RabbitMQ messages are not sent directly to the queue, they must go through the exchange ( exchange point). But now we will not focus on this, exchange points will be discussed in the third lesson. Now it’s enough to know that the default exchange point can be determined by specifying an empty string. This is a special exchange point - it allows you to determine exactly which message was sent to the queue. The queue name must be specified in the routing_key parameter:
channel.basic_publish(exchange='', routing_key='hello', body='Hello World!') print " [x] Sent 'Hello World!'" Before exiting the program, you need to make sure that the buffer has been cleared and the message reached RabbitMQ. You can be sure of this if you use secure broker connection closure.
connection.close() Receive messages

Our second program receive.py will receive messages from the queue and display them on the screen.
As well as in the first program, you first need to connect to RabbitMQ. To do this, use the same code as before. The next step, as before, is to make sure the queue exists. The queue_declare command will not create a new queue if it already exists, so no matter how many times this command is called, only one queue will be created anyway.
channel.queue_declare(queue='hello') You may wonder why we declare the queue again, because it has already been announced in the first program. This is necessary to make sure that there is a queue, as it will be if the send.py program is started first . But we do not know which program will be launched earlier. In such cases it is better to declare a queue in both programs.
Queue Monitoring
If you want to see which queues exist in RabbitMQ at the moment, you can do this with the rabbitmqctl command (you need root privileges):
$ sudo rabbitmqctl list_queues Listing queues ... hello 0 ...done. (for Windows - without sudo)
[Our company uses a more convenient monitoring script:]
watch 'sudo /usr/sbin/rabbitmqctl list_queues name messages_unacknowledged messages_ready messages durable auto_delete consumers | grep -v "\.\.\." | sort | column -t;' [the script outputs and updates every 2 seconds a table with a list of queues: the name of the queue; number of messages in processing; number of messages ready for processing; total number of messages; queue stability to restart the service; is it a temporary queue; number of subscribers]
Retrieving messages from a queue is more complicated than sending. Receiving is done using a subscription using the callback function. Upon receipt of each message, the Pika library calls this callback function. In our example, it will display the message text.
def callback(ch, method, properties, body): print " [x] Received %r" % (body,) Next, we need to designate that the callback function will receive messages from the queue with the name “hello”:
channel.basic_consume(callback, queue='hello', no_ack=True) Here you need to be sure that the queue we want to subscribe to has been announced. We did this earlier with the queue_declare command .
The parameter no_ack will be discussed later [in the second lesson ] .
And, finally, start an infinite process that waits for messages from the queue and calls the callback function when necessary.
print ' [*] Waiting for messages. To exit press CTRL+C' channel.start_consuming() Well, now all together
Full send.py code:
#!/usr/bin/env python import pika connection = pika.BlockingConnection(pika.ConnectionParameters( host='localhost')) channel = connection.channel() channel.queue_declare(queue='hello') channel.basic_publish(exchange='', routing_key='hello', body='Hello World!') print " [x] Sent 'Hello World!'" connection.close() Full receive.py code:
#!/usr/bin/env python import pika connection = pika.BlockingConnection(pika.ConnectionParameters( host='localhost')) channel = connection.channel() channel.queue_declare(queue='hello') print ' [*] Waiting for messages. To exit press CTRL+C' def callback(ch, method, properties, body): print " [x] Received %r" % (body,) channel.basic_consume(callback, queue='hello', no_ack=True) channel.start_consuming() Now we can try to run our programs in the terminal. First, send a message using the send.py program:
$ python send.py [x] Sent 'Hello World!' The execution of this program will terminate after sending each message. Now you need to get the message:
$ python receive.py [*] Waiting for messages. To exit press CTRL+C [x] Received 'Hello World!' Fine! We sent our first message through RabbitMQ. As you may have noticed, the execution of the receive.py program has not ended. She will wait for the next messages, and you can stop her by pressing Ctrl + C.
Try running send.py again in a new terminal window.
We learned how to send and receive messages through named queues. In the next lesson we will create a simple task queue [resource-intensive] .
UPD: library working with RabbitMQ, for your beloved PL, you can find on the official site here .
Source: https://habr.com/ru/post/149694/
All Articles