Hard prioritization, or the first 5 steps to an excellent application for Windows 8. Navigation
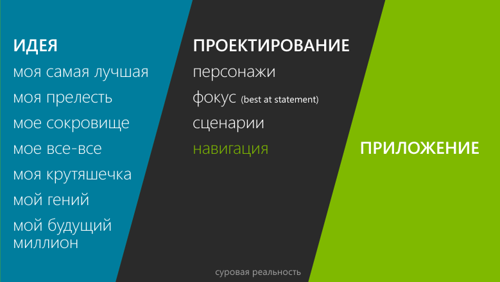
In the previous section, we looked at the first three steps in the design of an application:
- Target audience determination
- Formulation of the purpose of the application
- Selection of key scenarios
As you can see, the first three steps can really be safely applied to any projects
I think they will benefit from it. In this part we will look at the fourth step - planning the navigation in the application , and this time we can’t do without understanding the specifics of Windows 8.
4. Plan your navigation
You, probably, if you read the entire first part of the article, are surprised that we still have not drawn a single screen and have never looked at the concrete realization of anything. Do not be surprised - in this article we will not draw in detail the screens and even more so we will not write code. Nevertheless, everything that we do in the next two steps will play an extremely important role for all further interface design and application development itself.
')
The final goal of the fourth step is to form an understanding of what screens will be in your application, how information will be distributed over them, and how the transitions between them will be performed. We need to make an information map (it’s also an information architecture).
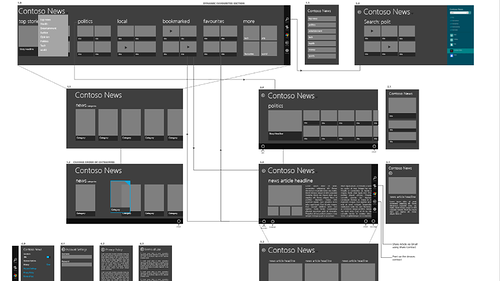
In principle, if you already have 1) a fairly clear idea of how an application should look, and 2) an understanding of how Windows 8 works, you can draw a diagram right away: you need to draw all the key screens, show how information is distributed between them and mark the transitions between the screens, tying them to the transition triggers (elements, buttons, links, gestures, etc.).
We will go from two sides: let's try to understand what screens are needed for our virtual application to cover key scenarios, and I will tell you what to look for from the point of view of designing applications specifically for Windows 8.
Application screens
Let's start with the screens - and there may be different strategies. For example, you can immediately try to draw an information scheme, starting with the main screen and gradually sinking into the details. This approach, in principle, can work if you have already developed a general idea of how the application should look - and, first of all, what information blocks in it will be and how it should interact with them. I think that for this you should also have some design experience.
For unfamiliar tasks, before putting the whole puzzle into a single picture, you can start with individual pieces / fragments. In a way, it really resembles pulling a puzzle (mosaic): from separate small pieces you first put separate fragments, and then reduce these fragments into a single picture.
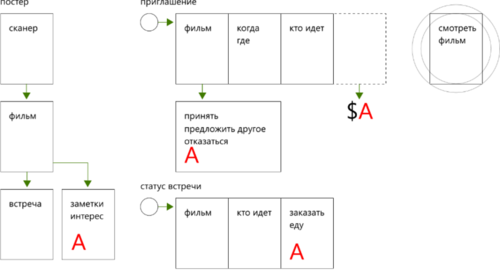
To begin this work, you need to return to your stories - and try to fix them in a simplified and consistent form in accordance with various scenarios.
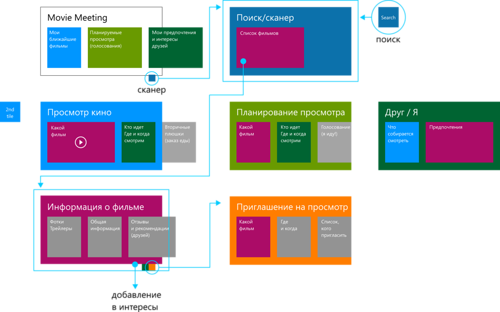
An example . We continue to deal with the Movie Meeting - my story can be summarized as follows:
- I: saw the poster → found out the movie
- I: create a meeting
- Send invitations
- Make the interest visible
- Friends: received invitations → details
- Friends: received reminders → details
- I: see the status, details, order food
- I + Friends: Enjoy Enhanced Movie
Here, the first two points refer to the first scenario, the second two to the second, the fifth to the secondary order of food, the sixth item is recorded on the third scenario.
Now you can try to translate these stories into separate small schemes - screens on which you need to identify the main blocks of information that are important for decision making or user satisfaction, and transitions between screens that reflect the sequence of movement (application flow):
With the letter “A,” I indicated the feeling that this screen might require additional explicit actions on the part of the user.
Assuming that your stories reveal key scenarios differently, you can get different sets of mini-schemes that more fully reveal the essence of your application.
Now, to move on, we need to clarify a few important nuances about the navigation patterns in Windows 8. Key article on the topic of navigation - Designing navigation for Metro style apps . I will note a few important points and a few additional nuances that should also be borne in mind.
Navigation in Windows 8.
First of all, it must be said (and emphasized) that the design of navigation must also be based on rigid prioritization. It is necessary to struggle by any means with an obsessive desire to place on one screen as much information, actions, links, etc. as possible.
In this sense, I really like the following quote from Susan Weinschenk’s article “ The Psychologist's View of UX Design” :
“It’s possible to get a task done. If you want more details. The disclosure of progressive disclosure . ”
Bring upstairs and in the most accessible place only what is really necessary - and allow the user to easily get into the details if necessary. At the same time, try to show the user where he is, and not where he should go (I will explain this thought, but if you grabbed it right away - you are on the right track).
For Windows 8 applications, there are two key navigation patterns: hierarchical and flat. (In principle, the Master-Details option, used, for example, in the Mail application, can be considered a separate type; however, we leave this question beyond the scope of this article.)
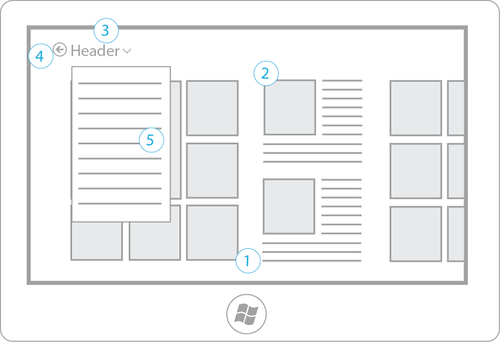
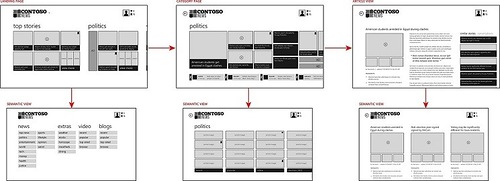
The hierarchical model of navigation assumes that the user sees at each step a certain slice of information with some degree of detail and, if necessary, can consistently immerse himself in the details.
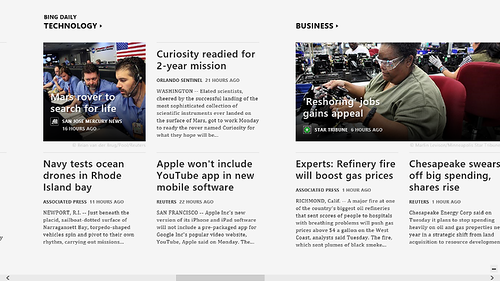
For example, in the news application at the first level, I see the latest and most important news - headlines and pictures, divided into separate groups. If the last 5-10 news is not enough for me and I want to know all the latest news about politics, I can go to the appropriate section (at the second level) - and see a list of all political news there. If the title and the picture are not enough for me to understand what is happening, and some news has hooked me, I can go down to the third level (from the first or second) - and read the entire news in its entirety.
The fact that at each level I am already receiving a certain piece of information corresponds precisely to the idea of showing where I am, and not where I can go. It is also important to note here that the dive to the level below is done directly through the content.

In a particular application, there may be more than three levels, but it is always important to remember about prioritization. You can think of it in such a way that for every next level you need twice as many weighty reasons for its presence. (However, you also need to restrain yourself from the desire to place all the information in general on the first screen.)
To return to the navigation stack, a back arrow may be located next to the header. You can also use the title menu (drop-down list 5 in the image below) to quickly jump to adjacent sections and to the main page of the application.
The hierarchical navigation model is well suited for large content collections and multiple sections or categories.
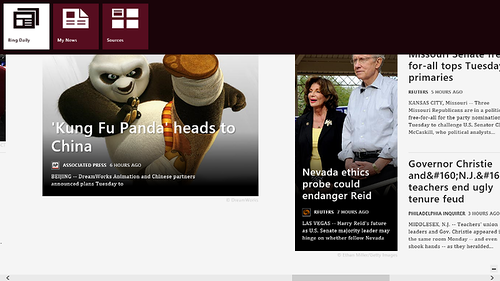
A flat navigation model for switching between different screens uses a special interface element - the navigation bar (navigation bar), which appears at the top with a corresponding gesture with your fingers, either by pressing the right mouse button or by using a command from the keyboard (Win + Z):

Please note that this item is not always present on the screen and is only called when requested by the user.
The navigation bar is well suited if you need to switch between multiple tabs (for example, in the browser), IM dialogs, documents, game sessions, etc., as well as for quick access to a small number of special sections.
In a specific application, both models can be combined and used simultaneously. For example, in the Bing News application, the hierarchical model is used to dive into separate news sections and specific news, while the flat model is used to quickly switch between the general flow, selected news and management of news sources.
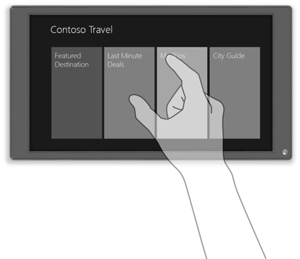
Context scaling (semantic zoom). In applications for Windows 8 there is another feature associated with the main method of location of information (horizontal with horizontal scrolling). As soon as your information goes beyond the screen, you will have to 1) tell the user what's next, and 2) help quickly navigate to the desired content section.
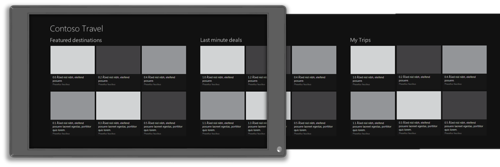
To solve both of these tasks, a special technique is used, which is called contextual scaling, triggered when compressing with fingers, ctrl + scrolling with the mouse, ctrl + “+” or pressing a special button, if it was provided by the developer:
In this mode, all sections become visible (or almost immediately) - and the user can easily select the desired one. A good technique is not only the display of section headings, but also some useful meta-information.
It is important to note that contextual scaling does not change the context and does not navigate to other pages - it only helps to quickly deal with the current page. In this case, this technique can be used on any page in the application, if it makes sense:
Pivots , perhaps familiar to you on Windows Phone, can also occur in Windows 8 applications. For example, you can easily find them in the Windows Store by going to a particular application:
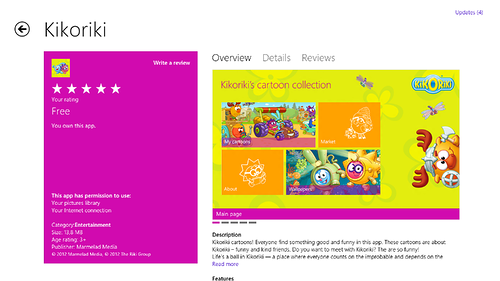
You can take this decision as an “interface with tabs”, but I want to emphasize that its main purpose is the same as in Windows Phone: switching between different filters or slices (groups) of information about an object. For example, in the case of an app store, it is a switch between a review, details and reviews of a specific (one) application.
Wonder buttons and contracts (above all, search, share and settings) are also an important part of your application, which takes on some of the functionality, or, more precisely, its activation.
The miracle buttons are located on a special panel that extends to the right and represent a uniform solution for four typical tasks: searching the application, sharing (transmitting) information with other applications, interacting with external devices (for example, outputting to the second screen or printing) and calling settings.
From the point of view of the information architecture, this means that, for example, the invocation of the application settings will be initialized not by some link or button inside the application, but by clicking on the corresponding miracle button. It's easy to portray, but just need to remember that this should work that way.

Searching and sharing (sharing) play another important role that you need to remember: they can be activators of your application . For example, if you show the user news, he can enter your application either from the tile on the start screen (or by selecting an application from the list of applications), or directly entering a search query in the search panel and selecting your application. In this case, the search results page from your application will open (should open). A similar script works for transferring data if your application can receive them.
(In principle, there may be other activators that you should know about - see the section on contracts on MSDN , but this is beyond the scope of this article).
Tiles and alerts , as you easily could have guessed, can also be additional entry points into the application and, in general, part of the solution to the task of informing the user about the current state of certain entities of your application. I will not dwell on this specifically, however, do not forget about it when designing.
Another important thing that can influence the structure of navigation, but requires separate consideration, is the attachment mode (snapped mode), in which your application is fixed in parallel with another application in the form of a narrow strip on the right or left. In this case, you need to redesign the screens and navigation (perhaps by inserting additional intermediate screens), taking into account the smaller available space and mostly vertical scrolling - we actively recall the need to set rigid priorities.
This concludes our brief immersion in the elements of the navigation system in Windows 8 applications and we can return to the main task of designing the information architecture of our virtual application.
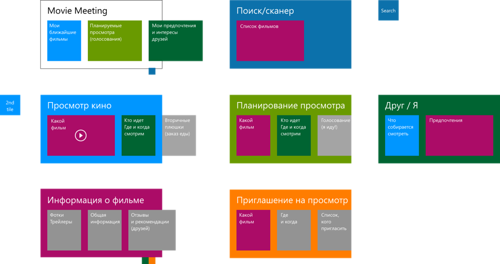
An example . Let me remind you, we are considering some Movie Meeting application that helps to organize an interesting movie with friends and it has three key scenarios:
- Find an interesting movie to watch.
- Share with friends
- Get a lot of viewing experience
At the stage of fixing mini-schemes, we had to get a primary understanding of how these scenarios work (a sequence of actions / screens) and the necessary information blocks for them.
(Designers with a detailed approach can also safely capture detailed user scripts in any usual way.)
Studying the nature and time of life of all these scenarios, we can understand that they all overlap each other, organizing some pyramid:
- "Watching a movie" is important on the eve and during watching.
- “Scheduling viewing / discussion / voting” is important for about a week before a decision is made and in parallel with the “viewing” for any future views.
- “The selection of the interesting” is important all the time to form your preferences and wishes (like a pool of ideas, what to see).

This suggests that all three scenarios should potentially be accessible from the starting screen (landing page), and, returning to the question of the presentation of content, are immediately available: not links, but directly accessible, albeit in a simplified or superficial way. . In other words, it will be necessary to bring the input points for all three scenarios into one screen.
In this case, the prioritization of actions (content) according to the degree of involvement of the user and the speed (lifetime) of the scenario is built from watching movies to planning and further to shaping interests, therefore the next views that the user is going to be in first place, the planned activities on the second and only after that the preferences / interests of the user and his friends.
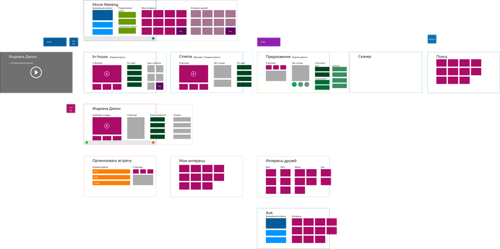
In the first approximation, we get such a set of screens (instead of a set of arrows, transitions, I used color coding) - here the hierarchical model of navigation is used as the main one:
At this stage, it is important to immediately get rid of our main scenarios and make sure that they work and we have not forgotten anything of principle:
In further elaboration and detailing, various changes may be made.
For example, in this particular case, it will certainly be advisable:
- post a scanner (photo) and search on various screens,
- to share the screens of my interests and the interests of friends (on the second, unlike the first, it makes sense to show viewing plans, and I see my own from the application's start screen),
- add a separate screen directly view,
- add a food / drink order screen,
- think about where your friends come from (and the social component in general), for example, it can be integration with the system's Contacts Picker,
- add notifications as additional entry points,
- add promotion or recommended content,
- add support for contextual scaling in all long lists,
- add settings panels
- think about the history of the purchase of tickets (including the possibility of printing through the relevant contract),
- and more small things ...
However, in all this splendor it will be important to keep in mind the priority of the main tasks and scenarios and, once again, to relate to them every decision made, not forgetting to drive your stories through the information map with invented characters.
In this regard, one of the most important tasks is to try to disentangle the scheme, making it more straightforward and, accordingly, removing cycles as much as possible.
Example. At one of the following iterations, I received the following information screen layout:
The same with transitions:
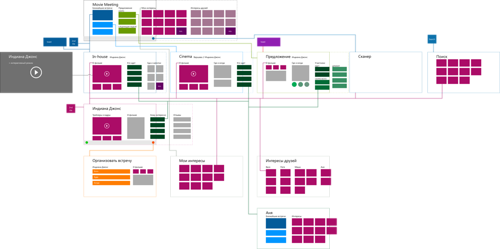
What is important to pay attention to:
- key scenarios should be solved as straightforwardly as possible (obviously);
- Scenarios with the shortest lifetime (operational) should be resolved as quickly as possible, that is, be at hand;
- any secondary scenarios should not distract the user, although they should be fairly easily accessible (most likely not from the first level) if they are important.
To be continued...
Great, now we are ready to think about the functionality, and what we will do in the next part;)
Key resources
Design for Windows 8Development for Windows 8
Application Development on the Microsoft Platform
Source: https://habr.com/ru/post/149539/
All Articles