Forwarding a video card in Xen, from under Ubuntu
Prehistory
Having read an article about a successful video card in a virtual machine, I decided that when I had two video adapters, I would do the same. Once the second adapter appeared, and decided to play around with the
Hardware
ASRock 990FX Extreme3 motherboard
AMD FX-8120 8x4.0 GHz processor
RAM 2x4 GB 1600 MHz
Video Card Gigabyte Radeon HD 5450 Silent 1024Mb 64bit
HIS Radeon HD 6670 1GB GDDR5 Video Card
SATA3 SSD for the main system
USB 3.0 HDD for the machine into which we will forward the video card
USB HDD because there is more space, and the speed of USB 3.0 is enough.
Software part
Ubuntu 12.10 x64 main system (kernel 3,6-rc1)
We will forward in Windows 7/8 x64 - it does not matter, both were checked.
Virtualization of the latest Xen 4.1, which is in the repository (this morning came an update that allows you to run Xen on processors with the architecture of Bulldozer, before that it was hopelessly falling at the start).
')
Training
I myself am a fan of the most simple examples, so I will be very brief and simple.
And another note - the instruction is suitable for the AMD platform, for Intel there are some differences with hardware virtualization, since there is no corresponding hardware - I can not check it.
First you need to look in the BIOS, the AMD 89x and AMD 99x chipsets must support IOMMU , if there is such an option in the BIOS and it is disabled, be sure to turn it on, otherwise it will not work.
Next, install Xen and the necessary components:
$ sudo apt-get install xen-hypervisor-4.1-amd64 xen-tools xenwatch qemu-utils qemu-common It'll be enough.
We will tweak the /etc/xen/xend-config.sxp configuration file in order for the network to work. Uncomment the line:
# (network-script network-bridge)
Next you need to correct the kernel boot commands. Open / etc / default / grub , look for GRUB_CMDLINE_LINUX , bring it to the form:
GRUB_CMDLINE_LINUX="max_loop=64 iommu=pt iommu=1 amd_iommu=fullflush xen-pciback.hide=(04:00.0)(04:00.1)"Thus, we increase the number of LOOP devices, enable IOMMU support for AMD, and disable the second video card, reserving it for Windows.
Read more about the video card. You need to see where the card is inserted, for example, how it looks from me:
Hidden text
  $ lspci
 00: 00.0 Host bridge: Advanced Micro Devices [AMD] nee ATI RD890 PCI to PCI bridge (external gfx0 port B) (rev 02)
 00: 00.2 IOMMU: Advanced Micro Devices [AMD] nee ATI RD990 I / O Memory Management Unit (IOMMU)
 00: 02.0 PCI bridge: Advanced Micro Devices [AMD] nee ATI RD890 PCI to PCI bridge (PCI express gpp port B)
 00: 05.0 PCI bridge: Advanced Micro Devices [AMD] nee ATI RD890 PCI to PCI bridge (PCI express gpp port E)
 00: 0a.0 PCI bridge: Advanced Micro Devices [AMD] nee ATI RD890 PCI to PCI bridge (external gfx1 port A)
 00: 0b.0 PCI bridge: Advanced Micro Devices [AMD] nee ATI RD890 PCI to PCI bridge (NB-SB link)
 00: 11.0 SATA controller: Advanced Micro Devices [AMD] nee ATI SB7x0 / SB8x0 / SB9x0 SATA Controller [AHCI mode] (rev 40)
 00: 12.0 USB controller: Advanced Micro Devices [AMD] nee ATI SB7x0 / SB8x0 / SB9x0 USB OHCI0 Controller
 00: 12.2 USB controller: Advanced Micro Devices [AMD] nee ATI SB7x0 / SB8x0 / SB9x0 USB EHCI Controller
 00: 13.0 USB controller: Advanced Micro Devices [AMD] nee ATI SB7x0 / SB8x0 / SB9x0 USB OHCI0 Controller
 00: 13.2 USB controller: Advanced Micro Devices [AMD] nee ATI SB7x0 / SB8x0 / SB9x0 USB EHCI Controller
 00: 14.0 SMBus: Advanced Micro Devices [AMD] nee ATI SBx00 SMBus Controller (rev 42)
 00: 14.1 IDE interface: Advanced Micro Devices [AMD] nee ATI SB7x0 / SB8x0 / SB9x0 IDE Controller (rev 40)
 00: 14.2 Audio Device: Advanced Micro Devices [AMD] nee ATI SBx00 Azalia (Intel HDA) (rev 40)
 00: 14.3 ISA bridge: Advanced Micro Devices [AMD] nee ATI SB7x0 / SB8x0 / SB9x0 LPC host controller (rev 40)
 00: 14.4 PCI bridge: Advanced Micro Devices [AMD] nee ATI SBx00 PCI to PCI Bridge (rev 40)
 00: 14.5 USB controller: Advanced Micro Devices [AMD] nee ATI SB7x0 / SB8x0 / SB9x0 USB OHCI2 Controller
 00: 16.0 USB controller: Advanced Micro Devices [AMD] nee ATI SB7x0 / SB8x0 / SB9x0 USB OHCI0 Controller
 00: 16.2 USB controller: Advanced Micro Devices [AMD] nee ATI SB7x0 / SB8x0 / SB9x0 USB EHCI Controller
 00: 18.0 Host bridge: Advanced Micro Devices [AMD] Family 15h Processor Function 0
 00: 18.1 Host bridge: Advanced Micro Devices [AMD] Family 15h Processor Function 1
 00: 18.2 Host bridge: Advanced Micro Devices [AMD] Family 15h Processor Function 2
 00: 18.3 Host bridge: Advanced Micro Devices [AMD] Family 15h Processor Function 3
 00: 18.4 Host bridge: Advanced Micro Devices [AMD] Family 15h Processor Function 4
 00: 18.5 Host bridge: Advanced Micro Devices [AMD] Family 15h Processor Function 5
 01: 00.0 VGA compatible controller: Advanced Micro Devices [AMD] nee ATI Cedar PRO [Radeon HD 5450 / Radeon HD 6350]
 01: 00.1 Audio Device: Advanced Micro Devices [AMD] nee ATI Cedar HDMI Audio [Radeon HD 5400/6300 Series]
 02: 00.0 USB controller: Etron Technology, Inc.  EJ168 USB 3.0 Host Controller (rev 01)
 03: 00.0 Ethernet controller: Broadcom Corporation NetLink BCM57781 Gigabit Ethernet PCIe (rev 10)
 04: 00.0 VGA compatible controller: Advanced Micro Devices [AMD] nee ATI Turks [Radeon HD 6670]
 04: 00.1 Audio device: Advanced Micro Devices [AMD] nee ATI Turks / Whistler HDMI Audio [Radeon HD 6000 Series]
We are interested in the lines:
  01: 00.0 VGA compatible controller: Advanced Micro Devices [AMD] nee ATI Cedar PRO [Radeon HD 5450 / Radeon HD 6350]
 01: 00.1 Audio Device: Advanced Micro Devices [AMD] nee ATI Cedar HDMI Audio [Radeon HD 5400/6300 Series]
 ...
 04: 00.0 VGA compatible controller: Advanced Micro Devices [AMD] nee ATI Turks [Radeon HD 6670]
 04: 00.1 Audio device: Advanced Micro Devices [AMD] nee ATI Turks / Whistler HDMI Audio [Radeon HD 6000 Series]
The first two correspond to the video card, which we leave Ubuntu, and the last two will give Windows. Two - because the video card is visible as a video and audio device at the same time, so you need to carry / carry them together. At the beginning of the line are the digits to be entered in the kernel boot options. They will hide from Ubuntu a second video card.
Actually, the preparation is completed if you have successfully booted by selecting the kernel from the “Xen 4.1-amd64” subsection at boot time. If you want the subsection to be the first in the list - rename the file.
/etc/grub.d/20_linux_xenat
/etc/grub.d/09_linux_xen
Install and configure a virtual machine
To install, you need a hard disk image. Create:
$ dd if=/dev/zero of=/media/Windows/HDD bs=1G count=90 A 90 GB disk file will be created in the / media / Windows directory, where the virtual machine will reside.
Create the following configuration file config.cfg in the same directory:
kernel = "/usr/lib/xen-4.1/boot/hvmloader"
builder = 'hvm'
vif = ['type = ioemu, bridge = eth0, ip = assigned-ip, mac = 22: 61: 34: 00: 00: 01']
address = 'assigned-ip'
netmask = '255.255.255.XXX'
memory = 1024
shadow_memory = 8
name = "windows"
cdrom = 'file: /media/Archive/Windows.iso'
disk = ['file: / media / Windows / HDD, hdc, w', 'file: /media/Archive/Windows.iso,hdb: cdrom, r']
device_model = '/usr/lib/xen-4.1/bin/qemu-dm'
# boot on floppy (a), hard disk © or CD-ROM (d)
# default: hard disk, cd-rom, floppy
#### boot it must be dc to install windows
boot = "dc"
#boot = "c"
vnc = 1 # use vnc to insall and setup windows after that you can disable this
vncconsole = 0
vncpasswd = ''
vncviewer = 1
vncunused = 1
vnclisten = '127.0.0.1'
vcpus = 2
stdvga = 0
serial = 'pty'
usbdevice = 'tablet'
on_reboot = 'restart'
on_crash = 'restart'
#pci = ['04: 00.0', '04: 00.1']
/media/Archive/Windows.iso - path to the image of the installation DVD with Windows
vnclisten = '127.0.0.1' - we are listening to the local computer, from which we will enter the virtual machine
memory = 1024 - RAM for the machine in MB
vcpus = 2 - the number of processor cores
name = "windows" - the name of the so-called domain of the virtual machine, it will be possible to distinguish it from the others.
pci = ['04: 00.0', '04: 00.1'] - we connect our reserved video card, but for now leave the line commented out
We try to run, if we have something.
$ sudo xm create /media/Windows/config.cfg Using config file "/media/Windows/config.cfg". Started domain windows (id=12) The output should be similar. Let's look at all the operating systems running under the hypervisor:
  $ sudo xm list
 Name ID Mem VCPUs State Time (s)
 Domain-0 0 7007 8 r ----- 6881.3
 windows 12 1024 2 -b ---- 32.1
Connect to the machine via VNC, for example, through Remina, which is the default in the latest versions of Ubuntu.
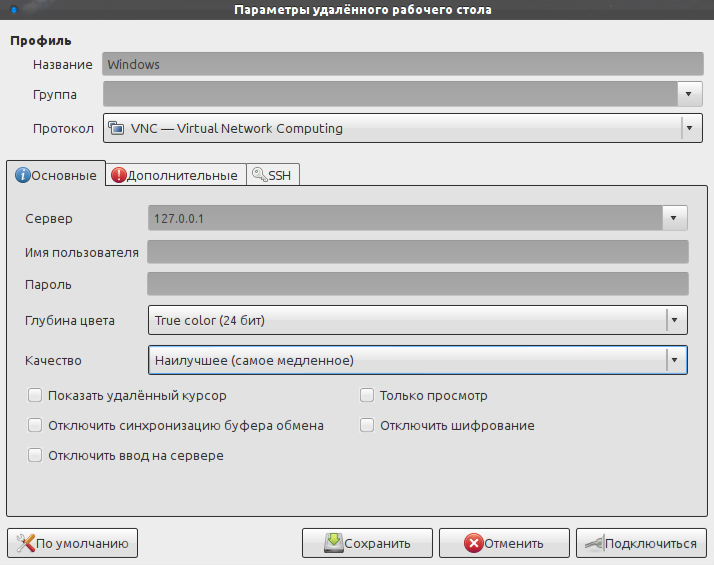
Save to save time in the future.
Immediately after connecting, we see the Windows installer. After a reboot, Remina may break the connection - just reconnect. After installation (everything is banal), install fresh drivers for your video card, and turn off Windows.
Edit the configuration file, uncomment the last line with the video card, start the virtual machine again. If the picture is frozen, and on the second monitor (it is optimal to have two monitors at hand - one for each OS) for a long time there is nothing - do the reset:
$ sudo xm reset windows And we start again, it should work.
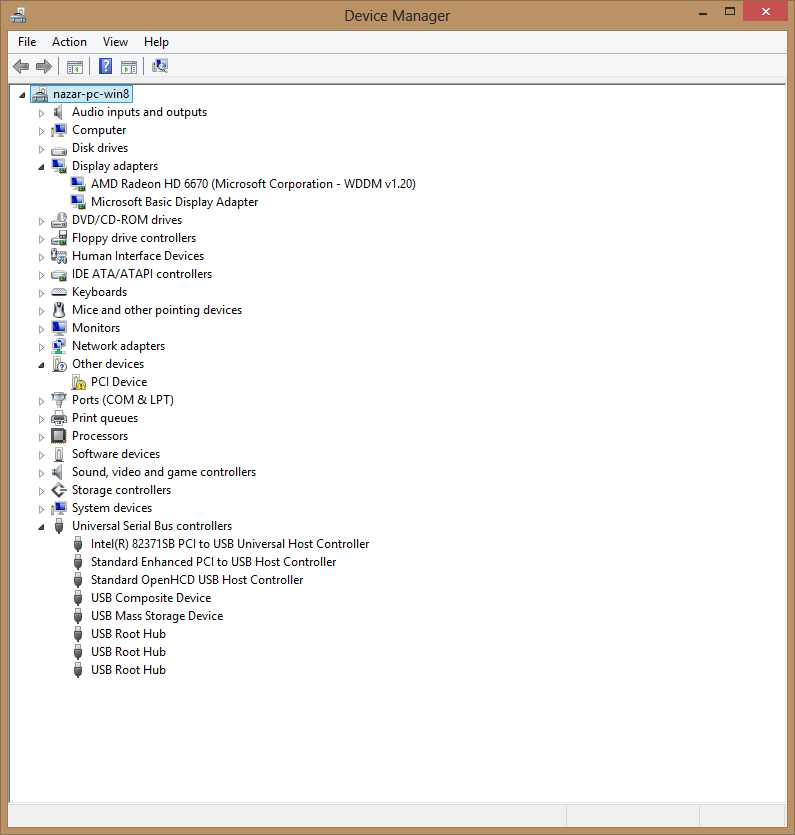
There was no sound - in the same way he forwarded one of the usb hubs with a USB sound card - and it worked.
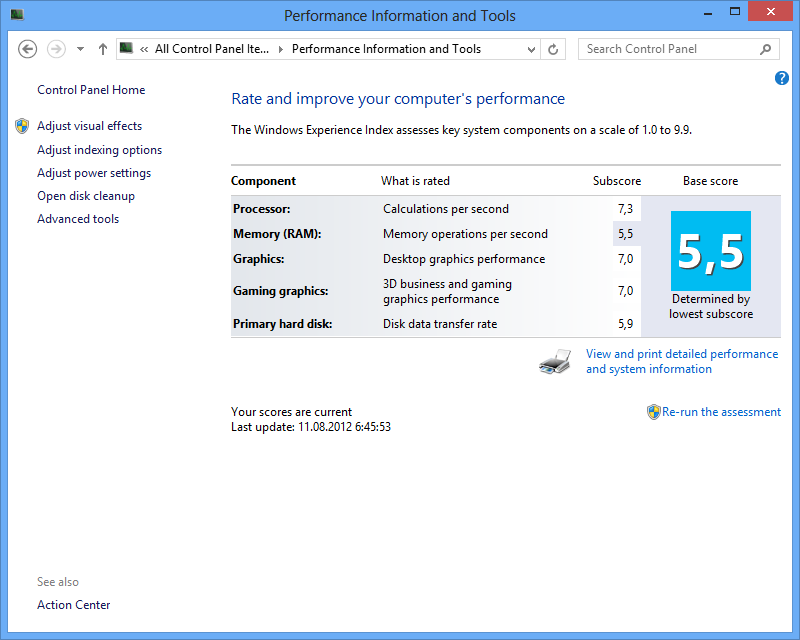
Windows 8 did not want to check performance indices, while Windows 7 showed 7.1 for 3D and 7.1 for 2D. Games, of course, work)
For convenience, you can save the domain of the virtual machine, and do not specify the path to the configuration permanently:
$ sudo xm create /media/Windows/config.cfg $ sudo xm start windows $ sudo xm shutdown -w windows $ sudo xm start windows Sources of inspiration and information:
http://help.ubuntu.ru/wiki/xen
http://umvirt.ru/node/69
http://www.virtualmin.com/documentation/cloudmin/windows
http://wiki.prgmr.com/mediawiki/index.php/Appendix_B:_The_Structure_of_the_Xen_Config_File
UPD:
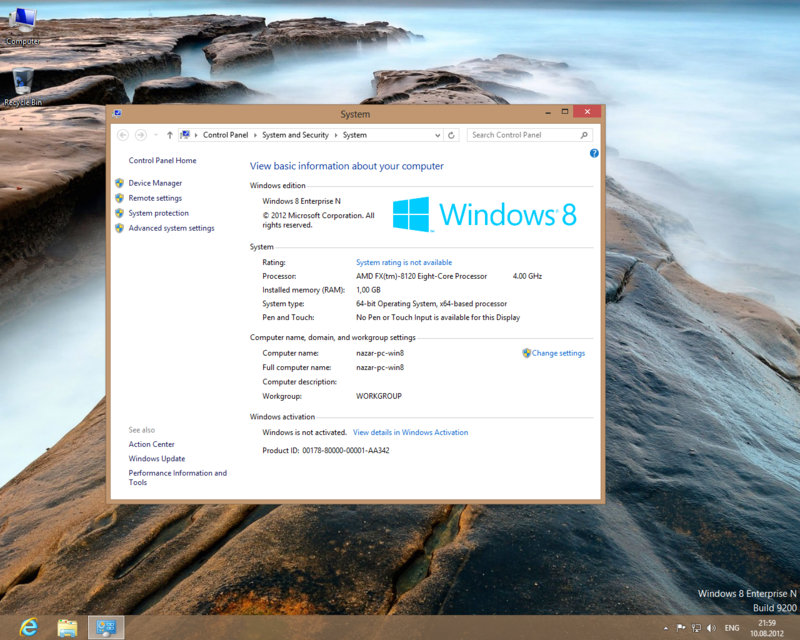
I am writing from under Windows, put another assembly, she agreed to issue an assessment of the system:
Gave the kernel and 2 GB of RAM.
The system is empty, the drivers are stock (date on video driver 06/19/2012 version 8.97.10.6).
Source: https://habr.com/ru/post/149416/
All Articles