Manage the kettle from the browser or as I did the Internet outlet
In this article I want to talk about my experience in creating a controlled outlet. Not GSM (everyone is sick of it, and it’s too easy - read the sms and pull it with pins), but controlled via a browser, using the buttons on the HTML page.
So, what path should make the signal to turn on the kettle?
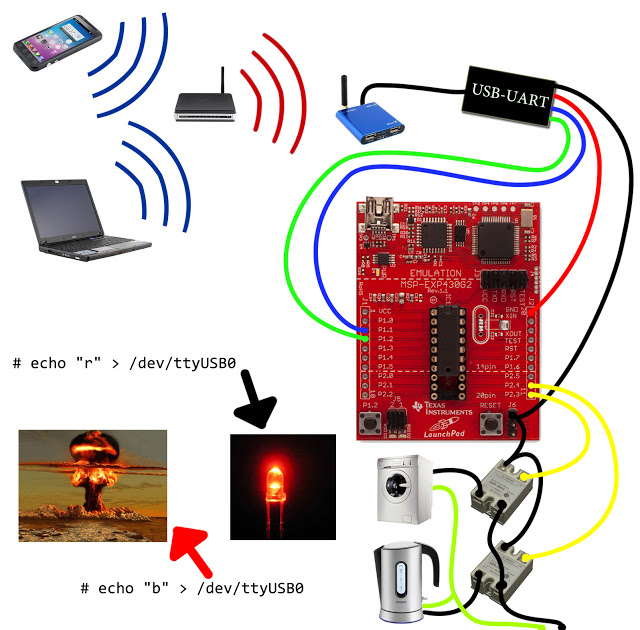
Pressing a button on the page -> clicking on a link and testing a web server -> executing a CGI script -> sending a command via a UART controller -> the appearance of voltage on the pin -> triggering a relay that turns on the kettle.
Consider everything in order.
Although no, let's start from the opposite end - the controller.
')
Physical level - we pull pins.
Under this role, the Texas board with MSP430 successfully turned up.
Under it was written the firmware in their environment Energia, which is redesigned for another controller by the editor of sketches Arduino. Yes, rejoice - the code is compatible with Arduine, and will work the same way. Looks like this:

All code can be viewed here . Carefully, there is a little bydlokoda.
And about the piece, I'll tell you now:
byte inByte = 0; // UART int status[12]; // void setup() { Serial.begin(9600);// UART pinMode(RED_LED, OUTPUT);// pinMode(6, OUTPUT);} if (Serial.available() > 0) { // , inByte = Serial.read(); // , switch (inByte){ // , : case 's': // "s", Serial.print("RED_LED:"); // , Serial.println(status[10]); // , break; case 'r': // , if (status[10] == 0) { // , , digitalWrite(RED_LED, HIGH); // status[10] = 1; } // ( ) else { digitalWrite(RED_LED, LOW); // status[10] = 0; } // ( ) break; } } } Actually, it all consists of this (to be honest, the first time I see the code for the arduino and the code editor itself, too), and I was too lazy to deal with something more difficult than the case.
It is controlled by 14 bytes, expressed for convenience in characters: 123456789nfrgs
132456789 - include, and when re-sending, turn off the pin.
n - includes all pins (from O N )
f - turns off all pins (from O F F)
s - shows what is included and what is not (from S TAT)
g - turns the green LED on or off ( G REEN)
r - red LED ... Well, you understand.
In one package, you can combine several characters, say rgs1 - turn on both LEDs, show information, and then apply voltage to the first pin.
Red-eyed
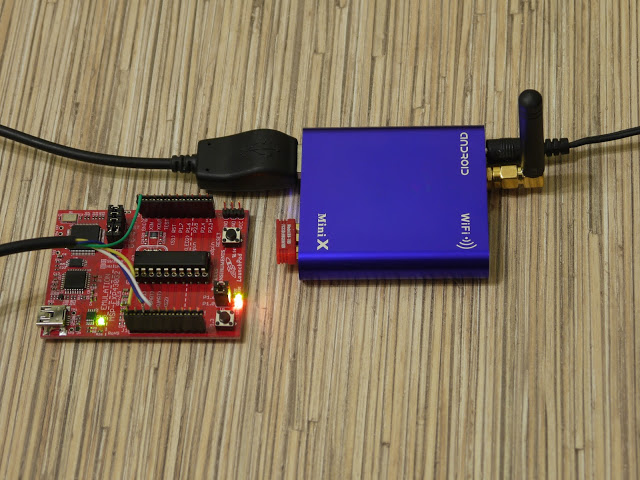
In zagashniki I found a cord from something, with the controller CP2101, which was immediately connected to the board.
No, I'm lying. We'll have to tell you about the computer.
I have a few such single-board computers, with an ARM-processor A10, and Android on board.
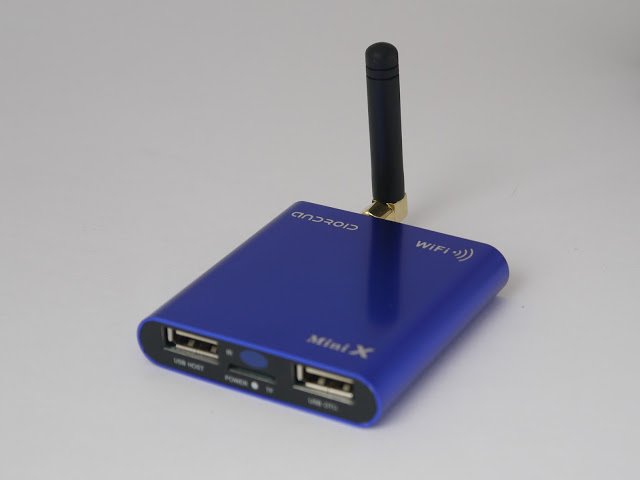
It was possible to run Linux, but I didn’t do that - I’m still watching movies on it, and in Androide it’s more convenient to do it. It took 4 hours to poke around in the output of Google, then in the giblets of the system, trying to assemble at least some module for the USB-UART converter. When I almost gave up, I came across a blog of my savior , in which he laid out two modules for Android on the A10 (he was able to build, unlike me), which were immediately loaded (insmod cp210x.ko). After that, I turned all my junk boxes upside down, but found the cord with the CP2101 converter.
We stick it into USB, with a sinking heart, we do ls / dev, and the coveted / dev / ttyUSB0 appears in the system!
This was followed by
stty -F / dev / ttyUSB0 9600 - initialize the port. it is better to perform with each formation, you never know. suddenly between parcels you pull out the lace.
/ system / bin / echo "r"> / dev / ttyUSB0 - sends a byte to the port.
And the controller accepts it, and turns on the port on which the red LED hangs.
Web and CGI
Good people told me how to transfer from the console level to the browser level. I share this sacred knowledge with you:
1) Busybox and SSH server needed. However, if you want to type scripts on the device itself, you can use the terminal emulator as well.
2) Create a directory in which we add the files:
http.cfg - web server configuration, which consists of one line: * .html: / system / bin / sh, which means that all html-files must be executed using the sh interpreter, and not just given to the user.
The script, let's call it, for example starthttpd, in which there will also be a few lines:
insmod / sdcard/www/cp210x.ko> / dev / null 2> & 1 is a line that loads the converter driver into the kernel (not to do it every time manually), and does not swear if it is there.
httpd -p12 -h / sdcard / www -c /sdcard/www/http.cfg - starts the server on port 12 (someone occupied 80), with the root folder / sdcard / www, and the config we made earlier.
and finally, the heart - index.html:
#!/bin/sh stty -F /dev/ttyUSB0 9600 # /system/bin/echo $QUERY_STRING >/dev/ttyUSB0 # , GET-. echo "Content-type: text/html" echo "" echo "<html><header></header><body>" echo "<input type=\"button\" value=\"RED_LED\" onclick=\"location.href='?r'\" />" # , (href='?r') echo "<input type=\"button\" value=\"GREEN_LED\" onclick=\"location.href='?g'\" /><p>" echo "<input type=\"button\" value=\"PIN_1.4\" onclick=\"location.href='?1'\" />" echo "<input type=\"button\" value=\"PIN_1.5\" onclick=\"location.href='?2'\" /><p>" echo "<input type=\"button\" value=\"PIN_1.7\" onclick=\"location.href='?9'\" />" echo "<input type=\"button\" value=\"PIN_2.0\" onclick=\"location.href='?3'\" /><p>" echo "<input type=\"button\" value=\"PIN_2.1\" onclick=\"location.href='?4'\" />" echo "<input type=\"button\" value=\"PIN_2.2\" onclick=\"location.href='?5'\" /><p>" echo "<input type=\"button\" value=\"PIN_2.3\" onclick=\"location.href='?6'\" />" echo "<input type=\"button\" value=\"PIN_2.4\" onclick=\"location.href='?7'\" /><p>" echo "<input type=\"button\" value=\"PIN_2.5\" onclick=\"location.href='?8'\" /><p>" echo "<input type=\"button\" value=\"ON_ALL\" onclick=\"location.href='?n'\" />" echo "<input type=\"button\" value=\"OFF_ALL\" onclick=\"location.href='?f'\" /><p>" echo "</font></pre>" echo "</body></html>" We get this menu with buttons:

It remains to remove the garbage from the table, and put it all together:
Here is a small video of the result:
Of course, the scope of application is not limited to color music. We add relays to 5v, and we get 9 remote controlled (!) Outputs from the computer that can steer anything — from lights in the toilet and office lights to air conditioners and power panels.
And you can also forward ssh to the server, and do it all the same, but from any place where there is internet.
Source: https://habr.com/ru/post/149289/
All Articles