WP Creator Calculator 3.0 - creating calculators
A new version of the plugin has been released! Version 3.5.
A new version of the plugin for WordPress, which allows you to create flexible forms of the calculator.
')
Major changes:
Demo calculator
The principle of the calculator:
field1 + (field 3 * (field 2 + field 4))
Verbatim:
(id1 (sign after the field)) (sign in front of the field id3 sign after the field) (sign in front of the field id2 sign after the field) (id4 signs after the field)
Parsing the calculator menu:

Text block:

Title - The text that is displayed above the block
Text - any text, it is possible to use HTML, thereby allowing the calculator form to accept any design.
You can also output values from $ _SESSION directly in the text using the codes [session id = "ID_CALC"] ID_ROW or sum calc [/ session]. More about sessions in the $ _SESSION section.
SELECT list

Title - The text that is displayed above the list.
Signs up - here you need to specify an arithmetic sign that will set the action before the drop-down list.
Signs after - here you need to specify an arithmetic sign that will set the action after the drop-down list.
List - to create a drop-down list, you need to arrange the data according to certain rules. For example - [price]: name; [500]: Installation of windows; [0]: Zero;
Checkbox

Title - The text that is displayed above the checkbox
Signs up - here you need to specify an arithmetic sign that will set the action before the checkbox.
Signs after - here you need to specify an arithmetic sign that will set the action after the checkbox.
Default value - if the checkbox is not selected, which default value is assigned to it. Assumed to be used for formulas with multiplication and division, to avoid errors in the calculation.
The price of the field is the cost of the field; when selecting the checkbox, this price will be substituted.
ps In checkboxes, unlike in the previous version, the list building function has been removed, because This caused many problems in the calculations. Now, in order to consistently build several checkboxes in a row, you can use CSS to arrange them as you need. More on CSS structure below.
Radio buttons
Title - The text that is displayed above the Radio buttons block.
Signs up - here you need to specify an arithmetic sign that will set the action before the block of Radio buttons.
Signs after - here you need to specify an arithmetic sign that will set the action after the block of Radio buttons.
List - to create a list of Radio buttons, you need to arrange the data according to certain rules! For example - [price]: name; [500]: Installation of windows; [0]: Zero;
ps Checked is installed on the first Radio button in the list.
Text field

Title - The text that is displayed above the field
Signs up - here you need to specify an arithmetic sign that will set the action in front of the text field.
Signs after - here you need to specify an arithmetic sign that will set the action after the text field.
Default value - if nothing is hammered into the field, then what default value is assigned to it. Assumed to be used for formulas with multiplication and division, to avoid errors in the calculation.
The price of the field is the cost of the field. The data entered by the user will be multiplied or divided (depending on what you indicate in the field “Action with data”) by this price.
Action with data - the arithmetic sign indicated here will be substituted between the data entered by the user (or the default field value) and the field price.
ps Note that the user can still enter 0, and if you have a division before that, an error will occur. To avoid it, think carefully about the formula.
Hidden field

Signs up - here you need to specify an arithmetic sign that will set the action in front of a hidden field.
Signs after - here you need to specify an arithmetic sign that will set the action after the hidden field.
The price of the field is the cost of the field.
$ _SESSION field

Signs up - here you need to specify an arithmetic sign that will set the action before the $ _SESSION field.
Sign after - here you need to specify an arithmetic sign that will set the action after the $ _SESSION field.
The default value is if the session you specified is empty, this value will be accepted.
Calculator ID - from which calculator you need to take data. More information about the structure of the array $ _SESSION below.
Field ID or sum - from which field ID you need to receive data, or specify sum to get the total cost of calculating the calculator.
jQuery field

This field copies the data that the user entered into the text field. By keyUp event. This field is hidden (input hidden).
Signs up - here you need to specify an arithmetic sign that will set the action in front of the jQuery field.
Sign after - here you need to specify an arithmetic sign that will set the action after the jQuery field.
Default value - if nothing is hammered into the field, then what default value is assigned to it. Assumed to be used for formulas with multiplication and division, to avoid errors in the calculation.
Field ID - from which text field to copy data.
Design customization

You can choose ready-to-use calculator designs.
1. Without design - empty css
2. Skeleton - no images, but with ordered blocks
3. Minimalism - A simple design that can fit any site layout.
All themes are in the plugin folder / theme
The plug-in folder contains the file example.css, which contains all the styles for the calculator, sending mail and the widget.
Setting up letters
New feature in the calculator for numerous requests. So far, at the testing stage.
If you enable this function in the settings, after the calculation, the visitor will be asked to send a letter to the site administrator with his personal data: name, phone, mail, comment, amount of calculation.
You can change all messages, letter text, and field names as you like.
The following settings are available:
Enable sending emails? - Yes or no
Subject - The text that will be specified in the subject line of the letter. The following data is added to the topic: Your subject letter + from name
Text in the letter - Text in the letter to be sent, followed by the user data
Text before the submission form - the displayed text before the data entry form
Successful send message - the text that will be displayed after the successful sending of the letter
On which E-Mail to send the letter - specify the email, the default data from the blog is admin_email
Name field Last name, Contact field E-Mail, Contact phone number field, Comment field - as these fields are called, are displayed before user input. If the field needs to be hidden leave it blank.
Filtering data before sending:
Error: Do not enter a name - the displayed error, if the name is empty
Error: Long Name - the displayed error, if the name is more than 100 characters
Error: Did not enter Email - displayed error if you did not enter mail
Error: Incorrect Email - the displayed error, if you entered a non-email (standard validation)
Error: Incorrect phone - the displayed error, if the phone contains invalid characters, valid - (numbers, space, dashes, brackets)
Error: Long Phone — The displayed error is if the phone exceeds 35 characters.
Error: Long Comment - the displayed error if the comment exceeds 2500 characters
Calculator settings (individual for each calculator, except for some fields)
Name of the calculation button - the text data is supplied in the value of the calculation button
Text in front of the sum - the displayed text in front of the sum of calculation
Text after amount - displayed text after calculation amount
Enable AJAX Calculator? - makes it possible to calculate without reloading pages
Action forms - the address of the page where the user will be redirected after clicking the calculation button
Memorize selected data in the form - allows you to memorize the entered or selected data by the user in the form after pressing the calculation button
Connect jQuery - this setting applies to all calculators, if you still have not connected the jQuery library to the site, select this option as Yes. Enabled by default. The connection is made using the wp_enqueue_script ("jquery") function through init actions
Start $ _SESSION - this setting applies to all calculators, if no sessions are running on your site, then this function starts with the function session_start (); through the action init.
In the same section of the menu you can permanently delete the calculator and all of its fields.
Calculator paragraphs:
The top field displays the selected settings from the menu.
Paragraph Fields added:
Displays which fields have been added to the selected calculator.
Showing their ID and name
To edit the desired field, click on the plus sign next to it, its settings will open
To swap fields, click on the field you want and hold the mouse button down and drag it to the right place.
Paragraph Text Formula:

Displays the ID of the added fields and their arithmetic values before and after.
This paragraph makes it easy to find errors in your formula.
Paragraph Preview calculator:
Displays the form of the calculator you created.
Also in this section, if the AJAX calculation function is not enabled, $ _SESSION data and sorted arrays by keys (by sorting) are displayed, which receives the calculator for calculation and substitutes the data in eval ();
CSS structure
HTML structure
How to insert a calculator on the site
The code for your theme files:
Shortcode for pages and posts: [wpcc id = "X"]
where X is the ID of the calculator you want to display.
$ _SESSION structure
Before each calculation, the $ _SESSION of the current calculator is deleted — unset ($ _ SESSION ['wpcc _'. $ Wpcc_id]);
Array structure
Installation:
1. Download plugin - wordpress.org/extend/plugins/wp-creator-calculator
2. Upload wp-content / plugins / to the plugins folder of your site
3. Activate the plugin
4. On the left in the administrative panel menu, select WPCC
5. Create and customize your calculator.
A new version of the plugin has been released! Version 3.5.
A new version of the plugin for WordPress, which allows you to create flexible forms of the calculator.
')
Major changes:
- Completely rewritten the algorithm for constructing the formula
- Simplified admin panel
- Added function AJAX calculations
- Added the ability to send settlement letters
- Fixed all the shortcomings and errors of the previous version
- Changed how Checkbox works
- Added default values to avoid “Division by zero” errors
- The selected values are remembered in the form after calculation
- JQuery field added
- Added Calculator Widget
- Removed extra fields: Sort (now just sort by mouse, Drag and Drop), CSS (each block has a unique class)
- Changed the structure of the table in the database
Note
1. The new version of the plugin database is not compatible with previous versions of the <3.0 plugin.
1.1 In the new version of the plugin, you can view data from an obsolete database if it exists.
2. All settings for each calculator are individual.
1.1 In the new version of the plugin, you can view data from an obsolete database if it exists.
2. All settings for each calculator are individual.
Demo calculator
The principle of the calculator:
field1 + (field 3 * (field 2 + field 4))
Verbatim:
(id1 (sign after the field)) (sign in front of the field id3 sign after the field) (sign in front of the field id2 sign after the field) (id4 signs after the field)
Parsing the calculator menu:
Text block:
Title - The text that is displayed above the block
Text - any text, it is possible to use HTML, thereby allowing the calculator form to accept any design.
You can also output values from $ _SESSION directly in the text using the codes [session id = "ID_CALC"] ID_ROW or sum calc [/ session]. More about sessions in the $ _SESSION section.
SELECT list
Title - The text that is displayed above the list.
Signs up - here you need to specify an arithmetic sign that will set the action before the drop-down list.
Signs after - here you need to specify an arithmetic sign that will set the action after the drop-down list.
List - to create a drop-down list, you need to arrange the data according to certain rules. For example - [price]: name; [500]: Installation of windows; [0]: Zero;
Checkbox
Title - The text that is displayed above the checkbox
Signs up - here you need to specify an arithmetic sign that will set the action before the checkbox.
Signs after - here you need to specify an arithmetic sign that will set the action after the checkbox.
Default value - if the checkbox is not selected, which default value is assigned to it. Assumed to be used for formulas with multiplication and division, to avoid errors in the calculation.
The price of the field is the cost of the field; when selecting the checkbox, this price will be substituted.
ps In checkboxes, unlike in the previous version, the list building function has been removed, because This caused many problems in the calculations. Now, in order to consistently build several checkboxes in a row, you can use CSS to arrange them as you need. More on CSS structure below.
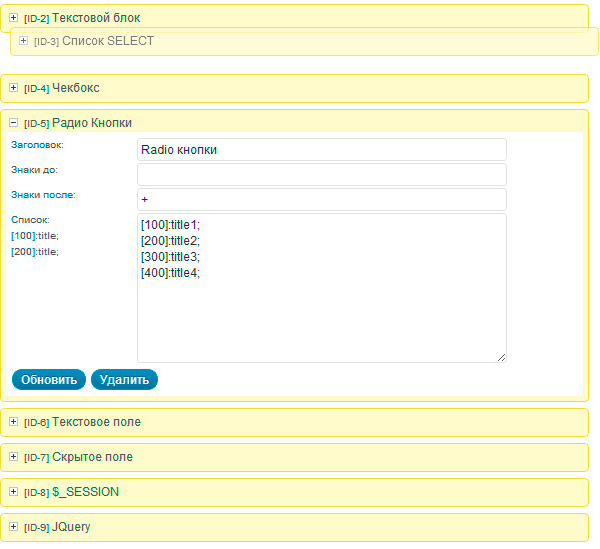
Radio buttons
Title - The text that is displayed above the Radio buttons block.
Signs up - here you need to specify an arithmetic sign that will set the action before the block of Radio buttons.
Signs after - here you need to specify an arithmetic sign that will set the action after the block of Radio buttons.
List - to create a list of Radio buttons, you need to arrange the data according to certain rules! For example - [price]: name; [500]: Installation of windows; [0]: Zero;
ps Checked is installed on the first Radio button in the list.
Text field
Title - The text that is displayed above the field
Signs up - here you need to specify an arithmetic sign that will set the action in front of the text field.
Signs after - here you need to specify an arithmetic sign that will set the action after the text field.
Default value - if nothing is hammered into the field, then what default value is assigned to it. Assumed to be used for formulas with multiplication and division, to avoid errors in the calculation.
The price of the field is the cost of the field. The data entered by the user will be multiplied or divided (depending on what you indicate in the field “Action with data”) by this price.
Action with data - the arithmetic sign indicated here will be substituted between the data entered by the user (or the default field value) and the field price.
ps Note that the user can still enter 0, and if you have a division before that, an error will occur. To avoid it, think carefully about the formula.
Hidden field
Signs up - here you need to specify an arithmetic sign that will set the action in front of a hidden field.
Signs after - here you need to specify an arithmetic sign that will set the action after the hidden field.
The price of the field is the cost of the field.
$ _SESSION field
Signs up - here you need to specify an arithmetic sign that will set the action before the $ _SESSION field.
Sign after - here you need to specify an arithmetic sign that will set the action after the $ _SESSION field.
The default value is if the session you specified is empty, this value will be accepted.
Calculator ID - from which calculator you need to take data. More information about the structure of the array $ _SESSION below.
Field ID or sum - from which field ID you need to receive data, or specify sum to get the total cost of calculating the calculator.
jQuery field
This field copies the data that the user entered into the text field. By keyUp event. This field is hidden (input hidden).
Signs up - here you need to specify an arithmetic sign that will set the action in front of the jQuery field.
Sign after - here you need to specify an arithmetic sign that will set the action after the jQuery field.
Default value - if nothing is hammered into the field, then what default value is assigned to it. Assumed to be used for formulas with multiplication and division, to avoid errors in the calculation.
Field ID - from which text field to copy data.
Design customization
You can choose ready-to-use calculator designs.
1. Without design - empty css
2. Skeleton - no images, but with ordered blocks
3. Minimalism - A simple design that can fit any site layout.
All themes are in the plugin folder / theme
The plug-in folder contains the file example.css, which contains all the styles for the calculator, sending mail and the widget.
Setting up letters
Screenshot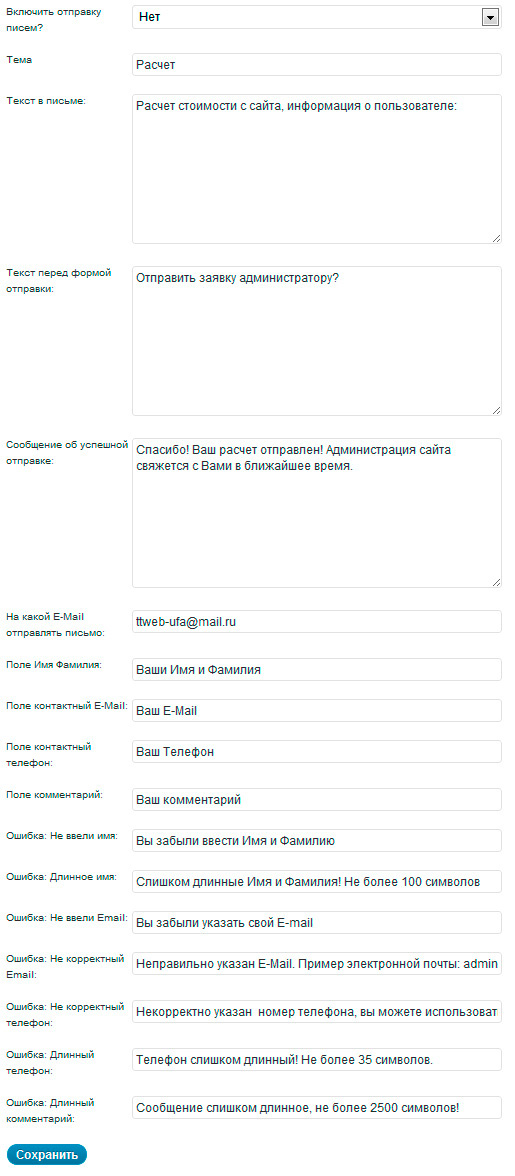
New feature in the calculator for numerous requests. So far, at the testing stage.
If you enable this function in the settings, after the calculation, the visitor will be asked to send a letter to the site administrator with his personal data: name, phone, mail, comment, amount of calculation.
You can change all messages, letter text, and field names as you like.
The following settings are available:
Enable sending emails? - Yes or no
Subject - The text that will be specified in the subject line of the letter. The following data is added to the topic: Your subject letter + from name
Text in the letter - Text in the letter to be sent, followed by the user data
Text before the submission form - the displayed text before the data entry form
Successful send message - the text that will be displayed after the successful sending of the letter
On which E-Mail to send the letter - specify the email, the default data from the blog is admin_email
Name field Last name, Contact field E-Mail, Contact phone number field, Comment field - as these fields are called, are displayed before user input. If the field needs to be hidden leave it blank.
Filtering data before sending:
Error: Do not enter a name - the displayed error, if the name is empty
Error: Long Name - the displayed error, if the name is more than 100 characters
Error: Did not enter Email - displayed error if you did not enter mail
Error: Incorrect Email - the displayed error, if you entered a non-email (standard validation)
Error: Incorrect phone - the displayed error, if the phone contains invalid characters, valid - (numbers, space, dashes, brackets)
Error: Long Phone — The displayed error is if the phone exceeds 35 characters.
Error: Long Comment - the displayed error if the comment exceeds 2500 characters
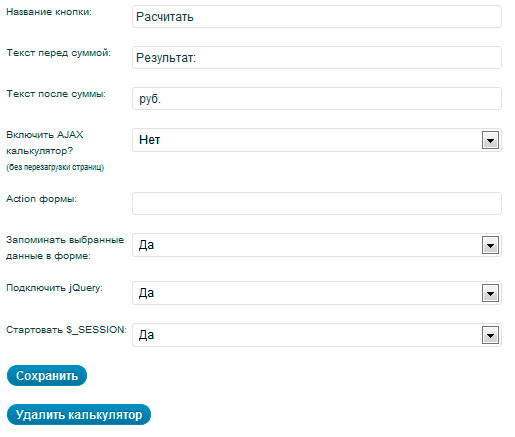
Calculator settings (individual for each calculator, except for some fields)
Name of the calculation button - the text data is supplied in the value of the calculation button
Text in front of the sum - the displayed text in front of the sum of calculation
Text after amount - displayed text after calculation amount
Enable AJAX Calculator? - makes it possible to calculate without reloading pages
Action forms - the address of the page where the user will be redirected after clicking the calculation button
Memorize selected data in the form - allows you to memorize the entered or selected data by the user in the form after pressing the calculation button
Connect jQuery - this setting applies to all calculators, if you still have not connected the jQuery library to the site, select this option as Yes. Enabled by default. The connection is made using the wp_enqueue_script ("jquery") function through init actions
Start $ _SESSION - this setting applies to all calculators, if no sessions are running on your site, then this function starts with the function session_start (); through the action init.
In the same section of the menu you can permanently delete the calculator and all of its fields.
Calculator paragraphs:
The top field displays the selected settings from the menu.
Paragraph Fields added:
Displays which fields have been added to the selected calculator.
Showing their ID and name
To edit the desired field, click on the plus sign next to it, its settings will open
To swap fields, click on the field you want and hold the mouse button down and drag it to the right place.
Paragraph Text Formula:
Displays the ID of the added fields and their arithmetic values before and after.
This paragraph makes it easy to find errors in your formula.
Paragraph Preview calculator:
Screenshot
Displays the form of the calculator you created.
Also in this section, if the AJAX calculation function is not enabled, $ _SESSION data and sorted arrays by keys (by sorting) are displayed, which receives the calculator for calculation and substitutes the data in eval ();
CSS structure
/* ID-calc - ID-row - */ /* Calculator Class */ /* wpcc, wpcc_ID-calc */ .wpcc {} /* wpcc_form, wpcc_ID-calc */ .wpcc_form {} /* wpcc_description, wpcc_description_ID-row */ .wpcc_description {} /* wpcc_text, wpcc_text_ID-row */ .wpcc_text {} /* wpcc_select, wpcc_select_ID-row */ .wpcc_select {} /* wpcc_checkbox, wpcc_checkbox_ID-row */ .wpcc_checkbox {} /* wpcc_radio, wpcc_radio_ID-row */ .wpcc_radio {} /* wpcc_inputtext, wpcc_inputtext_ID-row */ .wpcc_inputtext {} /* wpcc_submit, wpcc_submit_ID-calc */ .wpcc_submit {} /* wpcc_result_block, wpcc_result_block_ID-calc */ .wpcc_result_block {} /* wpcc_result, wpcc_result_ID-calc */ .wpcc_result {} /* Mail Class */ /* wpcc_mail_info, wpcc_mail_info_ID-calc */ .wpcc_mail_info {} /* wpcc_mail, wpcc_mail_ID-calc */ .wpcc_mail {} /* wpcc_mail_form, wpcc_mail_form_ID-calc */ .wpcc_mail_form {} /* wpcc_mail_sum, wpcc_mail_sum_ID-calc */ .wpcc_mail_sum {} /* wpcc_mail_text */ .wpcc_mail_text {} /* wpcc_mail_row */ .wpcc_mail_row {} /* wpcc_mail_author */ .wpcc_mail_author {} /* wpcc_mail_email */ .wpcc_mail_email {} /* wpcc_mail_phone */ .wpcc_mail_phone {} /* wpcc_mail_textarea */ .wpcc_mail_textarea {} /* wpcc_mail_send */ .wpcc_mail_send {} /* Widget class */ .wpcc_widget {}, .wpcc_widget_ID-calc {} HTML structure
<!-- calculator --> <div class="wpcc wpcc_1"> <form method="POST" action="" class="wpcc_form_1"> <div class="wpcc_description wpcc_description_2"> </div> <div class="wpcc_text wpcc_text_2"> , </div> <div class="wpcc_description wpcc_description_3"> </div> <select name="wpcc_structure[3]" class="wpcc_select wpcc_select_3"> <option value="100" selected>title1</option> <option value="200">title2</option> <option value="300">title3</option> <option value="400">title4</option> </select> <div class="wpcc_description wpcc_description_4"></div> <input type="checkbox" name="wpcc_structure[4]" value="100" class="wpcc_checkbox wpcc_checkbox_4" > <div class="wpcc_description wpcc_description_5"></div> <label><input type="radio" name="wpcc_structure[5]" value="100" class="wpcc_radio wpcc_radio_5" checked> title1</label> <label><input type="radio" name="wpcc_structure[5]" value="200" class="wpcc_radio wpcc_radio_5" > title2</label> <div class="wpcc_description wpcc_description_6"> </div> <input type="text" name="wpcc_structure_inputtext[6]" value="100" class="wpcc_inputtext wpcc_inputtext_6" id="wpcc_jq_6"> <input type="hidden" name="wpcc_structure[7]" value="500"> <input type="hidden" name="wpcc_structure[8]" value=""> <script>jQuery(document).ready(function( $ ) { $("#wpcc_jq_6").keyup(function(){ $("#wpcc_jq_get_9").val($(this).val()); }); });</script> <input type="hidden" id="wpcc_jq_get_9" name="wpcc_structure[9]" value=""> <input type="hidden" name="wpcc_structure_id" value="3,4,5,7,8,9"> <input type="submit" value="" name="wpcc_calculate" class="wpcc_submit wpcc_submit_1"> </form> <div class="wpcc_result_block wpcc_result_block_1"> <div class="wpcc_result wpcc_result_1">: 1006 .</div> </div> </div> <!-- mail --> <div class="wpcc_mail_info wpcc_mail_info_1" style="display:none;"></div> <div class="wpcc_mail wpcc_mail_1"> <form method="post" action="#wpcc_mail_ancor_1" class="wpcc_mail_form wpcc_mail_form_1"> <div class="wpcc_mail_sum">: 23255 .</div> <div class="wpcc_mail_text"> ?</div> <div class="wpcc_mail_row"><b> </b><input type="text" name="mail_author" class="wpcc_mail_author" value=""></div> <div class="wpcc_mail_row"><b> E-Mail</b><input type="text" name="mail_email" class="wpcc_mail_email" value=""></div> <div class="wpcc_mail_row"><b> </b><input type="text" name="mail_phone" class="wpcc_mail_phone" value=""></div> <div class="wpcc_mail_row"><b> </b><textarea name="mail_text" class="wpcc_mail_textarea" maxlength="2500"></textarea></div> <input type="hidden" name="wpcc_mail_sum" value="23255"> <input type="hidden" name="wpcc_mail_send_id" value="1"> <input type="submit" name="wpcc_mail_send" class="wpcc_mail_send wpcc_mail_send_1" value=""> </form> </div> /* Widget */ <div class="wpcc_widget wpcc_widget_1"> <!-- HTML --> </div> How to insert a calculator on the site
The code for your theme files:
echo do_shortcode('[wpcc id="X"]'); Shortcode for pages and posts: [wpcc id = "X"]
where X is the ID of the calculator you want to display.
$ _SESSION structure
Before each calculation, the $ _SESSION of the current calculator is deleted — unset ($ _ SESSION ['wpcc _'. $ Wpcc_id]);
Array ( [wpcc_1] => Array // wpcc_ID ( [3] => 100 // 3 - id [5] => 100 [7] => 100 [8] => 22509 [9] => 1 [4] => 100 [6] => 123 // , [6_sum] => 223 // [sum] => 23133 // ) ) Array structure
Array ( [1] => 100+ // 1 ID , 100 + [3] => 100+ [4] => 100+ [5] => (123+100)+ // , 123 , , (+) , 100 [6] => 100+ [7] => 23255+ [8] => 123 ) Installation:
1. Download plugin - wordpress.org/extend/plugins/wp-creator-calculator
2. Upload wp-content / plugins / to the plugins folder of your site
3. Activate the plugin
4. On the left in the administrative panel menu, select WPCC
5. Create and customize your calculator.
A new version of the plugin has been released! Version 3.5.
Source: https://habr.com/ru/post/149208/
All Articles