Subaru and Arduino: SSM1 protocol. Handshake
Initial data
- Subaru Forester born in 1998
- Carduino nano v7
- Three kilos of curiosity
Recently came to me a board called Carduino Nano v7. And somehow it so happened that around the same time, on the panel of my car, I was surprised to find a Check Engine light bulb. “This is zhzhzhzhzh is no accident” - I thought, and went deep in search. It turned out that errors can be read without additional devices - self-diagnosis in Forester is very simple and accessible to anyone. And then the Arduino? And despite the fact that the direct result of the search for information on diagnostics was the discovery of the existence of such a funny thing as the Subaru Select Monitor version 1, whose support for the protocol (the funny thing) is equipped with old Subaru cars, even before the K-line appeared in them. It is to such cars and applies my Forester. So I got a mischievous little thought - to realize some kind of on-board computer on the Arduino. I saw similar projects with an appeal to the K-line, but with SSM1 - only a couple of videos on YouTube, no specifics. So you have to do everything yourself.
Brief Description of the SSM1 Protocol
The exchange rate is 1953 baud (1953-8 E 1). The computer accepts the command to read the data and begins to pour back data from the requested address until it receives the command to stop. To write data to the address, you must first read the data at the same address. To request an ECU ID, you must first read the data from any address.
')
Teams

In response to the commands to read and write data, the following data packet arrives:

Forester again
Despite the fact that there is an OBD2 connector in my car, it has the complete absence of a K-line contact.
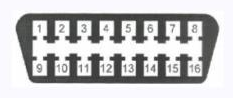
- Pin 4 - body ground
- Pin 5 - Signal Ground
- Pin 6 - CAN-High Line, J-2284
- Pin 7 - K-line diagnostics (ISO 9141-2 and ISO / DIS 14230-4)
- Pin 9 - SSM Clock
- Pin 11 - SSM Clock
- Pin 12 - SSM to ECM - data line from the SSM dealer diagnostic tool to the ECU
- Pin 13 - ECM to SSM - data line from ECU to dealer SSM diagnostic device
- Pin 14 - CAN-Low Line, J-2284
- Pin 15 - L-line diagnostics (ISO 9141-2 and ISO / DIS 14230-4)
- Pin 16 - power +12 from the battery
In the connector of my car 4 contacts are involved - 4,5,12,13 and 16.
One, two, three, four, five - we start to match
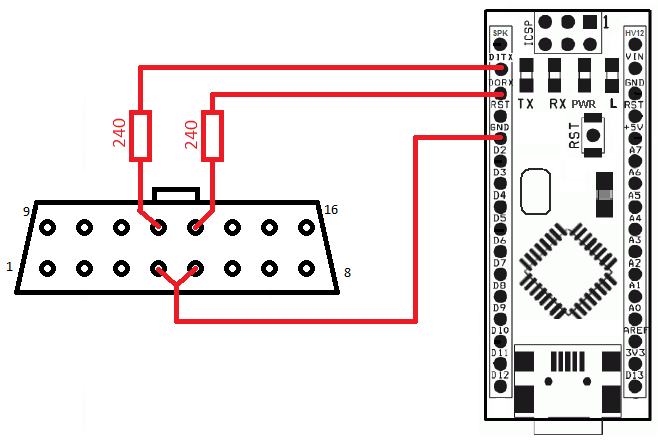
The OBD2 connector donor was the ELM327 adapter, purchased from the Chinese brothers, but absolutely useless for my Forester. An autopsy revealed that almost all legs, except for those that need, are unsoldered for use in ELM itself. In order not to burn the ports on the Arduin, we will connect the legs with the data (12 and 13) through resistors - I used 240 Ohm resistors. Earth connect to both feet to the ground (4 and 5). For the time being, we will power the Arduino from the cigarette lighter via a USB adapter.
So, use 3 wires:
In theory, it would be possible to stop at this, sew a sketch of the type in Arduino
void setup() { pinMode(0, INPUT); pinMode(1, OUTPUT); } void loop() { } and, connecting the Arduino to the laptop, use it as a regular USB Subaru lanyard with programs like EvoScan and SelectMonitor. But the main idea was exactly the onboard computer, so let's continue.
Compose a sketch
Since the title of this article contains the word “handshake”, we restrict ourselves to the handshake between Forester and Arduino - we will read the car's ROM ID. In order to limit the already assembled design, the read ROM ID is “flushed” with the built-in Arduino LED, designating 1 as a long flash, and 0 as two short flashes.
So, by action:
- Set the exchange mode UART 1953-8E1
- For 3 seconds, light the LED
- Turn off the LED and wait 2 seconds
- We are requesting a ROM ID
- We flash ROM ID with Arduino integrated LED
I had to google a little more, how to explain Arduino, that I needed parity, and, as a result, I got this sketch:
int led = 13; void setup() { byte romid[3]; // Serial.begin(1953); // : Even Parity UCSR0C = ( UCSR0C & ~_BV(UPM00) | _BV(UPM01) ); pinMode(led, OUTPUT); // 3 digitalWrite(led, HIGH); delay(3000); // 2 digitalWrite(led, LOW); delay(2000); if (ECU_GetROMID(romid)) // ROM ID - , { for (int i=0;i<3;i++) { show_byte(romid[i]); // } } } void loop() { // } void show_byte(byte b) { for (int i=7;i>=0;i--) { if (bitRead(b,i)==1) { digitalWrite(led, HIGH); delay(1000); digitalWrite(led, LOW); delay(1000); } else { digitalWrite(led, HIGH); delay(300); digitalWrite(led, LOW); delay(200); digitalWrite(led, HIGH); delay(300); digitalWrite(led, LOW); delay(1200); } } } void ECU_Stop() { byte txbuf[4]={0x12,0x00,0x00,0x00}; Serial.write(txbuf[0]); Serial.write(txbuf[1]); Serial.write(txbuf[2]); Serial.write(txbuf[3]); delay(50); Serial.flush(); } boolean ECU_GetROMID(byte * buffer) { char readCmd[4] ={0x78,0x00,0x00,0x00}; char romidCmd[4]={0x00,0x46,0x48,0x49}; char romid[3] ={0}; ECU_Stop(); Serial.write(readCmd[0]); Serial.write(readCmd[1]); Serial.write(readCmd[2]); Serial.write(readCmd[3]); int retries = 0; while (retries<8) { int nbytes = Serial.readBytes(romid,3); if ((nbytes == 3) && (romid[0]!=0x00)) break; Serial.write(romidCmd[0]); Serial.write(romidCmd[1]); Serial.write(romidCmd[2]); Serial.write(romidCmd[3]); ++retries; } ECU_Stop(); buffer[0] = romid[0]; buffer[1] = romid[1]; buffer[2] = romid[2]; if (romid[0] == 0x00) { return false; } return true; } Result
Fill this sketch in the Arduino, go down to the car, connect the OBD2 connector, turn on the ignition, power on the Arduino and ... begin to drive in the toes and edinichki into the phone, because they did not take anything else with them. Arduino cheerfully missed the
1010 0011 0000 0001 0001 0111 combination, which, when translated into universal, means 0xA30117 - this is my Forester's ROM ID. “Well, hello, 0xA30117! And my name is Roman. "Afterword
Unfortunately, for most vehicles with SSM1 support, at best, only 18 addresses of important parameters are known - such as battery voltage, engine speed and so on. Therefore, the work is still plowed field - read memory dump, search for addresses with errors, etc. Well then - there is still something to strive for ...
Materials used
SSM1 Protocol Information
Discussion SSM1, information about the schemes of adapters RS232-SSM1 and USB-SSM1
Source: https://habr.com/ru/post/149182/
All Articles