Creating and registering the Metro style component for WinRT
 The official release of Windows 8 is approaching every day, and more and more developers are thinking about creating their own Metro style app. And if you make several such applications at once, then most likely you will need to use the same code in different projects.
This article provides step-by-step instructions for creating a simple Metro style component, as well as features for registering such a library for future use in WinRT projects.
As an example of a component, we chose an animated Metro style download indicator, similar to the one that many of us have already seen in the new version of Windows. By the end of this article, you will not only know everything about the registration of components, but also be able to add a ready download indicator to your Metro app.
')
System requirements
If you have not had time to write your first program for Windows 8, then make sure that your development environment meets the following requirements:
- Development should be carried out in the operating system Windows 8 . At the time of this writing, Windows 8 is available in the Release Preview stage and can be downloaded from this link:
http://windows.microsoft.com/ru-RU/windows-8/download - For development, you will need the Visual Studio 2012 development environment , which is currently in the Release Candidate stage and is available for download from http://www.microsoft.com/visualstudio/11/ru-ru/downloads .
If you are not able to use the professional version of Visual Studio, you can always install Visual Studio Express 2012 for Windows 8 for free. In this article, all actions will be given for the interface of the professional version of Visual Studio 2012.
Creating a library
So, we launched Visual Studio 2012 and are ready to make our first Metro-style component.
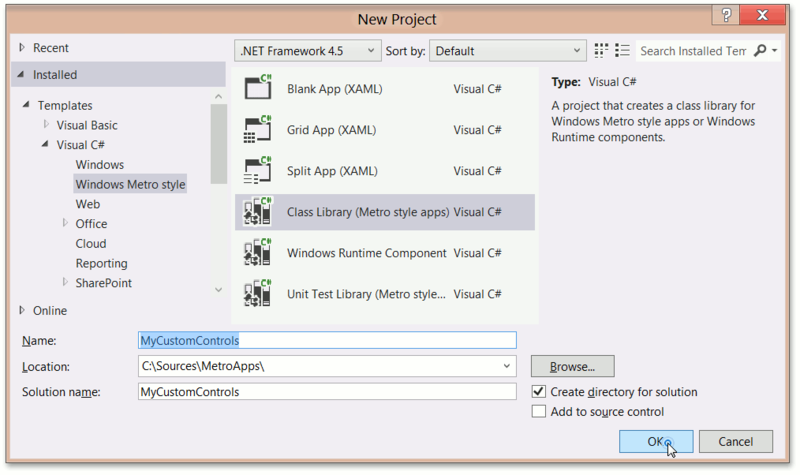
To do this, create a new project of type Class Library (Metro style apps) and call it MyCustomControls :
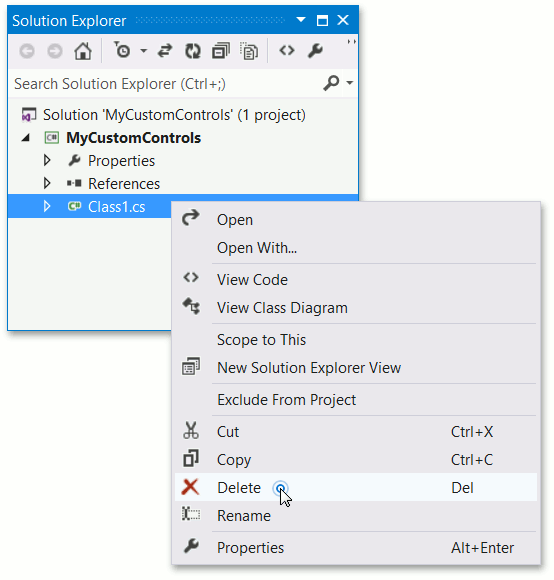
As a result, an empty project with one class will be created. Since in our case this class will not be needed, we will delete the Class1.cs file from the project:
Then add the stock to our future component. To do this, in the Add New Item dialog, select the new template - Templated Control - and give it the name MyCustomControl :

After these actions, two new files will appear in the project:
- MyCustomControl.cs , which contains the definition of our component as a descendant from the control:
namespace MyCustomControls { public sealed class MyCustomControl : Control { public MyCustomControl() { this.DefaultStyleKey = typeof(MyCustomControl); } } }
Replace it with the code below:namespace MyCustomControls { public sealed class MyCustomControl : Control { const double radius = 30; public static readonly DependencyProperty DataProperty = DependencyProperty.Register("Data", typeof(Geometry), typeof(MyCustomControl), new PropertyMetadata(null)); public Geometry Data { get { return (Geometry)GetValue(DataProperty); } set { SetValue(DataProperty, value); } } DispatcherTimer timer; double progress = 0.0; Size arrangeSize = new Size(0, 0); DateTime lastTime = DateTime.Now; public MyCustomControl() { this.DefaultStyleKey = typeof(MyCustomControl); timer = new DispatcherTimer(); timer.Tick += timer_Tick; timer.Interval = TimeSpan.FromMilliseconds(5); timer.Start(); } void timer_Tick(object sender, object e) { DateTime time = DateTime.Now; progress += 0.5 * (time - lastTime).TotalSeconds; lastTime = time; if (progress > 1) progress -= 1; Data = CreateGeometry(progress); } double CalcAngle(double progress) { double factor = 0.5 * Math.Cos(Math.PI * progress - Math.PI) + 0.5; return 2 * Math.PI * factor; } double CalcDistance(double angle) { return 0.3 * (Math.PI - Math.Abs(Math.PI - angle)); } Geometry CreateGeometry(double progress) { double angle = CalcAngle(progress); double distance = CalcDistance(angle); GeometryGroup newGeometry = new GeometryGroup() { FillRule = FillRule.Nonzero }; for (int i = 3; i > -4; i--) { Point location = new Point(0.5 * arrangeSize.Width + radius * Math.Cos(angle + i * distance - Math.PI / 2), 0.5 * arrangeSize.Height + radius * Math.Sin(angle + i * distance - Math.PI / 2)); newGeometry.Children.Add(new EllipseGeometry() { Center = location, RadiusX = 5, RadiusY = 5 }); } return newGeometry; } protected override Size MeasureOverride(Size availableSize) { base.MeasureOverride(availableSize); return new Size(!double.IsInfinity(availableSize.Width) ? availableSize.Width : 0, !double.IsInfinity(availableSize.Height) ? availableSize.Height : 0); } protected override Size ArrangeOverride(Size arrangeBounds) { arrangeSize = arrangeBounds; return base.ArrangeOverride(arrangeBounds); } } } - Themes \ Generic.xaml , where the style description is located, which will be applied by default to our controls. Let's enter the Path element in the markup:
<ResourceDictionary xmlns="http://schemas.microsoft.com/winfx/2006/xaml/presentation" xmlns:x="http://schemas.microsoft.com/winfx/2006/xaml" xmlns:local="using:MyCustomControls"> <Style TargetType="local:MyCustomControl"> <Setter Property="Template"> <Setter.Value> <ControlTemplate TargetType="local:MyCustomControl"> <Border Background="{TemplateBinding Background}" BorderBrush="{TemplateBinding BorderBrush}" BorderThickness="{TemplateBinding BorderThickness}"> <Path Fill="Aqua" Data="{Binding Path=Data, RelativeSource={RelativeSource TemplatedParent} }"/> </Border> </ControlTemplate> </Setter.Value> </Setter> </Style> </ResourceDictionary>
Then you can quickly test the work of the written component. To do this, add another project such as the Blank App (XAML) :

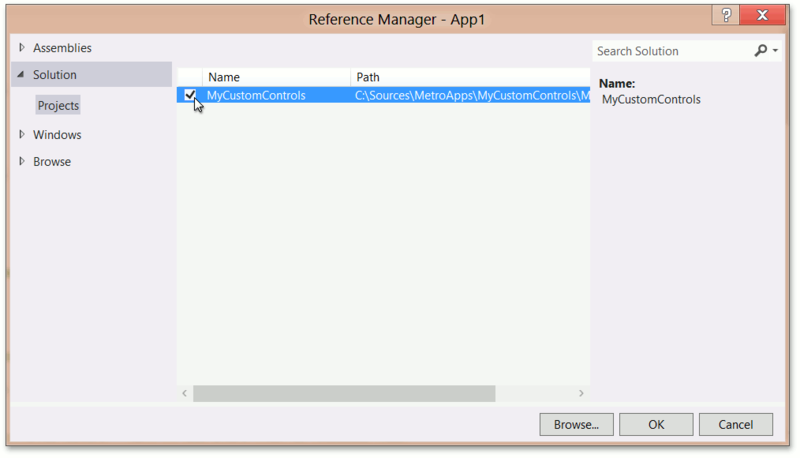
Now add to this project a link (of the Project Reference type) to our MyCustomControls assembly:
Next, you need to change the contents of the MainPage.xaml file, as shown below:
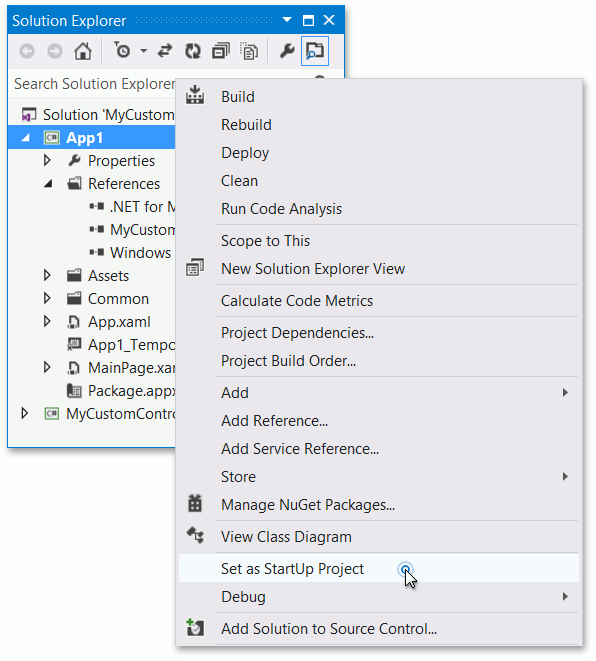
<Page x:Class="App1.MainPage" IsTabStop="false" xmlns="http://schemas.microsoft.com/winfx/2006/xaml/presentation" xmlns:x="http://schemas.microsoft.com/winfx/2006/xaml" xmlns:local="using:App1" xmlns:d="http://schemas.microsoft.com/expression/blend/2008" xmlns:mc="http://schemas.openxmlformats.org/markup-compatibility/2006" xmlns:my="using:MyCustomControls" mc:Ignorable="d"> <Grid Background="White"> <my:MyCustomControl /> </Grid> </Page> Then we will make the App1 starting application:
Now we launch our project and see the Metro style download indicator - which means that our component is operational!

Creating Extension SDK
Now you can go directly to creating your own Extension SDK. Using the Extension SDK, you can combine several libraries into one set that can be plugged into a Visual Studio project by adding one link to the entire SDK at once.
To begin with, we will create on the hard disk the following directory structure, which will contain everything necessary for our SDK:
MySDK
- - 1.0
- - - - References \ CommonConfiguration \ neutral \ MyCustomControls.dll
- - - - Redist \ CommonConfiguration \ neutral \ MyCustomControls.pri
- - - - Redist \ CommonConfiguration \ neutral \ MyCustomControls \ Themes \ generic.xaml
- - - - SDKManifest.xml
In this structure, MySDK is the root folder containing all other SDK files. It can have any name that reflects the name of your SDK. 1.0 is the version of your SDK.
References directory should contain all modules that will be included in the SDK, assembled in the appropriate configuration and for a specific architecture. That is, the next level defines the configuration, and perhaps only three options: Debug , Retail and CommonConfiguration . The last level, respectively, indicates the architecture for which these modules were collected: neutral , x64 , x86 and ARM . In this case, the build was made in Debug or Release under AnyCPU .
The Redist directory contains the files that are needed for debugging and execution, and they will be packaged. And again, it all depends on the configuration and architecture - just like for References .
The SDKManifest.xml file should have the following contents:
<?xml version="1.0" encoding="utf-8" ?> <FileList DisplayName="My Custom Controls" ProductFamilyName="My Controls" MinVSVersion="11.0" MinToolsVersion="4.0" CopyRedistToSubDirectory="." AppliesTo="WindowsAppContainer+WindowsXAML+Managed"> <File Reference="MyCustomControls.dll"> <ContainsControls>True</ContainsControls> </File> </FileList> This file describes all the assemblies that are in the References folder. The CopyRedistToSubDirectory parameter specifies where the files from the Redist folder will be copied to the package root. We installed it as "." - this means that all files will be copied to the root of the package.
Register Extension SDK
Now you can register your SDK in one of the following ways:
- copy the MySDK folder to the "% ProgramFiles% \ Microsoft SDKs \ Windows \ v8.0 \ Extension SDKs \" folder
- add a key to the registry that will contain the path to our SDK. I will give an example of the * .reg file, which will add the relevant data to the registry:
REGEDIT4 [HKEY_LOCAL_MACHINE\SOFTWARE\Microsoft\Microsoft SDKs\Windows\v8.0\ExtensionSDKs\MySDK\1.0] @="C:\\Sources\\MySDK\\1.0"
After the SDK has been created and registered, you can create a new test project such as the Blank App (XAML) .
In this case, we see that when adding a link to MyCustomControls.dll in the Windows-> Extentions section, MySDK will be visible.

To check whether everything works in this case, modify the MainPage.xaml file in the same way as we did in the previous test example, then build and run the project - and see our download indicator in action!
useful links
More information on how to create your Extension SDK can be found at the following link:
http://msdn.microsoft.com/library/hh768146(v=VS.110).aspx
If you want to learn more about WinRT, here are links to other useful resources:
- Windows 8 Development Center
msdn.microsoft.com/en-us/windows - Windows Metro Style Forums
social.msdn.microsoft.com/Forums/en-US/category/windowsapps - Windows 8 Metro style App Samples
code.msdn.microsoft.com/windowsapps - DevExpress - maker of visual components for the .NET platform, including WinRT
www.devexpress.com
Source: https://habr.com/ru/post/148928/
All Articles