Setting up wireless networks on a Cisco controller
Using my guides on the initial setup and connection of access points to the Wi-Fi controller of the Cisco WLC, you have built the necessary wireless network infrastructure. Now you need to configure the networks themselves (WLAN, SSID), to provide communication services to your users. About this is the final article of the introductory course of a young fighter. This is not a translation or copy-paste docks, but a brief squeeze of descriptions of all the required features, checked on their own skin.
Although your controller is controlled via the command line (console, ssh), almost all configuration operations are better (faster and more convenient) through the web interface. The controller is accessible via HTTP (by default; better switch to HTTPS) with the login password set during installation. In this article we will consider only the configuration of the wireless networks themselves. The remaining parameters (radio, security, control) and so are set to more or less acceptable values. In detail, all painted in the official documentation ,but who reads it . The purpose of this article is to communicate as clearly as possible the possible settings for an individual wireless network.
')
Each of your wireless networks is identified by a unique name, or SSID. Each network can have its own, independent set of authorization, encryption, QoS, additional properties. Each access point can serve (announce) up to 16 wireless networks. The controller (depending on the model) can serve up to 512 networks and up to hundreds of access points.
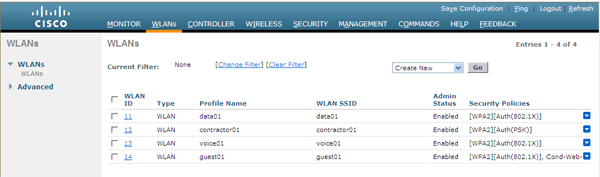
All settings are made in the WLANs menu (top picture). To create a new network, select the menu item “Create new”, and set the basic parameters:

Network type : WLAN (wireless). The controller can also work as a Captive Portal for a wired network (Guest LAN)
Profile name : An arbitrary word, usually the name of a network, is used when using “adult” WCS / NCS control systems.
Network Name (SSID) : how your network will be “visible” to client computers
Identifier (sequence number) : by default, your access points will announce networks with numbers <= 16
Having created a new network, you get into a window with bookmarks, in which all parameters of its work are indicated:

Enable enables / disables network access points
Security policy notifies you about the current set of network security policies that are configured further.
Radio policy allows you to choose in what range of frequencies (2.4, 5 GHz) and speeds (up to 11, up to 54 Mb / s) the network will work. Possible combinations of options. High Speed (802.11n) is a separate article. Naturally, your points should support the selected ranges.
The interface determines which wired network (sub-) interface (VLAN) of the controller will by default terminate the connections of wireless clients. You can create several so-called “dynamic interfaces”, each with its own VLAN ID, and distribute your users to them depending on which network they are connected to (which is most often used to provide guest access)
Multicast VLAN determines where in case of several groups of interfaces multicast traffic will go (topic of a separate article)
The last parameter Broadcast SSID determines whether the network name will be reflected in the beacon (announcements) of the packets periodically sent by the access point. Otherwise it is called “open / closed network”.
The next tab, Security, usually raises the most questions.
Wireless security is built from three components:
The first two policies work at OSI level 2, so they are called Layer 2 logically. Authorization is responsible for who to let into the network and how. Encryption defines the packet encryption algorithm itself in a radio environment. The web policy allows you to wrap the client HTTP session to the embedded web server of the controller (or external), and request confirmation / login-password through the form.
Available 2nd level security options:
Summing up the mini-result on L2 security, we say that in reality it is necessary to make a choice between:
Attention! High 802.11n connection speeds are only available for networks that use either Security = None, WPA2 / AES / PSK, or WPA2 / AES / 802.1X.
Under any option of security / authorization settings, you can enable an additional L3 policy, which is to intercept a client web session:
The following options are available:
Additionally, you can specify an ACL (access list) for users who have not passed authorization (for example, for a DNS server or an external web server with a logo).
You can also choose which page (form) to show to the user during authorization (standard, self-modified standard, or located on an external web server).
When using a RADIUS server, you need to make additional settings. First of all, specify the authorization server itself in the Security - RADIUS - AAA - Authentication menu:
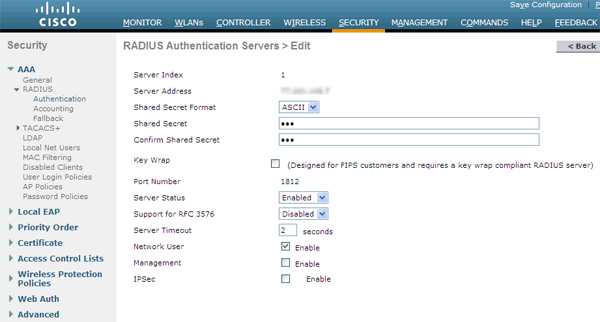
You must specify the following parameters:
IP address of the server . FreeRADIUS, Cisco ACS, Cisco ISE, Microsoft server are supported.
Shared secret (radius server key)
Network user - the server supports the authorization of Wi-Fi network users
Management - the server supports the authorization of the administrators of the controller itself
The remaining parameters of interest are not.
It is also useful to set the same server for accounting purposes.
In the security settings of the wireless network in the AAA servers tab, everything specified by default ensures the operation of all RADIUS servers registered with the controller:
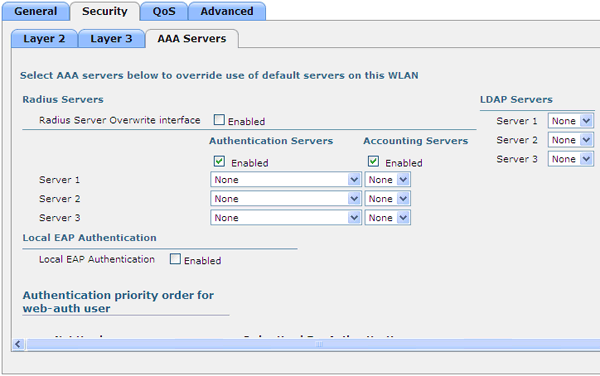
You can also assign a separate server for this wireless network, disable accounting, enable the mini RADIUS server built into the controller, etc.
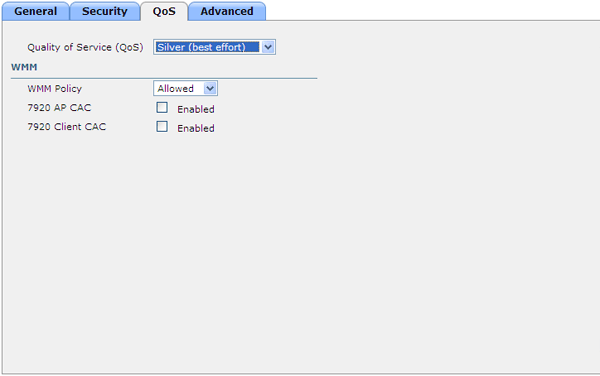
The QoS tab is responsible for the parameters of quality of service in the network, giving priorities to different types of traffic and users. It’s worth bothering if you have a voice, video, a lot of guest users with a large load, and in similar exotic cases in your wireless network.
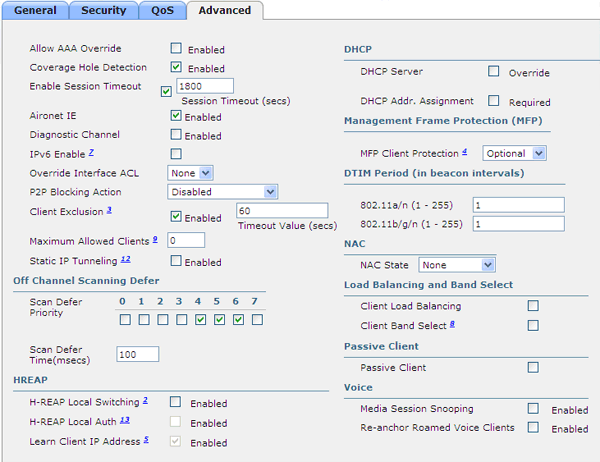
The last tab, Advanced, describes various “advanced parameters” of your wireless network, of which there are quite a lot. Tell about all.
So, having adjusted the network settings, clicking on the Apply button and not forgetting to save the controller configuration, we try to connect. Good luck!
Although your controller is controlled via the command line (console, ssh), almost all configuration operations are better (faster and more convenient) through the web interface. The controller is accessible via HTTP (by default; better switch to HTTPS) with the login password set during installation. In this article we will consider only the configuration of the wireless networks themselves. The remaining parameters (radio, security, control) and so are set to more or less acceptable values. In detail, all painted in the official documentation ,
')
Each of your wireless networks is identified by a unique name, or SSID. Each network can have its own, independent set of authorization, encryption, QoS, additional properties. Each access point can serve (announce) up to 16 wireless networks. The controller (depending on the model) can serve up to 512 networks and up to hundreds of access points.
All settings are made in the WLANs menu (top picture). To create a new network, select the menu item “Create new”, and set the basic parameters:
Network type : WLAN (wireless). The controller can also work as a Captive Portal for a wired network (Guest LAN)
Profile name : An arbitrary word, usually the name of a network, is used when using “adult” WCS / NCS control systems.
Network Name (SSID) : how your network will be “visible” to client computers
Identifier (sequence number) : by default, your access points will announce networks with numbers <= 16
Having created a new network, you get into a window with bookmarks, in which all parameters of its work are indicated:
Enable enables / disables network access points
Security policy notifies you about the current set of network security policies that are configured further.
Radio policy allows you to choose in what range of frequencies (2.4, 5 GHz) and speeds (up to 11, up to 54 Mb / s) the network will work. Possible combinations of options. High Speed (802.11n) is a separate article. Naturally, your points should support the selected ranges.
The interface determines which wired network (sub-) interface (VLAN) of the controller will by default terminate the connections of wireless clients. You can create several so-called “dynamic interfaces”, each with its own VLAN ID, and distribute your users to them depending on which network they are connected to (which is most often used to provide guest access)
Multicast VLAN determines where in case of several groups of interfaces multicast traffic will go (topic of a separate article)
The last parameter Broadcast SSID determines whether the network name will be reflected in the beacon (announcements) of the packets periodically sent by the access point. Otherwise it is called “open / closed network”.
The next tab, Security, usually raises the most questions.
Wireless security is built from three components:
- Authorization
- Encryption
- Web Policy (optional)
The first two policies work at OSI level 2, so they are called Layer 2 logically. Authorization is responsible for who to let into the network and how. Encryption defines the packet encryption algorithm itself in a radio environment. The web policy allows you to wrap the client HTTP session to the embedded web server of the controller (or external), and request confirmation / login-password through the form.
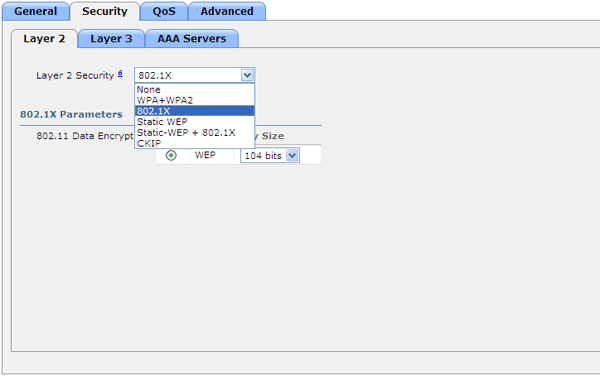
Available 2nd level security options:
- None - traffic authorization and encryption are not applied (“insecure network”). Used for guest access in hotspots. Often combined with a web policy where you connect to the wireless network without question, but when you try to log out of the web browser, the session is intercepted by the controller, and you are forced to enter a login and password, agree to the terms, etc. (see below).
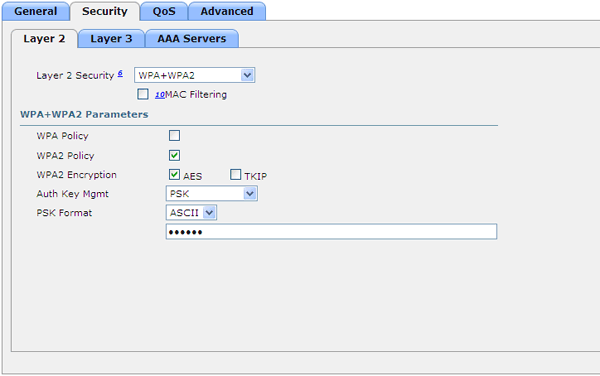
- WPA + WPA2 - allows you to select a WPA policy or WPA2 (or both), TKIP or AES encryption type (or both). These parameters are simply announced to customers in beacon packages. Not all client adapters (especially old ones) are able to understand the modern standard. If all customers are new, WPA2 / AES is best suited. Additionally, it is proposed to indicate how the key for encryption will be generated:
- 802.1X - an individual key for each client will be generated by the RADIUS server at the time of authorization. The safest option, also called WPA (2) Enterprise
- CCKM - uses its own Cisco key generation mechanism, suitable only for Cisco Wi-Fi phones
- PSK - shared (pre-shared) key, network password, in this case called WPA (2) Personal
- 802.1x + CCKM - a hybrid of CCKM and RADIUS key (for Cisco phones)
- 802.1X - an individual key for each client will be generated by the RADIUS server at the time of authorization. However, this is a WEP-key, and the radio channel encryption protocol is WEP, which in our time can no longer be used.
- Static WEP - static WEP key
- Static WEP + 802.1X - a hybrid of the two previous
- CKIP is a proprietary analogue of WEP for Cisco phones
Summing up the mini-result on L2 security, we say that in reality it is necessary to make a choice between:
- No encryption / authorization (guest access)
- WPA2 (AES) PSK aka "WPA2 Personal" to access the network with a common password
- WPA2 (AES) + 802.1X aka "WPA2 Enterprise" for access to the network through authorization on a RADIUS server (EAP: by domain account, certificate, etc.)
Attention! High 802.11n connection speeds are only available for networks that use either Security = None, WPA2 / AES / PSK, or WPA2 / AES / 802.1X.
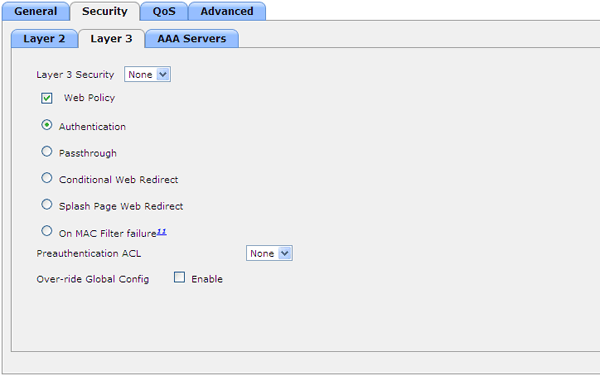
Under any option of security / authorization settings, you can enable an additional L3 policy, which is to intercept a client web session:
The following options are available:
- Authentication - the user sees the login-password input window, which are then checked on the controller (in its local database) or on the RADIUS server
- Passthrough - the user sees the welcome window, where they can optionally ask him his e-mail address (hereinafter it is not used anywhere and is not checked)
- Conditional Web Redirect - allows you to redirect the user session to the page specified in the RADIUS response after authorization. For example, on the recharge page. After the redirect, the user must log in again.
- Splash Page Web Redirect - the same, but with access to the network immediately
- On MAC Filter failure - redirect occurs when a user is blocked by the MAC filter
Additionally, you can specify an ACL (access list) for users who have not passed authorization (for example, for a DNS server or an external web server with a logo).
You can also choose which page (form) to show to the user during authorization (standard, self-modified standard, or located on an external web server).
When using a RADIUS server, you need to make additional settings. First of all, specify the authorization server itself in the Security - RADIUS - AAA - Authentication menu:
You must specify the following parameters:
IP address of the server . FreeRADIUS, Cisco ACS, Cisco ISE, Microsoft server are supported.
Shared secret (radius server key)
Network user - the server supports the authorization of Wi-Fi network users
Management - the server supports the authorization of the administrators of the controller itself
The remaining parameters of interest are not.
It is also useful to set the same server for accounting purposes.
In the security settings of the wireless network in the AAA servers tab, everything specified by default ensures the operation of all RADIUS servers registered with the controller:
You can also assign a separate server for this wireless network, disable accounting, enable the mini RADIUS server built into the controller, etc.
The QoS tab is responsible for the parameters of quality of service in the network, giving priorities to different types of traffic and users. It’s worth bothering if you have a voice, video, a lot of guest users with a large load, and in similar exotic cases in your wireless network.
The last tab, Advanced, describes various “advanced parameters” of your wireless network, of which there are quite a lot. Tell about all.
- Allow AAA Override - allows you to transfer additional parameters from the RADIUS server at the time of successful client authorization, and apply them to this client individually. Such parameters can be VLAN number, local interface name, access list (ACL), URL for redirect, QoS policy, etc.
- Coverage Hole Detection - controls the mechanism for determining and compensating for insufficient coverage for clients of a given wireless network. It is recommended to disable guest WLANs.
- Enable Session Timeout, Session Timeout (secs) - enables and defines the client session timeout during web authorization
- Aironet IE — Includes Cisco-specific beacon frame extensions. In this case, smart client adapters work better (roaming, energy saving), stupid ones may not work at all in such a network.
- Diagnostic Channel - activates an additional logical diagnostic channel for CCX5-compatible client adapters
- IPv6 - in reality only allows IPv6 traffic for web authorization
- Override Interface ACL - allows you to specify an alternative access list (ACL) instead of the one specified on the wired VLAN (management, dynamic) controller interface.
- P2P Blocking Action - defines the policy of passing traffic between wireless clients (within the controller). Valid values: Disabled (skip), Drop (do not skip), Forward-UpStream (send to the router, let it decide).
- Client Exclusion, Timeout Value (secs) - enables and sets the timeout for the exclusion (temporary blocking) of the client, the authorization of which in the wireless network failed.
- Maximum Allowed Clients - sets the maximum number of simultaneous associations with this network.
- Static IP Tunneling - allows roaming between controllers to clients with a static IP address
- Off Channel Scanning Defer, Scan Defer Priority - each point sometimes “jumps off” from its working channel (frequency) and listens to other channels for neighboring networks, spectrum cleanliness, “bad” subscribers, etc. At the same time, such a “jumping off” may adversely affect the voice traffic transmitted by this point. If a dot “sees” packets with a value of 802.1p of the field marked with a check mark (0 1 2 3 4 5 6 7), then the dismount from the working balance will be delayed.
- Scan Defer Time (msecs) - by how many milliseconds delayed
- H-REAP Local Switching - allows an access point that is in H-REAP (remote office) mode when servicing this wireless network to “lock” the subscriber traffic locally, rather than transmit to the controller in the CAPWAP tunnel
- H-REAP Local Auth - allows an access point that is in H-REAP (remote office) mode to maintain authorization for this wireless network locally, and not on the controller
- Learn Client IP Address - in H-REAP mode, the point will report the client’s IP address to the controller, if available
- DHCP Server Override, DHCP Server IP Addr - use the specified IP address of the DHCP server instead of the one specified in the settings of the wired interface of the controller to which the traffic of the wireless clients is “locked”.
- DHCP Addr. Assignment - require the use of a DHCP server by clients of this wireless network (statically configured clients will not work)
- MFP Client Protection — enable and require protection of client frames, the options Disabled (none), Optional (if available) and Required (required, and all your clients must support CCX5)
- DTIM Period (in beacon intervals) - how often to broadcast / multicast frames, affects the energy efficiency of clients
- NAC State - selects the operation mode in conjunction with the NAC device.
- Client Load Balancing - allows balancing clients between access points according to their workload
- Client Band Select - allows “pushing” of clients into the 5 GHz range, which is more preferable due to its smaller workload
- Passive Client - allows the operation of client devices that "say little" (like Wi-Fi weights)
- Media Session Snooping - allows you to "peep" into phone SIP-sessions
- Re-anchor Roamed Voice Clients - allows you to forcibly transfer between voice controllers that are roaming between controllers
So, having adjusted the network settings, clicking on the Apply button and not forgetting to save the controller configuration, we try to connect. Good luck!
Source: https://habr.com/ru/post/148903/
All Articles