Private VLAN support in Windows Server 2012
One of the main components of the new Hyper-V in Windows Server 2012 is the Hyper-V Extensible Switch. Hyper-V Extensible Switch is a second-level software managed switch with a number of interesting features, including support for Private VLAN (PVLAN) technology. I will briefly describe the implementation of the PVLAN in the Hyper-V switch and focus more on how to configure private VLANs for virtual machines (VMs). You can watch the technology in action in the first demonstration of a webcast dedicated to the new features of Hyper-V in Windows Server 2012.
The essence of PVLANs has already been discussed at Habré, in particular, here . For Hyper-V, you can assign each port of the Hyper-V Extensible Switch one primary (primary or Primary VLAN ID) identifier and one or more secondary (Secondary VLAN ID). Unlike a hardware switch with a specific number of ports, the port on the Hyper-V switch is identified by the virtual machine, and more precisely by the network adapter (since there may be several) of the virtual machine connected to this port. Therefore, hereinafter, set the settings for the Hyper-V Extensible Switch = port and set the settings for the corresponding virtual machine.
So, when configuring the PVLANs and specifying the Primary and Secondary VLAN IDs, the corresponding port can be configured in one of three modes:
In addition, it should be noted that the Hyper-V Extensible Switch transfers to the trunk mode the port that “looks” at the physical network adapter of the host. Assuming that your hardware switches do not block tagged packets, the logic of the considered modes does not depend on whether the VMs are running on the same physical host with Windows Server 2012 or on different ones.
')
One of the main applications of PVLAN is the additional isolation of VMs running in your data center and belonging to different departments, departments or organizations. Let me explain by example. Suppose there are four VMs running on a single host (see figure below). SRV1 and SRV2 belong, say, to the sales department, they run some application components, for example, in one SharePoint, in another SQL Server with a SharePoint database. SRV4 belongs to the financial department and must be isolated from the VM of other departments. Finally, SRV3 runs services that are necessary for all VMs of a given host or several hosts. A possible solution to this problem with the help of PVLAN:
Now let's implement this task in Windows Server 2012. Let's start with SRV4. PVLAN configuration is done by PowerShell cmdlets. As noted, the Hyper-V switch port is identified by the VM network adapter connected to this port. The easiest way to get information about VM network adapters is using the Get-VMNetworkAdapter command , specifying VM name as a parameter:

As you can see, there is a single network adapter in SRV4 with the same name as the virtual machine itself - SRV4. You can view the current VLAN settings of the corresponding Hyper-V Extensible Switch port using Get-VMNetworkAdapterVlan :

SRV4 is currently in Access mode with a single VLAN ID of zero. This is the default setting for the VM, equivalent to the fact that there are no VLANs at all. And while all other VMs are in the same condition: SRV1, SRV2, SRV3. We enable the mode we need for SRV4 using the Set-VMNetworkAdapterVlan command :
The -VMName and -VMNetworkAdapterName parameters specify the names of the VM and network adapter, respectively, and specify the Primary mode and Secondary VLAN ID with the other parameters. Check the settings:

Please note that from now on, SRV4 cannot interact with other VMs until we properly configure the PVLAN for them. We will do this with the appropriate commands using the PowerShell command pipeline, where the result of executing one command is passed to the input of the following:
I note that in the first command, the Secondary VLAN ID list is set by range. In addition, you can specify various identifier values by listing them separated by commas and enclosed in quotes: -SecondaryVlanIdList “4.5” .
At any time, you can return the settings to their original state, for example, for SRV4 by running:

Finally, a few words about the trunk mode. As I mentioned above, Hyper-V switches the port to which the physical network adapter is connected to the trunk mode. But if necessary, any VM can be switched to the trunk-mode so that it can receive packets with different VLAN IDs. For all the same SRV4 command will look like:

Here -AllowedVlanIdList sets the list of allowed VLAN IDs for both Primary and Secondary, and the -NativeVlanId parameter specifies which VLANs the untagged packets will belong to.
Thus, support for PVLAN technology along with other features of the Hyper-V Extensible Switch will help provide an additional level of VM isolation as part of a multi-tenant architecture.
Additional information can be found on the Microsoft Virtual Academy portal.
But the best, from my point of view, information source is the product itself, which you can download and try the listed opportunities in practice.
The essence of PVLANs has already been discussed at Habré, in particular, here . For Hyper-V, you can assign each port of the Hyper-V Extensible Switch one primary (primary or Primary VLAN ID) identifier and one or more secondary (Secondary VLAN ID). Unlike a hardware switch with a specific number of ports, the port on the Hyper-V switch is identified by the virtual machine, and more precisely by the network adapter (since there may be several) of the virtual machine connected to this port. Therefore, hereinafter, set the settings for the Hyper-V Extensible Switch = port and set the settings for the corresponding virtual machine.
So, when configuring the PVLANs and specifying the Primary and Secondary VLAN IDs, the corresponding port can be configured in one of three modes:
- promiscuous (mixed) - in this mode, the VM can exchange packets with any ports in which the Primary VLAN ID matches;
- community (common) - in this mode, the VM can exchange packets with any other ports configured in community mode, in which both Primary and Secondary VLAN ID match; besides (see above), a VM can interact with promiscuous ports that have the same Primary VLAN ID;
- isolated (isolated) - in this mode, the VM can interact only with promiscuous ports with the same Primary VLAN ID.
In addition, it should be noted that the Hyper-V Extensible Switch transfers to the trunk mode the port that “looks” at the physical network adapter of the host. Assuming that your hardware switches do not block tagged packets, the logic of the considered modes does not depend on whether the VMs are running on the same physical host with Windows Server 2012 or on different ones.
')
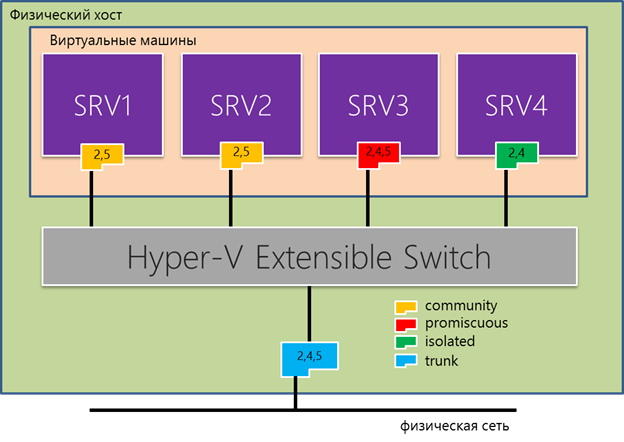
One of the main applications of PVLAN is the additional isolation of VMs running in your data center and belonging to different departments, departments or organizations. Let me explain by example. Suppose there are four VMs running on a single host (see figure below). SRV1 and SRV2 belong, say, to the sales department, they run some application components, for example, in one SharePoint, in another SQL Server with a SharePoint database. SRV4 belongs to the financial department and must be isolated from the VM of other departments. Finally, SRV3 runs services that are necessary for all VMs of a given host or several hosts. A possible solution to this problem with the help of PVLAN:
- Configure SRV1 and SRV2 in community mode with Primary VLAN ID = 2 and Secondary VLAN ID = 5; Of course, you yourself determine the specific values of identifiers;
- Configure SRV4 in isolated mode with Primary VLAN ID = 2 and Secondary VLAN ID = 4;
- Configure SRV3 in promiscuous mode with Primary VLAN ID = 2 and Secondary VLAN ID = 4 and 5.
Now let's implement this task in Windows Server 2012. Let's start with SRV4. PVLAN configuration is done by PowerShell cmdlets. As noted, the Hyper-V switch port is identified by the VM network adapter connected to this port. The easiest way to get information about VM network adapters is using the Get-VMNetworkAdapter command , specifying VM name as a parameter:
As you can see, there is a single network adapter in SRV4 with the same name as the virtual machine itself - SRV4. You can view the current VLAN settings of the corresponding Hyper-V Extensible Switch port using Get-VMNetworkAdapterVlan :
SRV4 is currently in Access mode with a single VLAN ID of zero. This is the default setting for the VM, equivalent to the fact that there are no VLANs at all. And while all other VMs are in the same condition: SRV1, SRV2, SRV3. We enable the mode we need for SRV4 using the Set-VMNetworkAdapterVlan command :
Set-VMNetworkAdapterVlan -VMName srv4 -VMNetworkAdapterName srv4 -Isolated -PrimaryVlanId 2 -SecondaryVlanId 4 The -VMName and -VMNetworkAdapterName parameters specify the names of the VM and network adapter, respectively, and specify the Primary mode and Secondary VLAN ID with the other parameters. Check the settings:
Please note that from now on, SRV4 cannot interact with other VMs until we properly configure the PVLAN for them. We will do this with the appropriate commands using the PowerShell command pipeline, where the result of executing one command is passed to the input of the following:
Get-VMNetworkAdapterVlan -VMName srv3 | Set-VMNetworkAdapterVlan -Promiscuous -PrimaryVlanId 2 -SecondaryVlanIdList 4-5 Get-VMNetworkAdapterVlan -VMName srv2 | Set-VMNetworkAdapterVlan -Community -PrimaryVlanId 2 -SecondaryVlanId 5 Get-VMNetworkAdapterVlan -VMName srv1 | Set-VMNetworkAdapterVlan -Community -PrimaryVlanId 2 -SecondaryVlanId 5 I note that in the first command, the Secondary VLAN ID list is set by range. In addition, you can specify various identifier values by listing them separated by commas and enclosed in quotes: -SecondaryVlanIdList “4.5” .
At any time, you can return the settings to their original state, for example, for SRV4 by running:
Finally, a few words about the trunk mode. As I mentioned above, Hyper-V switches the port to which the physical network adapter is connected to the trunk mode. But if necessary, any VM can be switched to the trunk-mode so that it can receive packets with different VLAN IDs. For all the same SRV4 command will look like:
Here -AllowedVlanIdList sets the list of allowed VLAN IDs for both Primary and Secondary, and the -NativeVlanId parameter specifies which VLANs the untagged packets will belong to.
Thus, support for PVLAN technology along with other features of the Hyper-V Extensible Switch will help provide an additional level of VM isolation as part of a multi-tenant architecture.
Additional information can be found on the Microsoft Virtual Academy portal.
But the best, from my point of view, information source is the product itself, which you can download and try the listed opportunities in practice.
Source: https://habr.com/ru/post/148734/
All Articles