Corona SDK - for beginners. Working with multiple scenes using the Storyboard API
Corona SDK is a cross-platform engine for creating games for iOS and Android. Personally, I like it because of its ease of learning: the five in Pascal school is enough knowledge to conquer the “crown”. On Habré there are already several articles on this topic, but there are very few detailed lessons for beginners both on this one and on other Russian-language sites.
In this article I will talk about one of the key issues of working with the Corona SDK - the organization of several scenes in one application.
To do this, there is a specially developed tool - StoryBoard API, which replaced the third-party Director class.
Consider a small example that explains how:
')
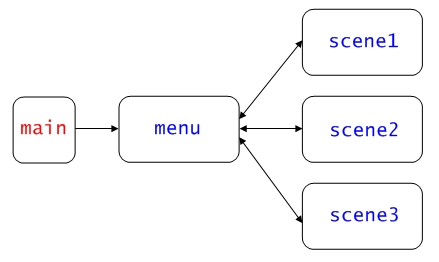
Our application at startup will show a menu consisting of three buttons, each of which leads us to a separate scene. Accordingly, we will have 4 scenes, for each of them we will need to create a file with the same name (menu.lua, scene1.lua, scene2.lua, scene3.lua) and the main file main.lua:

Let's start filling the application in order. In the main project file main.lua we write the following lines:
The first line connects the storyboard library to our application, in the second line we store the variable prevScene , which we then transfer to other scenes, well, and the third line redirects to the menu scene.
File menu.lua , like any other scene fill in the template, which is perfectly painted on of. Ansca website. Duplicate it completely here does not see the point. You can read it here . I will dwell only on the most important points.
First, before adding your code to the four standard events (createScene, enterScene, exitScene, destroyScene), declare the variables we use. In the menu, we will have variables for the background, three buttons and a text label with memory monitoring.
Next, create our background, buttons and an inscription inside the function scene: createScene (event) function. Also, in this part of our program we place functions that will change scenes at the touch of a button. All these are the same simplest functions for creating images and text from the standard Corona set. Therefore, to reduce the amount of text, I will give here only the lines responsible for the first button, the rest by analogy. Well, everyone who is interested can download the full source at the end of the topic.
I will only note that the “fromRight” parameter of the storyboard.gotoScene () function sets the effect of the appearance of a new scene on the right. Accordingly, you can set the appearance of the effect of left, top or bottom (fromLeft, fromTop or fromBottom), plus the classic fade. Parameter 800 is the effect execution time in milliseconds. These are not all effects, the full list can be read in the official documentation of the developers.
Now we need to set a small condition that will clear the device’s memory from the previous scene, depending on the value of the prevScene variable. It is very important not to forget to clear memory with the storyboard.removeScene () function, otherwise your application will consume a lot of resources and in the end it may just hang.
We do this when loading a new scene inside the function scene: enterScene (event) function, leaving the standard function from the examples of Corona memory monitoring developers in the same place.
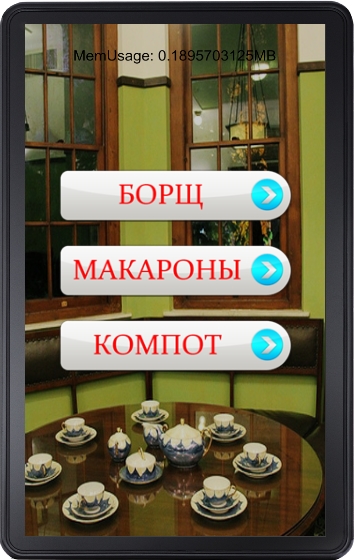
Save the file, run the simulator and watch our first scene. Because This menu.lua, then I decided to make the menu, but not software, but for a simple dining room:

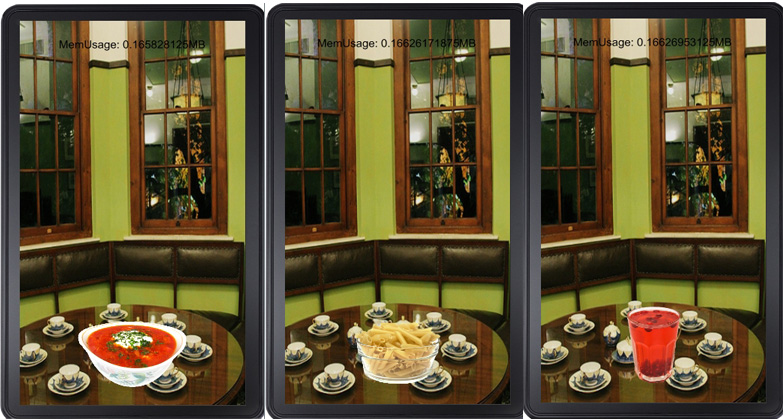
And finally, we create three scenes-clones of our menu, but:
1. No buttons.
2. Each scene with its subject on the table (a plate of borscht, a plate of pasta or a glass of compote)
3. We update our common variable for all scenes and slightly change the line with deleting the previous scene from memory, i.e. the storyboard.removeScene () function specifically deletes menu.lua, because this is the only possible previous scene:
4. Add the ability to return to the menu by clicking on the image-background. To do this, add the function to return to the menu in the createScene section:
In the enterScene section, let's attach an eventListener to our background, which will monitor the touches, and in the positive case, will send the program to perform our onSceneTouch () function:
Well, of course, let's not forget to remove the eventListener, when exiting the scene in the exitScene () section
Fill in all three scenes with these rules:

The same result can be obtained using only two scenes: the menu and another one, which, depending on the activated button, will show different products (a simple condition and one global variable). In order to consolidate the material studied, try to implement this mechanism.
If we did everything right, the memory occupied by the application should not increase with each transition to another scene. Keep track of this in your applications.
Well that's all. We created different scenes, walked through them with effects, and the variable prevScene was transmitted. At this familiarity with the storyBoard API can be considered complete.
Lesson sources can be downloaded here .
See the source code for the storyboard API work by Corona SDK developers here .
Related information (in English):
Introducing the Storyboard API
Storyboard Scene Events Explained
Common Storyboard API Questions
In this article I will talk about one of the key issues of working with the Corona SDK - the organization of several scenes in one application.
To do this, there is a specially developed tool - StoryBoard API, which replaced the third-party Director class.
Consider a small example that explains how:
- create scenes
- switch between scenes with different effects
- transfer variables between scenes
')
Our application at startup will show a menu consisting of three buttons, each of which leads us to a separate scene. Accordingly, we will have 4 scenes, for each of them we will need to create a file with the same name (menu.lua, scene1.lua, scene2.lua, scene3.lua) and the main file main.lua:

Let's start filling the application in order. In the main project file main.lua we write the following lines:
local storyboard = require "storyboard" storyboard.prevScene = 0 storyboard.gotoScene( "menu" ) The first line connects the storyboard library to our application, in the second line we store the variable prevScene , which we then transfer to other scenes, well, and the third line redirects to the menu scene.
File menu.lua , like any other scene fill in the template, which is perfectly painted on of. Ansca website. Duplicate it completely here does not see the point. You can read it here . I will dwell only on the most important points.
First, before adding your code to the four standard events (createScene, enterScene, exitScene, destroyScene), declare the variables we use. In the menu, we will have variables for the background, three buttons and a text label with memory monitoring.
local background, tap1, tap2, tap3, text Next, create our background, buttons and an inscription inside the function scene: createScene (event) function. Also, in this part of our program we place functions that will change scenes at the touch of a button. All these are the same simplest functions for creating images and text from the standard Corona set. Therefore, to reduce the amount of text, I will give here only the lines responsible for the first button, the rest by analogy. Well, everyone who is interested can download the full source at the end of the topic.
function scene:createScene( event ) local group = self.view local function GoToScene1 (event) storyboard.gotoScene( true, "scene1", "fromRight", 800 ) end tap1 = ui.newButton{ default = "img/tap1.png", over = "img/tap1_over.png", onRelease = GoToScene1, } tap1.x = display.contentCenterX; tap1.y = 150; group:insert(tap1); end I will only note that the “fromRight” parameter of the storyboard.gotoScene () function sets the effect of the appearance of a new scene on the right. Accordingly, you can set the appearance of the effect of left, top or bottom (fromLeft, fromTop or fromBottom), plus the classic fade. Parameter 800 is the effect execution time in milliseconds. These are not all effects, the full list can be read in the official documentation of the developers.
Now we need to set a small condition that will clear the device’s memory from the previous scene, depending on the value of the prevScene variable. It is very important not to forget to clear memory with the storyboard.removeScene () function, otherwise your application will consume a lot of resources and in the end it may just hang.
We do this when loading a new scene inside the function scene: enterScene (event) function, leaving the standard function from the examples of Corona memory monitoring developers in the same place.
function scene:enterScene( event ) local group = self.view if storyboard.prevScene > 0 then storyboard.removeScene( "scene"..storyboard.prevScene ) end -- show memory on display local showMem = function() text.text = text.text .. collectgarbage("count")/1000 .. "MB" text.x = display.contentWidth * 0.5 end local memTimer = timer.performWithDelay( 1000, showMem, 1 ) end Save the file, run the simulator and watch our first scene. Because This menu.lua, then I decided to make the menu, but not software, but for a simple dining room:

And finally, we create three scenes-clones of our menu, but:
1. No buttons.
2. Each scene with its subject on the table (a plate of borscht, a plate of pasta or a glass of compote)
3. We update our common variable for all scenes and slightly change the line with deleting the previous scene from memory, i.e. the storyboard.removeScene () function specifically deletes menu.lua, because this is the only possible previous scene:
storyboard.prevScene = 1 storyboard.removeScene( "menu" ); 4. Add the ability to return to the menu by clicking on the image-background. To do this, add the function to return to the menu in the createScene section:
local function onSceneTouch( self, event ) if event.phase == "began" then storyboard.gotoScene( "menu", "fade", 400 ) return true end In the enterScene section, let's attach an eventListener to our background, which will monitor the touches, and in the positive case, will send the program to perform our onSceneTouch () function:
background:addEventListener( "touch", background ) Well, of course, let's not forget to remove the eventListener, when exiting the scene in the exitScene () section
background:removeEventListener( "touch", background ) Fill in all three scenes with these rules:

The same result can be obtained using only two scenes: the menu and another one, which, depending on the activated button, will show different products (a simple condition and one global variable). In order to consolidate the material studied, try to implement this mechanism.
If we did everything right, the memory occupied by the application should not increase with each transition to another scene. Keep track of this in your applications.
Well that's all. We created different scenes, walked through them with effects, and the variable prevScene was transmitted. At this familiarity with the storyBoard API can be considered complete.
Lesson sources can be downloaded here .
See the source code for the storyboard API work by Corona SDK developers here .
Related information (in English):
Introducing the Storyboard API
Storyboard Scene Events Explained
Common Storyboard API Questions
Source: https://habr.com/ru/post/148704/
All Articles