Soldering for beginners
My relationship with radio and microelectronics can be described by an excellent joke about Leo Tolstoy, who loved to play the balalaika, but could not. Sometimes he writes another chapter of War and Peace, while he himself thinks “trendy brandy, trendy brandy ...”. After the courses of electrical engineering and microelectronics in my favorite MAI, plus the endless explanations of the brother, which I forget almost immediately, in principle, you can collect simple circuits and even come up with your own, good now, if you are reluctant to mess with analog signals, amplifications, pickups, etc. You can find a finished micro-assembly and stay in a more or less understandable world of digital microelectronics.
To the point. Today we will talk about soldering. I know that many newbies who want to play with microcontrollers are frightening. But, first, you can use the mock-up boards , where you simply stick the parts into the panel, without even a hint of soldering, as in the designer.
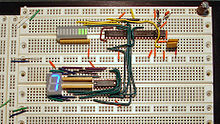
So you can collect a very curly device.
')

But sometimes you want to make a finished device. Again, it is not necessary to “poison” the board. If there are few details, you can use a circuit board without tracks (I used one for the GMC-4 bootloader ).

But you still have to solder. The question is how? Especially if you have never done this before. I may discover America, but just a few days ago I discovered for myself the magic world of soldering without much hemorrhoids.
Until now, my understanding of the essence of the manual soldering process was as follows. A soldering iron is taken (preferably with a tip not in the shape of an awl, but with a slight flattening, such as a spatula), solder and rosin. To seal the piglet, you take a bit of solder on the soldering iron , dip the soldering iron in the rosin, it happens, and while it goes, you quickly and quickly touch the soldering iron of the soldering point (the part, of course, should already be inserted) solder must somehow magically move to the place of soldering.
Alas, this method worked very poorly for me, practically did not work. The parts were heated, but the solder did not go anywhere from the soldering iron. Obviously, the problem was in the catalyst, that is, rosin. Togo "pshshshshsh", what I did, lowering the end of the soldering iron in the rosin, was clearly not enough to "start" the process of soldering. While you are dragging the soldering iron to the soldering point, almost all of the rosin has time to burn. That is why, by the way, I was completely incomprehensible to the nature of the solder, inside of which flux was already contained (some kind of catalyst, such as rosin). Anyway, at the time of soldering to the soldering iron, the entire flux has time to burn.
Experimentally, I found several ways to improve the process:
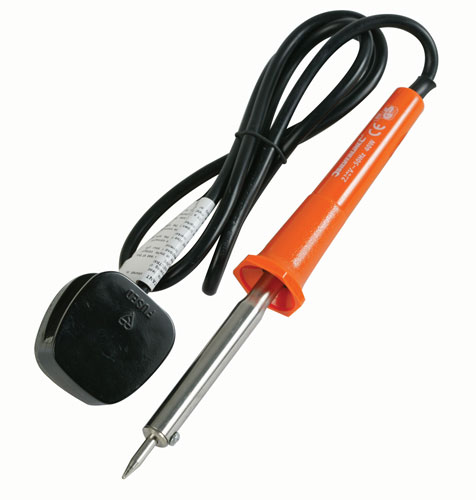
So, we are almost at the goal. I write everything in such detail, since, honestly, for me it was a breakthrough. As I accidentally discovered, all that is needed for soldering simple components is a soldering iron, the most common with a sting in the form of an awl:
and solder with flux inside :

EVERYTHING!
It's all about the process. Do it like this:
The key point here, as you already understood, is the supply of solder and flux directly to the place of soldering. A “built-in” flux in the solder gives it the required minimum amount, minimizing the fouling of the board.

It is clear that the waiting time at each phase requires at least minimal practice, but no more. I am sure that any newcomer using this method will solder Maximite in an hour.
Let me remind you the main signs of good soldering:
It is worth noting that all of the above refers to the soldering of elements that are inserted into the holes on the board. For soldering planar parts, the process is a bit more complicated, but real. Planar elements take up less space, but require a more accurate arrangement of the “patches” for them.
Planar elements (of course, not the smallest) are even easier for soldering in some way, although for self-made devices you will already have to poison the board, since there will not be any particular convenience from using planar elements on the breadboard.
So, a small, almost theoretical bonus about soldering planar elements. These can be microchips, transistors, resistors, capacitors, etc. Again, at home there are objective limitations on the size of the elements, which can be soldered with a regular soldering iron. Below I will give a list of what I personally soldered with an ordinary 220V awl soldering iron.
For soldering a planar element, it is no longer possible to use solder on the go, as it can “get off” too much, “flooding” several legs at once. Therefore, we must first in some way zaludit penny where you plan to put the component. Here, alas, no longer can do without a liquid flux (at least I did not succeed).
Phase 1
You drip a bit of liquid flux on the patches (or patches), take quite a bit of solder to the soldering iron (without flux). For planar solder elements in general, very little is needed. Then lightly touch the end of the soldering iron of each penny. It should get a little solder. More than necessary, each Pyatachek "will not take."
Phase 2
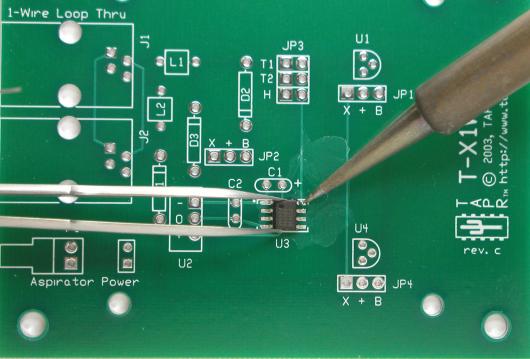
Take an item with tweezers. Firstly, it is more convenient, secondly, tweezers will remove heat, which is very important for planar elements. Attach an element to the place of soldering, holding it with tweezers. If it is a microcircuit, then it is necessary to hold it by the leg that you solder. For microcircuits, the heat sink is especially important, so you can use two tweezers. One you hold the part, and the second you attach to the soldered leg (there are some tweezers with a clip that you should not hold with your hands). With the second hand, you again apply a drop of liquid flux to the place of soldering (maybe a little gets on the microcircuit), with the same hand you take a soldering iron and for a second touch the place of soldering. Since there is already solder and flux there, the soldered leg will “plunge” into the solder applied at the tinning stage. Further, the procedure is repeated for all legs. If necessary, you can undermine the liquid flux.
When you buy a liquid flux, buy and washboard liquid. Alas, with liquid flux it is better to wash the board after soldering.
I must say, I have never been a professional, or even an advanced amateur in soldering. I did all this with an ordinary soldering iron. Pros have their own methods and equipment.
Of course, soldering a planar element requires much more skill. But still it is quite realistic at home. And if you do not solder chips, but only the simplest elements, it is still simplified. Chips can be purchased already soldered to the pads or in the form of ready-made assemblies.
Here are pictures of what I personally successfully soldered after a small workout.
This is the easiest type of enclosures. These can be put in the pads, which are the same on the complexity of the soldering. These are elementary soldered according to the first instruction.
The following two are more difficult. Here it is necessary to solder the second instruction with a neat heat sink and a liquid flux.

Elementary planar components, such as the resistors below, are quite simply soldered:
But there is, of course, a limit. This good is already beyond my abilities.


Toward the end, a couple of cheap, but very useful things to buy in addition to a soldering iron, solder, tweezers and clippers:
Successes in soldering! The smell of rosin is cool!
To the point. Today we will talk about soldering. I know that many newbies who want to play with microcontrollers are frightening. But, first, you can use the mock-up boards , where you simply stick the parts into the panel, without even a hint of soldering, as in the designer.
So you can collect a very curly device.
')
But sometimes you want to make a finished device. Again, it is not necessary to “poison” the board. If there are few details, you can use a circuit board without tracks (I used one for the GMC-4 bootloader ).
But you still have to solder. The question is how? Especially if you have never done this before. I may discover America, but just a few days ago I discovered for myself the magic world of soldering without much hemorrhoids.
Until now, my understanding of the essence of the manual soldering process was as follows. A soldering iron is taken (preferably with a tip not in the shape of an awl, but with a slight flattening, such as a spatula), solder and rosin. To seal the piglet, you take a bit of solder on the soldering iron , dip the soldering iron in the rosin, it happens, and while it goes, you quickly and quickly touch the soldering iron of the soldering point (the part, of course, should already be inserted) solder must somehow magically move to the place of soldering.
Alas, this method worked very poorly for me, practically did not work. The parts were heated, but the solder did not go anywhere from the soldering iron. Obviously, the problem was in the catalyst, that is, rosin. Togo "pshshshshsh", what I did, lowering the end of the soldering iron in the rosin, was clearly not enough to "start" the process of soldering. While you are dragging the soldering iron to the soldering point, almost all of the rosin has time to burn. That is why, by the way, I was completely incomprehensible to the nature of the solder, inside of which flux was already contained (some kind of catalyst, such as rosin). Anyway, at the time of soldering to the soldering iron, the entire flux has time to burn.
Experimentally, I found several ways to improve the process:
- Tinkering the places of soldering in advance. Actually, when soldering delicate things, like
Chip is extremely impractical. Moreover, usually, their legs are already
tinned - Crumble rosin directly to the place of soldering. Gently put the crystal of rosin directly to the place of soldering, and then the “shhhhhh” happens right there, which allows the solder to move normally from the soldering iron. Alas, after such a soldering, the entire board is surrounded by black splashes of burnt rosin. Although it is an insulator, sometimes solder defects are not visible. Therefore, the board should be washed, and this is a separate hemorrhoids. And the chipping itself makes the soldering extremely slow. So I soldered Maximite .
- Use liquid flux. By analogy with dyeing rosin, you can gently put a drop of liquid flux with a stick (usually, it is much “stronger” than rosin), and then there will be an active “pinch”, and soldering will occur. Alas, there are problems here too. Not all liquid fluxes are insulators, and the charge must also be washed, for example, with acetone. And those that are insulators still remain on the board, spread out and can interfere with the subsequent external "dial". Exit - wash.
So, we are almost at the goal. I write everything in such detail, since, honestly, for me it was a breakthrough. As I accidentally discovered, all that is needed for soldering simple components is a soldering iron, the most common with a sting in the form of an awl:
and solder with flux inside :
EVERYTHING!
It's all about the process. Do it like this:
- The part is inserted into the board and must be fixed (you will not have a second hand to hold).
- In one hand, a soldering iron is taken, in the other - solder wire (conveniently, if it is in a special dispenser, as in the picture).
- Solder soldering iron is not necessary .
- Touch the soldering iron tip with the soldering point and warm it. Usually, it is 3-4 seconds.
- Then, without removing the soldering iron, with your second hand, touch the tip of the solder wire with the flux of the soldering point. In reality, in this place all three parts touch at once: the element of soldering and its hole on the board, the soldering iron and the solder. After a second, “pshshshshsh” occurs, the tip of the solder wire melts (and some flux flows out of it), and the required amount of it passes to the soldering point. After a second, you can remove the soldering iron with solder and blow.
The key point here, as you already understood, is the supply of solder and flux directly to the place of soldering. A “built-in” flux in the solder gives it the required minimum amount, minimizing the fouling of the board.
It is clear that the waiting time at each phase requires at least minimal practice, but no more. I am sure that any newcomer using this method will solder Maximite in an hour.
Let me remind you the main signs of good soldering:
- A lot of solder does not mean quality contact. A droplet of solder at the site of contact should cover it from all sides, not having potholes, but not be an overly huge bulba.
- The color of the soldering should be closer to the shiny, and not to matte.
- If the board is double-sided, and the holes are non-plated, it is necessary to solder the technology on both sides.
It is worth noting that all of the above refers to the soldering of elements that are inserted into the holes on the board. For soldering planar parts, the process is a bit more complicated, but real. Planar elements take up less space, but require a more accurate arrangement of the “patches” for them.
Planar elements (of course, not the smallest) are even easier for soldering in some way, although for self-made devices you will already have to poison the board, since there will not be any particular convenience from using planar elements on the breadboard.
So, a small, almost theoretical bonus about soldering planar elements. These can be microchips, transistors, resistors, capacitors, etc. Again, at home there are objective limitations on the size of the elements, which can be soldered with a regular soldering iron. Below I will give a list of what I personally soldered with an ordinary 220V awl soldering iron.
For soldering a planar element, it is no longer possible to use solder on the go, as it can “get off” too much, “flooding” several legs at once. Therefore, we must first in some way zaludit penny where you plan to put the component. Here, alas, no longer can do without a liquid flux (at least I did not succeed).
Phase 1
You drip a bit of liquid flux on the patches (or patches), take quite a bit of solder to the soldering iron (without flux). For planar solder elements in general, very little is needed. Then lightly touch the end of the soldering iron of each penny. It should get a little solder. More than necessary, each Pyatachek "will not take."
Phase 2
Take an item with tweezers. Firstly, it is more convenient, secondly, tweezers will remove heat, which is very important for planar elements. Attach an element to the place of soldering, holding it with tweezers. If it is a microcircuit, then it is necessary to hold it by the leg that you solder. For microcircuits, the heat sink is especially important, so you can use two tweezers. One you hold the part, and the second you attach to the soldered leg (there are some tweezers with a clip that you should not hold with your hands). With the second hand, you again apply a drop of liquid flux to the place of soldering (maybe a little gets on the microcircuit), with the same hand you take a soldering iron and for a second touch the place of soldering. Since there is already solder and flux there, the soldered leg will “plunge” into the solder applied at the tinning stage. Further, the procedure is repeated for all legs. If necessary, you can undermine the liquid flux.
When you buy a liquid flux, buy and washboard liquid. Alas, with liquid flux it is better to wash the board after soldering.
I must say, I have never been a professional, or even an advanced amateur in soldering. I did all this with an ordinary soldering iron. Pros have their own methods and equipment.
Of course, soldering a planar element requires much more skill. But still it is quite realistic at home. And if you do not solder chips, but only the simplest elements, it is still simplified. Chips can be purchased already soldered to the pads or in the form of ready-made assemblies.
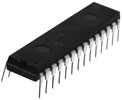
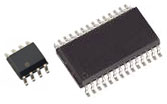
Here are pictures of what I personally successfully soldered after a small workout.
This is the easiest type of enclosures. These can be put in the pads, which are the same on the complexity of the soldering. These are elementary soldered according to the first instruction.
The following two are more difficult. Here it is necessary to solder the second instruction with a neat heat sink and a liquid flux.
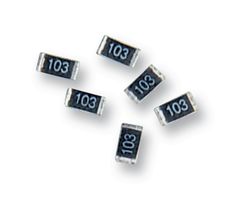
Elementary planar components, such as the resistors below, are quite simply soldered:
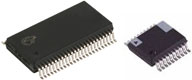
But there is, of course, a limit. This good is already beyond my abilities.
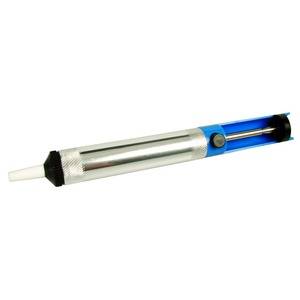
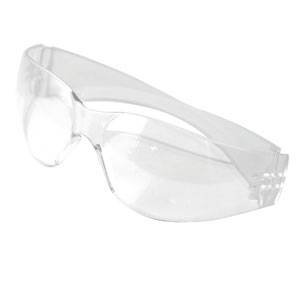
Toward the end, a couple of cheap, but very useful things to buy in addition to a soldering iron, solder, tweezers and clippers:
- Suction The inventor of this device should put a monument. Got a lot of solder or soldered to the wrong place? The solder itself, alas, will not jump back onto the soldering iron. But sucking removed elementary. Use one hand to warm up the "tap-off" place with a soldering iron. Keep a second cocked suction next. As "thawed", press the button, and the solder perfectly jumps to the suction.
- Points When dealing with legs and wires, it can happen that the heated foot springs off, and the solder will fly off somewhere, perhaps in the eye. It’s better not to joke.
Successes in soldering! The smell of rosin is cool!
Source: https://habr.com/ru/post/148656/
All Articles