SOAP Web service using Spring-WS

Once I was given the task of starting the development of Web services and gave me a simplest example of a project without any explanation. The project, of course, did not start. What Spring is and how it works, I also had no idea. I, too, could not find adequate articles on the development of Web services by means of Spring neither Russian-speaking nor English-speaking. I had to understand everything myself, it turned out not so scary.
And recently, I decided to see what new features have been added to Spring since then, and update old services, which as a result encouraged me to write this article.
This article is a guide to developing a simplest Web service that uses a SOAP protocol using Spring-WS.
And so, we will write the simplest service that takes a username and sends a greeting and the current time on the server.
What do we need?
- IDE. I use Eclipse .
- Ant
- soapUI
- Jdk
- Jre
- Spring Framework 3.1.2
- Spring-WS 2.1.0
- XMLBeans 2.5.0
- wsdl4j
- commons-logging-1.1.1
Preparation for work
Create a new web application project. In Eclipse, this is: “File => New => Dynamic Web Project”.
I called the project: HelloService.
Next, copy the libraries from Spring, XMLBean, wsdl4j, commons-logging into the WEB-INF / lib project directory.
If you wish, you can add them to the server libraries so as not to drag them with each application.
')
Creating a WSDL Schema
In fact, the WSDL scheme is intended to describe the service.
We will not create it manually, of course. The scheme will be generated automatically by Spring's tools, but more on that later.
We define input and output data.
Input data:
- String name.
Output:
- String greeting;
- Time is the current time.
Create a description of the input and output
In the WEB-INF directory, create the HelloService.xsd file. This file will be needed to generate the WSDL schema and create the corresponding Java classes.
File Text:
<?xml version="1.0" encoding="UTF-8"?> <schema xmlns="http://www.w3.org/2001/XMLSchema" targetNamespace="http://www.example.org/HelloService" elementFormDefault="qualified"> <element name="ServiceRequest"> <complexType> <sequence> <element name="name" type="string" maxOccurs="1" minOccurs="1"/> </sequence> </complexType> </element> <element name="ServiceResponse"> <complexType> <sequence> <element name="hello" type="string" maxOccurs="1" minOccurs="1"/> <element name="currentTime" type="time" maxOccurs="1" minOccurs="1"/> </sequence> </complexType> </element> </schema> The targetNamespace attribute is the namespace used. Those. all created objects will be located in the org.example.helloService package.
The ServiceRequest and ServiceResponse elements describe input and output data (request / response), respectively.
Attributes minOccurs and maxOccurs determine the number of repetitions of a given component within one element. If these parameters are not specified, then by default they are considered equal to 1. For the optional component, you must specify minOccurs = 0. With an unlimited number of components: maxOccurs = unbounded.
Read more about XML schemas here .
Create JavaBeans
Based on the created schema, we will create Java classes. To do this, create a file build.xml:
<?xml version="1.0" encoding="UTF-8"?> <project name="imsjob" default="build" basedir="."> <property name="WS_HOME" value="C:\AST\lib\standart"/> <property name="encoding" value="UTF-8"/> <path id="xbean.classpath"> <fileset dir="${WS_HOME}"> <include name="*.jar"/> </fileset> </path> <taskdef name="xmlbean" classname="org.apache.xmlbeans.impl.tool.XMLBean" classpathref="xbean.classpath" /> <target name="init"> <echo message="Start init"/> </target> <target name="build" depends="init"> <xmlbean schema="HelloService.xsd" destfile="lib\helloservice.jar" classpathref="xbean.classpath"/> </target> </project> The WS_HOME parameter must point to the directory where the XMLBeans resides.
HelloService.xsd - path to the created scheme.
lib \ helloservice.jar - created java-library.
Next, run Ant-build (I hope you have already installed it).
In Eclipse, you can run it like this: RMB by file build.xml => Run As => Ant Build.
If via the command line:
ant -buildfile build.xmlWell, wait for the completion of the construction. After that, we can check the project directory WEB-INF \ lib for the presence of the corresponding library (helloservice.jar).
Service implementation
We create the interface and class of service
Service interface: HelloService.java:
package org.example; import java.util.Calendar; public interface HelloService { public String getHello(String name) throws Exception; public Calendar getCurrentTime(); } Service implementation: HelloServiceImpl.java:
package org.example; import java.util.Calendar; import org.springframework.stereotype.Service; @Service public class HelloServiceImpl implements HelloService { public String getHello(String name) throws Exception { return "Hello, " + name + "!"; } public Calendar getCurrentTime() { return Calendar.getInstance(); } } This code, I think, does not need comments. The only thing that may cause questions for people who have not come across Spring before is the @ Service annotation. But I will tell about this later.
Endpoint
Endpoint is the class that will be responsible for processing incoming requests (a kind of entry point).
Create the HelloServiceEndpoint.java file:
package org.example; import org.springframework.beans.factory.annotation.Autowired; import org.springframework.ws.server.endpoint.annotation.Endpoint; import org.springframework.ws.server.endpoint.annotation.PayloadRoot; import org.example.helloService.ServiceRequestDocument; import org.example.helloService.ServiceRequestDocument.ServiceRequest; import org.example.helloService.ServiceResponseDocument; import org.example.helloService.ServiceResponseDocument.ServiceResponse; @Endpoint public class HelloServiceEndpoint{ private static final String namespaceUri = "http://www.example.org/HelloService"; private HelloService helloService; @Autowired public void HelloService (HelloService helloService) { this.helloService = helloService; } @PayloadRoot(localPart = "ServiceRequest", namespace = namespaceUri) public ServiceResponseDocument getService(ServiceRequestDocument request) throws Exception { ServiceRequestDocument reqDoc = request; ServiceRequest req = reqDoc.getServiceRequest(); ServiceResponseDocument respDoc = ServiceResponseDocument.Factory.newInstance(); ServiceResponse resp = respDoc.addNewServiceResponse(); String userName = req.getName(); String helloMessage = testNewService.getHello(userName); Calendar currentTime = testNewService.getCurrentTime(); resp.setHello(helloMessage); resp.setCurrentTime(currentTime); return respDoc; } } What is done here?
The @Endpoint annotation determines that this class will process incoming requests.
namespaceUri is the same namespace as was specified when creating the xml schema.
Now let's go back a bit and recall the @ Service annotation. If you don’t go into details in order not to overload the reader with unnecessary information, this annotation tells Spring to create the corresponding object. And the @Autowired annotation serves for injection (automatic substitution) of the corresponding object. Of course, when building simple applications, there is no sense in using these annotations, but I decided not to exclude them in this example.
And so, we go further.
The @PayloadRoot annotation before the method determines when receiving which request this method will be called. In our case, this is “ServiceRequest”.
Otherwise, everything should be clear. Please note that ServiceRequest, ServiceResponse, etc. - these are exactly the classes that were created based on our xml schema.
Spring configuration service
That is nearing completion.
Create a service-ws-servlet.xml file.
<?xml version="1.0" encoding="UTF-8"?> <beans xmlns="http://www.springframework.org/schema/beans" xmlns:xsi="http://www.w3.org/2001/XMLSchema-instance" xmlns:context="http://www.springframework.org/schema/context" xmlns:sws="http://www.springframework.org/schema/web-services" xsi:schemaLocation="http://www.springframework.org/schema/beans http://www.springframework.org/schema/beans/spring-beans-3.0.xsd http://www.springframework.org/schema/web-services http://www.springframework.org/schema/web-services/web-services-2.0.xsd http://www.springframework.org/schema/context http://www.springframework.org/schema/context/spring-context-3.0.xsd"> <context:component-scan base-package="org.example" /> <sws:annotation-driven /> <bean class="org.springframework.ws.server.endpoint.adapter.GenericMarshallingMethodEndpointAdapter"> <property name="marshaller" ref="marshaller" /> <property name="unmarshaller" ref="marshaller" /> </bean> <bean id="marshaller" class="org.springframework.oxm.xmlbeans.XmlBeansMarshaller"/> <sws:dynamic-wsdl id="HelloService" portTypeName="service" locationUri="/HelloService" > <sws:xsd location="/WEB-INF/HelloService.xsd" /> </sws:dynamic-wsdl> </beans> sws: annotation-driven - says that this project uses annotations.
And the context: component-scan indicates the package in which the annotations will be searched, while the search is also performed in subpackages.
The next two bins will always be the same. Their essence consists in accepting and transforming a request from Xml into a Java object and further inverse transformation.
sws: dynamic-wsdl is responsible for automatically generating a WSDL document based on the generated Xml schema.
The location points to the path to the scheme.
locationUri - the address (relative to the container) by which the WSDL scheme will be available.
In my case, WSDL is available at the following address:
localhost / HelloService / HelloService.wsdl
Deployment descriptor
And finally, the last.
In the WEB-INF directory, modify or create the web.xml file.
<?xml version="1.0" encoding="UTF-8"?> <!DOCTYPE web-app PUBLIC "-//Sun Microsystems, Inc.//DTD Web Application 2.3//EN" "http://java.sun.com/dtd/web-app_2_3.dtd"> <web-app> <display-name>HelloService</display-name> <description>HelloService</description> <servlet> <servlet-name>service-ws</servlet-name> <servlet-class>org.springframework.ws.transport.http.MessageDispatcherServlet</servlet-class> <init-param> <param-name>transformWsdlLocations</param-name> <param-value>true</param-value> </init-param> <servlet-mapping> <servlet-name>service-ws</servlet-name> <url-pattern>/*</url-pattern> </servlet-mapping> </web-app> I will not describe this file anymore, most should already know. For simple projects, it shouldn’t be changed. It is worth noting that the servlet name (servlet-name) must match the name of the Spring configuration file of the service-ws -servlet.xml service.
Well, then deploy the application to the server.
The creation of the service is completed. If nothing is missed, then the service should function.
Health check
The very first sign of correct operation is the generated WSDL scheme.
To check, simply go to the address of this scheme (http: //localhost/HelloService/HelloService.wsdl) and look: there should be an xml file displayed. If nothing is displayed or what error has appeared, reread the entire article carefully and look for what we did wrong.
For further verification, we will need soapUI (I have version 3.0.1).
Install and run it.
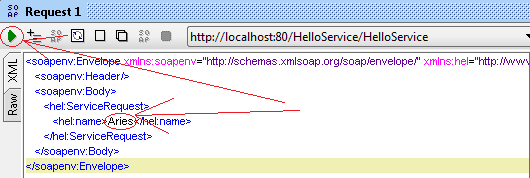
Create a new project: File => New soapUI Project. In the Initial WSDL / WADL field, insert the link to the WSDL scheme (http: //localhost/HelloService/HelloService.wsdl).
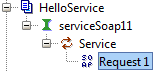
In the created project we open the necessary request.
In the Name field, type in the name and click on the button "Send request"
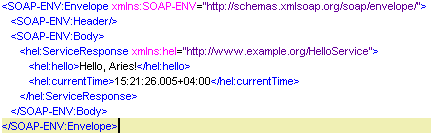
As a result, we receive a response from the server with a greeting and the current time.
If something went wrong, then again reread this article.
What's next?
Well, then you have to write a client for this Web service. But this is already material for another article, which may be written later if this material is of interest to someone.
Source: https://habr.com/ru/post/148403/
All Articles