We connect AWS Elastic Beanstalk and СloudBees
Introduction
In this article I will try to explain how to make two popular cloud services work together for the benefit of humanity. Surely that bright day will come when Elastic Beanstalk will be perfect and this article will not be needed.
The functionality that CloudBees provides which I lack in Elastic Beanstalk Free Tier
')
- MySQL DB
- Jenkins
- Svn git
- Deploy to CloudBees
The functionality that Elastic Beanstalk provides which I lack in CloudBees
- "100%" uptime
- speed
- monitoring, events and so on.
Undoubtedly, Elastic Beanstalk is a more powerful and promising service that will completely absorb CloudBees in the future, but for now we will do it better for yourself.
Step 1: Register Elastic Beanstalk (skip if you already have)
In the example, I created a test application on US East (Virginia) servers, which, I think, had a significant effect on the connection speed with the database and the deployment of the application from Jenkins. But you, of course, can try other regions.
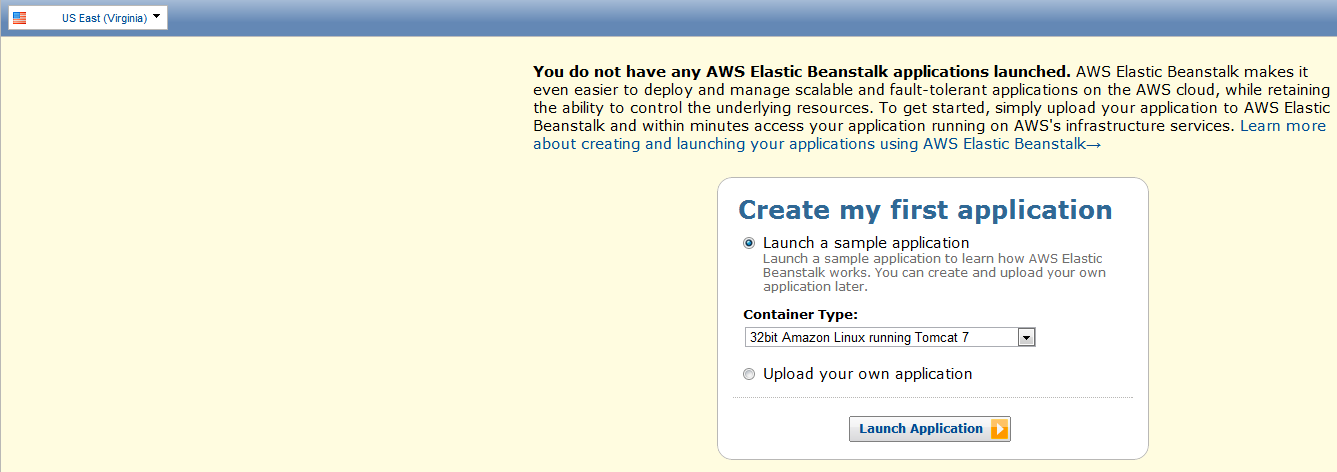
1.1 Create a new application
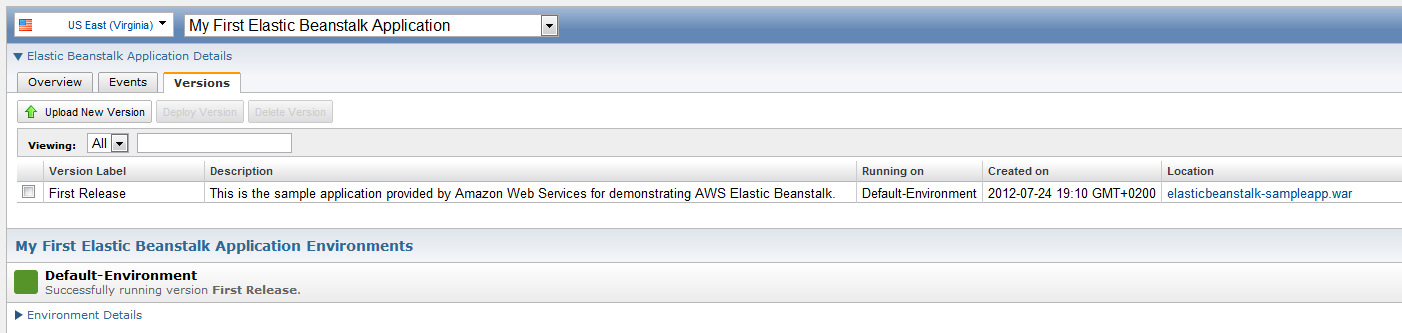
1.2 Get the result
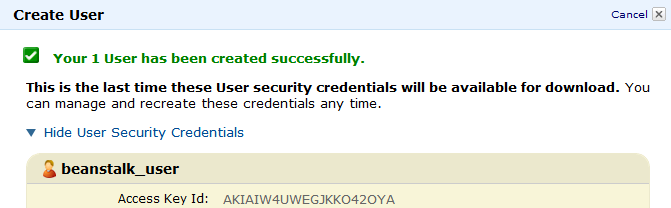
1.3 Create a new user for the Elastic Beanstalk API
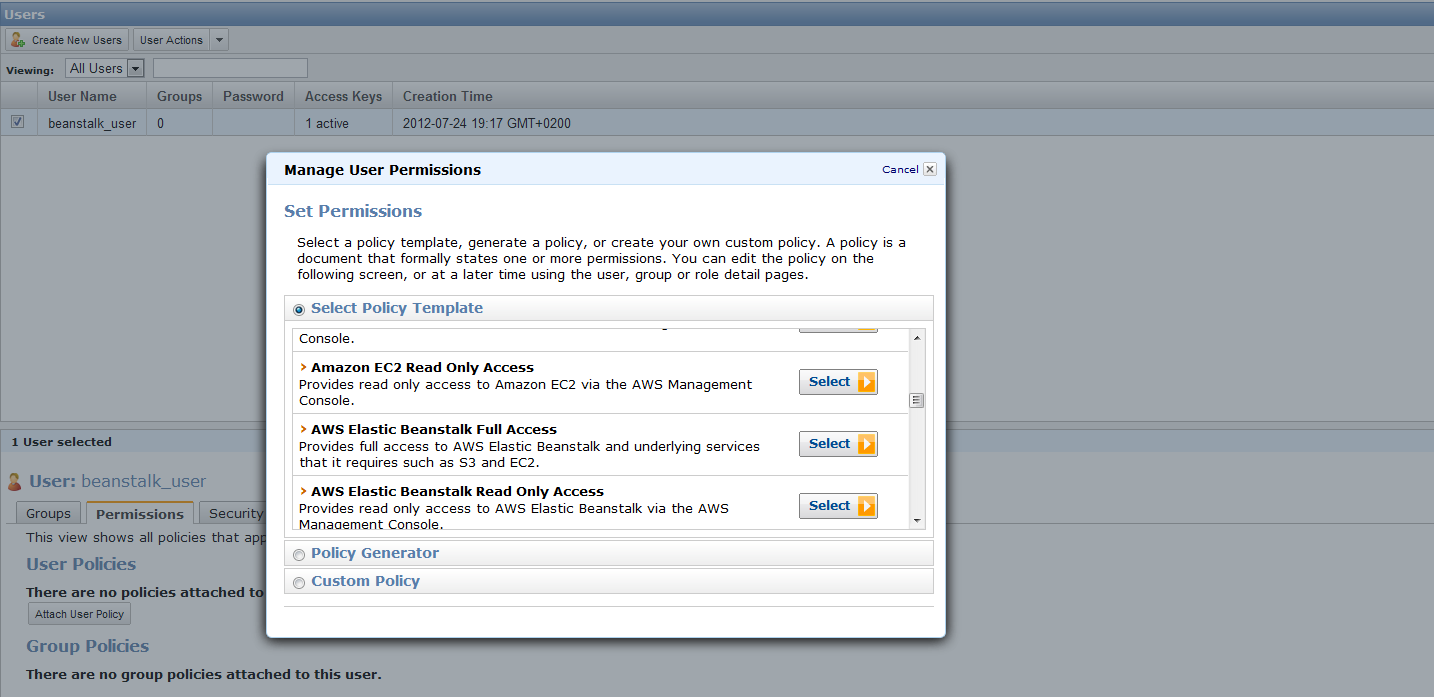
1.4 We give the user permission "AWS Elastic Beanstalk Full Access"
1.5 Checking the S3 bucket created to hold the WAR

1.6 Verify that the test application is running

Step 2: Register CloudBees (skip if you already have)
2.1 Create a new MySQL DB
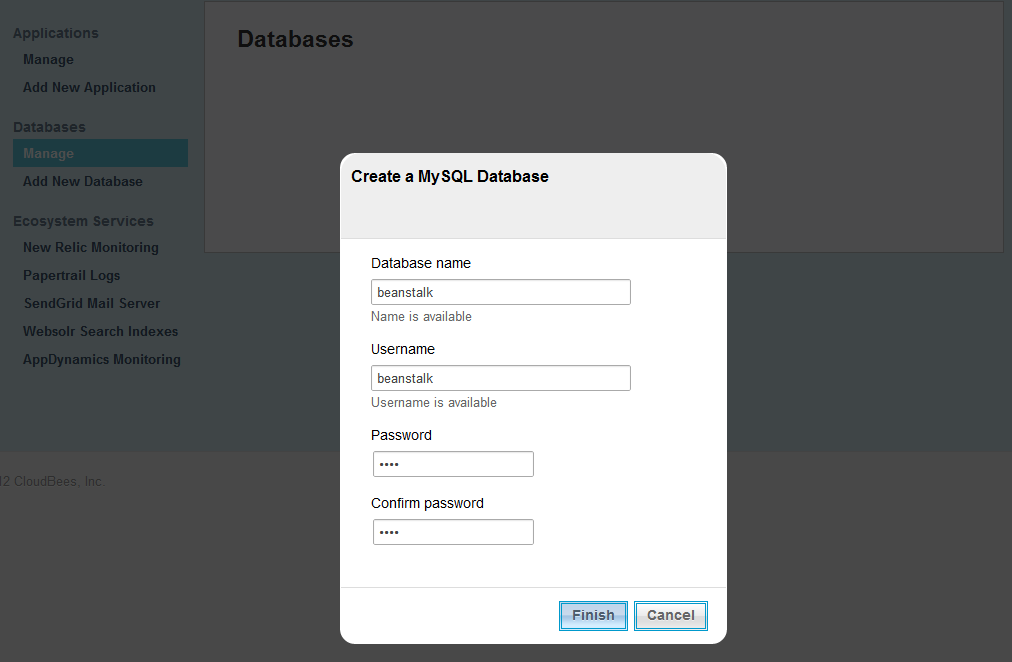
For the example, the testdata table was also created, with the fields id, foo, bar to demonstrate the speed of query execution.
2.2 Create a GIT repository (used solely as an example, to store sources)

2.3 to be continued ... see step: 4
Step 3: Create a test web application
pom.xml
<?xml version="1.0"?> <project xmlns="http://maven.apache.org/POM/4.0.0" xmlns:xsi="http://www.w3.org/2001/XMLSchema-instance" xsi:schemaLocation="http://maven.apache.org/POM/4.0.0 http://maven.apache.org/xsd/maven-4.0.0.xsd"> <modelVersion>4.0.0</modelVersion> <groupId>com.elasticbeanstalk.sampleapp</groupId> <artifactId>elasticbeanstalk-sampleapp</artifactId> <version>1.0-SNAPSHOT</version> <packaging>war</packaging> <name>elasticbeanstalk-sampleapp</name> <url>http://Default-Environment-whahswsu23.elasticbeanstalk.com</url> <properties> <maven.build.timestamp.format>yyyyMMddHHmmss</maven.build.timestamp.format> <beanstalk.versionLabel>${maven.build.timestamp}</beanstalk.versionLabel> </properties> <dependencies> <dependency> <groupId>mysql</groupId> <artifactId>mysql-connector-java</artifactId> <version>5.1.16</version> <scope>runtime</scope> </dependency> <dependency> <groupId>javax.servlet</groupId> <artifactId>jstl</artifactId> <version>1.2</version> <scope>runtime</scope> </dependency> </dependencies> <build> <finalName>elasticbeanstalk-sampleapp</finalName> <plugins> <plugin> <groupId>br.com.ingenieux</groupId> <artifactId>beanstalk-maven-plugin</artifactId> <version>0.2.6</version> <configuration> <applicationName>My First Elastic Beanstalk Application</applicationName> <s3Bucket>elasticbeanstalk-us-east-1-997639223855</s3Bucket> <s3Key>${maven.build.timestamp}-${project.build.finalName}.war</s3Key> <environmentName>Default-Environment</environmentName> </configuration> </plugin> </plugins> </build> </project> From the unusual only plugin beanstalk-maven-plugin to automatically install the application on the Elastic Beanstalk.
applicationName - specified the default value from clause 1.2
s3Bucket - the name of the S3 bucket from paragraph 1.5
s3Key - the name of the war file to save to S3, $ {maven.build.timestamp} will be used as the version name of the application.
environmentName - specified the default value from clause 1.2
context.xml
<Context> <Resource name="jdbc/beanstalk" auth="Container" type="javax.sql.DataSource" factory="org.apache.tomcat.dbcp.dbcp.BasicDataSourceFactory" username="beanstalk" password="" driverClassName="com.mysql.jdbc.Driver" url="jdbc:mysql://ec2-50-19-213-178.compute-1.amazonaws.com:3306/beanstalk?autoReconnect=true&characterEncoding=utf8" validationQuery="SELECT 1" maxWait="1000" removeAbandoned="true" maxActive="30" maxIdle="10" removeAbandonedTimeout="60" logAbandoned="true"/> </Context> Describes the connection to the database created in paragraph 2.1.
web.xml
<web-app xmlns="http://java.sun.com/xml/ns/j2ee" xmlns:xsi="http://www.w3.org/2001/XMLSchema-instance" xsi:schemaLocation="http://java.sun.com/xml/ns/j2ee http://java.sun.com/xml/ns/j2ee/web-app_2_4.xsd" version="2.4"> <display-name>Archetype Created Web Application</display-name> <welcome-file-list> <welcome-file>index.jsp</welcome-file> </welcome-file-list> <resource-ref> <res-ref-name>jdbc/beanstalk</res-ref-name> <res-type>javax.sql.DataSource</res-type> <res-auth>Container</res-auth> </resource-ref> </web-app> index.jsp
<%@ page session="false" %> <%@ page contentType="text/html;charset=UTF-8" language="java" %> <%@ taglib prefix="c" uri="http://java.sun.com/jsp/jstl/core" %> <%@ taglib prefix="sql" uri="http://java.sun.com/jsp/jstl/sql" %> <!DOCTYPE html PUBLIC "-//W3C//DTD XHTML 1.0 Transitional//EN" "http://www.w3.org/TR/xhtml1/DTD/xhtml1-transitional.dtd"> <html xmlns="http://www.w3.org/1999/xhtml"> <head> <meta http-equiv="Content-Type" content="text/html; charset=utf-8"/> <title>Custom Welcome Page</title> </head> <body> <p>Your <b>custom</b> AWS Elastic Beanstalk Application is now running on your own dedicated environment in the AWS Cloud</p> <br/><br/><b>testdata:</b><br/> <jsp:useBean id="now1" class="java.util.Date" /> <sql:query dataSource="jdbc/beanstalk" var="rst" scope="request"> select id, foo, bar from testdata </sql:query> <c:forEach items="${rst.rows}" var="row"> ${row.id} ${row.foo} ${row.bar}<br/> </c:forEach> <jsp:useBean id="now2" class="java.util.Date" /> <br/><br/>Time: ${now2.time - now1.time} ms. </body> </html> And test index page in which the simplest query to the database is executed and the execution time is displayed.
Download the entire project: git clone git: //git.cloudbees.com/wickiup/beanstalk.git
Step 4: Go back to CloudBees - set up Jenkins
4.1 Creating a new task

4.2 Specify from which repository to download the project (in the example of GIT from CloudBees)

4.3 Add Post Step to deploy applications on Elastic Beanstalk

aws.accessKey and aws.secretKey indicate the one that you received in step 1.3.
This step will add the WAR to the S3 repository, create a new version of the application, and update the instance.
4.4 We collect the project - we look in a log
[INFO] Target Path: s3://elasticbeanstalk-us-east-1-997639223855/20120724145549-elasticbeanstalk-sampleapp.war [INFO] Uploading artifact file: /scratch/hudson/workspace/beanstalk/target/elasticbeanstalk-sampleapp.war [INFO] Artifact Uploaded [INFO] SUCCESS [INFO] ETag: 81af708b625c34c2b5a9b1d12057f575 [class: String] [INFO] [INFO] --- beanstalk-maven-plugin:0.2.6:create-application-version (default-cli) @ elasticbeanstalk-sampleapp --- [INFO] SUCCESS [INFO] sourceBundle: {S3Bucket: elasticbeanstalk-us-east-1-997639223855, S3Key: 20120724145549-elasticbeanstalk-sampleapp.war, } [class: S3Location] [INFO] versionLabel: 20120724145549 [class: String] [INFO] description: elasticbeanstalk-sampleapp [class: String] [INFO] applicationName: My First Elastic Beanstalk Application [class: String] [INFO] dateCreated: Tue Jul 24 14:56:03 EDT 2012 [class: Date] [INFO] dateUpdated: Tue Jul 24 14:56:03 EDT 2012 [class: Date] [INFO] [INFO] --- beanstalk-maven-plugin:0.2.6:update-environment (default-cli) @ elasticbeanstalk-sampleapp --- [INFO] Calling update-environment, and using versionLabel: 20120724145549 [INFO] SUCCESS [INFO] resources: {LoadBalancer: {LoadBalancerName: awseb-Default-Environment, Domain: awseb-Default-Environment-1219914711.us-east-1.elb.amazonaws.com, Listeners: [{Protocol: http, Port: 80, }], }, } [class: EnvironmentResourcesDescription] [INFO] versionLabel: 20120724145549 [class: String] [INFO] status: Updating [class: String] [INFO] applicationName: My First Elastic Beanstalk Application [class: String] [INFO] endpointURL: awseb-Default-Environment-1219914711.us-east-1.elb.amazonaws.com [class: String] [INFO] health: Grey [class: String] [INFO] dateUpdated: Tue Jul 24 14:56:03 EDT 2012 [class: Date] [INFO] environmentId: e-4hephxdqd9 [class: String] [INFO] solutionStackName: 32bit Amazon Linux running Tomcat 7 [class: String] [INFO] CNAME: Default-Environment-whahswsu23.elasticbeanstalk.com [class: String] [INFO] description: This is the default environment for the sample application. [class: String] [INFO] dateCreated: Tue Jul 24 13:10:42 EDT 2012 [class: Date] [INFO] environmentName: Default-Environment [class: String] [INFO] ------------------------------------------------------------------------ [INFO] BUILD SUCCESS [INFO] ------------------------------------------------------------------------ [INFO] Total time: 14.653s [INFO] Finished at: Tue Jul 24 14:56:04 EDT 2012 [INFO] Final Memory: 6M/15M [INFO] ------------------------------------------------------------------------ Finished: SUCCESS Step 5: Verify that everything worked out
5.1 We look into the Elastic Beanstalk console

As we can see, a new version of the application has appeared (20120724145549), which is now active.
5.2 We look in console S3

WAR file (20120724145549-elasticbeanstalk-sampleapp.war) with the current version of the application in place.
5.3 Checking the WEB interface
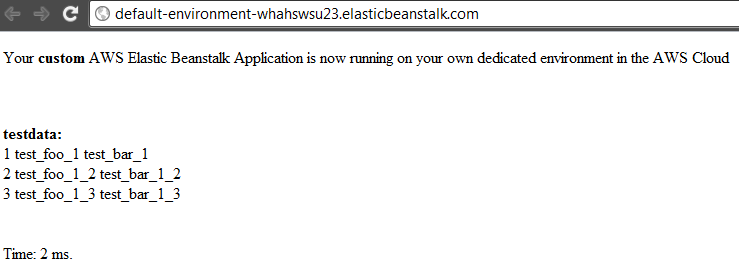
The query execution time is ~ 2 ms, which is not bad for a Free Tier.
Documentation
AWS Free Tier
beanstalk-maven-plugin
Source: https://habr.com/ru/post/148400/
All Articles