Android stopwatch with Python + sl4a + fullScreenUI
Introduction
Such a wonderful thing as SL4A (Scripting Level for Android) is no longer news. With each new SL4A release, the API's ability to access / control the smartphone is growing. Until recently, the creation of the user interface was limited to webView tools and standard dialog boxes. But in the r5 version a new one appeared, as the developers stated, so far experimental, a way to create a user interface - fullScreenUI.
FullScreenUI allows you to create an interface using standard
I hope that you are already familiar with SL4A (if not, then Habré has a lot of useful and interesting information).
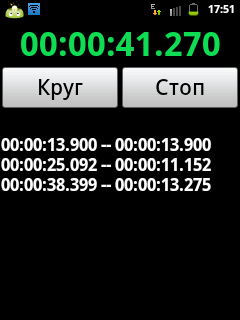
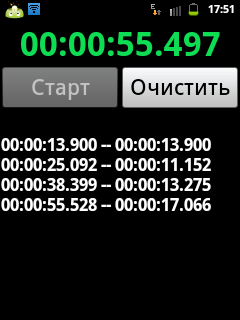
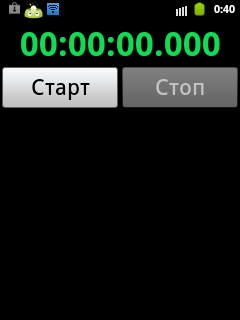
What happens
Here are the screenshots of the final result:
Markup
To begin with we will create a marking of our interface. This is the standard
Consider the markup itself:
<?xml version="1.0" encoding="utf-8"?> <RelativeLayout android:id="@+id/MainWidget" android:layout_width="fill_parent" android:layout_height="fill_parent" xmlns:android="http://schemas.android.com/apk/res/android"> android:background="#ff000000" <TextView android:id="@+id/display" android:layout_width="fill_parent" android:layout_height="wrap_content" android:layout_alignParentTop="true" android:textColor="#0bda51" android:text="00:00:00.000" android:textStyle="bold" android:gravity="center" android:textSize="60dp" /> <Button android:id="@+id/startbutton" android:layout_width="0dp" android:layout_height="wrap_content" android:layout_below="@id/display" android:layout_alignParentLeft="true" android:textSize="40dp" android:layout_toLeftOf = "@id/center"/> <Button android:id="@+id/center" android:layout_below="@id/display" android:layout_height="wrap_content" android:layout_width="0dp" android:layout_centerHorizontal="true" /> <Button android:id="@+id/stopbutton" android:layout_width="0pdp" android:layout_height="wrap_content" android:enabled="false" android:textSize="40dp" android:layout_below="@id/display" android:layout_alignParentRight="true" android:layout_toRightOf = "@id/center"/> <TextView android:id="@+id/info" android:layout_width="fill_parent" android:layout_height="0dp" android:layout_below="@id/stopbutton" android:textColor="#FFFFFF" android:text="" android:textStyle="bold" android:layout_alignParentBottom="true" android:textSize="30dp" android:layout_alignParentBottom="true"/> </RelativeLayout> ')
If you even see this markup for the first time, but have some experience with HTML or XML, everything should be clear. If we talk about the support of RelativeLayout, then the full use of this type of markup became possible after attributes such as
android:layout_alignParentBottom="true"- the bottom edge of the widget will be aligned to the bottom edge of the parent widget (similarly forlayout_alignParentTop,layout_alignParentLeft,layout_alignParentRight)android:layout_below="@id/display"- will place the widget under the widget with the specified idandroid:layout_toRightOf = "@id/center"- will place the widget to the left of the widget with the specified idandroid:layout_centerHorizontal="true"- will center on the parent widget- etc
The Button with the id “center” is created only so that the “Start” and “Stop” buttons are stretched to it (it is located in the center). This is what should work:
Code
Actually the stopwatch code itself. Some trivial or duplicate code is omitted. Full version: http://pastebin.com/z4H2p7Wq
God forgive me the Python community for ugly code and global variables, I just got acquainted with this programming language quite recently.
#StopWatch.py #------------------------ layout="""<?xml version="1.0" encoding="utf-8"?> ... </RelativeLayout> """ rCircle_label = "" rStart_label = "" rClear_label = "" rStop_label = "" #--------------------- import android, os, datetime # starttime=datetime.datetime.now() runed = False # True lastcircle = 0 cleared = True # True, def format_time(tm): hours = int(tm.seconds / 3600) minuts = int((tm.seconds - hours*3600)/60) seconds=tm.seconds - hours*3600 - minuts*60 microseconds = round(tm.microseconds/1000) return "{0:0>02}:{1:0>02}:{2:0>02}.{3:0>03}".format(hours,minuts,seconds,microseconds) # . now =0, def timediff(prev, now=0): if not now: now=datetime.datetime.now() diff=now-prev return format_time(diff) def stopwatch_start(): global runed,lastcircle,starttime runed=True starttime=datetime.datetime.now() lastcircle = starttime droid.fullSetProperty("startbutton","text",rCircle_label) droid.fullSetProperty("stopbutton","enabled","true") def stopwatch_circle(): # # t - lastdata = droid.fullQueryDetail("info").result['text'] newdata = lastdata+"\n"+t; droid.fullSetProperty("info","text",newdata) lastcircle = datetime.datetime.now() def stopwatch_stop(): # def stopwatch_clear(): # def eventloop(): while True: event=droid.eventWait(50).result if runed: droid.fullSetProperty("display","text",timediff(starttime)) if event != None: if event["name"]=="key": droid.vibrate(30) if event["data"]["key"] == '4': return elif event["data"]["key"]=='24' and cleared: if runed: stopwatch_circle() else: stopwatch_start() elif event["data"]["key"]=='25' and runed: stopwatch_stop() elif event["name"]=="click": droid.vibrate(30) id=event["data"]["id"] if id=="startbutton" and not runed: stopwatch_start() elif id=="stopbutton" and runed: stopwatch_stop() elif id=="stopbutton" and not runed: stopwatch_clear() elif id=="startbutton" and runed: stopwatch_circle() elif event["name"]=="screen": if event["data"]=="destroy": return droid = android.Android() try: print(droid.fullShow(layout)) droid.fullKeyOverride([24,25],True) droid.fullSetProperty("MainWidget","background","#ff000000") droid.fullSetProperty("startbutton","text",rStart_label) droid.fullSetProperty("stopbutton","text",rStop_label) eventloop() finally: droid.fullDismiss() Parsing code
So, in order to display the interface created by us in the form of xml markup, you need to pass a string with markup to the
droid.fullShow function. You can of course create a separate file with markup and then read it, but in the case when the markup is simple, like mine, I just assigned it to the layout variable. For debugging purposes, the result returned by droid.fullShow can be output to the console: print(droid.fullShow(layout)) If there were errors in the markup, or supported attributes, a corresponding message will be displayed. After calling this function, if the markup was correct, it will be displayed on the device screen. To remove it you need to call the function: droid.fullDismiss() If this function is not called for some reason, such as a program crash, then the created interface will not be cleared automatically, but simply will remain, so it is important to use the try finally constructNext line:
droid.fullKeyOverride([24,25],True) replaces the standard behavior when pressing keys with codes 24 and 25 (these are volume keys, codes for other keys here ). What does it mean? This means that if our script is running and one of these keys is pressed, then the standard action of these keys will not be executed (the volume of the sound will not be changed in this particular case).To change the properties of widgets from the script, there is a function
droid.fullSetProperty , which takes three parameters: the widget id, the property name, the value assigned. For example this line droid.fullSetProperty("startbutton","text",rStart_label) we change the inscription on the button.
To query the properties of
droid.fullQueryDetail , takes one value - the widget's id. For example, you can get the value of the property - text text field with id info as follows: droid.fullQueryDetail("info").result['text'] Message handling
All user actions, such as pressing a button, or a key, get into the script as messages.
Message handling is convenient to implement in a separate function. I have
eventloop() functions. There are a number of functions for processing messages. For this example it was convenient to use: droid.eventWait . This function stops the script until a message is received. Accepts optional parameter - maximum wait time in ms. If during this time the message was not received, the script will continue to run, and the result of the function will be the object None . If the message is received, the result of event=droid.eventWait(50).result there will be an associative array with the name of the event and information about it.To begin with, we check the value of
event["name"] , if it is equal to "key" , then a button was pressed, the code for which can be learned from event["data"]["key"] . If it is equal to “click” , then there was a click on a button (or another widget), whose id can be found in event["data"]["id"] .I hope that the rest of the code is completely understandable and does not require explanation.
Total
With the advent of fullScreenUI in sl4a, developers in Python, Perl, JRuby, Lua, BeanShell, JavaScript can now compete with Java developers. Although the fullScreenUI support in sl4a is still far from ideal, yet you can already create quite a good, fast graphical interface for your scripts. Developers are constantly engaged in the improvement of this API, which is very pleasing.
upd: The stopwatch is not the best example of using sl4a + python (since the specifics of the language is not the same), but for the introductory article - just right.
Source: https://habr.com/ru/post/148142/
All Articles