Quadcopter-R2. Upgrade
In the spring I wrote how to build a cheap and simple copter for 1 day and $ 120
Its main drawback is that the KKmultiopter controller is rather primitive in its capabilities - it cannot even keep the horizon itself. Well, let's fix this flaw!
Those who have already built on the previous recipe, I hasten to reassure - the upgrade budget is only $ 40-55. For those who build from scratch, there is an opportunity to improve the design.
I built a second copter, because Components for him were bought long ago.
So, time goes by, electronics is getting cheaper. The Chinese brothers relieve us of the need to assemble the flight controller from the individual components. The main character today will be the board Crius Multiwii SE.

Crius MultiWii SE
What is she like?
In fact, this is an Arduino-compatible board with the sensors we need:
ATMEGA328P - microcontroller
· ITG3205 three-axis gyroscope (angular velocity sensor)
· BMA180 (three-axis accelerometer)
· BMP085 (pressure sensor)
· HMC5883L three-axis magnetometer (compass)
The gyroscope performs the same function as on the cook board — it determines the deviations of the copter so that the control board can compensate for them.
Accelerometer - knows where the "bottom", due to the projection of the vector of gravity g on the coordinate system of the cock. Helps thus keep the horizon.
The pressure sensor - well, it's just an altimeter, you can use it to hold height (accuracy is low, but better than nothing). Not required.
Magnetometer - or compass. Allows you to determine the direction to the north and thus compensate for the rotation of the rotor around the vertical axis, which can not be caught with the accelerometer and gyroscope. It is useful.
In version 0.2, as for me, it costs $ 31.99 , although it already ends at rctimer.com, but there is on goodluckbuy.com
And in version 1.0 it costs $ 38.99
What to take - no difference. I took my v0.2 for 41.99
If you are ready to sacrifice a barometer and magnetometer in order to save, or you have something more awesome in store, take the version of Light (LE) - it only has a gyroscope and an accelerometer. Sold, for example, on goodlukbae.
In principle, from the mandatory, this is all that we need for the upgrade, everything else can be safely bought from the list of the kopter for $ 120.
I bought another USB-UART adapter for convenience: (useful to flash arduino pro, pro mini, and for my own crafts)
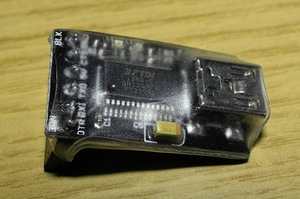
Sold without heat shrinkage, I stuffed it into it, so as not to accidentally close it or not to kill it with static.
You can use any adapter variant with a DTR line to reset from the Arduino environment.
')
The board is identical in size to the KKmulticopter, so you can simply put it in its place in the previous version of the multicopter.
Secured? Now the wires. I received such a kit (USB-UART ordered additionally):

Crius MultiWii SE
The cables are very interesting - one ordinary and two "tees":

In the previous article I talked about the channel numbers of the receiver.
Here they are called in the second variant:
1 - Aileron (Aileron, ROLL)
2 - Elevator (Pitch, PITCH)
3 - Throttle (gas)
4 - Rudder (rudder, yaw, YAW)
We connect the 1st channel of the receiver with conventional wiring, and the rest with a tee we connect only signal contacts:
just like for a KKmulticopter:

" Receiver Connection "
On the board, this will be consistently:
3, 1, 2, 4 channels (they are marked as THR, ROLL, PITCH, YAW - comb in the bottom row on the photo board).
Then we connect the cables from ESC. For the X-configuration of the copter, the following connection of motors is recommended: (pin numbers of Arduino / Crius are written on the motors)

Left Front Motor - D3
Right front motor - D10
Right rear engine - D9
Left rear engine - D11
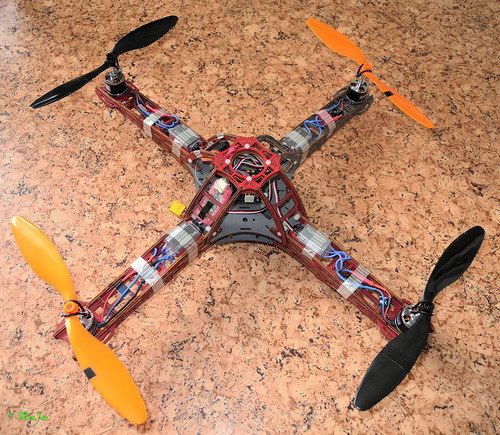
The connected and installed board looks like this:

I additionally connected to the TTL connector (on the large photo of the board, the top right 4-pin, on the photo of the installed board, there is a blue wire with a white connector) Bluetooth module that I used for the tracked robot:

Download:
Arduino 1.0
MultiWii release 2.0
We connect the Crius board to the computer via the FTDI connector.
We load and flash the sketch MultiWii_2_0.ino into the board. It is stitched like a regular Arduino Duemillanove w / Atmega328.
Now, launch the version of the configurator for your OS from the MultiWiiConf_2_0 folder (for example, MultiWiiConf_2_0.exe from application.windows32).
Select the port on the left that created the FTDI adapter (I have it 15th), if everything is done correctly, the list of ports will turn green. Click “Start” - the correctly stitched controller will show the sensor data:
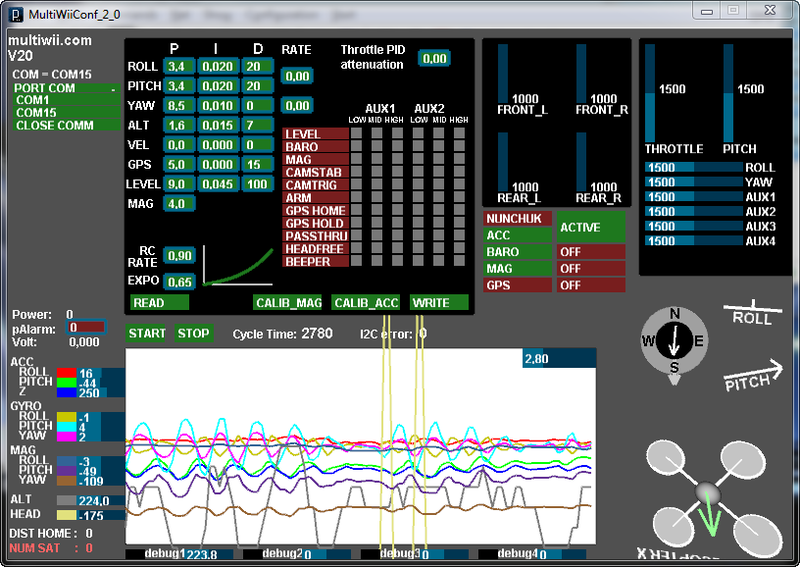
Move the sticks on the radio remote control - they should be displayed in the program.
Click Read - consider the settings, see the PID coefficients and other settings.
After changing the coefficients, do not forget to write them with the Write button.
Read more about customization via GUI here.
if you, like me, have connected the Bluetooth module instead of the FTDI cable, the same configuration can be done using the MultiWii Configurator program from the Android phone.
The program is not very complicated, I think everyone will understand.
Before you go out into the yard, carefully read about the PID settings .
Set up? We check fastenings, and we go to test and adjust on the street.
I set it up directly from the phone: we read the settings, change the parameters, write the phone into the pocket, check how it flies. Be careful - do not break your copter during setup.
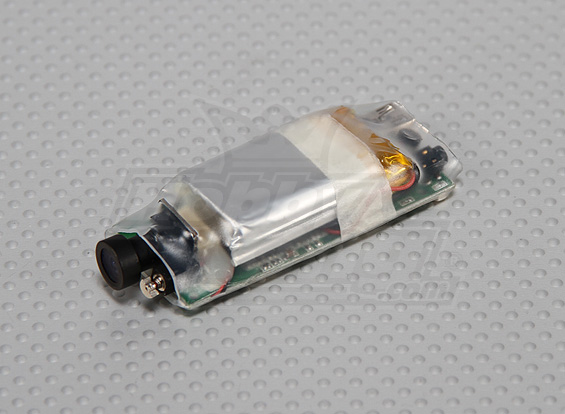
I secured a small camera on the top of the copter through the packaging dummy cellophane for vibration isolation
For training, I made a "chassis" of air bags that the Chinese put in order to keep the package safe:

" Quadcopter R2 "
PS For those who want the same copter, spare parts:
Motors Turnigy L2215J-900 Brushless Motor (200w) $ 11.81
Regulators Turnigy AE-25A Brushless ESC $ 10.29
Forward and reverse spin propellers for $ 4.47 for a set of 6 pieces.
Frame HobbyKing Quadcopter Frame V1 $ 14.99
Battery Turnigy 2200mAh 3S 40C $ 14.99
The rest of the small things and radio equipment fit any of the things described in the previous article . I use Turnigy 9x hardware with er9x firmware and 6-channel receiver Hobby King 2.4Ghz Receiver 6Ch V2 (it is smaller and cheaper than the native 8-channel)
What and how it is fixed can be seen on full-size photos by clicking on Yandex-photos. The album also contains other photos of the assembly process.
PPS Questions are better to ask here or in LJ in the comments to the post , since many ask the same questions in personal correspondence.
UPD. Instead of a frame HobbyKing Quadcopter Frame V1, take something else. At least Q450 Glass Fiber Quadcopter Frame 450mm or RM450 on rctimer - I ordered this myself, hopefully, it will be stronger. My frame showed itself not with the best hand in terms of better stability and rigidity, although it flew relatively well for my money. For learning the most - breaking, will protect the remaining components.
Have a good flight!
Its main drawback is that the KKmultiopter controller is rather primitive in its capabilities - it cannot even keep the horizon itself. Well, let's fix this flaw!
Those who have already built on the previous recipe, I hasten to reassure - the upgrade budget is only $ 40-55. For those who build from scratch, there is an opportunity to improve the design.
I built a second copter, because Components for him were bought long ago.
So, time goes by, electronics is getting cheaper. The Chinese brothers relieve us of the need to assemble the flight controller from the individual components. The main character today will be the board Crius Multiwii SE.
Crius MultiWii SE
What is she like?
In fact, this is an Arduino-compatible board with the sensors we need:
ATMEGA328P - microcontroller
· ITG3205 three-axis gyroscope (angular velocity sensor)
· BMA180 (three-axis accelerometer)
· BMP085 (pressure sensor)
· HMC5883L three-axis magnetometer (compass)
We will understand what and why you need:
The gyroscope performs the same function as on the cook board — it determines the deviations of the copter so that the control board can compensate for them.
Accelerometer - knows where the "bottom", due to the projection of the vector of gravity g on the coordinate system of the cock. Helps thus keep the horizon.
The pressure sensor - well, it's just an altimeter, you can use it to hold height (accuracy is low, but better than nothing). Not required.
Magnetometer - or compass. Allows you to determine the direction to the north and thus compensate for the rotation of the rotor around the vertical axis, which can not be caught with the accelerometer and gyroscope. It is useful.
Wonderful. How much does a miracle cost?
In version 0.2, as for me, it costs $ 31.99 , although it already ends at rctimer.com, but there is on goodluckbuy.com
And in version 1.0 it costs $ 38.99
What to take - no difference. I took my v0.2 for 41.99
If you are ready to sacrifice a barometer and magnetometer in order to save, or you have something more awesome in store, take the version of Light (LE) - it only has a gyroscope and an accelerometer. Sold, for example, on goodlukbae.
In principle, from the mandatory, this is all that we need for the upgrade, everything else can be safely bought from the list of the kopter for $ 120.
I bought another USB-UART adapter for convenience: (useful to flash arduino pro, pro mini, and for my own crafts)
Sold without heat shrinkage, I stuffed it into it, so as not to accidentally close it or not to kill it with static.
You can use any adapter variant with a DTR line to reset from the Arduino environment.
')
We connect
The board is identical in size to the KKmulticopter, so you can simply put it in its place in the previous version of the multicopter.
Secured? Now the wires. I received such a kit (USB-UART ordered additionally):
Crius MultiWii SE
The cables are very interesting - one ordinary and two "tees":
In the previous article I talked about the channel numbers of the receiver.
Here they are called in the second variant:
1 - Aileron (Aileron, ROLL)
2 - Elevator (Pitch, PITCH)
3 - Throttle (gas)
4 - Rudder (rudder, yaw, YAW)
We connect the 1st channel of the receiver with conventional wiring, and the rest with a tee we connect only signal contacts:
just like for a KKmulticopter:
" Receiver Connection "
On the board, this will be consistently:
3, 1, 2, 4 channels (they are marked as THR, ROLL, PITCH, YAW - comb in the bottom row on the photo board).
Then we connect the cables from ESC. For the X-configuration of the copter, the following connection of motors is recommended: (pin numbers of Arduino / Crius are written on the motors)
Left Front Motor - D3
Right front motor - D10
Right rear engine - D9
Left rear engine - D11
The connected and installed board looks like this:
I additionally connected to the TTL connector (on the large photo of the board, the top right 4-pin, on the photo of the installed board, there is a blue wire with a white connector) Bluetooth module that I used for the tracked robot:
Soft
Download:
Arduino 1.0
MultiWii release 2.0
We connect the Crius board to the computer via the FTDI connector.
We load and flash the sketch MultiWii_2_0.ino into the board. It is stitched like a regular Arduino Duemillanove w / Atmega328.
Now, launch the version of the configurator for your OS from the MultiWiiConf_2_0 folder (for example, MultiWiiConf_2_0.exe from application.windows32).
Select the port on the left that created the FTDI adapter (I have it 15th), if everything is done correctly, the list of ports will turn green. Click “Start” - the correctly stitched controller will show the sensor data:
Move the sticks on the radio remote control - they should be displayed in the program.
Click Read - consider the settings, see the PID coefficients and other settings.
After changing the coefficients, do not forget to write them with the Write button.
Read more about customization via GUI here.
if you, like me, have connected the Bluetooth module instead of the FTDI cable, the same configuration can be done using the MultiWii Configurator program from the Android phone.
The program is not very complicated, I think everyone will understand.
Before you go out into the yard, carefully read about the PID settings .
Set up? We check fastenings, and we go to test and adjust on the street.
I set it up directly from the phone: we read the settings, change the parameters, write the phone into the pocket, check how it flies. Be careful - do not break your copter during setup.
I secured a small camera on the top of the copter through the packaging dummy cellophane for vibration isolation
For training, I made a "chassis" of air bags that the Chinese put in order to keep the package safe:
" Quadcopter R2 "
Fly!
PS For those who want the same copter, spare parts:
Motors Turnigy L2215J-900 Brushless Motor (200w) $ 11.81
Regulators Turnigy AE-25A Brushless ESC $ 10.29
Forward and reverse spin propellers for $ 4.47 for a set of 6 pieces.
Frame HobbyKing Quadcopter Frame V1 $ 14.99
Battery Turnigy 2200mAh 3S 40C $ 14.99
The rest of the small things and radio equipment fit any of the things described in the previous article . I use Turnigy 9x hardware with er9x firmware and 6-channel receiver Hobby King 2.4Ghz Receiver 6Ch V2 (it is smaller and cheaper than the native 8-channel)
What and how it is fixed can be seen on full-size photos by clicking on Yandex-photos. The album also contains other photos of the assembly process.
PPS Questions are better to ask here or in LJ in the comments to the post , since many ask the same questions in personal correspondence.
Feel free to ask, but I will answer better for everyone at once.
UPD. Instead of a frame HobbyKing Quadcopter Frame V1, take something else. At least Q450 Glass Fiber Quadcopter Frame 450mm or RM450 on rctimer - I ordered this myself, hopefully, it will be stronger. My frame showed itself not with the best hand in terms of better stability and rigidity, although it flew relatively well for my money. For learning the most - breaking, will protect the remaining components.
Have a good flight!
Source: https://habr.com/ru/post/147991/
All Articles