Create extensions for Google Chrome
Yesterday I asked myself this question: how can I secure my profile in Google Chrome and in general all the data stored in it? Googling a bit, I found links to a bunch of extensions (like this ) that allow you to set a password both on the browser and on its individual profiles (this is logical if you know how Chrome works in the multi-profile mode). I started to install them and immediately tests for bugs. And as it turned out, none of them wants to work adequately in the multi-profile mode. Without thinking too long, I decided to write my own extension and at the same time understand the Google Chrome API. After reading a bit of documentation and sorting out how extensions work, I set to work.
 So let's get to work!
 We can set and change the password on the page that opens in the popup.html popup . Initially the password is not set and it can be set. You can later change it or even delete it. In short, all sorts of manipulations with the password to enter. I push the source of the file into the spoiler, I will not explain anything, in my opinion, and so everything is clear.
Write your comments and noticed bugs.
The principle of writing extensions
Some people think that expansion is something overseas, not subject to ordinary people. In fact, to write it you just need a notebook in which to write all this, and a browser in which to test writing. So, any extension for Chrome consists of the following components:- The manifest.json manifest file, which records information about the application;
- Other files that are used in the extension: it can be html-pages, scripts, images, etc.
So let's get to work!We write the manifest file
The manifest file is stored in the root folder of the project and, as you already understood, is a data set in JSON format. Consider the manifesto ishonik, and after that I will describe each item in more detail.{ "name": "Profile Guard", "description": "Google Chrome profile protection by password", "version": "0.1", "permissions": [ "tabs" ], "background_page": "background.html", "icons": { "48":"images/bigicon.jpg" }, "browser_action": { "default_title": "Profile Guard", "default_icon": "images/icon.png", "popup": "popup.html" } } - name , description and version - the actual name of the extension, its short description and version number;
- permissions is an array with additional extension rights to perform certain actions. You can read more here . In this case, the extension may know about open tabs and browser windows;
- background_page - the main page that runs when the browser starts and runs on the background;
- icons - a set of icons of different sizes;
- browser_action - description of the button on the toolbar. default_title - text when hovering over the button, default_icon - icon on the button, popup - html-page that opens in the pop-up after the click;
Background Page
The background page will check whether the password is set and prompt for it when opening the browser or creating a window with a certain profile. From the extensions I tested, my difference is precisely that it works more or less adequately in the multi-profile mode. The password from our profile will be stored in localStorage ['profile_password']. localStorage is an array in which an extension can store its own data without worrying about any other extension accessing this data. For each extension and profile it is a separate variable, so you can set different passwords for different profiles. <html> <head> <title>Profile Guard background page</title> </head> <body onload="pass();"> <script type="text/javascript"> function pass(){ chrome.windows.getAll(function(wins){ if(wins.length==1){ if(localStorage["profile_password"]){ var pass = prompt("Please enter password:",""); if(pass!=localStorage["profile_password"]){ alert("Access denied!"); chrome.windows.getCurrent(function (window){chrome.windows.remove(window.id)}); } } } }); } chrome.windows.onCreated.addListener(function(window){ pass(); }); </script> </body> </html> Set and change password
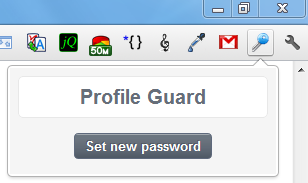
We can set and change the password on the page that opens in the popup.html popup . Initially the password is not set and it can be set. You can later change it or even delete it. In short, all sorts of manipulations with the password to enter. I push the source of the file into the spoiler, I will not explain anything, in my opinion, and so everything is clear.popup.html file
<html> <head> <title>Profile Guard background page</title> <style> body { font-family: sans-serif; background: #f5f5f5; color: #666E79; width: 250px; } div.form { background: white; border: solid 1px #e8e8e8; border-radius: 5px; } h1 { margin:0; padding: 0; font-size: 20px; text-align: center; line-height: 40px; } h2 { margin: 0 10px; padding: 0; font-size: 14px; line-height: 30px; } button { border:solid 1px #5E697C; background: URL(images/button.jpg); color: white; font-size: 13px; line-height: 22px; margin: 10px auto 15px; display: block; border-radius: 4px; cursor: pointer; font-weight: bolder; text-shadow: rgba(0,0,0,0.2) -1px -1px 0px; padding: 1 10px; } button:hover { background: URL(images/hover.jpg); } .newbutton { margin: 15px 0; } .field { padding: 5px 15px; text-align:right; } label { color: #989898; font-weight: bolder; font-size: 12px; float:left; line-height: 25px; } input { width: 135px; text-align:left; } </style> <script> function view(){ if(!localStorage["profile_password"]){ elnewbutton.style.display = "block"; elnewpass.style.display = "none"; elchpass.style.display = "none"; } else { elnewbutton.style.display = "none"; elnewpass.style.display = "none"; elchpass.style.display = "block"; } } function newpass(){ if(!localStorage["profile_password"]){ elnewpass.style.display = "block"; elnewbutton.style.display = "none"; } } function newset(){ if(!localStorage["profile_password"]){ var pass = npass.value; var conf = nconf.value; if(pass){ if(pass!=conf){ alert("Passwords don't match!"); npass.value = ""; nconf.value = ""; } else { localStorage["profile_password"] = pass; view(); alert("Password successfully changed"); } } } } function chset(){ if(localStorage["profile_password"]){ var old = cold.value; var pass = cpass.value; var conf = cconf.value; if(old!=localStorage["profile_password"]){ alert("Old password is entered incorrectly"); cold.value = ""; } else { if(pass){ if(pass!=conf){ cpass.value = ""; cconf.value = ""; alert("Passwords do not match!"); } else { localStorage["profile_password"] = pass; view(); alert("Password successfully changed"); } } } } } function claerpass(){ if(localStorage["profile_password"]){ var old = cold.value; if(!old){ alert("Enter old password first!"); } else { if(old!=localStorage["profile_password"]){ alert("Old password is entered incorrectly"); cold.value = ""; } else { localStorage["profile_password"] = ""; view(); alert("Password successfully deleted"); } } } } </script> </head> <body onload="view();"> <div class="form"> <h1>Profile Guard</h1> </div> <div class="newbutton" id="newbutton"> <button id="elnewbutton" onclick="newpass();">Set new password</button> </div> <div class="newpass form" id="elnewpass" style="display:block;"> <h2>Set password</h2> <div class="field"> <label>Password</label> <input type="password" id="npass" /> </div> <div class="field"> <label>Confirm</label> <input type="password" id="nconf" /> </div> <button id="elnewset" onclick="newset();">Set new password</button> </div> <div class="newpass form" id="elchpass" style="display:block;"> <h2>Password change</h2> <div class="field"> <label>Old password</label> <input type="password" id="cold" /> </div> <div class="field"> <label>Password</label> <input type="password" id="cpass" /> </div> <div class="field"> <label>Confirm</label> <input type="password" id="cconf" /> </div> <button id="elchset" onclick="chset();">Change password</button> <button id="elclear" onclick="claerpass();">Delete password</button> </div> </body> </html> Final stage
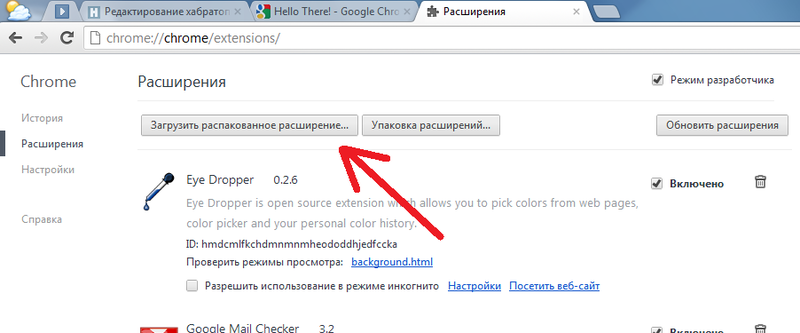
In conclusion, we need to pack our creation, it can be done on the extensions page by clicking on the "Expansion packaging" button. Specifying the folder with our output extension, we get two files: .crx - the file with the extension itself, .rem - the file with the secret key. In addition, you can share your creation with people, upload it to the Chrome WebStore , but for this you need to pay Google a fee of $ 5 (but this is only the first time during registration). Please do not judge strictly, because this is my first extension. Download the source can be on the link . I do not give a packaged extension, since only extensions from WebStore can be installed in chrome.Write your comments and noticed bugs.
')
Source: https://habr.com/ru/post/147824/
All Articles