Thermometer reading - via the web interface on the router
Good day! I want to tell you about a small tuning of the router, more precisely, about adding a digital thermometer and displaying data from it using the router itself.
When working on my diploma, the DS18B20 sensor came into my hands.

This is a digital output thermometer that transmits data using the 1-wire protocol. After some reflection, it was decided to teach my long-suffering router to display the external temperature, for statistics and just out of curiosity. I have a Linksys E3000 with an alternative firmware DD-WRT v24-sp2 (04/13/11) big. The usual firmware for such cases is not suitable, it does not give access to the necessary functions of the router in the future. My personal opinion is that DD-WRT is the best and most feature-rich alternative firmware. Well, how can you not fall in love with the firmware that supports BGP on a home router with 64 MB of RAM) Below is the DD-WRT firmware web interface.
')

Usually for data transmission over 1-wire use COM or LPT port, but, unfortunately, on this router there is only one USB connector. More precisely, it has wiring for UART on the board itself, but then you have to put up with the missing lid on the router, which ruins the design talent of the company Linksys. In this case, to work with the sensor, you can use USB converters - RS-232 like pl2303. But for the correct operation of this converter you need drivers. I’ll say right away that you shouldn’t do as I do and compile them from source, because the drivers for pl2303 are already included in the DD-WRT firmware and are not loaded) To download them, you will have to connect to the router via authorization by ssh or telnet protocols ( root, the password is the same as the one you specified in the web interface) If everything went well, then you see something like this:

As you already understood, this is a unix system (not IOS, unfortunately, Linksys is not Cisco), so there shouldn't be any difficulties with adapting to the shell.
The drivers are located in the /lib/modules/2.6.24.111/kernel/drivers/usb/serial directory and are called usbserial.ko and pl2303.ko. 2.6.24.111 is the version of the kernel and then it may well change in the future) they are loaded with the commands insmod usbserial.ko and insmod pl2303.ko from the directory where they are kept. If the USB-RS-232 adapter is connected, then after these commands the device should appear at the address / dev / usb / tts / <device number>, in my case number 0. You can check the driver loading via dmesg, it should show something like :
registered new interface driver usbserial
drivers / usb / serial / usb-serial.c: USB Serial Driver core
drivers / usb / serial / usb-serial.c: USB Serial support registered for pl2303
pl2303 1-1.3: 1.0: pl2303 converter detected
usb 1-1.3: pl2303 converter now attached to ttyUSB0
usbcore: registered new interface driver pl2303
drivers / usb / serial / pl2303.c: Prolific PL2303 USB to serial adapter driver driver
The next thing to do is add a program that can work with 1-wire.
It is called digitemp and distributed under the GNU General Public License. You can compile it for your router or search the Internet for a compiled program for your firmware. But there is a small underwater stone here - it will not be possible to write the program directly into the ROM due to the hardware features of the router. You can either write to / tmp, in other words, to RAM, where it will be safely erased after a reboot, or to a USB flash drive that will be connected via a usb hub. It is highly desirable that the hub be active, otherwise when loading the router, there may not be enough power at the same time on the USB flash drive and pl2303 and one / both devices are recognized in the system incorrectly.
In order for the flash drive to work, it is necessary that the Core USB Support, Automatic Drive Mount items be selected in the web interface of the router and the mount point be specified in Disk Mount Point. All this is in the web interface under Services> USB . My flash drive was mounted in / opt.
The next thing to check is how the digitemp works. This is checked with the commands ./digitemp -s / dev / usb / tts / 0 –i (initialization of the device) and ./digitemp -a (read the temperature from all the sensors, of which there is only one piece). As written in the manual, it is necessary to initialize once, but when reading the data on a schedule it turned out that it is necessary to initialize each time. If everything went well, the output of the commands should be something like this:
DigiTemp v3.3.2 Copyright 1996-2004 by Brian C. Lane
GNU Public License v2.0 - http: # www.brianlane.com
Turning off all DS2409 Couplers
.
Searching the 1-Wire LAN
28B6ACDA020000EC: DS18B20 Temperature Sensor
ROM # 0: 28B6ACDA020000EC
Wrote .digitemprc
Nov 01 16:40:13 Sensor 0 C: 20.88 F: 69.57
All hardware assembly:

The case remains for the small - the creation of a web interface to display the temperature.
There were quite a few options for its creation, but I stopped at creating a dynamic web page based on cgi-bin. It receives data from text files, which are essentially just the result of running the digitemp on the crown. For the krone to work correctly, you need to configure the NTP client on the router so that the time taken to remove the data is accurate. This is done in the Setup -> Basic Setup - Time Settings section of the DD-WRT web interface. There you must first start it (select enable), then set the Time zone (Summer time (DST)), and specify the name or address of the NTP server in the Server IP / Name setting, say, VNIIFTRI addresses (ntp1.vniiftri.ru). After saving the changes and rebooting, the router synchronizes the time with the State standard of time and frequency.
Unfortunately, due to the vulnerability in the latest versions of DD-WRT, cgi-bin scripts from the user directory are disabled, so for the dynamic page you need to install a separate web server, which I chose lighttpd. The page itself is written in perl, microperl is selected as the processor, respectively, in the lighttpd configuration, mod_cgi is uncommented, it is needed for the web page to work. Below are the changes to the standard lighttpd configuration.
server.document-root = "/ opt / share / www /"
# Directory in which files of web pages will be located.
index-file.names = ("index.cgi")
# Default page.
server.event-handler = "poll"
# Type of event handling.
server.tag = "lighttpd"
# sign the web server, be polite
static-file.exclude-extensions = (".fcgi", ".php", ".pl", ".py", ".rb", ".cgi")
# Prohibit the processing of the following pages as static.
server.port = 8081
# Port on which the web server will work.
server.username = "nobody"
# The username under which the web server will run.
server.groupname = "65534"
# User group under which the web server will run.
cgi.assign = (".pl" => "/ opt / bin / microperl",
".cgi" => "/ opt / bin / microperl")
# specifies which handler to use for cgi-bin based web pages.
To display the temperature graph, the Raphael library is used. I will not give the listings themselves, because of their large volume and low information content.
And the final touch - so that everything works even after a reboot, an edit was added to the startup script configuration in the DD-WRT web interface.
insmod /lib/modules/2.6.24.111/kernel/drivers/usb/serial/usbserial.ko
insmod /lib/modules/2.6.24.111/kernel/drivers/usb/serial/pl2303.ko
// load drivers for thermometer operation
chmod 666 / dev / usb / tts / 0
chmod 666 /opt/var/log/lighttpd/error.log
chmod 666 /opt/var/log/lighttpd/access.log
// Change file permissions, although with such numbers only daemons run.
grep -q nobody / etc / passwd || echo "nobody: *: 65534: 65534: nobody: / var: / bin / false" >> / etc / passwd
// Creating a user under which lighttpd will work (A little paranoia has never hurt anyone!)
lighttpd -f /opt/etc/lighttpd/lighttpd.conf
// Run the lighttpd itself in daemon mode (the operating system is this, not me ...).
Another line has been added to cron, and it is responsible for the removal of data on a schedule.
0 * * * * root sh /opt/input.sh
The contents of the script input.sh (which reads data from the sensor every hour)
#! / bin /
/opt/share/./digitemp -s / dev / usb / tts / 0 -i;
/opt/share/./digitemp -a -o% .2C | tail -n 1 >> /opt/share/www/temp1.txt
# Writes the temp.txt temperature from the sensor, in degrees Celsius, two decimal places.
tail -n 24 /opt/share/www/temp1.txt> /opt/share/www/temp.txt
# Cuts the last 24 temperature values from a file.
date +% R >> /opt/share/www/time1.txt
# Records the hour at which the data was taken.
tail -n 24 /opt/share/www/time1.txt> /opt/share/www/time.txt
# Cuts the last 24 temperature values from a file.
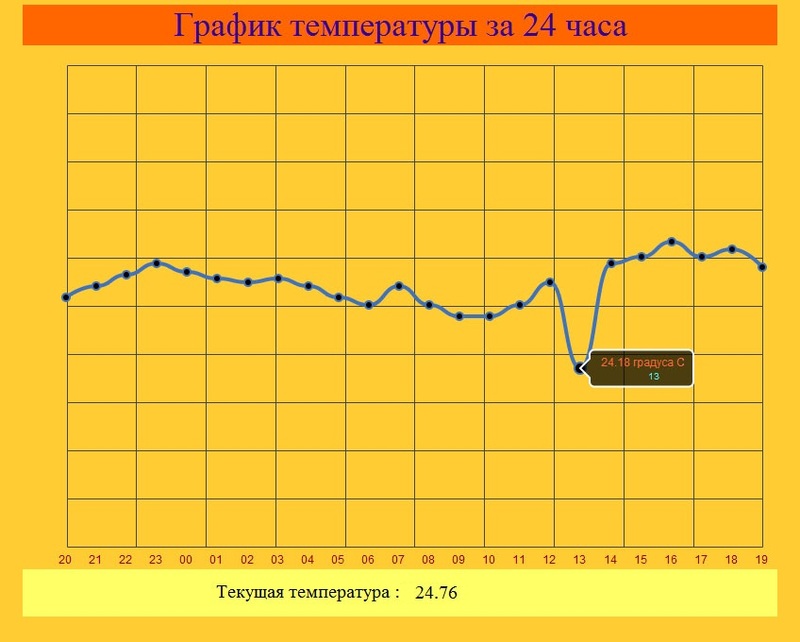
Thus, we get the temperature in the last 24 hours.
After all the settings, when you go to page 192.168.1.1:8081 this will be displayed:
Although the 1-wire standard itself works on a common bus, it allows a line length of up to 300 meters, which allows measuring the temperature throughout the house and beyond. In addition, not only sensors work with 1-wire, but also actuators, so that on the basis of this protocol and your home router, you can build a small smart house with control via the Internet.
When working on my diploma, the DS18B20 sensor came into my hands.
This is a digital output thermometer that transmits data using the 1-wire protocol. After some reflection, it was decided to teach my long-suffering router to display the external temperature, for statistics and just out of curiosity. I have a Linksys E3000 with an alternative firmware DD-WRT v24-sp2 (04/13/11) big. The usual firmware for such cases is not suitable, it does not give access to the necessary functions of the router in the future. My personal opinion is that DD-WRT is the best and most feature-rich alternative firmware. Well, how can you not fall in love with the firmware that supports BGP on a home router with 64 MB of RAM) Below is the DD-WRT firmware web interface.
')
Usually for data transmission over 1-wire use COM or LPT port, but, unfortunately, on this router there is only one USB connector. More precisely, it has wiring for UART on the board itself, but then you have to put up with the missing lid on the router, which ruins the design talent of the company Linksys. In this case, to work with the sensor, you can use USB converters - RS-232 like pl2303. But for the correct operation of this converter you need drivers. I’ll say right away that you shouldn’t do as I do and compile them from source, because the drivers for pl2303 are already included in the DD-WRT firmware and are not loaded) To download them, you will have to connect to the router via authorization by ssh or telnet protocols ( root, the password is the same as the one you specified in the web interface) If everything went well, then you see something like this:
As you already understood, this is a unix system (not IOS, unfortunately, Linksys is not Cisco), so there shouldn't be any difficulties with adapting to the shell.
The drivers are located in the /lib/modules/2.6.24.111/kernel/drivers/usb/serial directory and are called usbserial.ko and pl2303.ko. 2.6.24.111 is the version of the kernel and then it may well change in the future) they are loaded with the commands insmod usbserial.ko and insmod pl2303.ko from the directory where they are kept. If the USB-RS-232 adapter is connected, then after these commands the device should appear at the address / dev / usb / tts / <device number>, in my case number 0. You can check the driver loading via dmesg, it should show something like :
registered new interface driver usbserial
drivers / usb / serial / usb-serial.c: USB Serial Driver core
drivers / usb / serial / usb-serial.c: USB Serial support registered for pl2303
pl2303 1-1.3: 1.0: pl2303 converter detected
usb 1-1.3: pl2303 converter now attached to ttyUSB0
usbcore: registered new interface driver pl2303
drivers / usb / serial / pl2303.c: Prolific PL2303 USB to serial adapter driver driver
The next thing to do is add a program that can work with 1-wire.
It is called digitemp and distributed under the GNU General Public License. You can compile it for your router or search the Internet for a compiled program for your firmware. But there is a small underwater stone here - it will not be possible to write the program directly into the ROM due to the hardware features of the router. You can either write to / tmp, in other words, to RAM, where it will be safely erased after a reboot, or to a USB flash drive that will be connected via a usb hub. It is highly desirable that the hub be active, otherwise when loading the router, there may not be enough power at the same time on the USB flash drive and pl2303 and one / both devices are recognized in the system incorrectly.
In order for the flash drive to work, it is necessary that the Core USB Support, Automatic Drive Mount items be selected in the web interface of the router and the mount point be specified in Disk Mount Point. All this is in the web interface under Services> USB . My flash drive was mounted in / opt.
The next thing to check is how the digitemp works. This is checked with the commands ./digitemp -s / dev / usb / tts / 0 –i (initialization of the device) and ./digitemp -a (read the temperature from all the sensors, of which there is only one piece). As written in the manual, it is necessary to initialize once, but when reading the data on a schedule it turned out that it is necessary to initialize each time. If everything went well, the output of the commands should be something like this:
DigiTemp v3.3.2 Copyright 1996-2004 by Brian C. Lane
GNU Public License v2.0 - http: # www.brianlane.com
Turning off all DS2409 Couplers
.
Searching the 1-Wire LAN
28B6ACDA020000EC: DS18B20 Temperature Sensor
ROM # 0: 28B6ACDA020000EC
Wrote .digitemprc
Nov 01 16:40:13 Sensor 0 C: 20.88 F: 69.57
All hardware assembly:
The case remains for the small - the creation of a web interface to display the temperature.
There were quite a few options for its creation, but I stopped at creating a dynamic web page based on cgi-bin. It receives data from text files, which are essentially just the result of running the digitemp on the crown. For the krone to work correctly, you need to configure the NTP client on the router so that the time taken to remove the data is accurate. This is done in the Setup -> Basic Setup - Time Settings section of the DD-WRT web interface. There you must first start it (select enable), then set the Time zone (Summer time (DST)), and specify the name or address of the NTP server in the Server IP / Name setting, say, VNIIFTRI addresses (ntp1.vniiftri.ru). After saving the changes and rebooting, the router synchronizes the time with the State standard of time and frequency.
Unfortunately, due to the vulnerability in the latest versions of DD-WRT, cgi-bin scripts from the user directory are disabled, so for the dynamic page you need to install a separate web server, which I chose lighttpd. The page itself is written in perl, microperl is selected as the processor, respectively, in the lighttpd configuration, mod_cgi is uncommented, it is needed for the web page to work. Below are the changes to the standard lighttpd configuration.
server.document-root = "/ opt / share / www /"
# Directory in which files of web pages will be located.
index-file.names = ("index.cgi")
# Default page.
server.event-handler = "poll"
# Type of event handling.
server.tag = "lighttpd"
# sign the web server, be polite
static-file.exclude-extensions = (".fcgi", ".php", ".pl", ".py", ".rb", ".cgi")
# Prohibit the processing of the following pages as static.
server.port = 8081
# Port on which the web server will work.
server.username = "nobody"
# The username under which the web server will run.
server.groupname = "65534"
# User group under which the web server will run.
cgi.assign = (".pl" => "/ opt / bin / microperl",
".cgi" => "/ opt / bin / microperl")
# specifies which handler to use for cgi-bin based web pages.
To display the temperature graph, the Raphael library is used. I will not give the listings themselves, because of their large volume and low information content.
And the final touch - so that everything works even after a reboot, an edit was added to the startup script configuration in the DD-WRT web interface.
insmod /lib/modules/2.6.24.111/kernel/drivers/usb/serial/usbserial.ko
insmod /lib/modules/2.6.24.111/kernel/drivers/usb/serial/pl2303.ko
// load drivers for thermometer operation
chmod 666 / dev / usb / tts / 0
chmod 666 /opt/var/log/lighttpd/error.log
chmod 666 /opt/var/log/lighttpd/access.log
// Change file permissions, although with such numbers only daemons run.
grep -q nobody / etc / passwd || echo "nobody: *: 65534: 65534: nobody: / var: / bin / false" >> / etc / passwd
// Creating a user under which lighttpd will work (A little paranoia has never hurt anyone!)
lighttpd -f /opt/etc/lighttpd/lighttpd.conf
// Run the lighttpd itself in daemon mode (the operating system is this, not me ...).
Another line has been added to cron, and it is responsible for the removal of data on a schedule.
0 * * * * root sh /opt/input.sh
The contents of the script input.sh (which reads data from the sensor every hour)
#! / bin /
/opt/share/./digitemp -s / dev / usb / tts / 0 -i;
/opt/share/./digitemp -a -o% .2C | tail -n 1 >> /opt/share/www/temp1.txt
# Writes the temp.txt temperature from the sensor, in degrees Celsius, two decimal places.
tail -n 24 /opt/share/www/temp1.txt> /opt/share/www/temp.txt
# Cuts the last 24 temperature values from a file.
date +% R >> /opt/share/www/time1.txt
# Records the hour at which the data was taken.
tail -n 24 /opt/share/www/time1.txt> /opt/share/www/time.txt
# Cuts the last 24 temperature values from a file.
Thus, we get the temperature in the last 24 hours.
After all the settings, when you go to page 192.168.1.1:8081 this will be displayed:
Although the 1-wire standard itself works on a common bus, it allows a line length of up to 300 meters, which allows measuring the temperature throughout the house and beyond. In addition, not only sensors work with 1-wire, but also actuators, so that on the basis of this protocol and your home router, you can build a small smart house with control via the Internet.
Source: https://habr.com/ru/post/147259/
All Articles